WM SYSTEMS WM-E1S Iskra Modem
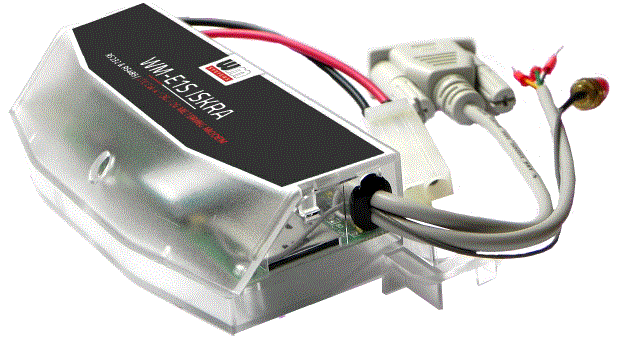
ຂໍ້ມູນຈໍາເພາະ
- Hardware Type/Version: 31 Final
- Hardware Version: 17-02-2025
ຂໍ້ມູນຜະລິດຕະພັນ
- The modem is a versatile device designed for wireless communication and data transmission. It supports various cellular module types including LTE Cat.4, 3G, 2G, LTE Cat.1 with 2G fallback, and LTE Cat.M/NB with 2G fallback.
- The modem can operate on different networks based on user settings, supporting multi-operator SIM cards and roaming features. It is suitable for retrieving measurement data, event logs, load curve data, and managing meter parameters remotely.
- Additionally, the modem offers power outage protection through an optional supercapacitor component, ensuring continuous operation during minor power interruptions.
- Configuration and firmware updates can be done locally via ports or remotely through various connection methods, enhancing security with unique passwords and TLS protocol.
ຂໍ້ມູນສະເພາະຂອງເອກະສານ
This documentation was made for presenting the installation and configuration steps of the WM-E1S ISKRA® energy metering modem.
| ສະບັບເອກະສານ: | REV ວັນທີ 2.77.5/XNUMX/XNUMX |
| ຮາດແວ ປະເພດ/ສະບັບ: | WM-E1S® modem for Iskra® MT830, MT831 electricity meters |
| ຮາດແວ ລຸ້ນ: | V 5.x (V 5.10 SIMCOM, V5.11 SIMCOM, V5.21 SIMCOM / V 5.30 TELIT / V
5.42 QUECTEL / V5.52 QUECTEL) |
| ເວີຊັນ Firmware: |
|
| ໄລຍະ WM-E® ກຳນົດຄ່າ ສະບັບຊອບແວ: | ວ 1.4.3.5 |
| ໜ້າ: | 31 |
| ສະຖານະ: | ສຸດທ້າຍ |
| ສ້າງ: | 17-02-2025 |
| ດັດແກ້ຫຼ້າສຸດ: | 07-08-2025 |
ບົດທີ 1. ບົດແນະນຳ
- The WM-E1S ISKRA® modem is suitable for remote reading of electricity meters on LTE-based cellular networks.
- You can save money by using our modem, because furthermore there is no need of manual readout of the meter systems.
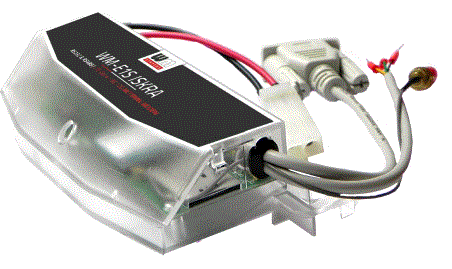
ການສື່ສານໄຮ້ສາຍ
ໂມເດັມສາມາດສັ່ງດ້ວຍໂມດູນໂທລະສັບມືຖືທີ່ແຕກຕ່າງກັນ:
- ໂມດູນ LTE Cat.4 / 3G / 2G
- ໂມດູນ LTE Cat.1 ກັບ 2G “fallback”
- ໂມດູນ LTE Cat.M / Cat.NB ທີ່ມີ 2G “fallback”
- ໃນໄລຍະການສື່ສານ LTE 4G, ທຸກລຸ້ນຂອງອຸປະກອນມີໂຫມດ 2G ຫຼື 2G "fallback" ຄຸນນະສົມບັດ, ດັ່ງນັ້ນໃນກໍລະນີຂອງ outage/ການເຂົ້າບໍ່ເຖິງຂອງເຄືອຂ່າຍ LTE 4G, ມັນກໍາລັງຕິດຕໍ່ສື່ສານໃນເຄືອຂ່າຍ 2G ຕື່ມອີກ.
- Depending on the client’s needs, the modem can be set to which network it uses (e.g. only LTE 4G or 3G, etc.) or the best available network (Auto mode).
- It can also be set that only GSM-CSData connection – e.g. in the case of a CSData supported module, by initiating CSData calls.
- ໂມເດັມຮອງຮັບການໃຊ້ງານຫຼາຍຊິມ ແລະຄຸນສົມບັດໂຣມມິງ.
- ອຸປະກອນສະຫນອງ SIM-card ເປັນເອກະລາດ- ແລະການແກ້ໄຂຜູ້ປະຕິບັດການໂທລະສັບມືຖືເປັນເອກະລາດ.
ການອອກແບບແລະການຕິດຕັ້ງ
- This modem was especially developed for various Iskra® MT830, MT831 type of 3-phase electricity meters.
- The modem is available with different type of data connectors, so it is suitable for different connection modes. It can be connected to the meter through its RS232, RS485 interface by its design and its connection interface.
- The device can be installed under the sealed terminal cover of the electricity meter without replacing the seal certifying the first verification or the non-destructively sealed measuring housing.
- This solution also means the possibility of future expansion, which is a great help especially in cases where the installation space is scarce.
- Each model of the modem family can be ordered with a housing to be properly fit and mount on each meter type.
- It can also be used as an external modem – for a universal meter with any standard connector and it can be fastened due an optional 35mm DIN-rail adapter (order option).
ຄຸນສົມບັດການດໍາເນີນງານ, ຄຸນສົມບັດ
- ດັ່ງນັ້ນ, ໂມເດັມແມ່ນເຫມາະສົມສໍາລັບການດຶງຂໍ້ມູນການວັດແທກປະຈຸບັນແລະເກັບຮັກສາໄວ້, ອ່ານບັນທຶກເຫດການທີ່ບັນທຶກໄວ້ແລະຂໍ້ມູນເສັ້ນໂຄ້ງການໂຫຼດ, ແລະການອ່ານແລະການຄຸ້ມຄອງພາລາມິເຕີແມັດຈາກໄລຍະໄກ. files.
- The modem has been designed to provide “Pull” operating mode, which means that the modem has a transparent communication data sending from the meter to the HES (smart metering center/server).
- ອຸປະກອນສາມາດເຂົ້າເຖິງໄລຍະໄກຜ່ານເຄືອຂ່າຍມືຖືແລະສາມາດສົ່ງຂໍ້ມູນຜ່ານອິນເຕີເນັດໂດຍໃຊ້ APN.
- ໂມເດັມໄດ້ຖືກກະກຽມໂດຍພື້ນຖານແລ້ວສໍາລັບການສົ່ງຂໍ້ມູນທີ່ມີຄວາມໂປ່ງໃສລະຫວ່າງເຄື່ອງແມ່ຂ່າຍການວັດແທກຫຼືຜູ້ໃຫ້ບໍລິການວັດແທກ, ດ້ວຍການໂທຫາ CSData (ພຽງແຕ່ສໍາລັບການຕັ້ງຄ່າເຄືອຂ່າຍ 2G!) ແລະຜ່ານການເຊື່ອມຕໍ່ອິນເຕີເນັດມືຖື (TCP) (ໂຫມດ "PULL") ທີ່ເຫມາະສົມສໍາລັບການລົງທະບຽນເຄື່ອງວັດແທກໄຟຟ້າ. ແລະການອ່ານຫ່າງໄກສອກຫຼີກຂອງເສັ້ນໂຄ້ງການໂຫຼດ, ການນໍາໃຊ້ຄໍາສັ່ງການອ່ານມາດຕະຖານ, ການອ່ານຫ່າງໄກສອກຫຼີກແລະການດັດແກ້ຕົວວັດແທກ / ຕົວກໍານົດການ, ການປັບປຸງ firmware ຄໍາຮ້ອງສະຫມັກຂອງແມັດ.
- Over the RS232/RS485 compatible data connection
ການເຊື່ອມຕໍ່
ອຸປະກອນສາມາດສັ່ງໄດ້ໂດຍຊຸດການເຊື່ອມຕໍ່ຕໍ່ໄປນີ້:
- RS232 (DSUB-9 connector / 2-wore connector interface) – for modem configuration and meter connection
- RS485 (2 or 4-wire connector) – for meter connection
ແຫຼ່ງພະລັງງານແລະພະລັງງານ outage
ອຸປະກອນສາມາດໄດ້ຮັບການພະລັງງານຈາກການເຊື່ອມຕໍ່ຕົ້ນຕໍຂອງວັດ (ໂດຍທົ່ວໄປ 100V-240V AC voltagແລະ).
ໂມເດັມສາມາດເຊື່ອມຕໍ່ຜ່ານໂຫມດຕໍ່ໄປນີ້:
- ແມັດແມ່ນເຊື່ອມຕໍ່ກັບເຄືອຂ່າຍພະລັງງານ AC 57.7/100V: ໂມເດັມຕ້ອງເຊື່ອມຕໍ່ກັບສາຍ vol.tage (100V, L1..L2 ຫຼື L2..L3 ຫຼື L1..L3)
- ແມັດແມ່ນເຊື່ອມຕໍ່ກັບເຄືອຂ່າຍພະລັງງານ AC 230/400V: ໂມເດັມຕ້ອງເຊື່ອມຕໍ່ກັບໄລຍະ vol.tage (230V, L1..N ຫຼື L2..N ຫຼື L3..N)
Supercapacitor
- ໂມເດັມຍັງສາມາດໃຊ້ໄດ້ກັບພະລັງງານ outage ການປົກປ້ອງໂດຍອົງປະກອບ supercapacitor ທາງເລືອກ, ເຊິ່ງອະນຸຍາດໃຫ້ສືບຕໍ່ການດໍາເນີນງານຂອງໂມເດັມໃນກໍລະນີຂອງພະລັງງານເລັກນ້ອຍ outage(s).
- ໃນກໍລະນີຂອງພະລັງງານ outage, supercapacitor ຈະປ່ອຍອອກມາເມື່ອເວລາ, ແລະໂມເດັມຈະປິດລົງ. ເມື່ອການສະຫນອງພະລັງງານກັບຄືນມາ, ໂມເດັມເລີ່ມຕົ້ນໃຫມ່ແລະສົ່ງຂໍ້ມູນຜ່ານເຄືອຂ່າຍໂທລະສັບມືຖື, ແລະອົງປະກອບຂອງຕົວເກັບປະຈຸຈະຖືກຄິດຄ່າ).
ການຕັ້ງຄ່າແລະເຟີມແວໂຫຼດຫນ້າຈໍຄືນ
- ໂມເດັມສາມາດຕັ້ງຄ່າໄດ້ພາຍໃນເຄື່ອງຜ່ານພອດ RS232 ຫຼືພອດ optical, ຫ່າງໄກສອກຫຼີກດ້ວຍການໂທຫາ CSData (ພຽງແຕ່ຖ້າທ່ານໃຊ້ການຕັ້ງຄ່າທີ່ຍັງໃຊ້ເຄືອຂ່າຍ 2G!) ຫຼືຜ່ານການເຊື່ອມຕໍ່ອິນເຕີເນັດມືຖື (TCP), ແລະເຟີມແວຂອງມັນສາມາດຖືກປັບປຸງໄດ້. ໂມເດັມສາມາດຕັ້ງຄ່າໄດ້ຜ່ານພອດ TCP ຫ່າງໄກສອກຫຼີກ (ຫຼືຜ່ານການເຊື່ອມຕໍ່ serial ທ້ອງຖິ່ນ) ແລະດໍາເນີນການໃນເຄືອຂ່າຍໄຮ້ສາຍໂດຍການກໍາຫນົດຄ່າ APN, ຊື່ຜູ້ໃຊ້ແລະລະຫັດຜ່ານ (ຂໍ້ມູນ APN ແມ່ນສະຫນອງໃຫ້ໂດຍຜູ້ໃຫ້ບໍລິການມືຖືທ້ອງຖິ່ນຂອງທ່ານ).
- ການຕັ້ງຄ່າທັງຫມົດສາມາດໄດ້ຮັບການຕັ້ງຄ່າດ້ວຍເຄື່ອງມືການບໍລິຫານຂອງພວກເຮົາ (ຊອບແວ WM-E Term®), ແຕ່ຍັງ API ທີ່ມີຢູ່ເພື່ອໃຫ້ຄູ່ຮ່ວມງານຂອງພວກເຮົາສາມາດປັບສະພາບແວດລ້ອມການບໍລິຫານໃນປັດຈຸບັນຂອງເຂົາເຈົ້າໄດ້ຢ່າງງ່າຍດາຍ.
- ການຕັ້ງຄ່າແມ່ນເປັນໄປໄດ້ໂດຍອຸປະກອນຫນຶ່ງຫຼືສໍາລັບກຸ່ມຂອງອຸປະກອນ.
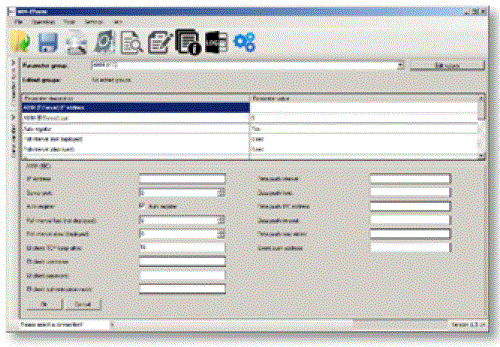
- The WM-E Term® tool is password protected and user management is also possible. The configuration tool requires Windows® platform to run. It is available in English and some local languages as well (as French, German, Spanish, Czech and Hungarian as well.).
Firmware refresh
The WM-E Term® also provides safe firmware change for one device or a group of devices – by locally or remotely.
ຄວາມປອດໄພ
- The modem performs HW identification during firmware replacement and when starting its operation. The modem is protected against installing a 3rd party made or a modified firmware. Likewise, the modem cannot be operated from a 3rd party made or a modified firmware due to its integrity and compatibility checking.
- ແຟລດພາຍນອກ- ແລະເນື້ອຫາແຟລດພາຍໃນຂອງອຸປະກອນຖືກເຂົ້າລະຫັດໄວ້.
- This product’s firmware is encrypted and with a unique AES encryption key therefore its prevented against uploading or using any 3rd party made or modified firmware. data from other devices. The modem cannot be upgraded by any other 3rd party firmware – its safe.
- The modem uses a special and unique communication protocol. The data communication with the meter and the meter readout is also safe due to the applied double checksum when recepting any communication package or the data telegram.
- The control port of the modem is encrypted by AES – optional.
- The modem can be configured to be used with a unique configuration password and an optional communication password during its operation to increase the security to high level.
- The TLS protocol prototected firmware can be chosed and uploaded (by request) to increase the security to maximum.
ສະຖານະພາບແລະການແຈ້ງການ
- ໂມເດັມກໍາລັງຕິດຕາມສຸຂະພາບຂອງເຄືອຂ່າຍມືຖື ແລະການສື່ສານອຸປະກອນຢ່າງຕໍ່ເນື່ອງ, ແລະສາມາດສົ່ງຂໍ້ມູນສະຖານະ (ຄວາມແຮງສັນຍານ, QoS).
- By the configured features, the device is able to send SMS alarm notification, Last Gasp notification – depending on the used cellular network and mobile operators (if the SMS notification is not disallowed on the network, then it can be used).
ໃບຢັ້ງຢືນ
According to the CE certification, the modem complies with the Radio Equipment Directive (ReD) standard 2014/53/EU – part 3.a, 3.b, 3.c and ReD Cybersecurity part 3.d. The product is RoHS and CE certified.
Chapter 2. Connectors, interfaces
ພາຍໃນ view 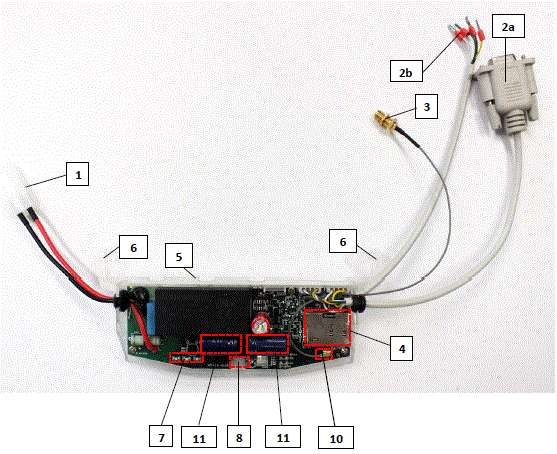
- ຕົວເຊື່ອມຕໍ່ຫຼັກ (ຕົວເຊື່ອມຕໍ່ pigtail, ສໍາລັບພະລັງງານ AC ຂອງແມັດ)
- RS232 connector (DSUB9 or 2-wire order option, wire with sleeve)
- RS485 connector (2-pin or 4-pin – order option, wire with sleeve)
- ຕົວເຊື່ອມຕໍ່ເສົາອາກາດ (SMA-M, 50 Ohm)
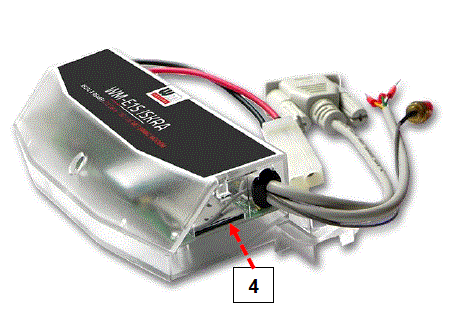
- SIM card slot (push-insert)
- ຜູ້ຖືພາດສະຕິກ (ການສ້ອມແຊມຖົງຢາງຕ່ໍາໃສ່ກັບຖົງຢາງເທິງ)
- Plastic hooks (for mounting the modem, into the Honeywell® / Elster® electricity meter, under the terminal cover)
- LEDs ສະຖານະພາບ
- screw fixation ຂອງ enclosure ໂມເດັມເທິງ
- ຕົວເຊື່ອມຕໍ່ເສົາອາກາດ U.FL
- Supercapacitors (ທາງເລືອກການສັ່ງຊື້)
ຂັ້ນຕອນການຕິດຕັ້ງ
- ຂັ້ນຕອນ #1: Remove the meter terminal cover, loosen the screws.
- ຂັ້ນຕອນທີ 2: ໃຫ້ແນ່ໃຈວ່າອຸປະກອນບໍ່ໄດ້ເປີດ, ເອົາຕົວເຊື່ອມຕໍ່ AC (1) ອອກຈາກເຄື່ອງວັດແທກ.
- ຂັ້ນຕອນທີ 3: Insert a replaceable and active SIM card (with APN) into the SIM-holder (4) – the chip looks down, and the cutted edge of the SIM looks to the modem. Push the SIM until it will be fastened (you will hear a click sound).
(If it is necessary, the SIM card can be easily removed by pressing the card again, causing the card to be ejected from the tray.) - ຂັ້ນຕອນທີ 4: ຕິດຕັ້ງຝາປິດໂມເດັມ (5) ແລະຍຶດໃກ້ກັບເຄື່ອງວັດແທກ – ຫຼືຕິດໃສ່ຝາໃນຕໍາແໜ່ງຄົງທີ່. ທ່ານສາມາດໃສ່ອຸປະກອນເຂົ້າໄປໃນຈຸດຕິດຕັ້ງພາຍໃນຂອງເຄື່ອງວັດ - ພາຍໃຕ້ການປົກຫຸ້ມຂອງເຄື່ອງວັດ (18) - ແລະຕິດມັນກັບຝາປິດຂອງວັດໄດ້ຕາມຄູ່ມືຜູ້ໃຊ້ຂອງວັດ.
- ຂັ້ນຕອນ #5: Mount an external magnetic base or stick antenna to the antenna connector (3) corresponding to the communication – e.g. LTE antenna.
- ຂັ້ນຕອນ #6: Connect the modem to your computer with the RS232 cable (2a) and an RS232/USB DONGLE converter.
- ຂັ້ນຕອນທີ 7: ເຊື່ອມຕໍ່ຕົວເຊື່ອມຕໍ່ໄຟ AC ຂອງໂມເດັມ (1) – ການເຊື່ອມຕໍ່ເຕົ້າສຽບສາຍໄຟ ຫຼືຕົວເຊື່ອມຕໍ່ “pigtail” ຂຶ້ນກັບລຸ້ນ – ຕໍ່ກັບການປ້ອນຂໍ້ມູນພະລັງງານແມັດ (ສໍາລັບ 100-230V AC) ຫຼືກັບແຫຼ່ງສະຫນອງພະລັງງານ 230V ພາຍນອກ.
- ຂັ້ນຕອນທີ 8: ຕັ້ງຄ່າໂມເດັມດ້ວຍຊອບແວ WM-E Term®.
ໃຫ້ສັງເກດວ່າໂມເດັມສາມາດຕັ້ງຄ່າໄດ້ຜ່ານພອດ RS232 ຂອງມັນເທົ່ານັ້ນ!
- ຂັ້ນຕອນທີ 9: After completing the configuration, remove the R232 cable – labeled with „2a” – from the USB adapter.
- ຂັ້ນຕອນ #10: Disconnect the modem AC power connector (1) from the meter (or power source). The modem will be shutting down.
- ຂັ້ນຕອນ #11: Make a data connection between the modem and the meter on the interface you want to use (port nr. data connection „2a” to the meter RS232 data connector (signed by „G”)).
- ຂັ້ນຕອນທີ 12: ຖ້າໂມເດັມມີສາຍ RS485, ຫຼັງຈາກນັ້ນເຮັດໃຫ້ການເຊື່ອມຕໍ່ຂໍ້ມູນລະຫວ່າງໂມເດັມແລະເຄື່ອງວັດແທກໂດຍຕົວເຊື່ອມຕໍ່ RS485 (2b) ໂດຍໃຊ້ສາຍຂໍ້ມູນທີ່ເຊື່ອມຕໍ່.
- ຂັ້ນຕອນ #13: Connect back the modem’s AC power connector (1) – wire socket connection or “pigtail” connector depending on the version – to the meter’s power input (for 100-230V AC).
Then the modem will be powered by the meter and the modem will starting its operation and the LED signals are signing the current activity. - ຂັ້ນຕອນທີ 14: Place back the terminal cover of the meter and secure with the two screws.
Connecting the modem to the meter (Iskra® MT830, MT831 meters)
- ຂັ້ນຕອນທີ 1: Remove the Iskra® MT830 or MT831 meter’s communication module plastic case by releasing the 2 screws from the top of the housing.
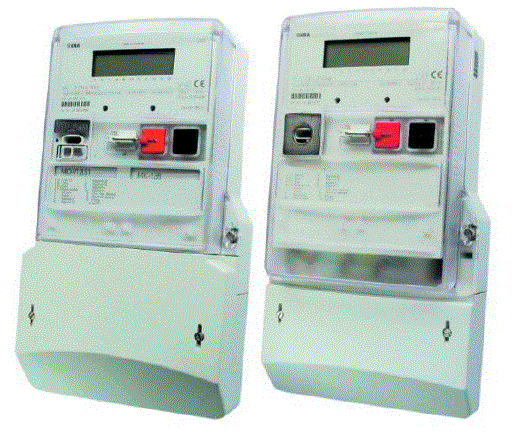
- ຂັ້ນຕອນທີ 2: ເຊື່ອມຕໍ່ກັບເຄື່ອງວັດແທກໂດຍໃຊ້ຕົວເຊື່ອມຕໍ່ຂໍ້ມູນ.
- Connect the RS485 („2b” signed cable 2-pin wire/sleeve (brown and white wires) to the meter’s RS485 input.
- If the input has 4-pins, you can also connect all four cables to the place which is marked with „D”.
- The picture shows the sleeve wire connection, but the modem can also be ordered with a “pigtail” connection. Some meters are prepared to receive a terminal block, in which case connect a 2- or 4-pin terminal block to the sleeves.

- ຂັ້ນຕອນທີ 3: ເຊື່ອມຕໍ່ປລັກໄຟພາດສະຕິກຂອງໂມເດັມ (1) ກັບການເຊື່ອມຕໍ່ສອງສາຍຂອງແມັດ (ໝາຍດ້ວຍ “E” ໃນຮູບຕໍ່ໄປນີ້). ຖ້າຕົວເຊື່ອມຕໍ່ໄຟຟ້າ AC ບໍ່ແມ່ນປລັກໄຟແຕ່ເປັນສາຍໄຟ, ເຊື່ອມຕໍ່ສາຍໄຟກັບໄລຍະແມັດແລະດິນ.

- ຂັ້ນຕອນທີ 4: If you haven’t already done, connect the appropriate antenna (3) to the modem swing connector.
- ຂັ້ນຕອນທີ 5: ເຊື່ອມຕໍ່ເຕົ້າສຽບປາຍສາຍຂອງສາຍໂມເດັມ AC (1) ກັບເຄື່ອງວັດແທກ, ກັບຈຸດເຊື່ອມຕໍ່ພະລັງງານ AC (ສາຍໄຟສີແດງແລະສີດໍາ) - ລະມັດລະວັງ, ເພາະວ່າໃນໄລຍະນີ້, ເຄື່ອງວັດສາມາດມີຕ່ໍາກວ່າ 100-240V ການສະຫນອງ AC vol.tage! Since now, the modem gets its power from the meter.
ເອົາໃຈໃສ່! ຢ່າຖອດຝາປິດອຸປະກອນອອກເມື່ອເປີດໂມເດັມ! - ຂັ້ນຕອນທີ 6: Attach the modem (signed by „G”) under the terminal cover of the meter, to the part designed for it (to the tabs (marked “H”), or to another attachment point.

- ຂັ້ນຕອນ #7: Replace the terminal cover on the meter, slide it on, and secure it with the two screws.
ການເຊື່ອມຕໍ່ເສົາອາກາດ
The modem requires enough signal strength of the cellular network and LTE or similar antenna for the proper operation and good communication. Where the signal strength of the cellular network is sufficienty, there an internal antenna may be enough to use. However, in places where the signal strength is low or poor, you should use an external antenna (50 Ohm, SMA connector), which can be mounted to the modem – you can place it even inside of the top cover of the meter.
LEDs ປະຕິບັດງານ
The LED numbering is the same as the LED labels on the modem panel: from left to right in order: LED1 (blue, left), LED3 (green, center), LED2 (red, right). 
Factory default LED signals
| ຕົວລະບຸ LED | ເຫດການ |
| LED 1 ສະຖານະ GSM / GPRS |
|
|
|
| ໄຟ LED 3 ສະຖານະ E-meter |
|
| ໄຟ LED 2 ຊິມ ສະຖານະ / ຊິມ ຄວາມລົ້ມເຫຼວ or PIN failure |
|
ໃນໄລຍະຄ່າເລີ່ມຕົ້ນຂອງໂຮງງານ, ການດໍາເນີນງານແລະລໍາດັບຂອງສັນຍານ LED ສາມາດປ່ຽນແປງໄດ້ໂດຍເຄື່ອງມືການຕັ້ງຄ່າ WM-E Term®, ຢູ່ກຸ່ມຕົວກໍານົດຕົວກໍານົດການ Standard Meter Interface, ບ່ອນທີ່ທ່ານສາມາດກໍານົດຫນຶ່ງໃນຫນ້າທີ່ຕໍ່ໄປນີ້ຂອງ leds (LED1. .LED3) ອີງຕາມບັນຊີລາຍຊື່ຕໍ່ໄປ:
| ສະຖານະ LED ທີ່ເລືອກໄດ້ (ໃນ WM-E Term) |
| ບໍ່ແມ່ນ ໃຊ້ |
| ສະຖານະ GSM / GPRS (ເບິ່ງຂ້າງເທິງ) |
| ສະຖານະ SIM (ເບິ່ງຂ້າງເທິງ) |
| ສະຖານະ E-meter (ເບິ່ງຂ້າງເທິງ) |
| ສະຖານະພາບການ relay E-meter – ໃນກໍລະນີຂອງ WM-E3S ລຸ້ນ CIR (ສະຖານະພາບຜົນຜະລິດ relay E-meter) |
| ສະຖານະ M-Bus |
| ສະຖານະເຟີມແວ |
| ສະຖານະພາບເຄືອຂ່າຍແລະເຕັກໂນໂລຊີການເຂົ້າເຖິງ – ສະຖານະພາບເຄືອຂ່າຍແລະຂໍ້ມູນຂ່າວສານເຕັກໂນໂລຊີທີ່ສາມາດເຂົ້າເຖິງ |
| ສະຖານະແມັດດ້ວຍການສຳຫຼວດ IEC – ສະຖານະເຄື່ອງວັດແທກໃນກໍລະນີການສື່ສານ IEC |
| ສະຖານະລູກຄ້າ AMM (IEC). |
ສັນຍານ LED ສະຖານະເພີ່ມເຕີມ (ສາມາດຕັ້ງຄ່າໄດ້ເຊັ່ນດຽວກັນ):
| ຕົວລະບຸ LED | ເຫດການ |
| ສະຖານະ Relay E-meter E-meter Relay* ສະຖານະພາບຜົນຜະລິດ (ໃນກໍລະນີຂອງ WM-E3S CIR ເທົ່ານັ້ນ) |
|
| ສະຖານະ M-Bus | · ບໍ່ໄດ້ນໍາໃຊ້ |
| ເຟີມແວ ສະຖານະ |
|
| ສະຖານະເຄືອຂ່າຍ ແລະເຕັກໂນໂລຊີການເຂົ້າເຖິງ |
|
| ສະຖານະແມັດດ້ວຍການສຳຫຼວດ IEC |
|
| ສະຖານະລູກຄ້າ AMM (IEC). |
|
- ການສະຫນອງພະລັງງານຂອງ e-meter ສາມາດຄວບຄຸມດ້ວຍ relay ທີ່ລະບຸໄວ້ຢູ່ທີ່ນີ້. ບໍ່ສາມາດນໍາໃຊ້ສໍາລັບການປ່ຽນແປງພາສີ!
- The EI client is a transparent TCP channel outgoing from the modem to the EI server
- At the relay status, as it is shown in the next figure it is „Disconnected”, which is the “active” mode (relay retracted, in which case the LED is turned on).
- "ເຊື່ອມຕໍ່" ຢູ່ໃນໂຫມດ "ປົກກະຕິ" (ປ່ອຍ relay), LED ປິດ.
- ໃນກໍລະນີຂອງ "ກຽມພ້ອມສໍາລັບການເຊື່ອມຕໍ່", ມັນແມ່ນ "ພ້ອມ", ເມື່ອໄຟ LED ກະພິບຫນຶ່ງຄັ້ງໃນທຸກໆວິນາທີ.
- ໃນລະຫວ່າງການອັບໂຫລດເຟີມແວ, LEDs ສະແດງໃຫ້ເຫັນການເຮັດວຽກປົກກະຕິ - ບໍ່ມີການຊີ້ບອກທີ່ແຕກຕ່າງກັນໃນລະຫວ່າງການປັບປຸງ FW. ຫຼັງຈາກຕິດຕັ້ງ FW, ໄຟ LED ສາມອັນໄດ້ສະຫວ່າງຂຶ້ນເປັນເວລາ 5 ວິນາທີແລະຫຼັງຈາກນັ້ນທັງສາມໄຟຈະສະຫວ່າງຂຶ້ນ. ຈາກນັ້ນໂມເດັມຈະຣີສະຕາດ ແລະໃຊ້ເຟີມແວໃໝ່. ຫຼັງຈາກນັ້ນ, ແຕ່ລະ LED ຈະສືບຕໍ່ກະພິບຕາມລັດທີ່ລະບຸໄວ້.
ຕົວເຊື່ອມຕໍ່ພາຍໃນ
- RS232 – 4-pin internal connector, connected to the CN500. Serial cable outfit to DSUB-9 type connector (alternatively it can be ordered with an 2-wire type connector outfit).
- RS485 – 4-pin internal connector, connected to the CN501. The RS485 cable outfit leads to 2- or 4-wire connector.
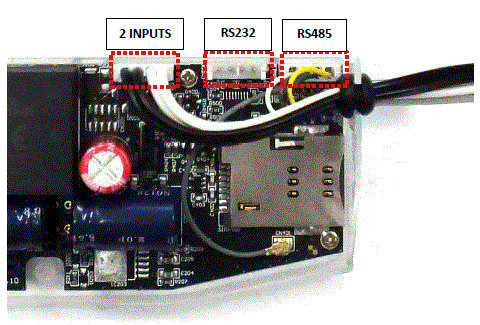
Order option: 2 INPUTS – order option – 4-pin connector, connected to the CN502. The cable outfit leads to a 4-wire connector to connect to the external devices. Pinout: black wire is related to input nr. #1, white wire is related to input nr. #2.
ຕົວເຊື່ອມຕໍ່ RS232 pinout (ຕົວເຊື່ອມຕໍ່ CS5 ພາຍໃນ)
| ສີ | ທາງເລືອກ ສີ | ມາກ | ຄວາມຫມາຍ | Meter RS232 port connector side |
| ສີຂາວ | ດຳ | GND | ດິນ | Meter_GND |
| ສີນ້ຳຕານ | ສີແດງ | RX | ກຳລັງຮັບຂໍ້ມູນ | Meter_TX |
| ສີຂຽວ | ສີຂຽວ | TX | ການສົ່ງຂໍ້ມູນ | Meter_RX |
| ສີເຫຼືອງ | ສີເຫຼືອງ | ດີເຈ | DCD(in case of compatible meter) | Meter_DCD |
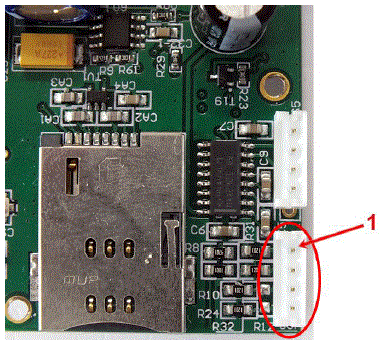
ໃນຕົວເຊື່ອມຕໍ່ CS5 – ຫມາຍໂດຍວົງສີແດງຢູ່ໃນຮູບ – pin no. “1” ແມ່ນຕົວເຊື່ອມຕໍ່ GND. 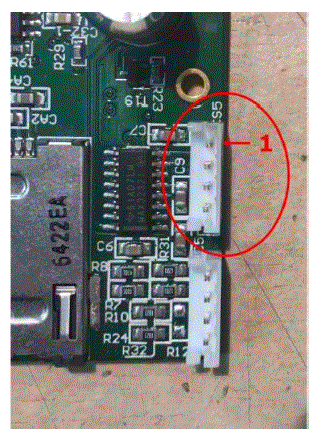
ຕົວເຊື່ອມຕໍ່ RS485 pinout (ຕົວເຊື່ອມຕໍ່ CS7 ພາຍໃນ)
| ສີ | ທາງເລືອກ ສີ | ມາກ | ຄວາມຫມາຍ | Meter RS485 port connector side |
| ສີຂາວ | ດຳ | RX+ | ກຳລັງຮັບຂໍ້ມູນ | Meter_TX+ |
| ສີນ້ຳຕານ | ສີແດງ | RX- | ກຳລັງຮັບຂໍ້ມູນ | Meter_TX- |
| ສີເຫຼືອງ | ສີເຫຼືອງ | TX- | ການສົ່ງຂໍ້ມູນ | ແມັດ_RX- |
| ສີຂຽວ | ສີຂຽວ | TX+ | ການສົ່ງຂໍ້ມູນ | Meter_RX+ |
ໃນຕົວເຊື່ອມຕໍ່ CS7 – ຫມາຍໂດຍວົງສີແດງຢູ່ໃນຮູບ – pin nr. “1” ແມ່ນຕົວເຊື່ອມຕໍ່ RX+.
ພະລັງງານ outage management – for supercapacitor expansion!
- If supercapacitors are presented on the PCB board, then the firmware of the modem will support the LastGASP feature. This means that in case of power outage supercapacitor ຂອງໂມເດັມອະນຸຍາດໃຫ້ເຮັດວຽກຕໍ່ໄປຂອງໂມເດັມໃນເວລາສັ້ນໆ (ສອງສາມນາທີ).
- ໃນກໍລະນີຂອງການກວດພົບການສູນເສຍຂອງແຫຼ່ງພະລັງງານ / ການປ້ອນຂໍ້ມູນ, ໂມເດັມຈະສ້າງເຫດການ "POWER ສູນເສຍ" ແລະຂໍ້ຄວາມຈະຖືກສົ່ງໃນທັນທີເປັນຂໍ້ຄວາມ SMS ກັບເບີໂທລະສັບທີ່ກໍານົດໄວ້.
- ໃນກໍລະນີຂອງການຟື້ນຕົວຕົ້ນຕໍ / ແຫຼ່ງພະລັງງານ, ໂມເດັມຈະສ້າງຂໍ້ຄວາມ "ການສົ່ງຄືນພະລັງງານ" ແລະການສົ່ງໂດຍຂໍ້ຄວາມ SMS.
- ການຕັ້ງຄ່າຂໍ້ຄວາມ LastGASP ສາມາດເປີດໃຊ້ໄດ້ໂດຍແອັບພລິເຄຊັນ WM-E Term® – ໃນສ່ວນກຸ່ມພາລາມິເຕີ AMM (IEC).
ວິທີການປະຕິບັດການຊຸກຍູ້
- ກົນໄກການອ່ານແລະການສົ່ງຂໍ້ມູນຄົບຖ້ວນສົມບູນໄປຫາສູນກາງແລະທິດທາງອື່ນສໍາລັບວຽກງານການຕັ້ງຄ່າແລະການບໍາລຸງຮັກສາສາມາດປະຕິບັດໄດ້ຕາມເສັ້ນທາງທີ່ກໍານົດໄວ້.

- ໂມເດັມບໍ່ເຮັດວຽກຢ່າງຕໍ່ເນື່ອງໃນເຄືອຂ່າຍ.
- ດັ່ງນັ້ນ, ມີທາງເລືອກອື່ນແລະຮູບແບບການສົ່ງຂໍ້ມູນແມັດເພື່ອເລີ່ມຕົ້ນການອ່ານທາງໄກໂດຍອັດຕະໂນມັດໃນໄລຍະເວລາທີ່ກໍານົດໄວ້ກ່ອນ. ຢ່າງໃດກໍ່ຕາມ, ມັນກໍ່ເປັນໄປໄດ້ທີ່ຈະເລີ່ມຕົ້ນການສົ່ງຂໍ້ມູນໃນກໍລະນີທີ່ມີເຫດການທີ່ແຕກຕ່າງກັນ (ເຊັ່ນ: ການຖອນຝາປິດ, ຂໍ້ຄວາມ SMS ເຂົ້າມາຈາກສູນກາງ).
- ໃນສະຖານະການນີ້, ໂມເດັມໄດ້ຖືກເຊື່ອມຕໍ່ກັບເຄືອຂ່າຍຂໍ້ມູນມືຖືພຽງແຕ່ໃນໄລຍະເວລາຂອງການສົ່ງຂໍ້ມູນ.
- The device needs to be connected to GSM network and ready to connect to GPRS, but without active IP connection.
ການຊຸກຍູ້ຂໍ້ມູນ - ເລີ່ມຕົ້ນໃນເວລາທີ່ກໍານົດໄວ້ລ່ວງຫນ້າ
- ວິທີ Data Push ກະຕຸ້ນ FTP file ອັບໂຫຼດ, ຂໍ້ຄວາມທຳມະດາ ຫຼືເຂົ້າລະຫັດໄວ້.
- ເປັນເອກະລັກ fileຊື່ແລະ file ຖືກສ້າງຂຶ້ນອັດຕະໂນມັດ.
- ຟັງຊັນ ftp ຍັງຕ້ອງການເຄື່ອງແມ່ຂ່າຍ ftp ເພື່ອຮັບຂໍ້ມູນທີ່ສາມາດເຂົ້າເຖິງໄດ້ຈາກເຄືອຂ່າຍມືຖືທີ່ໃຊ້ໃນປັດຈຸບັນ.
- ftp ຕ້ອງຖືກຕັ້ງເປັນໂໝດ passive.
- ເປັນເອກະລັກ file ຊື່ແມ່ນຖືກສ້າງຂຶ້ນໂດຍອັດຕະໂນມັດ.
- ໄດ້ file ສະເຫມີປະກອບດ້ວຍສອງພາກສ່ວນ, ທໍາອິດການລົງທະບຽນມາດຕະຖານອ່ານແລະຫຼັງຈາກນັ້ນບັນທຶກເຫດການ (ປະກອບດ້ວຍເຫດການຂອງ 31 ມື້ທີ່ຜ່ານມາ).
- ການອ່ານທີ່ສະແດງເປັນຮູບແບບ IEC ມາດຕະຖານ, ລວມທັງບາງຕົວຄວບຄຸມ ASCII ເຊັ່ນ STX ETX, ແລະອື່ນໆ.
ປຸກປຸກ (sending alarms) – starting when new event can be read from meter
- ວິທີການກະຕຸ້ນເຕືອນ TCP ສົ່ງ DLMS WPDU ມີທີ່ຢູ່ IP,
- ໝາຍເລກພອດຟັງສຳລັບບໍລິການໂປ່ງໃສ, ແລະ ID meter.
ກະຕຸ້ນດ້ວຍ SMS
- ການເຊື່ອມຕໍ່ GPRS ສາມາດໄດ້ຮັບການກະຕຸ້ນຫ່າງໄກສອກຫຼີກທີ່ມີ SMS ທີ່ກໍານົດໄວ້ຈາກເບີໂທໃດຫນຶ່ງ.
- ຂໍ້ຄວາມ SMS ຕ້ອງຖືກປະໄວ້ຫວ່າງເປົ່າ.
- ຫຼັງຈາກ SMS ໄດ້ຮັບ, ໂມເດັມຈະເຊື່ອມຕໍ່ກັບເຄືອຂ່າຍ IP, ແລະສາມາດເຂົ້າເຖິງໄດ້ເປັນເຄື່ອງແມ່ຂ່າຍ IP ສໍາລັບໄລຍະເວລາທີ່ກໍານົດໄວ້ໃນ config. file.
- Example config file ຈະຖືກສະຫນອງໃຫ້ມີການຕັ້ງຄ່າ 30 ນາທີ.
ການດໍາເນີນງານ LED ໃນລະຫວ່າງການໂທ CSD
ການໂທ CSD ປະກອບດ້ວຍສອງພາກສ່ວນ:
- ພວກເຮົາຕ້ອງການອ່ານ / ຕັ້ງຄ່າແມັດໃນຮູບແບບໂປ່ງໃສ
- ພວກເຮົາຕ້ອງການເຮັດການຕັ້ງຄ່າໂມເດັມ / ອັບເດດເຟີມແວ
ເພື່ອອ່ານ / ຕັ້ງຄ່າເຄື່ອງວັດແທກໃນຮູບແບບໂປ່ງໃສ:
- LED ທີ່ຖືກຕັ້ງຄ່າສໍາລັບສະຖານະ GSM / GPRS ຈະຖືກສະຫວ່າງຢ່າງຕໍ່ເນື່ອງໃນລະຫວ່າງການໂທ CSD.
- LED ທີ່ຖືກຕັ້ງຄ່າສໍາລັບສະຖານະ e-meter ຈະກະພິບຕາມສະຖານະການໂທ CSD:
- ມັນຈະກະພິບທຸກໆເຄິ່ງວິນາທີຈາກຈຸດເລີ່ມຕົ້ນຂອງການເຊື່ອມຕໍ່ໄປຫາຈຸດສິ້ນສຸດຂອງການເຊື່ອມຕໍ່ / ຖ້າການໂຕ້ຕອບການວັດແທກບໍ່ໄດ້ຖືກຕັ້ງຄ່າສໍາລັບອັດຕາ baud ຂອງ 9600, LED ຈະຖືກສະຫວ່າງຢ່າງຕໍ່ເນື່ອງຈາກຈຸດເລີ່ມຕົ້ນຈົນເຖິງທ້າຍຂອງການເຊື່ອມຕໍ່.
- ຫຼັງຈາກປິດການເຊື່ອມຕໍ່, LED ຈະປິດ
ຖ້າທ່ານຕ້ອງການການຕັ້ງຄ່າໂມເດັມ / ອັບເດດເຟີມແວ:
- LED ທີ່ຖືກຕັ້ງຄ່າສໍາລັບສະຖານະ GSM / GPRS ຈະຖືກສະຫວ່າງຢ່າງຕໍ່ເນື່ອງໃນລະຫວ່າງການໂທ CSD.
- ໃນກໍລະນີນີ້, LEDs ອື່ນໆບໍ່ປ່ຽນແປງເນື່ອງຈາກໂຫມດ CSD.
ການຕັ້ງຄ່າຈາກການເຊື່ອມຕໍ່ CSD
ຖ້າໂມເດັມປິດເປີດໃໝ່ເນື່ອງຈາກການຕັ້ງຄ່າບໍ່ຖືກຕ້ອງ, ມັນເປັນໄປໄດ້ທີ່ຈະເຂົ້າເຖິງມັນດ້ວຍການໂທຫາ CSD. ການດໍາເນີນງານຂອງມັນສາມາດຖືກປັບລະອຽດໃນຊໍແວ Term WM-E ທີ່ມີຄ່າທີ່ສາມາດລະບຸໄດ້ໃນພາກສະຫນາມການຊັກຊ້າການເຊື່ອມຕໍ່ PDP ໃນກຸ່ມພາລາມິເຕີ APN. ສໍາລັບຂໍ້ມູນເພີ່ມເຕີມ, ເບິ່ງບົດທີ 3.1 ຂອງຄູ່ມືຜູ້ໃຊ້ເງື່ອນໄຂ WM-E.
ເຊື່ອມຕໍ່ເຄືອຂ່າຍຄືນໃໝ່ອັດຕະໂນມັດ
ຖ້າຜູ້ໃຫ້ບໍລິການເຄືອຂ່າຍມືຖືລຸດໂມເດັມອອກຈາກເຄືອຂ່າຍມືຖືເນື່ອງຈາກເຄືອຂ່າຍຂອງອຸປະກອນບໍ່ມີການເຄື່ອນໄຫວ, ມີພາລາມິເຕີທີ່ມີຢູ່ຖ້າສິ່ງເຫຼົ່ານີ້ຖືກຕັ້ງ, ການເຊື່ອມຕໍ່ອັດຕະໂນມັດແລະໄລຍະເວລາສາມາດສ້າງໃຫມ່ໄດ້. ຖ້າຜູ້ໃຫ້ບໍລິການເຄືອຂ່າຍສົ່ງຂໍ້ຄວາມໄປຫາໂມເດັມວ່າການເຊື່ອມຕໍ່ຂໍ້ມູນໄດ້ສູນເສຍ, ການເຊື່ອມຕໍ່ຈະຖືກຟື້ນຟູໂດຍອັດຕະໂນມັດ. ຖ້າຫາກວ່າທ່ານບໍ່ໄດ້ສົ່ງຂໍ້ຄວາມ, ທ່ານສາມາດເລືອກຈາກການແກ້ໄຂທັງສອງນີ້ເພື່ອປະຕິບັດຕາມ:
Active mode – Use periodical ping, set the ping:
- ສໍາລັບການຕັ້ງຄ່ານີ້, ໃຫ້ຕັ້ງຕົວກໍານົດການ ping ຂອງກຸ່ມ Watchdog ເປັນ Ping IP-address, ຈໍານວນ ping retries, Ping wait-time (ສໍາລັບການຕອບກັບ) ແລະເວລາລໍຖ້າ (ສໍາລັບຕໍ່ໄປ).
- ຖ້າບໍ່ມີການຕອບໂຕ້ ping, ມັນຈະເຊື່ອມຕໍ່ເຄືອຂ່າຍຄືນໃຫມ່ຫຼັງຈາກໄລຍະເວລາທີ່ລະບຸໄວ້ໃນວິນາທີ, ການເຊື່ອມຕໍ່ GPRS ປິດແລະຟື້ນຟູຫຼັງຈາກພາລາມິເຕີເວລານີ້.
ເອົາໃຈໃສ່! ໃນກໍລະນີທີ່ໃຊ້ ping ເລື້ອຍໆ, ການຈະລາຈອນຂໍ້ມູນຈະສູງຂຶ້ນ, ແຕ່ໂອກາດທີ່ອຸປະກອນຈະຍັງຄົງຢູ່ໃນເຄືອຂ່າຍມືຖື.
Passive mode – If you don’t use the ping – set the connection retry:
- ສໍາລັບການຕັ້ງຄ່ານີ້, ໃຊ້ຕົວກໍານົດການ Watchdog ວິນາທີ, ການເຊື່ອມຕໍ່ gprs ປິດແລະຟື້ນຟູຫຼັງຈາກພາລາມິເຕີທີ່ໃຊ້ເວລານີ້.
- ໃນທີ່ນີ້ທ່ານສາມາດກໍານົດວ່າຫຼັງຈາກເຄືອຂ່າຍອອກຈາກໂມເດັມ, ໂມເດັມລໍຖ້າດົນປານໃດກ່ອນທີ່ຈະພະຍາຍາມເຊື່ອມຕໍ່ເຄືອຂ່າຍມືຖືອີກເທື່ອຫນຶ່ງ. ຖາມຜູ້ໃຫ້ບໍລິການມືຖືຂອງທ່ານກ່ຽວກັບການຕັ້ງຄ່າທີ່ສະເໜີໃຫ້.
ເອົາໃຈໃສ່! ຖ້າມີການຈາລະຈອນຂໍ້ມູນໜ້ອຍລົງ ແລະບໍ່ມີການກຳນົດຄ່າ ping, ອຸປະກອນອາດຈະບໍ່ຢູ່ໃນເຄືອຂ່າຍເປັນເວລາດົນ.
- ຖ້າທ່ານຕັ້ງພາລາມິເຕີນີ້ເປັນຄ່າຕໍ່າທີ່ສາມາດເຮັດໃຫ້ເກີດການເຊື່ອມຕໍ່ເຄືອຂ່າຍຄືນໃຫມ່ເລື້ອຍໆ.
- Therefore, under no circumstances should you set this value lower than what your mobile service provider recommends. (e.g. there are mobile network providers that limit the number of times a modem can log on to the network in a given time).
Two meter readout ports
- Every WM-E modem has two ports for meter communication, configuration and FW updates. You can configure all the two to control their operation by its priority.
- The first port is, the Utility communication port for (Primary), which you can use for meter readout and configuration. This port has higher priority for meter readout over the secondary port, therefore the operation of this primary port will always override the secondary port’s operation (e.g. if you configured these ports and when the meter will be read out via the primary port (Utility comm. port), then the secondary port’s operation (Customer comm. port) will be hanging – e.g. meter reading – until the primary port is not finished with the current read out.
- This priorization at operation is not effecting the firmware updates or configuration processes of the modem.
- The second port. the Customer communication port for (Secondary)* can be also used with lower priority for meter communication, configuration and FW updates.
- ສຳຄັນ! The two ports should be set to different port numbers.
- This feature can be configured in the WM-E Term software in Standard settings mode, or you can also edit it in Advanced settings mode in the M2M parameter group.
- ສຳຄັນ! Note, that this feature is available in modem firmware v5.3.4.1 or in newer firmware versions!
Automatic protocol detect and switch
- The Data format for meters value (E-Meter serial port) can be configured in the WM-E Term software in Standard settings mode, or you can also edit it in Advanced settings mode in the Transp. / NTA parameter group.
- Over the usual data formats (as 7E1, 8N1, 7O1, 7N2, 8E1, 8O1, 8N2) you can choose the ’Auto’ mode setting.
- In this case, the first data packet of the incoming connection is checked by the firmware. It will automatically decode the incoming communications and if it is detecting that as IEC protocol, then the modem will switch to data mode 7E1 towards the meter. In all other cases, the data mode remains at 8N1 mode.
- ໝາຍເຫດ, that in case of WM-E1S type modems, since it is not known which port the meter is connected to, the firmware also changes the data mode of both ports (RS232 and RS485 ports).
- In this case, the modem detects the format corresponding to the protocol, so it only sends the necessary communication towards the meter and will automatically know when configuration will occur.
- ສຳຄັນ! Note, that this feature is available in modem firmware v5.3.4.1 or in newer firmware versions!
ບົດທີ 3. ການຕັ້ງຄ່າໂມເດັມ
ການຕັ້ງຄ່າ
- ໂມເດັມຕ້ອງໄດ້ຮັບການຕັ້ງຄ່າໂດຍຊອຟແວ WM-E Term® ໂດຍການຕັ້ງຄ່າພາລາມິເຕີຂອງມັນທີ່ຕ້ອງຖືກປະຕິບັດກ່ອນທີ່ຈະດໍາເນີນການແລະການນໍາໃຊ້ປົກກະຕິ.
- Over the parameter settings of meter, modem and communication, etc., you can also test the modem communication by the configuration program.
Important! The modem can be configured through RS232 connection only!
During the configuration, you have to remove the meter-modem data connection (2a) and you have to connect the modem to your computer by the following hints.
ສຳຄັນ!
- Note that until the configuration the modem is not connected to the meter, therefore it cannot readout the parameter values through the RS232 interface. Another configuration port should be selected for that – e.g. Optical or TCP/IP port.
- The modem can be connected with the RS232 cable (2a) by using the USB DONGLE adapter by directly to your computer.
ເອົາໃຈໃສ່!
- During the configuration, the power supply of the modem must be assured by its AC plug from an external power source (from 100-230V AC or by the meter 57-100V AC).
- Use the WM-E Term program for the configuration – use the WM-E Term User manual.
- For the proper communication of the modem, you have to configure the APN settings of the SIM – as PIN code, APN, username and password. These all can be configured by using the WM-E Term® software through the serial link connection.
- ສໍາລັບການດໍາເນີນງານສົບຜົນສໍາເລັດຂອງໂມດູນການສື່ສານ, ມັນຈໍາເປັນຕ້ອງມີຄວາມເຂັ້ມແຂງສັນຍານທີ່ເຫມາະສົມ.
- ໃນສະຖານທີ່ທີ່ມີຄວາມແຮງຂອງສັນຍານທີ່ເຂັ້ມແຂງ, ມັນເປັນໄປໄດ້ທີ່ຈະໃຊ້ເສົາອາກາດພາຍໃນ, ສໍາລັບພື້ນທີ່ທີ່ມີການຮັບບໍ່ດີ, ຕິດເສົາອາກາດພາຍນອກ (ການເຊື່ອມຕໍ່ 50 Ohm SMA) ກັບຕົວເຊື່ອມຕໍ່ເສົາອາກາດ (3) ຂອງອຸປະກອນ, ທີ່ທ່ານສາມາດວາງໄວ້ພາຍໃນເຖິງແມ່ນວ່າພາຍໃນ. ແມັດ enclosure (ພາຍໃຕ້ທີ່ຢູ່ອາໄສພາດສະຕິກ).
- If you want to readout the meter parameter values during the PC-modem connection, after the the RS232-configuration you made, then you should select a different configuration port to the meter as TCP/IP or Optical, etc.
ຕັ້ງຄ່າໂມເດັມໂດຍ WM-E Term®
- ຕ້ອງການສະພາບແວດລ້ອມການເຮັດວຽກຂອງ Microsoft .NET ໃນຄອມພິວເຕີຂອງທ່ານ.
- Download WM-E Term® software to your computer from the following location using a browser: https://m2mserver.com/m2m-downloads/WM-ETerm_v1_4.zip
- ຫຼັງຈາກນັ້ນ, unzip .zip ໄດ້ file ໄປທີ່ໄດເລກະທໍລີແລະດໍາເນີນການ WM-ETerm.exe file.
- ຊອບແວການຕັ້ງຄ່າສະຫນັບສະຫນູນການຄຸ້ມຄອງບັນຊີຜູ້ໃຊ້ແລະການປ່ຽນລະຫັດຜ່ານ. ທ່ານສາມາດເຂົ້າສູ່ລະບົບໂຄງການດ້ວຍລະຫັດຜ່ານ! ປະຕິບັດຕາມຄູ່ມືຜູ້ໃຊ້ຂອງຊອບແວການຕັ້ງຄ່າ WM-E Term®!
- ໄຟ LED ໃນອຸປະກອນແຈ້ງໃຫ້ທ່ານຮູ້ກ່ຽວກັບສະຖານະປະຈຸບັນຂອງໂມເດັມ.
- ການຕັ້ງຄ່າໂຮງງານ file sample (ສໍາລັບໄລຍະ WM-E): https://m2mserver.com/m2m-downloads/WM-E1S_STD_v5210_default.zip
- ສໍາລັບການເຮັດວຽກຂອງການສື່ສານເຄືອຂ່າຍໂທລະສັບມືຖືໂມເດັມແລະການຕັ້ງຄ່າ SIM card (ເຊັ່ນ: APN, ລະຫັດຜ່ານ, ແລະບັນຊີ) ແມ່ນຕ້ອງການ.
- ນອກຈາກນັ້ນ, ໃຫ້ແນ່ໃຈວ່າ review ແລະບັນທຶກຟັງຊັນຄວາມໄວຂອງຂໍ້ມູນແບບໂປ່ງໃສຢູ່ໃນໂຄງການ WM-E Term ສໍາລັບການຕັ້ງຄ່າ RS232, RS485. ນອກຈາກນັ້ນ, ທ່ານຕ້ອງສົ່ງການຕັ້ງຄ່າທີ່ຕັ້ງໄວ້ໃຫ້ກັບໂມເດັມໂດຍໃຊ້ໂປຣແກຣມ - ອີງຕາມເອກະສານຄູ່ມືຜູ້ໃຊ້ຂອງຊອບແວການຕັ້ງຄ່າ.
- ດ້ວຍຊອບແວການຕັ້ງຄ່າ, ທ່ານຍັງສາມາດອັບເດດເຟີມແວຂອງໂມເດັມໄດ້. ຫຼັງຈາກນັ້ນ, ໂມເດັມຈະ restart ແລະເຮັດວຽກຕາມການຕັ້ງຄ່າໃຫມ່.
- ຄູ່ມືການໃຊ້ WM-E Term: https://m2mserver.com/m2m-downloads/WM-E-TERM_User_Manual_V1_97.pdf
ການສົ່ງ SMS ຈາກແມັດ
- ອີງຕາມການຕັ້ງຄ່າເຄື່ອງວັດແທກ, ໂດຍການນໍາໃຊ້ໂມເດັມ, ເຄື່ອງວັດແທກສາມາດສົ່ງຂໍ້ຄວາມ SMS ທີ່ສອດຄ້ອງກັບຄໍາສັ່ງ AT ມາດຕະຖານໄປຫາເບີໂທລະສັບທີ່ຖືກຕັ້ງຄ່າຢູ່ຂ້າງແມັດ.
- ມັນເປັນມູນຄ່າການຕັ້ງຄ່ານີ້ຕົ້ນຕໍສໍາລັບການປຸກແລະເຫດການພິເສດ, ອີງຕາມຄວາມສາມາດຂອງແມັດ.
- ບໍ່ຈຳເປັນຕ້ອງມີການຕັ້ງຄ່າອື່ນໃນ WM-E Term®.
ຄວາມແຮງຂອງສັນຍານ
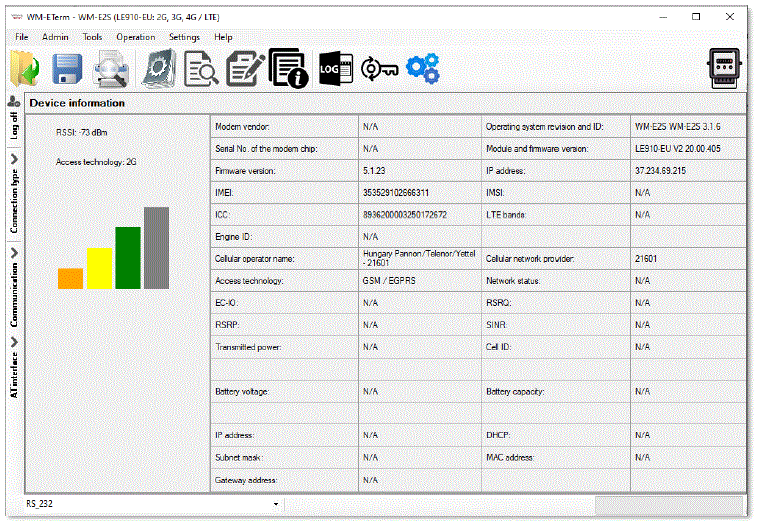
- ກວດເບິ່ງຄວາມແຮງສັນຍານຂອງເຄືອຂ່າຍໂທລະສັບມືຖືໃນເມນູຂໍ້ມູນອຸປະກອນຊອບແວ WM-E Term® ຫຼືໂດຍການໃຊ້
 ໄອຄອນ. ໃນຕອນທ້າຍຂອງຂະບວນການ, ຂໍ້ມູນສະຖານະພາບໃນປະຈຸບັນຈະຖືກປັບປຸງ.
 - ກວດເບິ່ງຄ່າ RSSI (ຢ່າງຫນ້ອຍມັນຄວນຈະເປັນສີເຫຼືອງ - ຊຶ່ງຫມາຍຄວາມວ່າຄວາມແຮງສັນຍານສະເລ່ຍ - ຫຼືດີກວ່າຖ້າມັນເປັນສີຂຽວ).
- ທ່ານສາມາດປ່ຽນຕໍາແຫນ່ງເສົາອາກາດໃນຂະນະທີ່ທ່ານຈະບໍ່ໄດ້ຮັບຄ່າ dBm ທີ່ດີກວ່າ (ສະຖານະຕ້ອງຖືກອ່ານອີກເທື່ອຫນຶ່ງເພື່ອໂຫຼດຫນ້າຈໍຄືນ).
ພະລັງງານ outage ການຄຸ້ມຄອງ
- ຮຸ່ນເຟີມແວຂອງໂມເດັມແມ່ນສະຫນັບສະຫນູນຄຸນສົມບັດ LastGASP, ຊຶ່ງຫມາຍຄວາມວ່າໃນກໍລະນີຂອງພະລັງງານ outage supercapacitor ຂອງໂມເດັມອະນຸຍາດໃຫ້ເຮັດວຽກຕໍ່ໄປຂອງໂມເດັມໃນເວລາສັ້ນໆ (ສອງສາມນາທີ).
- ໃນກໍລະນີຂອງການກວດພົບການສູນເສຍຂອງແຫຼ່ງພະລັງງານ / ການປ້ອນຂໍ້ມູນ, ໂມເດັມຈະສ້າງເຫດການ "POWER ສູນເສຍ" ແລະຂໍ້ຄວາມຈະຖືກສົ່ງໃນທັນທີເປັນຂໍ້ຄວາມ SMS ກັບເບີໂທລະສັບທີ່ກໍານົດໄວ້.
- ໃນກໍລະນີຂອງການຟື້ນຕົວຕົ້ນຕໍ / ແຫຼ່ງພະລັງງານ, ໂມເດັມຈະສ້າງຂໍ້ຄວາມ "ການສົ່ງຄືນພະລັງງານ" ແລະການສົ່ງໂດຍຂໍ້ຄວາມ SMS.
- ການຕັ້ງຄ່າຂໍ້ຄວາມ LastGASP ສາມາດເປີດໃຊ້ໄດ້ໂດຍແອັບພລິເຄຊັນ WM-E Term® – ໃນສ່ວນກຸ່ມພາລາມິເຕີ AMM (IEC).
ຣີສະຕາດໂມເດັມ
ບໍ່ສາມາດຊອກຫາທາງເລືອກໂດຍກົງສໍາລັບການປິດເປີດໂມເດັມຄືນໃໝ່ໃນ WM-E Term. ແຕ່ມັນງ່າຍຫຼາຍທີ່ຈະຍູ້ໂມເດັມໃຫ້ຣີສະຕາດ.
- ເລືອກຕົວກໍານົດການໃດໆຈາກຄ່າ readout.
- ປ່ຽນຄ່າພາຣາມິເຕີ
- ຍູ້ໄປທີ່ປຸ່ມບັນທຶກ.
- Send the settings by Parameters Write
 ໄອຄອນໃສ່ໂມເດັມ.
 - ໃນຕອນທ້າຍຂອງຂະບວນການຂຽນ, ໂມເດັມຈະຖືກເລີ່ມຕົ້ນໃຫມ່.
- ການປິດເປີດອຸປະກອນຄືນໃໝ່ແມ່ນເຊັນໂດຍ LED3, ເຊິ່ງຈະຖືກກະພິບໄວໂດຍສີຂຽວເປັນເວລາ 15 ວິນາທີ. ການເລີ່ມຕົ້ນຕ້ອງການ 2-3 ນາທີໃນຂະນະທີ່ໂມເດັມຈະມີຢູ່ໃນການໂຕ້ຕອບຂອງມັນ.
- After all, the LED will be operating ordinary as it is listed in the LED operation behaviour description.
ບົດທີ 4. ສະຫນັບສະຫນູນ
ຖ້າຫາກທ່ານມີຄໍາຖາມທາງດ້ານວິຊາການກ່ຽວກັບການນໍາໃຊ້ທ່ານສາມາດຊອກຫາພວກເຮົາກ່ຽວກັບຄວາມເປັນໄປໄດ້ການຕິດຕໍ່ດັ່ງຕໍ່ໄປນີ້:
- ອີເມວ: support@m2mserver.com
- ໂທລະສັບ: +36 20 333-1111
ສະຫນັບສະຫນູນ
- ຜະລິດຕະພັນມີ void ປະຈໍາຕົວທີ່ມີຂໍ້ມູນທີ່ສໍາຄັນກ່ຽວກັບຜະລິດຕະພັນສໍາລັບສາຍສະຫນັບສະຫນູນ.
- ເຕືອນໄພ! ຄວາມເສຍຫາຍຫຼືການຖອນສະຕິກເກີ void ຫມາຍຄວາມວ່າການສູນເສຍການຮັບປະກັນຜະລິດຕະພັນ.
- ສະຫນັບສະຫນູນຜະລິດຕະພັນອອນໄລນ໌ມີຢູ່ທີ່ນີ້: https://www.m2mserver.com/en/support/
ສະຫນັບສະຫນູນຜະລິດຕະພັນ
ເອກະສານແລະຂໍ້ມູນທີ່ກ່ຽວຂ້ອງກັບຜະລິດຕະພັນແມ່ນມີຢູ່ທີ່ນີ້. https://www.m2mserver.com/en/product/wm-e1s-iskra/
ບົດທີ 5. ແຈ້ງການທາງກົດໝາຍ
- ©2025. WM Systems LLC.
- ຂໍ້ຄວາມແລະຮູບປະກອບທີ່ນໍາສະເຫນີໃນເອກະສານນີ້ແມ່ນຢູ່ພາຍໃຕ້ລິຂະສິດ. ການສຳເນົາ, ການນຳໃຊ້, ການຈຳລອງ ຫຼື ການພິມເຜີຍແຜ່ເອກະສານຕົ້ນສະບັບ ຫຼື ພາກສ່ວນຂອງມັນເປັນໄປໄດ້ດ້ວຍການຕົກລົງ ແລະ ການອະນຸຍາດຈາກ WM Systems LLC. ເທົ່ານັ້ນ.
- ຕົວເລກໃນເອກະສານນີ້ແມ່ນຮູບພາບ, ທີ່ສາມາດແຕກຕ່າງຈາກຮູບລັກສະນະທີ່ແທ້ຈິງ.
- WM Systems LLC ບໍ່ໄດ້ຮັບຜິດຊອບໃດໆສໍາລັບຄວາມບໍ່ຖືກຕ້ອງຂອງຂໍ້ຄວາມໃນເອກະສານນີ້.
- ຂໍ້ມູນທີ່ນໍາສະເຫນີສາມາດປ່ຽນແປງໄດ້ໂດຍບໍ່ຕ້ອງແຈ້ງໃຫ້ທາບໃດໆ.
- ຂໍ້ມູນທີ່ພິມອອກໃນເອກະສານນີ້ແມ່ນໃຫ້ຂໍ້ມູນເທົ່ານັ້ນ. ສໍາລັບລາຍລະອຽດເພີ່ມເຕີມຕິດຕໍ່ພວກເຮົາ.
ຄຳເຕືອນ
ຄວາມຜິດພາດຫຼືຄວາມຜິດພາດທີ່ຈະເກີດຂຶ້ນໃນລະຫວ່າງການອັບໂຫລດ / ໂຫຼດຫນ້າຈໍຄືນຊອບແວສາມາດນໍາໄປສູ່ການອຸປະກອນການເສຍຫາຍ. ໃນເວລາທີ່ສະຖານະການນີ້ເກີດຂຶ້ນໂທຫາຜູ້ຊ່ຽວຊານຂອງພວກເຮົາ.
FAQ
How can I configure the modem for optimal performance?
You can configure the modem locally via RS232 or optical port, or remotely using CSData calls or mobile internet (TCP) connection. Ensure to set up unique passwords for increased security.
ຂ້ອຍຄວນເຮັດແນວໃດໃນກໍລະນີຂອງພະລັງງານ outage?
ຖ້າຫາກວ່າມີພະລັງງານ outage, the optional supercapacitor component in the modem allows it to continue operation temporarily. Once power is restored, the modem will automatically restart and resume sending data over the cellular network.
ເອກະສານ / ຊັບພະຍາກອນ
 |
WM SYSTEMS WM-E1S Iskra Modem [pdf] ຄູ່ມືຜູ້ໃຊ້ WM-E1S Iskra Modem, WM-E1S, Iskra Modem, Modem |
