ຄູ່ມືຜູ້ໃຊ້
![]()
VLVWIP2000-ENC
VLVWIP2000-DEC
JPEG2000 AvoIP ຕົວເຂົ້າລະຫັດ ແລະຕົວຖອດລະຫັດ

ສະຫງວນລິຂະສິດທັງໝົດ
Version: VLVWIP2000-ENC_2025V1.0
Version: VLVWIP2000-DEC_2025V1.0
![]()
JPEG2000 AvoIP ຕົວເຂົ້າລະຫັດ ແລະຕົວຖອດລະຫັດ
ຄໍານໍາ
ອ່ານຄູ່ມືຜູ້ໃຊ້ນີ້ຢ່າງລະອຽດກ່ອນທີ່ຈະໃຊ້ຜະລິດຕະພັນ. ຮູບພາບທີ່ສະແດງຢູ່ໃນຄູ່ມືນີ້ແມ່ນສໍາລັບການອ້າງອີງເທົ່ານັ້ນ. ຮູບແບບທີ່ແຕກຕ່າງກັນແລະສະເພາະແມ່ນຂຶ້ນກັບຜະລິດຕະພັນທີ່ແທ້ຈິງ.
ຄູ່ມືນີ້ແມ່ນສໍາລັບຄໍາແນະນໍາການດໍາເນີນງານເທົ່ານັ້ນ, ກະລຸນາຕິດຕໍ່ຜູ້ຈັດຈໍາຫນ່າຍທ້ອງຖິ່ນສໍາລັບການຊ່ວຍເຫຼືອດ້ານການບໍາລຸງຮັກສາ. ໃນຄວາມພະຍາຍາມຢ່າງຕໍ່ເນື່ອງເພື່ອປັບປຸງຜະລິດຕະພັນ, ພວກເຮົາສະຫງວນສິດທີ່ຈະເຮັດການປ່ຽນແປງຫນ້າທີ່ຫຼືຕົວກໍານົດການໂດຍບໍ່ມີການແຈ້ງການຫຼືພັນທະ. ກະລຸນາອ້າງອີງຫາຕົວແທນຈໍາໜ່າຍສຳລັບລາຍລະອຽດຫຼ້າສຸດ.
ຖະແຫຼງການ FCC
ອຸປະກອນນີ້ສ້າງ, ໃຊ້ແລະສາມາດ radiate ພະລັງງານຄວາມຖີ່ວິທະຍຸແລະ, ຖ້າຫາກວ່າບໍ່ໄດ້ຕິດຕັ້ງແລະນໍາໃຊ້ຕາມຄໍາແນະນໍາ, ອາດຈະເຮັດໃຫ້ເກີດການແຊກແຊງອັນຕະລາຍກັບການສື່ສານວິທະຍຸ. ມັນໄດ້ຖືກທົດສອບແລະພົບວ່າປະຕິບັດຕາມຂໍ້ຈໍາກັດສໍາລັບອຸປະກອນດິຈິຕອນຊັ້ນ B, ອີງຕາມພາກທີ 15 ຂອງກົດລະບຽບ FCC. ຂໍ້ຈໍາກັດເຫຼົ່ານີ້ຖືກອອກແບບມາເພື່ອສະຫນອງການປົກປ້ອງທີ່ສົມເຫດສົມຜົນຕໍ່ການແຊກແຊງທີ່ເປັນອັນຕະລາຍໃນການຕິດຕັ້ງການຄ້າ.
ການດໍາເນີນງານຂອງອຸປະກອນດັ່ງກ່າວໃນເຂດທີ່ຢູ່ອາໄສມີແນວໂນ້ມທີ່ຈະເຮັດໃຫ້ເກີດການແຊກແຊງ, ໃນກໍລະນີດັ່ງກ່າວນີ້, ຜູ້ໃຊ້ໃນຄ່າໃຊ້ຈ່າຍຂອງຕົນເອງຈະຕ້ອງໃຊ້ມາດຕະການໃດກໍ່ຕາມທີ່ອາດຈະມີຄວາມຈໍາເປັນເພື່ອແກ້ໄຂການແຊກແຊງ.
ການປ່ຽນແປງຫຼືການດັດແກ້ທີ່ບໍ່ໄດ້ຮັບອະນຸມັດຢ່າງຈະແຈ້ງໂດຍການຜະລິດຈະເປັນໂມຄະສິດອໍານາດຂອງຜູ້ໃຊ້ໃນການດໍາເນີນງານອຸປະກອນໄດ້.
![]()

![]()
![]()
ຂໍ້ຄວນລະວັງຄວາມປອດໄພ
ເພື່ອຮັບປະກັນປະສິດທິພາບທີ່ດີທີ່ສຸດຈາກຜະລິດຕະພັນ, ກະລຸນາອ່ານຄໍາແນະນໍາທັງຫມົດຢ່າງລະອຽດກ່ອນທີ່ຈະນໍາໃຊ້ອຸປະກອນ. ບັນທຶກຄູ່ມືນີ້ສໍາລັບການອ້າງອີງຕື່ມອີກ.
- ຖອດອຸປະກອນຢ່າງລະມັດລະວັງແລະປະຫຍັດກ່ອງຕົ້ນສະບັບແລະອຸປະກອນການຫຸ້ມຫໍ່ສໍາລັບການຂົນສົ່ງໃນອະນາຄົດທີ່ເປັນໄປໄດ້.
- ປະຕິບັດຕາມຄວາມລະມັດລະວັງດ້ານຄວາມປອດໄພຂັ້ນພື້ນຖານເພື່ອຫຼຸດຜ່ອນຄວາມສ່ຽງທີ່ຈະເກີດໄຟໄຫມ້, ໄຟຟ້າຊ້ໍາແລະບາດເຈັບຂອງບຸກຄົນ.
- ຢ່າຮື້ຖອນເຮືອນຫຼືດັດແປງໂມດູນ. ມັນອາດຈະສົ່ງຜົນໃຫ້ເກີດການຊ໊ອກໄຟຟ້າຫຼືບາດແຜ.
- ການນໍາໃຊ້ອຸປະກອນຫຼືພາກສ່ວນທີ່ບໍ່ໄດ້ຕາມສະເພາະຂອງຜະລິດຕະພັນອາດຈະເຮັດໃຫ້ເກີດຄວາມເສຍຫາຍ, ການເຊື່ອມໂຊມຫຼືເຮັດວຽກຜິດປົກກະຕິ.
- ອ້າງອີງການບໍລິການທັງໝົດໃຫ້ກັບພະນັກງານບໍລິການທີ່ມີຄຸນວຸດທິ.
- ເພື່ອປ້ອງກັນອັນຕະລາຍຈາກໄຟໄຫມ້ຫຼືອາການຊ໊ອກ, ຢ່າເຮັດໃຫ້ຫນ່ວຍງານຖືກຝົນ, ຄວາມຊຸ່ມຊື່ນຫຼືຕິດຕັ້ງຜະລິດຕະພັນນີ້ຢູ່ໃກ້ກັບນ້ໍາ.
- ຫ້າມເອົາສິ່ງຂອງໜັກໆໃສ່ສາຍຕໍ່ໃນກໍລະນີມີການບີບອັດ.
- ຢ່າເອົາທີ່ຢູ່ອາໄສຂອງອຸປະກອນອອກເພາະວ່າການເປີດຫຼືຖອດທີ່ຢູ່ອາໄສອາດຈະເຮັດໃຫ້ທ່ານເປັນອັນຕະລາຍ voltage ຫຼືອັນຕະລາຍອື່ນໆ.
- ຕິດຕັ້ງອຸປະກອນໃນສະຖານທີ່ທີ່ມີລະບາຍອາກາດໄດ້ດີເພື່ອຫຼີກເວັ້ນການເສຍຫາຍທີ່ເກີດຈາກຄວາມຮ້ອນເກີນໄປ.
- ຮັກສາໂມດູນຢູ່ຫ່າງຈາກຂອງແຫຼວ.
- ການຮົ່ວໄຫຼເຂົ້າໄປໃນເຮືອນອາດຈະເຮັດໃຫ້ເກີດໄຟໄຫມ້, ໄຟຟ້າຊອດ, ຫຼືອຸປະກອນເສຍຫາຍ. ຖ້າວັດຖຸ ຫຼືຂອງແຫຼວຕົກລົງ ຫຼື ຮົ່ວໃສ່ເຮືອນ, ໃຫ້ຖອດໂມດູນອອກທັນທີ.
- ຫ້າມບິດ ຫຼື ດຶງດ້ວຍແຮງປາຍຂອງສາຍເຄເບີນ. ມັນສາມາດເຮັດໃຫ້ເກີດຄວາມຜິດປົກກະຕິ.
- ຫ້າມໃຊ້ນໍ້າຢາລ້າງແອ ຫຼືນໍ້າຢາເພື່ອທໍາຄວາມສະອາດເຄື່ອງນີ້. ຖອດສາຍໄຟໃສ່ອຸປະກອນກ່ອນທຳຄວາມສະອາດທຸກຄັ້ງ.
- ຖອດສາຍໄຟເມື່ອປະໄວ້ໂດຍບໍ່ໄດ້ໃຊ້ເປັນເວລາດົນນານ.
- ຂໍ້ມູນກ່ຽວກັບການກໍາຈັດອຸປະກອນທີ່ຂູດຂີ້ເຫຍື້ອ: ຫ້າມເຜົາຫຼືປະສົມກັບສິ່ງເສດເຫຼືອໃນຄົວເຮືອນທົ່ວໄປ, ກະລຸນາປະຕິບັດໃຫ້ເຂົາເຈົ້າເປັນສິ່ງເສດເຫຼືອໄຟຟ້າປົກກະຕິ.
ຂອບໃຈສໍາລັບການຊື້ຜະລິດຕະພັນນີ້
ສໍາລັບປະສິດທິພາບແລະຄວາມປອດໄພທີ່ດີທີ່ສຸດ, ກະລຸນາອ່ານຄໍາແນະນໍາເຫຼົ່ານີ້ຢ່າງລະມັດລະວັງກ່ອນທີ່ຈະເຊື່ອມຕໍ່, ປະຕິບັດການຫຼືປັບຜະລິດຕະພັນນີ້. ກະລຸນາເກັບຮັກສາຄູ່ມືນີ້ໄວ້ສໍາລັບການອ້າງອີງໃນອະນາຄົດ.
ອຸປະກອນປ້ອງກັນໄຟຟ້າແນະນໍາ
ຜະລິດຕະພັນນີ້ປະກອບດ້ວຍອົງປະກອບໄຟຟ້າທີ່ລະອຽດອ່ອນທີ່ອາດຈະໄດ້ຮັບຄວາມເສຍຫາຍຈາກ spikes ໄຟຟ້າ, surges, ໄຟຟ້າຊ໊ອກ, ການໂຈມຕີຂອງແສງ, ແລະອື່ນໆ. ການນໍາໃຊ້ລະບົບປ້ອງກັນກະດ້າງແມ່ນແນະນໍາໃຫ້ສູງເພື່ອປ້ອງກັນແລະຍືດອາຍຸຂອງອຸປະກອນຂອງທ່ານ.
1. ບົດແນະນຳ
This product is based on JPEG2000 technology. It integrates Copper port and Fiber port within a single box. Encoder input supports up to 4K60 4:4:4, audio embedding or extracting. Decoder output supports up to 4K60 4:4:4, audio extracting. The product supports ARC/eARC/S/PDIF/Analog audio return function, also supports USB2.0/KVM/Camera, 1G Ethernet, bidirectional RS-232, two-way IR and POE function. Guest mode controls of RS-232, IR, CEC are supported. Built-in two channel RELAY ports and two channel I/O ports for contact control. Dante AV-A mode is supported if the product is license activated.
Built-in MJPEG Substream ທີ່ສະຫນັບສະຫນູນຄໍາສັ່ງ API ຈໍານວນຫລາຍເພື່ອບັນລຸການຕັ້ງຄ່າທີ່ມີຄວາມຍືດຫຍຸ່ນແມ່ນເປັນປະໂຫຍດສໍາລັບແອັບຯຄວບຄຸມຂອງພາກສ່ວນທີສາມກ່ອນ.view ເນື້ອໃນວິດີໂອ.
ລະບົບແມ່ນອີງໃສ່ Linux ສໍາລັບການພັດທະນາຊອບແວ, ສະຫນອງວິທີການຄວບຄຸມທີ່ມີຄວາມຍືດຫຍຸ່ນ, ທີ່ອີງໃສ່ເຄືອຂ່າຍອັດສະລິຍະຂອງ 1G Ethernet Switch.
2. ຄຸນສົມບັດ
☆ HDCP 2.2 ສອດຄ່ອງ
☆ ຮອງຮັບແບນວິດວິດີໂອ 18Gbps
☆ Input and output video resolution is up to 4K60 4:4:4, as specified in HDMI 2.0b
☆ໄລຍະການສົ່ງສັນຍານສາມາດຂະຫຍາຍໄດ້ເຖິງ 328ft / 100m ຜ່ານສາຍ CAT5E/6/6A/7
☆ Transmit video, analog/digital audio, IR , RS-232, CEC and USB over Ethernet
☆ລວມພອດທອງແດງແລະພອດ Fiber ພາຍໃນກ່ອງດຽວ
☆ ARC/eARC/S/PDIF/Analog audio return function
☆ Dante AV-A mode is supported if license activated
☆ການຕັ້ງຄ່າຊ່ອງຜ່ານປຸ່ມກະດານຫນ້າແລະຫນ້າຈໍ LED
☆ Built-in two channel RELAY ports and two channel I/O ports for contact control
☆ສະຫນັບສະຫນູນຟັງຊັນ unicast ແລະ multicast
☆ສະຫນັບສະຫນູນ point-to-point, ວິດີໂອມາຕຣິກເບື້ອງແລະການທໍາງານຂອງຝາວິດີໂອ (ວິດີໂອກໍາແພງສະຫນັບສະຫນູນສູງເຖິງ 9 × 9)
☆ ການຄຸ້ມຄອງຫ້ອງຮຽນວິດີໂອອັດສະລິຍະ
☆ສະຫນັບສະຫນູນ MJPEG Substream ໃນເວລາຈິງກ່ອນview
☆ 1G Ethernet Switch
☆ສະຫນັບສະຫນູນການທໍາງານ POE
☆ໃນຕົວ web ການຕັ້ງຄ່າ ແລະການຄວບຄຸມໜ້າ, Telnet ແລະ SSH ເຊັ່ນກັນ
☆ ຮູບແບບສຽງ HDMI: LPCM 2.0/5.1/7.1CH, Dolby Digital/Plus/EX, Dolby True HD, DTS, DTS-96/24, DTS-EX DSD, DTS High Res, DTS-HD Master
☆ ການອອກແບບເຄືອຂ່າຍ smart ສໍາລັບການຕິດຕັ້ງງ່າຍແລະປ່ຽນແປງໄດ້
3. ເນື້ອໃນຊຸດ
| ຈຳນວນ | ລາຍການ |
| 1 | 4K60 ຜ່ານຕົວເຂົ້າລະຫັດ IP 1GbE |
| 1 | ສາຍຮັບ IR (1.5 ແມັດ) |
| 1 | ສາຍ IR Blaster (1.5 ແມັດ) |
| 3 | 3-pin 3.81mm ຕົວເຊື່ອມຕໍ່ Phoenix |
| 2 | 4-pin 3.81mm ຕົວເຊື່ອມຕໍ່ Phoenix |
| 1 | ອະແດບເຕີ Power Lock 12V / 2.5A |
| 2 | ຫູຟັງ |
| 4 | ສະກູເຄື່ອງ (KM3*4) |
| 1 | ຄູ່ມືຜູ້ໃຊ້ |
or
| ຈຳນວນ | ລາຍການ |
| 1 | ຕົວຖອດລະຫັດ 4K60 ຜ່ານ IP 1GbE |
| 1 | ສາຍຮັບ IR (1.5 ແມັດ) |
| 1 | ສາຍ IR Blaster (1.5 ແມັດ) |
| 3 | 3-pin 3.81mm ຕົວເຊື່ອມຕໍ່ Phoenix |
| 2 | 4-pin 3.81mm ຕົວເຊື່ອມຕໍ່ Phoenix |
| 1 | ອະແດບເຕີ Power Lock 12V / 2.5A |
| 2 | ຫູຟັງ |
| 4 | ສະກູເຄື່ອງ (KM3*4) |
| 1 | ຄູ່ມືຜູ້ໃຊ້ |
4. ຂໍ້ມູນຈໍາເພາະ
ດ້ານວິຊາການ
| HDMI ປະຕິບັດຕາມ | HDMI 2.0b |
| HDCP ສອດຄ່ອງ | HDCP 2.2 |
| ແບນວິດວິດີໂອ | 18Gbps |
| ມາດຕະຖານການບີບອັດວິດີໂອ | JPEG2000 |
| ແບນວິດເຄືອຂ່າຍວິດີໂອ | 1G |
| ຄວາມລະອຽດວິດີໂອ | ເຖິງ 4K@60Hz 4:4:4 |
| ຄວາມເລິກຂອງສີ | ການປ້ອນຂໍ້ມູນ: 8/10/12-bit ຜົນຜະລິດ: 8-bit |
| ພື້ນທີ່ສີ | RGB 4:4:4, YCbCr 4:4:4 / 4:2:2 / 4:2:0 |
| ຮູບແບບສຽງ HDMI | LPCM 2.0/5.1/7.1CH, Dolby Digital/Plus/EX, Dolby True HD, DTS, DTS-96/24, DTS-EX DSD, DTS ຄວາມລະອຽດສູງ, DTS-HD Master |
| ໄລຍະການສົ່ງ | 100M CAT5E/6/6A/7 |
| ລະດັບ IR | ຄ່າເລີ່ມຕົ້ນ 12V, ທາງເລືອກ 5V |
| ຄວາມຖີ່ IR | Wideband 20K – 60KHz |
| ການປົກປ້ອງ ESD | IEC 61000-4-2: ± 8kV (ລະບາຍອາກາດ-ຊ່ອງຫວ່າງ) & ± 4kV (ການປະຕິບັດການຕິດຕໍ່) |
ການເຊື່ອມຕໍ່
| ຕົວເຂົ້າລະຫັດ | Input: 1 x HDMI IN [Type A, 19-pin female] 1 x L/R AUDIO IN [3-pin 3.81mm Phoenix connector] Output: 1 x HDMI OUT [Type A, 19-pin female] 1 x L/R AUDIO OUT [3-pin 3.81mm Phoenix connector] 1 x SPDIF OUT [Optical audio connector] Control: 1 x RS-232 [3-pin 3.81mm Phoenix connector] 1 x LAN (POE) [RJ45 jack] 1 x FIBER [Optical fiber slot] 1 x USB 2.0 HOST [Type B, 4-pin female] 2 x USB 2.0 DEVICE [Type-A, 4pin female] 2 x RELAYS [3.81mm Phoenix connector] 2 x DIGITAL IO [3.81mm Phoenix connector] 1 x IR IN [3.5mm Audio Jack] 1 x IR OUT [3.5mm Audio Jack] |
| ຕົວຖອດລະຫັດ | Input: 1 x SPDIF IN [Optical audio connector] 1 x L/R AUDIO IN [3-pin 3.81mm Phoenix connector] Output: 1 x HDMI OUT [Type A, 19-pin female] 1 x L/R AUDIO OUT [3-pin 3.81mm Phoenix connector] Control: 1 x RS-232 [3.81mm Phoenix connector] 1 x LAN (POE) [RJ45 jack] 1 x FIBER [Optical fiber slot] 2 x USB 1.1 DEVICE [Type-A, 4-pin female] 2 x USB 2.0 DEVICE [Type-A, 4-pin female] 2 x RELAYS [3.81mm Phoenix connector] 2 x DIGITAL IO [3.81mm Phoenix connector] 1 x IR IN [3.5mm Audio Jack] 1 x IR OUT [3.5mm Audio Jack] |
ກົນຈັກ
| ທີ່ຢູ່ອາໄສ | ຝາປິດໂລຫະ |
| ສີ | ດຳ |
| ຂະໜາດ | ຕົວເຂົ້າລະຫັດ/ຕົວຖອດລະຫັດ: 204mm [W] x 136mm [D] x 25.5mm [H] |
| ນ້ຳໜັກ | ຕົວເຂົ້າລະຫັດ: 631g, ຕົວຖອດລະຫັດ: 626g |
| ການສະຫນອງພະລັງງານ | ວັດສະດຸປ້ອນ: AC100 – 240V 50/60Hz, ຜົນຜະລິດ: DC 12V / 2.5A (ມາດຕະຖານສະຫະລັດ / EU, CE / FCC / UL ຢັ້ງຢືນ) |
| ການບໍລິໂພກພະລັງງານ | ຕົວເຂົ້າລະຫັດ: 8.52W, ຕົວຖອດລະຫັດ: 7.08W (ສູງສຸດ) |
| ອຸນຫະພູມປະຕິບັດການ | 32 - 104 ° F / 0 - 40 ° C |
| ອຸນຫະພູມການເກັບຮັກສາ | -4 - 140 ° F / -20 - 60 ° C |
| ຄວາມຊຸ່ມຊື່ນພີ່ນ້ອງ | 20 – 90% RH (ບໍ່ condensing) |
| ຄວາມລະອຽດ / ຄວາມຍາວສາຍ | 4K60 - ຕີນ / ແມັດ | 4K30 - ຕີນ / ແມັດ | 1080P60 – ຟຸດ / ແມັດ |
| HDMI ເຂົ້າ / ອອກ | ຂະ ໜາດ 16ft / 5M | ຂະ ໜາດ 32ft / 10M | ຂະ ໜາດ 50ft / 15M |
| ການນໍາໃຊ້ສາຍ "Premium High Speed HDMI" ແມ່ນແນະນໍາໃຫ້ສູງ. | |||
5. ການຄວບຄຸມການເຮັດວຽກແລະ ໜ້າ ທີ່
ກະດານເຂົ້າລະຫັດ 5.1


| ບໍ່. | ຊື່ | ລາຍລະອຽດຫນ້າທີ່ |
| 1 | ຣີເຊັດ | ຫຼັງຈາກເປີດອຸປະກອນແລ້ວ, ໃຫ້ກົດປຸ່ມ RESET ຄ້າງໄວ້ຈົນກ່ວາໄຟ LED ແລະ LINK LED flash ໃນເວລາດຽວກັນ, ປ່ອຍປຸ່ມເພື່ອຣີເຊັດອຸປະກອນເປັນການຕັ້ງຄ່າໂຮງງານ. |
| 2 | ໄຟ LED (ສີແດງ) |
|
| 3 | ເຊື່ອມຕໍ່ LED (ສີຂຽວ) | ສະຖານະການເຊື່ອມຕໍ່ LED.
|
| 4 | ຈໍ LED | ສະແດງລະຫັດຕົວເຂົ້າລະຫັດເປັນຄ່າເລີ່ມຕົ້ນ. ສະແດງຕົວເລືອກທີ່ສອດຄ້ອງກັນຂອງຟັງຊັນການຕັ້ງຄ່າໃນລະຫວ່າງການຕັ້ງການຕັ້ງຄ່າຕົວເຂົ້າລະຫັດ. |
| 5 | CH SELECT | ໃຊ້ເພື່ອຕັ້ງລະຫັດຕົວເຂົ້າລະຫັດ ແລະການຕັ້ງຄ່າອື່ນໆ. |
| 6 | ອຸປະກອນ USB 2.0 | ເຊື່ອມຕໍ່ກັບອຸປະກອນ USB 2.0. |
| 7 | USB ເຈົ້າພາບ | ຕົວເຊື່ອມຕໍ່ USB-B ສໍາລັບການເຊື່ອມຕໍ່ PC. |
| 8 | IR OUT | ພອດສົ່ງສັນຍານ IR. ລະດັບ IR ສາມາດຖືກຕັ້ງເປັນ 5V ຫຼື 12V (ຄ່າເລີ່ມຕົ້ນ) ຜ່ານປຸ່ມແຜງ. |
| 9 | IR IN | ພອດປ້ອນສັນຍານ IR. ລະດັບ IR ສາມາດຖືກຕັ້ງເປັນ 5V ຫຼື 12V (ຄ່າເລີ່ມຕົ້ນ) ຜ່ານປຸ່ມແຜງ. |
| 10 | RELAYS I Digital IO | VCC: Power output (12V or 5V configurable), maximum to 12V @50mA, 5V@ 100mA loading. The default output is 12V. RELAYS: 2 channel low-voltage relay ພອດ, ແຕ່ລະກຸ່ມແມ່ນເອກະລາດແລະໂດດດ່ຽວ, ສູງສຸດເຖິງ 1A 30VDC loading. ລາຍຊື່ຜູ້ຕິດຕໍ່ຖືກຕັດການເຊື່ອມຕໍ່ໂດຍຄ່າເລີ່ມຕົ້ນ. DIGITAL IO: 2 ຊ່ອງ GPIO ພອດ, ສໍາລັບການຄວບຄຸມລະດັບສັນຍານອອກດິຈິຕອນຫຼືການກວດສອບ input (ເຖິງ 12V ລະດັບການກວດພົບ). ຮູບແບບການຄວບຄຸມຜົນຜະລິດ (ຮູບແບບເລີ່ມຕົ້ນ, ລະດັບຕ່ໍາເປັນຜົນຜະລິດເລີ່ມຕົ້ນ) ຫຼືຮູບແບບການກວດສອບການປ້ອນຂໍ້ມູນແມ່ນສາມາດຕັ້ງຄ່າໄດ້. The DIGITAL IO internal pull-up voltage ປະຕິບັດຕາມ VCC. ໂໝດຄວບຄຸມການສົ່ງອອກ: ກ. ສູງສຸດທີ່ທົນທານຕໍ່ກະແສໄຟຟ້າແມ່ນ 50mA ເມື່ອຜົນຜະລິດລະດັບຕ່ໍາ. ຂ. ເມື່ອ VCC ແມ່ນ 5V ແລະລະດັບສູງແມ່ນຜົນຜະລິດ, ຄວາມອາດສາມາດຂັບລົດສູງສຸດໃນປະຈຸບັນແມ່ນ 2mA. ຄ. ເມື່ອ VCC ແມ່ນ 12V ແລະລະດັບສູງແມ່ນຜົນຜະລິດ, ຄວາມອາດສາມາດຂັບລົດສູງສຸດໃນປະຈຸບັນແມ່ນ 5mA. ໂໝດກວດຫາການປ້ອນຂໍ້ມູນ: ກ. ເມື່ອ VCC ເປັນ 5V, DIGITAL IO ຈະຖືກດຶງເຖິງ 5V ພາຍໃນໂດຍຜ່ານຕົວຕ້ານທານ 2.2K ohm. ຂ. ເມື່ອ VCC ເປັນ 12V, DIGITAL IO ຈະຖືກດຶງເຖິງ 12V ພາຍໃນໂດຍຜ່ານຕົວຕ້ານທານ 2.2K ohm. |
| 11 | RS-232 | RS-232 ພອດ serial, ສະຫນັບສະຫນູນຄໍາສັ່ງ RS-232 pass-through ແລະການຄວບຄຸມພອດ serial ທ້ອງຖິ່ນ. |
| 12 | ສຽງເຂົ້າ/ອອກ | AUDIO IN: Analog audio input port, the audio can be embedded into the HDMI signal for pass-through over to HDMI output and audio out on Decoder, or be loop out by the AUDIO OUT port on Encoder. |
| AUDIO OUT: Analog audio output port. It can output the audio extracted from the HDMI IN port (in case of LPCM) . Also it can output the audio transmitted from the AUDIO IN port of the Decoder in unicast mode (point-to-point direct connection). | ||
| 13 | SPDIF ອອກ | S/PDIF signal output port. It can output the ARC or S/PDIF audio returned from the Decoder when both the Encoder and Decoder are correspondingly set to the ARC or S/PDIF audio return mode (Set through the Controller Box or API commands in Multicast mode; Set through the front panel buttons in unicast mode). |
| 14 | HDMI ອອກ | ຮູສຽບ HDMI ພາຍໃນທ້ອງຖິ່ນ, ເຊື່ອມຕໍ່ກັບອຸປະກອນສະແດງ HDMI ເຊັ່ນ: ໂທລະພາບ ຫຼື ຈໍພາບ. |
| 15 | HDMI ເຂົ້າ | ພອດປ້ອນສັນຍານ HDMI, ເຊື່ອມຕໍ່ກັບອຸປະກອນແຫຼ່ງ HDMI ເຊັ່ນ Blu-ray Player ຫຼື Set-top box ທີ່ມີສາຍ HDMI. |
| 16 | ເສັ້ນໃຍ | ເຊື່ອມຕໍ່ດ້ວຍໂມດູນເສັ້ນໄຍແສງ, ແລະສົ່ງສັນຍານໄປຫາຕົວຖອດລະຫັດດ້ວຍສາຍເຄເບີນໃຍແສງໂດຍກົງ ຫຼືຜ່ານ Switch. |
| 17 | LAN (POE) | 1G LAN ພອດ, ເຊື່ອມຕໍ່ເຄືອຂ່າຍ Switch to form a distribution system. ໝາຍເຫດ: ເມື່ອສະວິດເຄືອຂ່າຍສົ່ງກະແສໄຟ POE, ອະແດບເຕີ DC 12V ບໍ່ຈໍາເປັນຕ້ອງໃຊ້ໃນໜ່ວຍ. |
| 18 | ຕົວຊີ້ວັດສັນຍານຂໍ້ມູນ lamp (ສີເຫຼືອງ) | Light flashing: There is data transmission. ▪ Light off: There is no data transmission. |
| 19 | ຕົວຊີ້ວັດການເຊື່ອມຕໍ່ສັນຍານ lamp (ສີຂຽວ) | Light on: The network cable is connected normally. ▪ Light off: The network cable is not connected well. |
| 20 | DC 12V | ອຸປະກອນສາມາດໄດ້ຮັບການຂັບຜ່ານສອງວິທີການ:
When the Switch supports POE function, DC power supply is not needed. |
ລາຍລະອຽດການດໍາເນີນງານຂອງຫນ້າຈໍ LED ແລະປຸ່ມ CH SELECT (ສໍາລັບການເຂົ້າລະຫັດ).
1, ENC ID: ຫຼັງຈາກລະບົບເປີດແລ້ວ, ໜ້າຈໍ LED ຂອງຕົວເຂົ້າລະຫັດຈະສະແດງ ENC ID (000 ຕາມຄ່າເລີ່ມຕົ້ນຖ້າບໍ່ໄດ້ຕັ້ງ).
2, ທີ່ຢູ່ IP: ກົດປຸ່ມຂຶ້ນຄ້າງໄວ້ 5 ວິນາທີ, ໜ້າຈໍ LED ຂອງຕົວເຂົ້າລະຫັດຈະສະແດງເປັນລຳດັບ “IPx”, “xxx”, “xxx”, “xxx”, “xxx”, ເຊິ່ງເປັນໂໝດ IP ແລະທີ່ຢູ່ IP ຂອງຕົວເຂົ້າລະຫັດ.
3, ໂໝດການຕັ້ງຄ່າ: ກົດປຸ່ມ UP + ລົງຄ້າງໄວ້ໃນເວລາດຽວກັນສໍາລັບການ 5 ວິນາທີ, ຫຼັງຈາກນັ້ນປ່ອຍເພື່ອເຂົ້າໄປໃນຮູບແບບການຕັ້ງຄ່າທີ່ມີ "CFN" ການສະແດງຢູ່ໃນຫນ້າຈໍ LED.
4, ການຕັ້ງຄ່າ ID ອຸປະກອນ: After entering the configuration mode, press the UP/DOWN button to enter the first page with the current ID number (e.g. 001) displaying on the LED screen (000 by default). Press and hold UP + DOWN buttons for 5 seconds, then release to enter the ID settings mode, in which the ID number (e.g. 001) on the LED screen will flash at 1Hz, then press the UP/DOWN button to select the device ID you desired (ID range: 000~762), then press and hold UP + DOWN buttons for 5 seconds to confirm the setting and stop flashing. After setting, the unit will reboot automatically.
ໝາຍເຫດ: ID ອຸປະກອນບໍ່ສາມາດຖືກແກ້ໄຂໃນໂຫມດ Controller Box.
5, ການຕັ້ງຄ່າ EDID: After entering the configuration mode, press the UP/DOWN button to enter the second page with “E00” (in which “E” refers to EDID, “00” to EDID ID) or “COP” (which indicates copy EDID) displaying on the LED screen (E15 by default).
Press and hold UP + DOWN buttons for 5 seconds, then release to enter the EDID settings mode, in which the EDID ID number (e.g. E01) on the LED screen will flash at 1Hz, then press the UP/DOWN button to select the EDID ID you desired, then press and hold UP + DOWN buttons for 5 seconds to confirm the setting and stop flashing.
EDID ID ທີ່ສອດຄ້ອງກັນມີດັ່ງນີ້:
| EDID ID | ຄຳອະທິບາຍ EDID |
| E00 | 1080P_Stereo_Audio_2.0_SDR |
| E01 | 1080P_DolbyDTS_5.1_SDR |
| E02 | 1080P_HD_Audio_7.1_SDR |
| E03 | 1080I_Stereo_Audio_2.0_SDR |
| E04 | 1080I_DolbyDTS_5.1_SDR |
| E05 | 1080I_HD_Audio_7.1_SDR |
| E06 | 3D_Stereo_Audio_2.0_SDR |
| E07 | 3D_DolbyDTS_5.1_SDR |
| E08 | 3D_HD_Audio_7.1_SDR |
| E09 | 4K2K30_444_Stereo_Audio_2.0_SDR |
| E10 | 4K2K30_444_DolbyDTS_5.1_SDR |
| E11 | 4K2K30_444_HD_Audio_7.1_SDR |
| E12 | 4K2K60_420_Stereo_Audio_2.0_SDR |
| E13 | 4K2K60_420_DolbyDTS_5.1_SDR |
| E14 | 4K2K60_420_HD_Audio_7.1_SDR |
| E15 | 4K2K60_444_Stereo_Audio_2.0_SDR |
| E16 | 4K2K60_444_DolbyDTS_5.1_SDR |
| E17 | 4K2K60_444_HD_Audio_7.1_SDR |
| E18 | 4K2K60_444_Stereo_Audio_2.0_HDR_10-bit |
| E19 | 4K2K60_444_DolbyDTS_5.1_HDR_10-bit |
| E20 | 4K2K60_444_HD_Audio_7.1_HDR_10-bit |
| E21 | DVI_1280x1024 |
| E22 | DVI_1920x1080 |
| E23 | DVI_1920x1200 |
ໝາຍເຫດ: In point to point connection mode, before using the EDID copy function, all codecs need to be set to CA1 unicast mode, and after setting, the HDMI cable of the Decoder needs to be re-plugged to report the EDID of TV to the Encoder.
6, ການຕັ້ງຄ່າໂໝດ IR: After entering the configuration mode, press the UP/DOWN button to enter the third page with “IR2” (in which “IR” refers to IR and “2” to 12V) displaying on the LED screen (IR2 by default). Press and hold UP + DOWN buttons for 5 seconds, then release to enter the settings mode, in which the IR mode (IR1 or IR2) on the LED screen will flash at 1Hz, then press the UP/DOWN button to select the IR mode, then press and hold UP + DOWN buttons for 5 seconds to confirm the setting and stop flashing.
The corresponding IR mode options are as follows:
IR1: 5V ສາຍ IR
IR2: 12V ສາຍ IR
7, Audio embedding mode settings: After entering the configuration mode, press the UP/DOWN button to enter the fourth page with “HDI/ANA” displaying on the LED screen (HDI by default). Press and hold UP + DOWN buttons for 5 seconds, then release to enter the settings mode, in which the audio return mode (HDI/ANA) on the LED screen will flash at 1Hz, then press the UP/DOWN button to select the mode, then press and hold UP + DOWN buttons for 5 seconds to confirm the setting and stop flashing.
The corresponding audio embedding mode options are as follows:
HDI: HDMI audio embedding
ANA: Analog audio embedding
8, ການຕັ້ງຄ່າໂໝດ IP: After entering the configuration mode, press the UP/DOWN button to enter the fifth page with “IP1/IP2/IP3” displaying on the LED screen (IP3 by default).
Press and hold UP + DOWN buttons for 5 seconds, then release to enter the settings mode, in which the IP mode (IP1/IP2/IP3) on the LED screen will flash at 1Hz, then press the UP/DOWN button to select the mode, then press and hold UP + DOWN buttons for 5 seconds to confirm the setting and stop flashing. After setting, the unit will reboot automatically.
The corresponding IP mode options are as follows:
IP1: Static IP mode (Default IP address: 169.254.100.254)
IP2: ໂຫມດ IP DHCP
IP3: Auto IP mode (Default assigned network segment: 169.254.xxx.xxx)
Note: The IP mode can not be modified in Controller Box mode.
9, Fiber/Copper mode settings: After entering the configuration mode, press the UP/DOWN button to enter the sixth page with “CPP/FIB” displaying on the LED screen (CPP by default). Press and hold UP + DOWN buttons for 5 seconds, then release to enter the settings mode, in which the Fiber/Copper mode (CPP/FIB) on the LED screen will flash at 1Hz, then press the UP/DOWN button to select the mode, then press and hold UP + DOWN buttons for 5 seconds to confirm the setting and stop flashing. After setting, the unit will reboot automatically.
The corresponding Fiber/Copper mode options are as follows:
CPP: Copper mode
FIB: Fiber mode
10 , Multicast mode settings: After entering the configuration mode, press the UP/DOWN button to enter the seventh page with “CA1/CA2” displaying on the LED screen (CA1 by default). Press and hold UP + DOWN buttons for 5 seconds, then release to enter the settings mode, in which the multicast mode (CA1/CA2) on the LED screen will flash at 1Hz, then press the UP/DOWN button to select the mode, then press and hold UP + DOWN buttons for 5 seconds to confirm the setting and stop flashing. After setting, the unit will reboot automatically.
The corresponding multicast mode options are as follows:
CA1: Unicast mode
CA2: Multicast mode
11 , ການຕັ້ງຄ່າຮູບແບບການກັບຄືນສຽງ: After entering the configuration mode, press the UP/DOWN button to enter the eighth page with “C2C/A2A” displaying on the LED screen (C2C by default). Press and hold UP + DOWN buttons for 5 seconds, then release to enter the settings mode, in which the audio return mode (C2C/A2A) on the LED screen will flash at 1Hz, then press the UP/DOWN button to select the mode, then press and hold UP + DOWN buttons for 5 seconds to confirm the setting and stop flashing. After setting, the unit will reboot automatically.
The corresponding audio return mode options are as follows:
C2C: The eARC/ARC or S/PDIF audio from the Decoder is transmitted back to the HDMI IN or SPDIF OUT port of the Encoder.
A2A: The analog audio embedded in the Decoder is transmitted back to the AUDIO OUT analog audio port of the Encoder.
ໝາຍເຫດ:
(1) ຮູບແບບການກັບຄືນສຽງບໍ່ສາມາດຖືກດັດແປງຜ່ານປຸ່ມແຜງດ້ານຫນ້າໃນ Controller Box ຫຼື Multicast mode.
(2) Only when both the Encoder and Decoder are correspondingly set to C2C/A2A audio return mode in unicast mode, the audio return can be realized.
(3) The A2A audio return mode is available only in unicast mode.
(4) ເມື່ອໃຊ້ ARC, ສຽງ ARC amplifier ເທິງຕົວເຂົ້າລະຫັດ HDMI IN ພອດແລະ ARC TV ໃນຕົວຖອດລະຫັດ HDMI OUT ພອດຄວນຖືກນໍາໃຊ້.
ເມື່ອໃດທີ່ຈະໃຊ້ eARC, ສຽງ eARC amplifier ຢູ່ໃນຜອດເຂົ້າລະຫັດ HDMI IN ແລະ eARC TV ຢູ່ໃນຕົວຖອດລະຫັດ HDMI OUT ພອດຄວນຖືກນໍາໃຊ້.
(5) ຫຼັງຈາກເຂົ້າສູ່ໂຫມດການຕັ້ງຄ່າຕ່າງໆ, ທ່ານສາມາດກົດປຸ່ມ DOWN ຄ້າງໄວ້ເພື່ອອອກຈາກອິນເຕີເຟດປະຈຸບັນຢ່າງໄວວາ, ຫຼືຖ້າທ່ານບໍ່ດໍາເນີນການໃດໆພາຍໃນ 5 ວິນາທີ, ມັນຈະກັບຄືນສູ່ການໂຕ້ຕອບທີ່ຜ່ານມາໂດຍອັດຕະໂນມັດ.
ແຜງຕົວຖອດລະຫັດ 5.2


| ບໍ່. | ຊື່ | ລາຍລະອຽດຫນ້າທີ່ |
| 1 | ຣີເຊັດ | ຫຼັງຈາກເປີດອຸປະກອນແລ້ວ, ໃຫ້ກົດປຸ່ມ RESET ຄ້າງໄວ້ຈົນກ່ວາໄຟ LED ແລະ LINK LED flash ໃນເວລາດຽວກັນ, ປ່ອຍປຸ່ມເພື່ອຣີເຊັດອຸປະກອນເປັນການຕັ້ງຄ່າໂຮງງານ. |
| 2 | ໄຟ LED (ສີແດງ) |
|
| 3 | ເຊື່ອມຕໍ່ LED (ສີຂຽວ) | ສະຖານະການເຊື່ອມຕໍ່ LED.
|
| 4 | ຈໍ LED | ສະແດງລະຫັດຕົວເຂົ້າລະຫັດທີ່ເລືອກເປັນຄ່າເລີ່ມຕົ້ນ. ສະແດງຕົວເລືອກທີ່ສອດຄ້ອງກັນຂອງຟັງຊັນການຕັ້ງຄ່າໃນລະຫວ່າງການຕັ້ງການຕັ້ງຄ່າຕົວຖອດລະຫັດ. |
| 5 | CH SELECT | ໃຊ້ເພື່ອຕັ້ງລະຫັດຕົວຖອດລະຫັດ ແລະການຕັ້ງຄ່າອື່ນໆ. |
| 6 | ອຸປະກອນ USB 1.1 | ເຊື່ອມຕໍ່ກັບອຸປະກອນ USB 1.1, ເຊັ່ນ: Keyboard ຫຼືຫນູ. |
| 7 | ອຸປະກອນ USB 2.0 | ເຊື່ອມຕໍ່ຫາອຸປະກອນ USB 2.0, ເຊັ່ນ USB flash disk ຫຼື USB Camera. |
| 8 | IR OUT | ພອດສົ່ງສັນຍານ IR. ລະດັບ IR ສາມາດຖືກຕັ້ງເປັນ 5V ຫຼື 12V (ຄ່າເລີ່ມຕົ້ນ) ຜ່ານປຸ່ມແຜງ. |
| 9 | IR IN | ພອດປ້ອນສັນຍານ IR. ລະດັບ IR ສາມາດຖືກຕັ້ງເປັນ 5V ຫຼື 12V (ຄ່າເລີ່ມຕົ້ນ) ຜ່ານປຸ່ມແຜງ. |
| 10 | RELAYS I Digital IO | VCC: ຜົນຜະລິດພະລັງງານ (12V ຫຼື 5V configurable), ສູງສຸດເຖິງ 12V@50mA, 5V@ 100mA loading. ຜົນຜະລິດເລີ່ມຕົ້ນແມ່ນ 12V. RELAYS: 2 channel low-voltage relay ພອດ, ແຕ່ລະກຸ່ມແມ່ນເອກະລາດແລະໂດດດ່ຽວ, ສູງສຸດເຖິງ 1A 30VDC loading. ລາຍຊື່ຜູ້ຕິດຕໍ່ຖືກຕັດການເຊື່ອມຕໍ່ໂດຍຄ່າເລີ່ມຕົ້ນ. DIGITAL IO: 2 channel GPIO ports, for digital level signal output control or input detection (up to 12V level detection). The output control mode (default mode, low level as default output) or input detection mode is configurable. The DIGITAL IO internal pull-up voltage ປະຕິບັດຕາມ VCC. ໂໝດຄວບຄຸມການສົ່ງອອກ: ກ. ສູງສຸດທີ່ທົນທານຕໍ່ກະແສໄຟຟ້າແມ່ນ 50mA ເມື່ອຜົນຜະລິດລະດັບຕ່ໍາ. ຂ. ເມື່ອ VCC ແມ່ນ 5V ແລະລະດັບສູງແມ່ນຜົນຜະລິດ, ຄວາມອາດສາມາດຂັບລົດສູງສຸດໃນປະຈຸບັນແມ່ນ 2mA. ຄ. ເມື່ອ VCC ແມ່ນ 12V ແລະລະດັບສູງແມ່ນຜົນຜະລິດ, ຄວາມອາດສາມາດຂັບລົດສູງສຸດໃນປະຈຸບັນແມ່ນ 5mA. ໂໝດກວດຫາການປ້ອນຂໍ້ມູນ: ກ. ເມື່ອ VCC ເປັນ 5V, DIGITAL IO ຈະຖືກດຶງເຖິງ 5V ພາຍໃນໂດຍຜ່ານຕົວຕ້ານທານ 2.2K ohm. ຂ. ເມື່ອ VCC ເປັນ 12V, DIGITAL IO ຈະຖືກດຶງເຖິງ 12V ພາຍໃນໂດຍຜ່ານຕົວຕ້ານທານ 2.2K ohm. |
| 11 | RS-232 | RS-232 ພອດ serial, ສະຫນັບສະຫນູນຄໍາສັ່ງ RS-232 pass-through ແລະການຄວບຄຸມພອດ serial ທ້ອງຖິ່ນ. |
| 12 | ສຽງເຂົ້າ/ອອກ | AUDIO IN: ພອດປ້ອນຂໍ້ມູນສຽງອະນາລັອກ, ສຽງສາມາດຖືກສົ່ງໄປຫາ Encoder AUDIO OUT ໃນໂໝດ unicast (ການເຊື່ອມຕໍ່ໂດຍກົງຈາກຈຸດຫາຈຸດ). |
| AUDIO OUT: ຜອດອອກສຽງອະນາລັອກ. ມັນອອກສຽງດຽວກັນກັບ HDMI OUT ໃນກໍລະນີທີ່ຮູບແບບສຽງແມ່ນ LPCM. | ||
| 13 | SPDIF ເຂົ້າ | ຜອດປ້ອນສັນຍານ S/PDIF. |
| 14 | HDMI ອອກ | ພອດສົ່ງສັນຍານ HDMI, ເຊື່ອມຕໍ່ກັບອຸປະກອນສະແດງ HDMI ເຊັ່ນ: ໂທລະພາບ ຫຼື ຈໍພາບ. |
| 15 | ເສັ້ນໃຍ | ເຊື່ອມຕໍ່ດ້ວຍໂມດູນເສັ້ນໄຍແສງ, ແລະຮັບສັນຍານຈາກຕົວເຂົ້າລະຫັດດ້ວຍສາຍເຄເບີນໃຍແສງໂດຍກົງ ຫຼືຜ່ານ Switch. |
| 16 | LAN (POE) | 1G LAN ພອດ, ເຊື່ອມຕໍ່ເຄືອຂ່າຍ Switch to form a distribution system. ໝາຍເຫດ: ເມື່ອສະວິດເຄືອຂ່າຍສົ່ງກະແສໄຟ POE, ອະແດບເຕີ DC 12V ບໍ່ຈໍາເປັນຕ້ອງໃຊ້ໃນໜ່ວຍ. |
| 17 | ຕົວຊີ້ວັດສັນຍານຂໍ້ມູນ lamp (ສີເຫຼືອງ) |
|
| 18 | ຕົວຊີ້ວັດການເຊື່ອມຕໍ່ສັນຍານ lamp (ສີຂຽວ) |
|
| 19 | DC 12V | ອຸປະກອນສາມາດໄດ້ຮັບການຂັບຜ່ານສອງວິທີການ:
When the Switch supports POE function, DC power supply is not needed. |
ລາຍລະອຽດການດໍາເນີນງານຂອງຫນ້າຈໍ LED ແລະປຸ່ມ CH SELECT (ສໍາລັບການຖອດລະຫັດ).
1, ການເຊື່ອມຕໍ່ ENC: ຫຼັງຈາກລະບົບເປີດແລ້ວ, ໜ້າຈໍ LED ຂອງຕົວຖອດລະຫັດຈະສະແດງ 000 ຕາມຄ່າເລີ່ມຕົ້ນຖ້າບໍ່ໄດ້ຕັ້ງ. ກົດປຸ່ມຂຶ້ນ/ລົງໂດຍກົງເພື່ອເລືອກ ID ຊ່ອງຂອງຕົວເຂົ້າລະຫັດທີ່ເຊື່ອມຕໍ່ (ໄລຍະ ID: 000~762) ເພື່ອສໍາເລັດການເຊື່ອມຕໍ່.
2, ທີ່ຢູ່ IP: ກົດປຸ່ມຂຶ້ນຄ້າງໄວ້ 5 ວິນາທີ, ໜ້າຈໍ LED ຂອງຕົວຖອດລະຫັດຈະສະແດງເປັນລຳດັບ “IPx”, “xxx”, “xxx”, “xxx”, “xxx”, ເຊິ່ງເປັນໂໝດ IP ແລະທີ່ຢູ່ IP ຂອງຕົວຖອດລະຫັດ.
3, ໂໝດການຕັ້ງຄ່າ: ກົດປຸ່ມ UP + ລົງຄ້າງໄວ້ໃນເວລາດຽວກັນສໍາລັບການ 5 ວິນາທີ, ຫຼັງຈາກນັ້ນປ່ອຍເພື່ອເຂົ້າໄປໃນຮູບແບບການຕັ້ງຄ່າທີ່ມີ "CFN" ການສະແດງຢູ່ໃນຫນ້າຈໍ LED.
4, ການຕັ້ງຄ່າ ID ອຸປະກອນ: After entering the configuration mode, press the UP/DOWN button to enter the first page with the current ID number (e.g. 001) displaying on the LED screen (000 by default). Press and hold UP + DOWN buttons for 5 seconds, then release to enter the ID settings mode, in which the ID number (e.g. 001) on the LED screen will flash at 1Hz, then press the UP/DOWN button to select the device ID you desired (ID range: 000~762), then press and hold UP + DOWN buttons for 5 seconds to confirm the setting and stop flashing. After setting, the unit will reboot automatically.
ໝາຍເຫດ: ID ອຸປະກອນບໍ່ສາມາດຖືກແກ້ໄຂໃນໂຫມດ Controller Box.
5, Output scaling settings: After entering the configuration mode, press the UP/DOWN button to enter the second page with “S00” (in which “S” refers to Scaling, and “00” to resolution ID) displaying on the LED screen (S00 by default). Press and hold UP + DOWN buttons for 5 seconds, then release to enter the settings mode, in which the Sxx on the LED screen will flash at 1Hz, then press the UP/DOWN button to select the ID you desired, then press and hold UP + DOWN buttons for 5 seconds to confirm the setting and stop flashing.
The scaling settings are listed below:
| Scaling Sxx | ລາຍລະອຽດຄວາມລະອຽດ |
| S00 | ຂ້າມ |
| S01 | 1080P50 |
| S02 | 1080P60 |
| S03 | 720P50 |
| S04 | 720P60 |
| S05 | 2160P24 |
| S06 | 2160P30 |
| S07 | 2160P50 |
| S08 | 2160P60 |
| S09 | 1280×1024 |
| S10 | 1360×768 |
| S11 | 1440×900 |
| S12 | 1680×1050 |
| S13 | 1920×1200 |
6, ການຕັ້ງຄ່າໂໝດ IR: After entering the configuration mode, press the UP/DOWN button to enter the third page with “IR2” (in which “IR” refers to IR and “2” to 12V) displaying on the LED screen (IR2 by default). Press and hold UP + DOWN buttons for 5 seconds, then release to enter the settings mode, in which the IR mode (IR1 or IR2) on the LED screen will flash at 1Hz, then press the UP/DOWN button to select the IR mode, then press and hold UP + DOWN buttons for 5 seconds to confirm the setting and stop flashing.
The corresponding IR mode options are as follows:
IR1: 5V ສາຍ IR
IR2: 12V ສາຍ IR
7, eARC/ARC or S/PDIF audio return settings: After entering the configuration mode, press the UP/DOWN button to enter the fourth page with “ARC/SPD” displaying on the LED screen (ARC by default). Press and hold UP + DOWN buttons for 5 seconds, then release to enter the audio return settings mode, in which the audio return mode (ARC/SPD) on the LED screen will flash at 1Hz, then press the UP/DOWN button to select the mode, then press and hold UP + DOWN buttons for 5 seconds to confirm the setting and stop flashing. The corresponding audio return mode options are as follows:
ARC: eARC/ARC audio return (The audio from the HDMI OUT port of Decoder is transmitted back to the HDMI IN port of the Encoder.)
SPD: S/PDIF audio return (The audio from the S/PDIF IN port of Decoder is transmitted back to the S/PDIF OUT port of the Encoder.)
ໝາຍເຫດ:
(1) ຮູບແບບການກັບຄືນສຽງບໍ່ສາມາດຖືກດັດແປງຜ່ານປຸ່ມແຜງດ້ານຫນ້າໃນ Controller Box ຫຼື Multicast mode.
(2) Only when both the Encoder and Decoder are set to C2C audio return mode, the eARC/ARC or S/PDIF audio return can be realized.
(3) ເມື່ອໃຊ້ ARC, ສຽງ ARC amplifier ເທິງຕົວເຂົ້າລະຫັດ HDMI IN ພອດແລະ ARC TV ໃນຕົວຖອດລະຫັດ HDMI OUT ພອດຄວນຖືກນໍາໃຊ້.
ເມື່ອໃດທີ່ຈະໃຊ້ eARC, ສຽງ eARC amplifier ຢູ່ໃນຜອດເຂົ້າລະຫັດ HDMI IN ແລະ eARC TV ຢູ່ໃນຕົວຖອດລະຫັດ HDMI OUT ພອດຄວນຖືກນໍາໃຊ້.
8, ການຕັ້ງຄ່າໂໝດ IP: After entering the configuration mode, press the UP/DOWN button to enter the fifth page with “IP1/IP2/IP3” displaying on the LED screen (IP3 by default).
Press and hold UP + DOWN buttons for 5 seconds, then release to enter the settings mode, in which the IP mode (IP1/IP2/IP3) on the LED screen will flash at 1Hz, then press the UP/DOWN button to select the mode, then press and hold UP + DOWN buttons for 5 seconds to confirm the setting and stop flashing. After setting, the unit will reboot automatically.
The corresponding IP mode options are as follows:
IP1: Static IP mode (Default IP address: 169.254.100.253)
IP2: ໂຫມດ IP DHCP
IP3: Auto IP mode (Default assigned network segment: 169.254.xxx.xxx)
ໝາຍເຫດ: ໂໝດ IP ບໍ່ສາມາດແກ້ໄຂໄດ້ໃນໂໝດ Controller Box.
9, Fiber/Copper mode settings: After entering the configuration mode, press the UP/DOWN button to enter the sixth page with “CPP/FIB” displaying on the LED screen (CPP by default). Press and hold UP + DOWN buttons for 5 seconds, then release to enter the settings mode, in which the Copper/Fiber mode (CPP/FIB) on the LED screen will flash at 1Hz, then press the UP/DOWN button to select the mode, then press and hold UP + DOWN buttons for 5 seconds to confirm the setting and stop flashing. After setting, the unit will reboot automatically.
The corresponding Fiber/Copper mode options are as follows:
CPP: Copper mode
FIB: Fiber mode
10 , Multicast mode settings: After entering the configuration mode, press the UP/DOWN button to enter the seventh page with “CA1/CA2” displaying on the LED screen (CA1 by default). Press and hold UP + DOWN buttons for 5 seconds, then release to enter the settings mode, in which the Multicast mode (CA1/CA2) on the LED screen will flash at 1Hz, then press the UP/DOWN button to select the mode, then press and hold UP + DOWN buttons for 5 seconds to confirm the setting and stop flashing. After setting, the unit will reboot automatically.
The corresponding multicast mode options are as follows:
CA1: Unicast mode
CA2: Multicast mode
11 , ການຕັ້ງຄ່າຮູບແບບການກັບຄືນສຽງ: After entering the configuration mode, press the UP/DOWN button to enter the eighth page with “C2C/A2A” displaying on the LED screen (C2C by default). Press and hold UP + DOWN buttons for 5 seconds, then release to enter the settings mode, in which the audio return mode (C2C/A2A) on the LED screen will flash at 1Hz, then press the UP/DOWN button to select the mode, then press and hold UP + DOWN buttons for 5 seconds to confirm the setting and stop flashing. After setting, the unit will reboot automatically.
The corresponding audio return mode options are as follows:
C2C: The eARC/ARC or S/PDIF audio from the Decoder is transmitted back to the HDMI IN or S/PDIF OUT port of the Encoder.
A2A: The analog audio embedded in the Decoder is transmitted back to the AUDIO OUT analog audio port of the Encoder.
ໝາຍເຫດ:
(1) ຮູບແບບການກັບຄືນສຽງບໍ່ສາມາດຖືກດັດແປງຜ່ານປຸ່ມແຜງດ້ານຫນ້າໃນ Controller Box ຫຼື Multicast mode.
(2) Only when both the Encoder and Decoder are correspondingly set to C2C/A2A audio return mode in unicast mode, the audio return can be realized.
(3) The A2A audio return mode is available only in unicast mode.
(4) ເມື່ອໃຊ້ ARC, ສຽງ ARC amplifier ເທິງຕົວເຂົ້າລະຫັດ HDMI IN ພອດແລະ ARC TV ໃນຕົວຖອດລະຫັດ HDMI OUT ພອດຄວນຖືກນໍາໃຊ້.
ເມື່ອໃດທີ່ຈະໃຊ້ eARC, ສຽງ eARC amplifier ຢູ່ໃນຜອດເຂົ້າລະຫັດ HDMI IN ແລະ eARC TV ຢູ່ໃນຕົວຖອດລະຫັດ HDMI OUT ພອດຄວນຖືກນໍາໃຊ້.
(5) ຫຼັງຈາກເຂົ້າສູ່ໂຫມດການຕັ້ງຄ່າຕ່າງໆ, ທ່ານສາມາດກົດປຸ່ມ DOWN ຄ້າງໄວ້ເພື່ອອອກຈາກອິນເຕີເຟດປະຈຸບັນຢ່າງໄວວາ, ຫຼືຖ້າທ່ານບໍ່ດໍາເນີນການໃດໆພາຍໃນ 5 ວິນາທີ, ມັນຈະກັບຄືນສູ່ການໂຕ້ຕອບທີ່ຜ່ານມາໂດຍອັດຕະໂນມັດ.
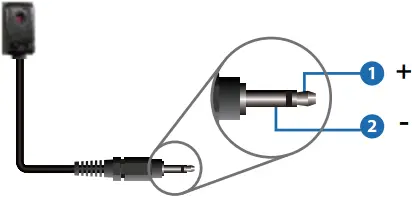
5.3 ນິຍາມ IR Pin

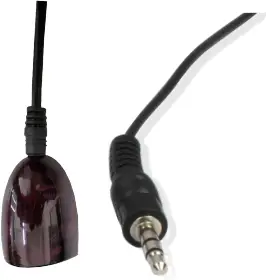
IR BLASTER IR RECEIVER
IR BLASTER
ຜູ້ຮັບ IR
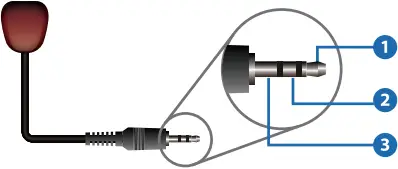
(1) ສັນຍານ IR
(2) ການຖົມດິນ
(3) ພະລັງງານ 12V
6. ຄໍາແນະນໍາກ່ຽວກັບການຕິດຕັ້ງ Rack
6.1 6U V2 ການຕິດຕັ້ງ Rack
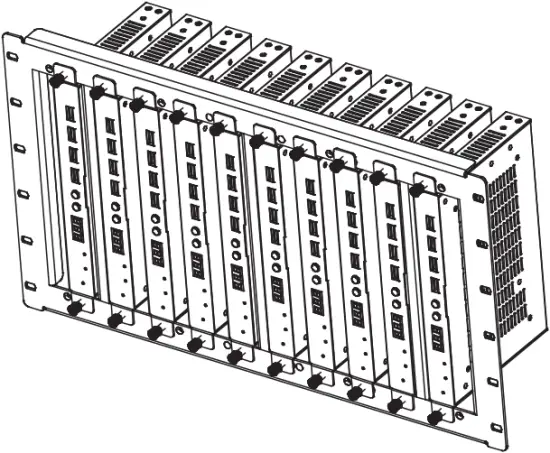
ຜະລິດຕະພັນນີ້ສາມາດຕິດຕັ້ງຢູ່ໃນ rack 6U V2 ມາດຕະຖານ (ກະລຸນາຕິດຕໍ່ຜູ້ສະຫນອງຂອງທ່ານສໍາລັບການຂາຍ rack 6U V2). ຂັ້ນຕອນການຕິດຕັ້ງແມ່ນດັ່ງຕໍ່ໄປນີ້:
ຂັ້ນຕອນທີ 1: ໃຊ້ສະກູທີ່ປະກອບມາເພື່ອແກ້ໄຂສອງຫູຍຶດໃສ່ຜະລິດຕະພັນ, ດັ່ງທີ່ສະແດງຢູ່ໃນຮູບຂ້າງລຸ່ມນີ້:
ຂັ້ນຕອນທີ 2: ໃສ່ຜະລິດຕະພັນທີ່ມີຫູຍຶດເຂົ້າໄປໃນ rack 6U V2 (6/8/10 ຫນ່ວຍສາມາດຕິດຕັ້ງຕາມແນວຕັ້ງ), ດັ່ງທີ່ສະແດງຢູ່ໃນຮູບຂ້າງລຸ່ມນີ້:
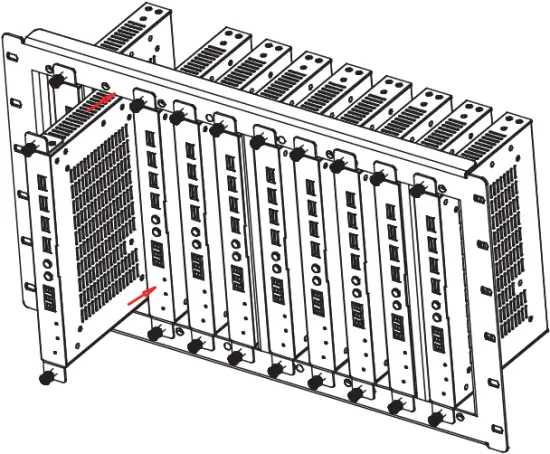
ຂັ້ນຕອນທີ 3: ໃຊ້ສະກູເພື່ອແກ້ໄຂຫູຍຶດໃສ່ rack ເພື່ອເຮັດສໍາເລັດການຕິດຕັ້ງ, ດັ່ງທີ່ສະແດງຢູ່ໃນຮູບຂ້າງລຸ່ມນີ້:
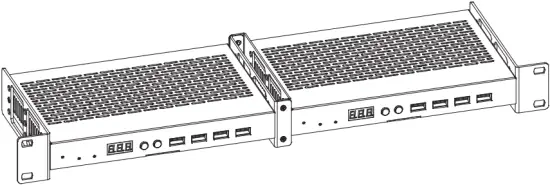
6.2 1U V2 ການຕິດຕັ້ງ Rack
ຜະລິດຕະພັນນີ້ຍັງສາມາດຕິດຕັ້ງຢູ່ໃນ rack 1U V2 ມາດຕະຖານ (2 ຫນ່ວຍສາມາດຕິດຕັ້ງຕາມແນວນອນ). ຂັ້ນຕອນການຕິດຕັ້ງແມ່ນດັ່ງຕໍ່ໄປນີ້:
ຂັ້ນຕອນທີ 1: ໃຊ້ screws ລວມເພື່ອແກ້ໄຂສອງວົງເລັບ 1U V2 ໃນສອງຜະລິດຕະພັນຕາມລໍາດັບ, ດັ່ງທີ່ສະແດງຢູ່ໃນຮູບຂ້າງລຸ່ມນີ້:
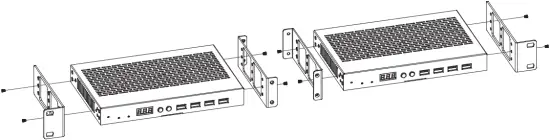
ຂັ້ນຕອນທີ 2: ໃຊ້ສະກູເພື່ອແກ້ໄຂສອງວົງເລັບ 1U V2 ຮ່ວມກັນ, ດັ່ງທີ່ສະແດງຢູ່ໃນຮູບຂ້າງລຸ່ມນີ້:

ຂັ້ນຕອນທີ 3: ຍຶດສະກູລະຫວ່າງສອງວົງເລັບ 1U V2, ດັ່ງນັ້ນສອງຜະລິດຕະພັນຖືກຕິດຢູ່ໃນ rack 1U V2, ດັ່ງທີ່ສະແດງຢູ່ໃນຮູບຂ້າງລຸ່ມນີ້:
7. ບົດແນະນຳການດຳເນີນງານຂອງ MJPEG Substream
7.1 MJPEG Substream Preview/ ການຕັ້ງຄ່າຜ່ານ Web ໜ້າ
The product supports playing MJPEG Substream on computer through the corresponding software such as ເຄື່ອງຫຼິ້ນສື່ VLC, ພ້ອມກັນນັ້ນທ່ານສາມາດເຂົ້າເຖິງໄດ້ Web ໜ້າເພື່ອກຳນົດຄ່າ MJPEG Substream.
ປະຕິບັດຕາມຂັ້ນຕອນຂ້າງລຸ່ມນີ້ເພື່ອທາງສ່ວນຫນ້າຂອງview ແລະກຳນົດຄ່າ MJPEG Substream.
ຂັ້ນຕອນທີ 1: ເຊື່ອມຕໍ່ຕົວເຂົ້າລະຫັດ, ຕົວຖອດລະຫັດ ແລະ PC ກັບ Switcher ດຽວກັນ, ຈາກນັ້ນເຊື່ອມຕໍ່ອຸປະກອນແຫຼ່ງ HDMI ແລະການສະຫນອງພະລັງງານ. ແຜນວາດການເຊື່ອມຕໍ່ແມ່ນສະແດງໃຫ້ເຫັນຂ້າງລຸ່ມນີ້.
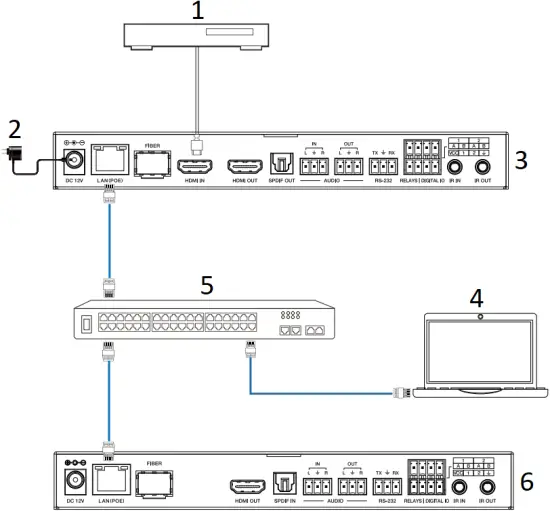
- Blu-ray Player
- Power Adapter
- ຕົວເຂົ້າລະຫັດ
- PC
- ຫຼັບ Ethernet 1G
- ຕົວຖອດລະຫັດ
ຂັ້ນຕອນທີ 2: Install a bonjour protocol checking tool (such as zeroconfService Browser) on PC to find the IP address of the Encoder/Decoder.
ເອົາ zeroconfServiceBrowser ເປັນ exampເລ. ຫຼັງຈາກເປີດຊອບແວ, ທ່ານສາມາດເລືອກ "ຜູ້ຈັດການກຸ່ມເຮັດວຽກ" ໃນການບໍລິການຂອງຕົວທ່ອງເວັບ, ເລືອກຊື່ເຈົ້າພາບໃນ Service-Instances, ແລະຊອກຫາທີ່ຢູ່ IP ໃນລາຍການທີ່ຢູ່ໃນ Instance-Info.
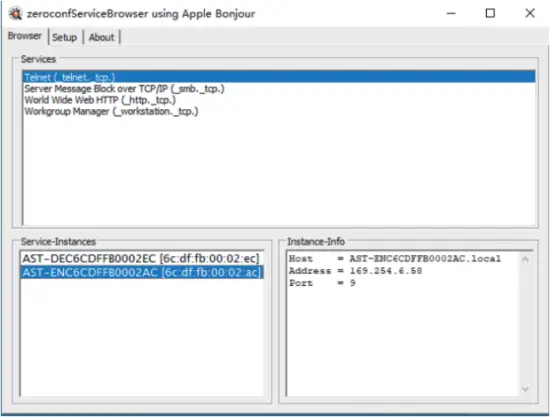
ໝາຍເຫດ:
(1) ປ່ອງຢ້ຽມໃນແຈເບື້ອງຊ້າຍລຸ່ມສະແດງຊື່ເຈົ້າພາບຂອງອຸປະກອນທັງຫມົດໃນເຄືອຂ່າຍປະຈຸບັນ.
(2) The window in the lower right corner displays the Host name, IP address and Port number of the device.
(3) The Host name of Encoder starts with AST-ENC; the Host name of Decoder starts with AST-DEC.
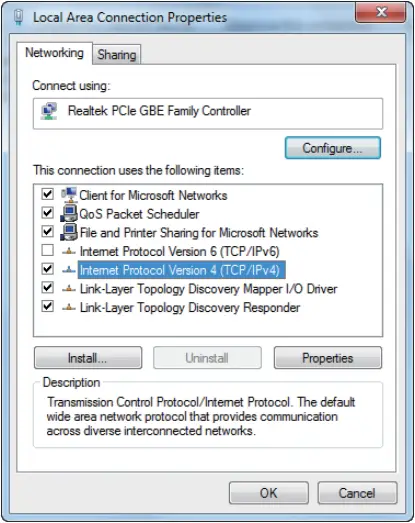
ຂັ້ນຕອນທີ 3: ຕັ້ງທີ່ຢູ່ IP ຂອງ PC ໃຫ້ກັບພາກສ່ວນເຄືອຂ່າຍດຽວກັນກັບທີ່ຢູ່ IP ຂອງຕົວເຂົ້າລະຫັດ/ຕົວຖອດລະຫັດທີ່ພົບໃນຂັ້ນຕອນທີ 2.

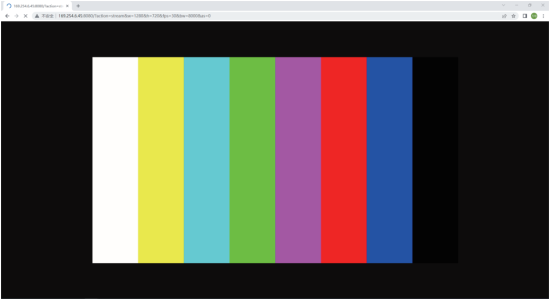
ຂັ້ນຕອນທີ 4: ອີງຕາມທີ່ຢູ່ IP ຂອງຕົວເຂົ້າລະຫັດ/ຕົວຖອດລະຫັດທີ່ພົບເຫັນຜ່ານເຄື່ອງມືກວດສອບໂປໂຕຄອນ bonjour, ໃຫ້ໃສ່ “http://IP:PORT/?action=stream” ເຂົ້າໄປໃນ web browser ໃນ PC. MJPEG Substream ຈະຖືກສະແດງດ້ວຍຄວາມລະອຽດເລີ່ມຕົ້ນ, ດັ່ງທີ່ສະແດງຢູ່ໃນຮູບຂ້າງລຸ່ມນີ້.
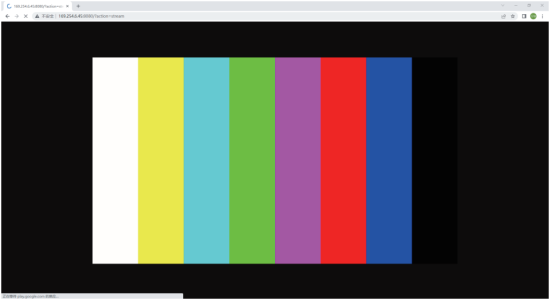
ຂັ້ນຕອນທີ 5: ປ່ຽນຄວາມລະອຽດຂອງທີ່ຢູ່ IP ຕົວເຂົ້າລະຫັດ/ຕົວຖອດລະຫັດທີ່ໄດ້ຮັບໃນຮູບແບບຕໍ່ໄປນີ້.
http://IP:PORT/?action=stream&w=x&h=x&fps=x&bw=x&as=x&mq=x
- WIDTH: [ທາງເລືອກ] ຄວາມກວ້າງຂອງຮູບ. ໃນ pixels. 'x' ຫມາຍຄວາມວ່າບໍ່ມີການປ່ຽນແປງ.
ຄ່າເລີ່ມຕົ້ນແມ່ນ 640. - HEIGHT: [ທາງເລືອກ] ຄວາມສູງຂອງຮູບ. ໃນ pixels. 'x' ຫມາຍຄວາມວ່າບໍ່ມີການປ່ຽນແປງ.
ຄ່າເລີ່ມຕົ້ນແມ່ນ 360. - FRAMERATE: [ທາງເລືອກ] ອັດຕາເຟຣມຂອງສະຕຣີມຍ່ອຍ.
ຫນ່ວຍງານ: fps (ເຟຣມຕໍ່ວິນາທີ). 'x' ຫມາຍຄວາມວ່າບໍ່ມີການປ່ຽນແປງ. ຄ່າເລີ່ມຕົ້ນແມ່ນ 30. - BW: [ທາງເລືອກ] ແບນວິດສູງສຸດຂອງການຈະລາຈອນຍ່ອຍ.
ຫົວໜ່ວຍ: Kbps (Kbits ຕໍ່ວິນາທີ). 'x' ຫມາຍຄວາມວ່າບໍ່ມີການປ່ຽນແປງ. ຄ່າເລີ່ມຕົ້ນແມ່ນ 8000 (8Mbps). - AS: [ທາງເລືອກ] ການຕັ້ງຄ່າອັດຕາສ່ວນ. 'x' ຫມາຍຄວາມວ່າບໍ່ມີການປ່ຽນແປງ. ຄ່າເລີ່ມຕົ້ນແມ່ນ 0.
- 0: ຂະຫຍາຍໄປສູ່ສິ່ງທີ່ “WIDTH” ແລະ “HEIGHT” ກຳນົດຄ່າ
- 1: [A1 only] keep original aspect ratio and place in the center of output (letterboxing or pillarboxing)
- MINQ: [ທາງເລືອກ] ຈໍານວນຄຸນນະພາບຮູບຕໍາ່ສຸດທີ່. ຊ່ວງ: 10, 20, …, 90, 100, ການຕັ້ງຄ່າທີ່ສູງຂຶ້ນຫມາຍເຖິງຄຸນນະພາບຮູບພາບທີ່ດີກວ່າ. 'x' ຫມາຍຄວາມວ່າບໍ່ມີການປ່ຽນແປງ. ຄ່າເລີ່ມຕົ້ນແມ່ນ 10. ຈຳກັດຕົວເລກຄຸນນະພາບຂັ້ນຕ່ຳຂອງການຄວບຄຸມແບນວິດອັດຕະໂນມັດຂອງໄດເວີ. ຖ້າຄຸນນະພາບຕ່ໍາກວ່າມູນຄ່າ MINQ, ໄດເວີຈະຫຼຸດລົງກອບໂດຍການສົ່ງກັບຂະຫນາດ 0 file.
ຫຼັງຈາກການປ່ຽນແປງ, ປ້ອນທີ່ຢູ່ IP ຕົວເຂົ້າລະຫັດ / Decoder ໃຫມ່ເຂົ້າໄປໃນ web browser ໃນ PC, MJPEG Substream ຈະຖືກສະແດງດ້ວຍຄວາມລະອຽດທີ່ຕ້ອງການ, ດັ່ງທີ່ສະແດງຢູ່ໃນຮູບຂ້າງລຸ່ມນີ້.
7.2 ຄໍາແນະນໍາ VLC Media Player
ກ່ອນອື່ນໝົດ, ປະຕິບັດຂັ້ນຕອນ 1~3 ດັ່ງທີ່ໄດ້ອະທິບາຍໄວ້ໃນບົດທີ 7.1, ຈາກນັ້ນເປີດເຄື່ອງຫຼິ້ນສື່ VLC ໃນ PC. ກະລຸນາເບິ່ງໄອຄອນຕໍ່ໄປນີ້.

ກົດ “ສື່> ເປີດເຄືອຂ່າຍ Stream”
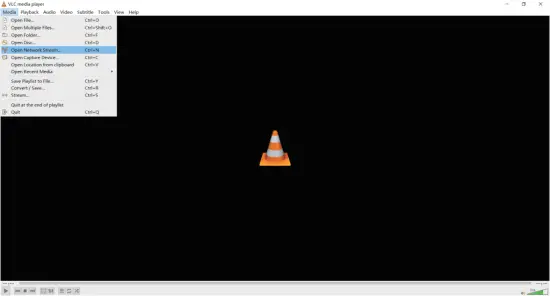
ຫຼັງຈາກທີ່ຄລິກໃສ່ "Open Network Stream" ທາງເລືອກ, ຫນ້າຕໍ່ໄປນີ້ຈະປາກົດຂຶ້ນ.
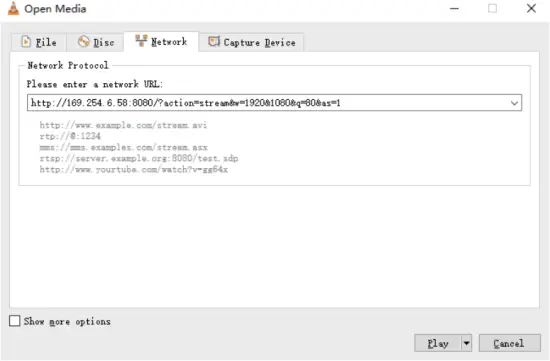
ເຂົ້າສູ່ເຄືອຂ່າຍ MJPEG Substream URL, ຫຼັງຈາກນັ້ນໃຫ້ຄລິກໃສ່ "ຫຼິ້ນ” ປຸ່ມ.
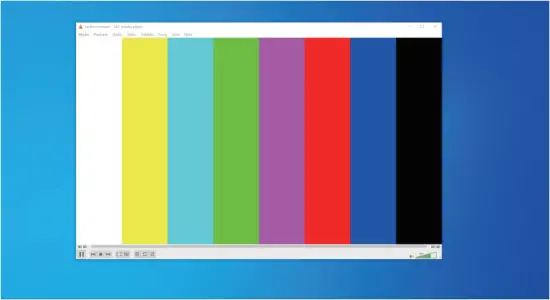
ເລືອກ “ເຄື່ອງມື> ຂໍ້ມູນ Codec“, a pop-up window will display and show you Stream information, as shown in the figure below.

ເລືອກ “ເຄື່ອງມື>ຂໍ້ມູນຕົວແປງສັນຍານ>ສະຖິຕິ” to check current Bitrate. Please see the following picture.

ຫມາຍເຫດ: ອັດຕາບິດແມ່ນລອຍຂຶ້ນແລະລົງເມື່ອທ່ານກວດເບິ່ງມັນ. ນີ້ແມ່ນປະກົດການປົກກະຕິ.
8. ສະຫຼັບຕົວແບບ
ສະວິດເຄືອຂ່າຍທີ່ໃຊ້ເພື່ອຕັ້ງຄ່າລະບົບຄວນຮອງຮັບຄຸນສົມບັດຂ້າງລຸ່ມນີ້:
- ປະເພດຂອງ layer 3/managed network Switch.
- ແບນວິດ Gigabit.
- ຄວາມສາມາດໃນການກອບ jumbo 8KB.
- IGMP snooping.
ຮູບແບບ Switch ຕໍ່ໄປນີ້ແມ່ນແນະນໍາໃຫ້ສູງ.
| ຜູ້ຜະລິດ | ໝາຍເລກຕົວແບບ |
| CISCO | CISCO SG500 |
| CISCO | ຊຸດ CATALYST |
| HUAWEI | S5720S-28X-PWR-LI-AC |
| ZyXEL | GS2210 |
| ຫຼູຫຼາ | AMS-4424P |
9. 4K ໃນໄລຍະການຄວບຄຸມລະບົບ IP
ຜະລິດຕະພັນນີ້ສາມາດຖືກຄວບຄຸມໂດຍ Controller Box ຫຼືຕົວຄວບຄຸມພາກສ່ວນທີສາມ. ສໍາລັບລາຍລະອຽດຂອງ 4K ຜ່ານການຄວບຄຸມລະບົບ IP, ກະລຸນາເບິ່ງຄູ່ມືຜູ້ໃຊ້ຂອງ "ວິດີໂອຜ່ານ IP Controller".
10. ຄໍາຮ້ອງສະຫມັກ example
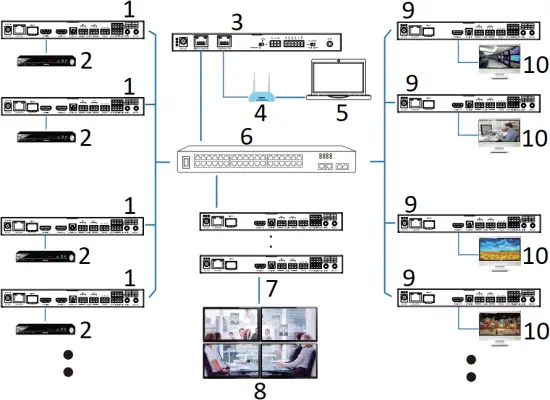
- ບໍລິສັດ ENC
- DVD
- ກ່ອງຄວບຄຸມ
- ເຣົາເຕີ (ທາງເລືອກ)
- PC
- ຫຼັບ Ethernet 1G
- 4 × DEC
- ຝາວິດີໂອ
- DEC
- TV
ໝາຍເຫດ:
(1) For the default IP mode of Control LAN port of the Controller Box is DHCP, the PC also needs to be set to “Obtain an IP address automatically” mode, and a DHCP server (e.g. network router) is required in the system.
(2) If there is no DHCP server in the system, 192.168.0.225 will be used as the IP address of Control LAN port. You need to set the IP address of the PC to be in the same network segment. For example, ຕັ້ງທີ່ຢູ່ IP ຂອງ PC ເປັນ 192.168.0.88.
(3) ທ່ານສາມາດເຂົ້າເຖິງ Web GUI ໂດຍການປ້ອນທີ່ຢູ່ IP ຂອງພອດ Control LAN (192.168.0.225) ຫຼື URL “http://controller.local” ໃນຕົວທ່ອງເວັບຂອງຄອມພິວເຕີຂອງທ່ານ.
(4) ບໍ່ຈໍາເປັນຕ້ອງສົນກັບການຕັ້ງຄ່າຂອງພອດ Video LAN ຂອງກ່ອງຄວບຄຸມ, ພວກເຂົາເຈົ້າໄດ້ຖືກຈັດການໂດຍ Controller ອັດຕະໂນມັດ (ຄ່າເລີ່ມຕົ້ນ).
(5) ເມື່ອສະວິດເຄືອຂ່າຍບໍ່ຮອງຮັບ PoE, ຕົວເຂົ້າລະຫັດ, ຕົວຖອດລະຫັດ ແລະກ່ອງຄວບຄຸມຄວນຖືກຂັບເຄື່ອນໂດຍອະແດບເຕີໄຟຟ້າ DC.
![]()
ຂໍ້ກໍານົດ HDMI ແລະ HDMI High-Definition Multimedia interface, ແລະ HDMI Logo ແມ່ນເຄື່ອງຫມາຍການຄ້າຫຼືເຄື່ອງຫມາຍການຄ້າທີ່ຈົດທະບຽນຂອງ HDMI Licensing LLC ໃນສະຫະລັດແລະປະເທດອື່ນໆ.
ການບໍລິການລູກຄ້າ
ການສົ່ງຄືນຜະລິດຕະພັນໃຫ້ກັບການບໍລິການລູກຄ້າຂອງພວກເຮົາຫມາຍເຖິງການຕົກລົງຢ່າງເຕັມທີ່ຂອງຂໍ້ກໍານົດແລະເງື່ອນໄຂຕໍ່ໄປນີ້. ມີຂໍ້ກໍານົດແລະເງື່ອນໄຂອາດຈະມີການປ່ຽນແປງໂດຍບໍ່ມີການແຈ້ງລ່ວງຫນ້າ.
1) ການຮັບປະກັນ
ໄລຍະເວລາຮັບປະກັນຈໍາກັດຂອງຜະລິດຕະພັນແມ່ນຄົງທີ່ສາມປີ.
2) ຂອບເຂດ
ຂໍ້ກໍານົດແລະເງື່ອນໄຂຂອງການບໍລິການລູກຄ້າເຫຼົ່ານີ້ນໍາໃຊ້ກັບການບໍລິການລູກຄ້າທີ່ສະຫນອງໃຫ້ສໍາລັບຜະລິດຕະພັນຫຼືລາຍການອື່ນໆທີ່ຂາຍໂດຍຜູ້ຈັດຈໍາຫນ່າຍທີ່ໄດ້ຮັບອະນຸຍາດເທົ່ານັ້ນ.
3) ການຍົກເວັ້ນການຮັບປະກັນ:
- ໝົດອາຍຸການຮັບປະກັນ.
- Factory applied serial number has been altered or removed from the Product.
- ຄວາມເສຍຫາຍ, ການເຊື່ອມໂຊມຫຼືຄວາມຜິດພາດທີ່ເກີດຈາກ:
✓ ການສວມໃສ່ແລະ tear ປົກກະຕິ.
✓ ການນໍາໃຊ້ອຸປະກອນຫຼືພາກສ່ວນທີ່ບໍ່ໄດ້ຕາມສະເພາະຂອງພວກເຮົາ.
✓ ບໍ່ມີໃບຢັ້ງຢືນ ຫຼືໃບແຈ້ງໜີ້ທີ່ເປັນຫຼັກຖານການຮັບປະກັນ.
✓ ຮູບແບບຜະລິດຕະພັນທີ່ສະແດງຢູ່ໃນບັດຮັບປະກັນບໍ່ກົງກັບຮູບແບບຂອງຜະລິດຕະພັນສໍາລັບການສ້ອມແປງຫຼືມີການປ່ຽນແປງ.
✓ ຄວາມເສຍຫາຍຈາກເຫດຮ້າຍແຮງ.
✓ ການບໍລິການບໍ່ໄດ້ຮັບອະນຸຍາດຈາກຕົວແທນຈໍາໜ່າຍ.
✓ ສາເຫດອື່ນໆທີ່ບໍ່ກ່ຽວຂ້ອງກັບຄວາມຜິດປົກກະຕິຂອງຜະລິດຕະພັນ. - ຄ່າຂົນສົ່ງ, ຄ່າຕິດຕັ້ງຫຼືຄ່າແຮງງານສໍາລັບການຕິດຕັ້ງຫຼືການຕິດຕັ້ງຜະລິດຕະພັນ.
4) ເອກະສານ:
ການບໍລິການລູກຄ້າຈະຍອມຮັບຜະລິດຕະພັນທີ່ບົກພ່ອງໃນຂອບເຂດການຮັບປະກັນໃນເງື່ອນໄຂດຽວທີ່ຄວາມພ່າຍແພ້ໄດ້ຖືກກໍານົດຢ່າງຈະແຈ້ງ, ແລະເມື່ອໄດ້ຮັບເອກະສານຫຼືສໍາເນົາໃບແຈ້ງຫນີ້, ຊີ້ບອກວັນທີຂອງການຊື້, ປະເພດຂອງຜະລິດຕະພັນ, ໄດ້. ເລກລໍາດັບ, ແລະຊື່ຂອງຜູ້ຈັດຈໍາຫນ່າຍ.
ຂໍ້ສັງເກດ: ກະລຸນາຕິດຕໍ່ຜູ້ຈັດຈໍາຫນ່າຍໃນທ້ອງຖິ່ນຂອງທ່ານສໍາລັບການຊ່ວຍເຫຼືອຫຼືການແກ້ໄຂເພີ່ມເຕີມ.
ເອກະສານ / ຊັບພະຍາກອນ
 |
VIVO LINK JPEG2000 AVoIP Encoder and Decoder [pdf] ຄູ່ມືຜູ້ໃຊ້ VLVWIP2000-ENC, VLVWIP2000-DEC, JPEG2000 AVoIP Encoder and Decoder, JPEG2000, AVoIP Encoder and Decoder, Encoder and Decoder, and Decoder |