1. ບົດແນະນຳ
This user manual provides comprehensive instructions for the installation, operation, and maintenance of your Urageuxy WS0320 Wireless Weather Station. This system is designed to monitor various indoor and outdoor environmental conditions, including temperature, humidity, wind speed, wind direction, UV index, rainfall, and barometric pressure. Please read this manual thoroughly before using the device to ensure proper setup and functionality.
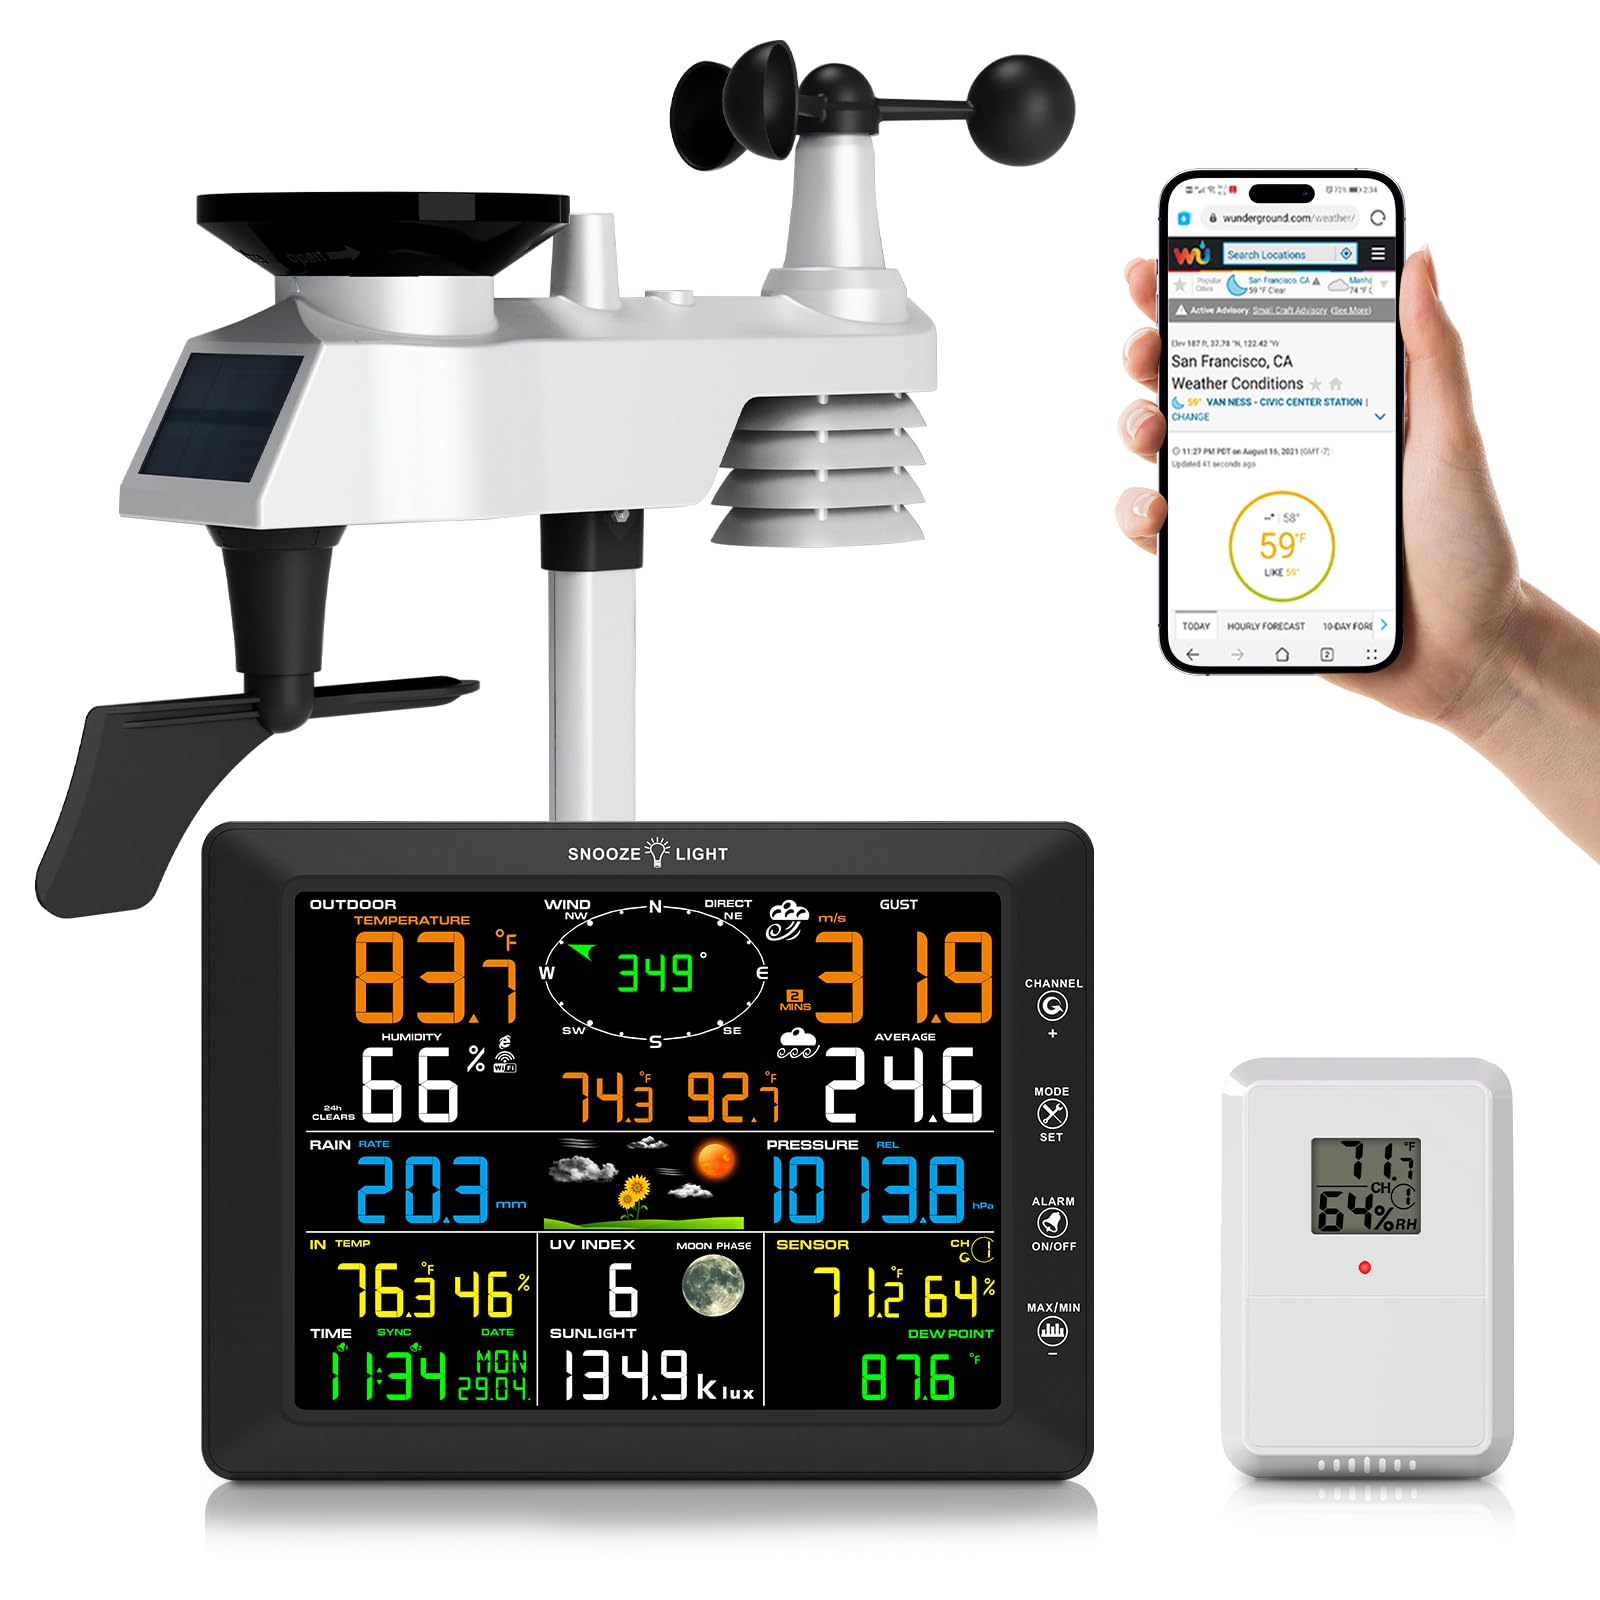
Image 1.1: Urageuxy WS0320 Weather Station, showing the main display console and the integrated outdoor sensor.
2. ເນື້ອໃນຊຸດ
ກວດສອບວ່າອົງປະກອບທັງຫມົດທີ່ລະບຸໄວ້ຂ້າງລຸ່ມນີ້ແມ່ນລວມຢູ່ໃນຊຸດຂອງທ່ານ:
- 1x Weather Station Console (Display Unit)
- 1x 7-IN-1 Integrated Outdoor Sensor
- 1x Remote Thermo-hygrometer Sensor
- 1x Foot Mounting (with pole insert)
- 1x Mounting Bracket Back Plate (for pole mount)
- 1x Mounting Pole
- 2x Pole mounting nuts (M3) / bolts (Ø3)
- 4x Pole mounting nuts (M5) / bolts (Ø5)
- 4x Tapping screws
- 1x ຄູ່ມືການສອນ

Image 2.1: Visual representation of all items included in the weather station package.
3. ຜະລິດຕະພັນເກີນview
3.1. ຄອນໂຊນຈໍສະແດງຜົນ
The main display console features an 8.3-inch color LCD screen that presents all collected weather data. It includes readings for indoor/outdoor temperature and humidity, wind speed and direction, rainfall, UV index, barometric pressure, time, date, and moon phase. The console also supports customizable alerts and adjustable backlight levels.

ຮູບພາບ 3.1: ດ້ານຫນ້າ view of the display console with all weather parameters shown.

ຮູບພາບ 3.2: ລາຍລະອຽດ view of the display console, highlighting buttons, ports, and mounting options.
3.2. 7-IN-1 Integrated Outdoor Sensor
This robust outdoor sensor unit measures wind speed, wind direction, rainfall, UV index, light intensity, outdoor temperature, and humidity. It is designed to withstand various weather conditions and transmits data wirelessly to the display console up to 328 feet (100 meters) in open areas. The unit is powered by a solar panel and backup batteries.

Image 3.3: Components of the 7-IN-1 outdoor sensor.
3.3. Remote Thermo-Hygrometer Sensor
An additional remote sensor is included to monitor temperature and humidity in a separate indoor or outdoor location. This allows for monitoring conditions in areas such as greenhouses, basements, garages, or baby rooms.

Image 3.4: The weather station system, including the remote sensor, demonstrating its wireless capabilities.
4. ຕັ້ງຄ່າ
4.1. ການສະຫນອງພະລັງງານ
ຈໍສະແດງຜົນ: The display console can be powered by the included AC adapter or by 3x AAA batteries (not included) for backup. It is recommended to use the AC adapter for continuous operation.
ເຊັນເຊີກາງແຈ້ງ: The 7-IN-1 outdoor sensor is primarily powered by its integrated solar panel. It also requires 3x AA batteries (not included) for backup power during periods of low light or nighttime operation.
ເຊັນເຊີໄລຍະໄກ: The remote thermo-hygrometer sensor requires 2x AA batteries (not included).

Image 4.1: Power supply options for the display console and outdoor sensor.
4.2. ການຕິດຕັ້ງເຊັນເຊີກາງແຈ້ງ
Install the 7-IN-1 outdoor sensor in an open area to ensure accurate readings for wind, rain, and sunlight. The sensor should be mounted on a pole or fence using the provided mounting hardware. Ensure the wind vane is oriented correctly (facing North) for accurate wind direction readings. The transmission range is up to 328 feet (100 meters) without obstacles.
- Assemble the mounting pole and attach the foot mounting or mounting bracket back plate.
- Securely attach the outdoor sensor unit to the mounting pole.
- Install the required AA batteries into the outdoor sensor's battery compartment.
- Mount the assembled sensor in your desired outdoor location, ensuring it is level using the built-in level indicator.
- Orient the wind vane to face North.
4.3. Remote Sensor Installation
Install 2x AA batteries into the remote thermo-hygrometer sensor. Place this sensor in the desired secondary monitoring location, ensuring it is within range of the main display console.
4.4. Display Console Placement
Place the display console indoors in a location where it is easily visible. It can be placed on a desktop using its integrated stand or mounted on a wall using the hanging holes. Avoid direct sunlight or heat sources that could affect indoor temperature readings.
4.5. ການເຊື່ອມຕໍ່ WiFi
The weather station supports 2.4G Wi-Fi connectivity for uploading data to online weather services like Weather Underground, WeatherCloud, and PWS weather. Follow these general steps to connect:
- Ensure your display console is powered on. The WiFi icon on the console should be flashing.
- Using a computer or smartphone, connect to the Wi-Fi network named "WeatherHome" broadcast by the console.
- ເປີດ ກ web browser and navigate to the console's setup page (usually an IP address like 192.168.1.1 or similar, refer to the full instruction manual for the exact address).
- Configure your home 2.4G Wi-Fi network details (SSID and password) on the setup page.
- Once connected, the console will attempt to upload data. You may need to create accounts on Weather Underground or WeatherCloud and enter your Station ID and Key on the console's web interface to enable data upload to these services.

Image 4.2: Steps for connecting the weather station to your home Wi-Fi network and online weather services.
5. ຄໍາແນະນໍາການດໍາເນີນງານ
5.1. ຄຸນສົມບັດການສະແດງ
The 8.3-inch color display provides real-time data. Key information displayed includes:
- ອຸນຫະພູມ ແລະ ຄວາມຊຸ່ມຊື່ນກາງແຈ້ງ: Current readings from the 7-IN-1 outdoor sensor.
- ອຸນຫະພູມ ແລະ ຄວາມຊຸ່ມຊື່ນພາຍໃນ: Current readings from the display console's internal sensor.
- ຄວາມໄວ ແລະ ທິດທາງລົມ: Real-time wind data, including gust speed and average speed.
- ຝົນ: Daily, weekly, monthly, and total rainfall accumulation.
- UV Index & Sunlight: Ultraviolet radiation level and light intensity.
- ຄວາມກົດດັນ Barometric: Current atmospheric pressure and historical trend.
- ພະຍາກອນອາກາດ: Icon-based forecast for the next 12-24 hours.
- ເວລາແລະວັນທີ: Automatically synchronized via Wi-Fi.
- ເດືອນໄລຍະ: Current lunar phase.
- Dew Point & Feels Like: Calculated values based on temperature and humidity.
5.2. ປັບ Backlight
The display console features a 4-level adjustable backlight (High, Medium, Low, Off). When the backlight is on, press the ແສງ SNOOZE / LIGHT key to cycle through the three brightness levels. To turn the backlight on permanently from the off state, press and hold the ແສງ SNOOZE / LIGHT ປຸ່ມສໍາລັບສາມວິນາທີ.

Image 5.1: Backlight adjustment levels.
5.3. Customizable Alerts
The weather station allows you to set customizable alerts for various parameters, including wind, rain, temperature, humidity, and UV index. Refer to the full instruction manual for detailed steps on setting specific alert thresholds.
5.4. Data Upload to Weather Services
Once connected to Wi-Fi and configured with your Weather Underground or WeatherCloud accounts, the station will automatically upload real-time and historical weather data. You can access this data remotely via their respective websites or mobile applications.

Image 5.2: Accessing live weather data through Wi-Fi on various devices.
6. ບໍາລຸງຮັກສາ
6.1. ທໍາຄວາມສະອາດ
- ຈໍສະແດງຜົນ: ເຊັດຈໍສະແດງຜົນແລະຄasing ມີອ່ອນ, damp ຜ້າ. ຫຼີກລ້ຽງການເຮັດຄວາມສະອາດຂັດ.
- ເຊັນເຊີກາງແຈ້ງ: Periodically check the rain collector for debris (leaves, insects) and clean as necessary to ensure accurate rainfall measurements. Ensure the wind cups and wind vane spin freely. Gently wipe the solar panel to maintain charging efficiency.
6.2. ການທົດແທນຫມໍ້ໄຟ
Replace batteries in the outdoor sensor, remote sensor, and display console (if using battery backup) when the low battery indicator appears on the display. Always use fresh, high-quality batteries of the specified type (AA for sensors, AAA for console backup).
6.3. ການປັບຕົວເຊັນເຊີ
The weather station supports manual calibration for certain parameters to ensure reliable accuracy. Refer to the advanced settings section of the full instruction manual for detailed calibration procedures.
7. ການແກ້ໄຂບັນຫາ
| ບັນຫາ | ສາເຫດທີ່ເປັນໄປໄດ້ | ການແກ້ໄຂ |
|---|---|---|
| ບໍ່ມີຂໍ້ມູນພາຍນອກສະແດງຢູ່. | Outdoor sensor not powered or out of range. | Check outdoor sensor batteries. Ensure sensor is within 328ft (100m) of the console and free from major obstructions. Re-pair the sensor if necessary (refer to full manual). |
| Incorrect wind direction. | Outdoor sensor not oriented North. | Re-orient the outdoor sensor so the wind vane points North. |
| Rainfall readings are inaccurate. | ຕົວເກັບຝົນຖືກສະກັດໂດຍຂີ້ເຫຍື້ອ. | Clean the rain collector funnel and tipping bucket mechanism. |
| ການເຊື່ອມຕໍ່ Wi-Fi ລົ້ມເຫລວ. | Incorrect Wi-Fi password, 5G network, or console too far from router. | Ensure you are connecting to a 2.4G Wi-Fi network. Double-check password. Move console closer to the router. Restart console and router. |
| Data not uploading to Weather Underground/Cloud. | Incorrect Station ID/Key or network issue. | Verify your Station ID and Key on the console's web interface. Check your internet connection. Ensure accounts are active. |
| ຈໍສະແດງຜົນມືດລົງ ຫຼື ປິດ. | ການຕັ້ງຄ່າໄຟພື້ນຫຼັງ, ບັນຫາພະລັງງານ. | Press the SNOOZE/LIGHT button to adjust backlight. Check AC adapter connection or replace AAA batteries. |
8. ຂໍ້ມູນຈໍາເພາະ
| ຄຸນສົມບັດ | ລາຍລະອຽດ |
|---|---|
| ໝາຍເລກຕົວແບບ | WS0320 |
| ປະເພດການສະແດງ | ຈໍສະແດງຜົນສີ LCD |
| ຂະ ໜາດ ຈໍສະແດງຜົນ | 8.47"W x 6.22"H x 0.87"D |
| ການເຊື່ອມຕໍ່ | Wi-Fi (2.4G) |
| ຊ່ວງເຊັນເຊີກາງແຈ້ງ | ສູງເຖິງ 328 ຟຸດ (100 ແມັດ) ໃນອາກາດເປີດ |
| ຄວາມຖືກຕ້ອງຂອງອຸນຫະພູມ | ±2°F |
| ແຫຼ່ງພະລັງງານ (ຄອນໂຊນ) | AC Adapter, 3x AAA batteries (backup, not included) |
| ແຫຼ່ງພະລັງງານ (ເຊັນເຊີກາງແຈ້ງ) | Solar Panel, 3x AA batteries (backup, not included) |
| ແຫຼ່ງພະລັງງານ (ເຊັນເຊີໄລຍະໄກ) | 2x AA ຫມໍ້ໄຟ (ບໍ່ລວມ) |
| ວັດສະດຸ | Acrylonitrile Butadiene Styrene (ABS) |
| ອົງປະກອບລວມ | Weather Station Console, 7-IN-1 Outdoor Sensor, Remote Sensor, Mounting Hardware, Instruction Manual |
9. ການຮັບປະກັນແລະການສະຫນັບສະຫນູນ
For warranty information and technical support, please refer to the contact details provided in the original product packaging or visit the official Urageuxy website. Customer reviews indicate responsive support for product issues.