1. ຜະລິດຕະພັນເກີນview
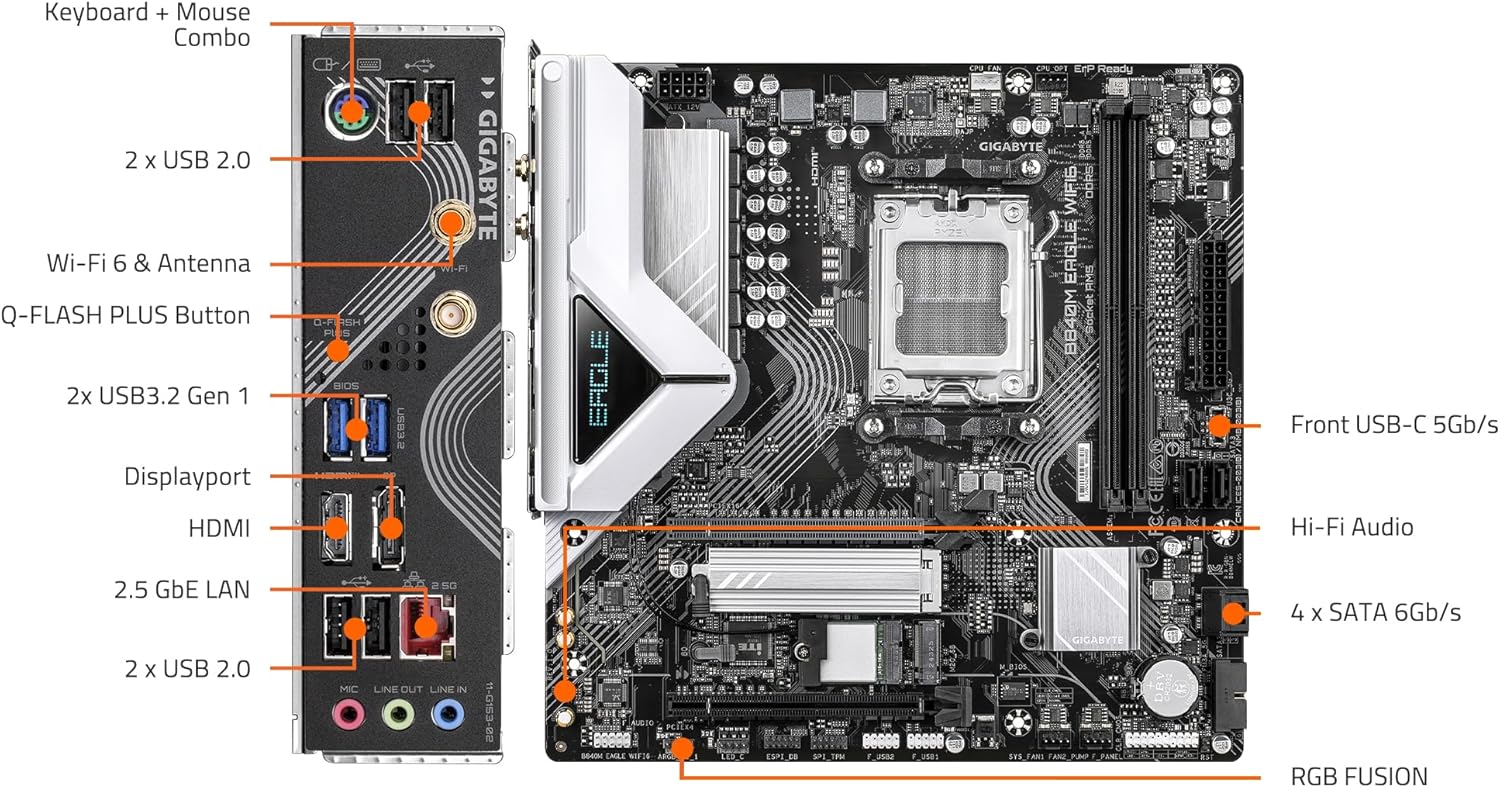
The GIGABYTE B840M Eagle WIFI6 is a Micro-ATX motherboard designed for AMD Socket AM5 processors, supporting AMD Ryzen 9000, 8000, and 7000 series. It features DDR5 memory support, dual M.2 slots, PCIe 4.0 connectivity, USB 3.2 Gen 1, WIFI6, and 2.5GbE LAN. This motherboard is engineered to provide a stable and high-performance foundation for your personal computer system.


2. ຄຸນນະສົມບັດທີ່ສໍາຄັນ
- ຊັອກເກັດ AMD AM5: ຮອງຮັບໂປເຊດເຊີ AMD Ryzen 9000 / Ryzen 8000 / Ryzen 7000 Series.
- ເຂົ້າກັນໄດ້ກັບ DDR5: Features 2 DIMM slots for DDR5 memory.
- ການອອກແບບພະລັງງານ: Robust 5+2+2 power phase design for stable performance.
- ຄວາມຮ້ອນ: Equipped with VRM and M.2 Thermal Guards for efficient heat dissipation.
- ການເຊື່ອມຕໍ່: Includes PCIe 4.0, 2x M.2 Slots, and USB-C ports.
- DIY Friendly: Features M.2 EZ-Latch, PCIe EZ-Latch, and Wi-Fi EZ-Plug for simplified installation.
- ເຄືອຂ່າຍ: Integrated WIFI6 and 2.5GbE LAN for high-speed network connectivity, plus BT 5.3.
3. ຄູ່ມືການຕິດຕັ້ງ
This section provides a general guide for installing your GIGABYTE B840M Eagle WIFI6 motherboard. Always refer to the detailed instructions provided with your CPU, RAM, and other components for specific installation procedures.
3.1. ການກະກຽມ
- ຮັບປະກັນວ່າພື້ນທີ່ເຮັດວຽກຂອງທ່ານສະອາດ ແລະ ມີແສງສະຫວ່າງພຽງພໍ.
- ປ່ອຍໄຟຟ້າສະຖິດໂດຍການສຳຜັດວັດຖຸໂລຫະທີ່ມີດິນກ່ອນທີ່ຈະຈັບຕ້ອງອົງປະກອບຕ່າງໆ.
- Gather all necessary components: CPU, CPU cooler, RAM, M.2 SSDs, graphics card, power supply, and PC case.
3.2. ການຕິດຕັ້ງ CPU
- Locate the AMD Socket AM5 on the motherboard.
- ເປີດຄັນຍຶດຊັອກເກັດ CPU.
- Carefully align the CPU with the socket, ensuring the golden triangle on the CPU matches the triangle on the socket. Do not force the CPU into place.
- ປິດລີເວີຮັກສາໄວ້ເພື່ອຮັບປະກັນ CPU.
3.3. ການຕິດຕັ້ງ CPU Cooler
Install your chosen CPU cooler according to its manufacturer's instructions. Ensure proper thermal paste application for optimal cooling.
3.4. ການຕິດຕັ້ງ RAM
- ເປີດຄລິບຢູ່ທັງສອງສົ້ນຂອງຊ່ອງ DDR5 DIMM.
- Align the RAM module with the slot, ensuring the notch on the module matches the key in the slot.
- ກົດລົງໃຫ້ແໜ້ນທັງສອງສົ້ນຂອງໂມດູນ RAM ຈົນກ່ວາ clips ເຂົ້າໄປໃນສະຖານທີ່.
3.5. ການຕິດຕັ້ງ SSD M.2
The motherboard features 2 M.2 slots with EZ-Latch. Refer to the motherboard diagram for their locations.
- Locate an M.2 slot and remove the M.2 Thermal Guard if present.
- ສຽບ M.2 SSD ເຂົ້າໄປໃນຊ່ອງໃສ່ມຸມ.
- Gently push down the SSD and secure it using the M.2 EZ-Latch mechanism.
- Reinstall the M.2 Thermal Guard.
3.6. ການຕິດຕັ້ງເມນບອດ
- Install the I/O shield into your PC case (if not pre-attached).
- ຈັດຮຽງເມນບອດກັບຈຸດຢືນຢູ່ໃນກໍລະນີ PC ຂອງທ່ານ.
- ຮັບປະກັນແຜ່ນເມນບອດດ້ວຍສະກູ, ຮັບປະກັນບໍ່ໃຫ້ແຫນ້ນ.
3.7. ການເຊື່ອມຕໍ່ພະລັງງານ
- ເຊື່ອມຕໍ່ຕົວເຊື່ອມຕໍ່ໄຟຫຼັກ ATX 24-pin ຈາກແຫຼ່ງສະໜອງໄຟຂອງທ່ານໃສ່ກັບເມນບອດ.
- Connect the 8-pin (or 4+4-pin) ATX 12V CPU power connector.
3.8. ແຜງດ້ານຫນ້າແລະການເຊື່ອມຕໍ່ອຸປະກອນຂ້າງ
Connect the front panel headers (power button, reset button, USB ports, audio jacks) and other peripherals (SATA drives, case fans) to the appropriate headers on the motherboard. Refer to the labeled diagram below for assistance.

3.9. ການຕິດຕັ້ງບັດກາຟິກ
- Open the PCIe EZ-Latch on the primary PCIe x16 slot.
- Insert your graphics card firmly into the slot until it clicks into place.
- ຍຶດກາດກຣາບຟິກເຂົ້າກັບເຄສ PC ດ້ວຍສະກູ.
- ເຊື່ອມຕໍ່ສາຍໄຟ PCIe ທີ່ຈໍາເປັນຈາກການສະຫນອງພະລັງງານຂອງທ່ານກັບບັດກາຟິກ.
4. ຄໍາແນະນໍາການດໍາເນີນງານ
4.1. ການ Boot ທໍາອິດແລະການຕັ້ງຄ່າ BIOS / UEFI
- After connecting all components and peripherals, power on your system.
- Press the designated key (usually DEL or F2) during startup to enter the BIOS/UEFI setup utility.
- Configure boot order, system time, and other essential settings as needed. Save changes and exit.
4.2. ການຕິດຕັ້ງລະບົບປະຕິບັດການ
ໃສ່ສື່ການຕິດຕັ້ງລະບົບປະຕິບັດການຂອງທ່ານ (USB drive ຫຼື DVD) ແລະປະຕິບັດຕາມການເຕືອນໃນຫນ້າຈໍເພື່ອຕິດຕັ້ງ OS ທີ່ທ່ານຕ້ອງການ.
4.3. ການຕິດຕັ້ງໄດເວີ
After OS installation, install the latest drivers for your motherboard, graphics card, and other components. You can find the latest drivers on the GIGABYTE official website for your B840M Eagle WIFI6 motherboard.
4.4. ການເຊື່ອມຕໍ່ເຄືອຂ່າຍ
- ສາຍ LAN: Connect an Ethernet cable to the 2.5GbE LAN port on the rear I/O panel.
- Wireless (WIFI6): Attach the included Wi-Fi antennas to the connectors on the rear I/O panel. Ensure Wi-Fi drivers are installed for wireless connectivity.
5. ບໍາລຸງຮັກສາ
ການບໍາລຸງຮັກສາເປັນປົກກະຕິຈະຊ່ວຍຮັບປະກັນອາຍຸຍືນແລະປະສິດທິພາບທີ່ດີທີ່ສຸດຂອງລະບົບ motherboard ແລະ PC ຂອງທ່ານ.
- ທໍາຄວາມສະອາດຂີ້ຝຸ່ນ: Periodically clean dust from inside your PC case, especially from fans, heatsinks, and motherboard components, using compressed air. Ensure the system is powered off and unplugged before cleaning.
- ອັບເດດ BIOS/UEFI: ກວດສອບ GIGABYTE website for the latest BIOS/UEFI updates. Updates can improve compatibility, stability, and performance. Follow GIGABYTE's instructions carefully when updating the BIOS.
- ອັບເດດໄດເວີ: Keep your system drivers updated to ensure compatibility and optimal performance with new software and hardware.
- ການກວດສອບອົງປະກອບ: Occasionally check all cable connections (power, data, front panel) to ensure they are secure.
6. ການແກ້ໄຂບັນຫາ
This section addresses common issues you might encounter. For more complex problems, refer to the GIGABYTE support webສະຖານທີ່ຫຼືຕິດຕໍ່ສະຫນັບສະຫນູນດ້ານວິຊາການ.
6.1. ບໍ່ມີພະລັງງານ / ບໍ່ມີ POST (Power-On Self-Test)
- ໃຫ້ແນ່ໃຈວ່າສາຍໄຟທັງໝົດ (ATX 24-pin, CPU 8-pin, ພະລັງງານ PCIe) ໄດ້ເຊື່ອມຕໍ່ກັນຢ່າງແໜ້ນໜາແລ້ວ.
- ກວດສອບການສະຫນອງໄຟໄດ້ຖືກເປີດແລະເຮັດວຽກຖືກຕ້ອງ.
- ກວດສອບການເຊື່ອມຕໍ່ແຜງດ້ານໜ້າ, ໂດຍສະເພາະຫົວປຸ່ມເປີດປິດ.
- Reseat RAM modules and the graphics card.
- Try booting with minimal components (CPU, one RAM stick, graphics card) to isolate the issue.
- Clear CMOS by removing the CMOS battery for a few minutes or using the clear CMOS jumper (refer to motherboard manual for exact location).
6.2. ຄວາມບໍ່ສະຖຽນລະພາບຂອງລະບົບ / ການຂັດຂ້ອງ
- ຮັບປະກັນວ່າໄດເວີທັງໝົດແມ່ນອັບເດດແລ້ວ.
- ກວດສອບອຸນຫະພູມ CPU ແລະ GPU ເພື່ອຫຼີກລ່ຽງການຮ້ອນເກີນໄປ.
- ເປີດໃຊ້ເຄື່ອງມືວິນິດໄສຄວາມຈຳເພື່ອກວດສອບ RAM ທີ່ຜິດພາດ.
- ກວດສອບການສະຫນອງພະລັງງານ wattage ແມ່ນພຽງພໍສໍາລັບອົງປະກອບທັງຫມົດ.
6.3. ບັນຫາການເຊື່ອມຕໍ່ເຄືອຂ່າຍ
- Wired: Check Ethernet cable connection and router/modem status. Ensure LAN drivers are installed.
- ໄຮ້ສາຍ: Ensure Wi-Fi antennas are properly attached and Wi-Fi drivers are installed. Check Wi-Fi network settings in your operating system.
6.4. Peripheral Not Detected
- Ensure the peripheral is correctly connected to the appropriate port.
- Install the latest drivers for the peripheral.
- Test the peripheral on another port or another system if possible.
7. ຂໍ້ກໍານົດດ້ານວິຊາການ
| ຄຸນສົມບັດ | ຂໍ້ມູນຈໍາເພາະ |
|---|---|
| ເຕົ້າສຽບ CPU | AMD Socket AM5 |
| ໂປເຊດເຊີທີ່ເຂົ້າກັນໄດ້ | AMD Ryzen 9000 / Ryzen 8000 / Ryzen 7000 ຊຸດ |
| ຊິບເຊັດ | AMD B840 |
| ເທກໂນໂລຍີຫນ່ວຍຄວາມຈໍາ RAM | DDR5 |
| Memory Slots | 2x DIMMs |
| ຄວາມໄວໂມງຄວາມຈຳ | Up to 5200 MHz (and higher via OC) |
| ການເກັບຮັກສາ | 2x M.2 Slots, 4x SATA 6Gb/s |
| PCIe Slots | PCIe 4.0 |
| ພອດ USB | USB 3.2 Gen 1, USB-C |
| ເຄືອຂ່າຍ | WIFI6, 2.5GbE LAN, BT 5.3 |
| ປັດໄຈແບບຟອມ | Micro-ATX |
| ຂະໜາດ (LxWxH) | 8.82 x 8.82 x 1 ນິ້ວ |
| ນ້ໍາຫນັກລາຍການ | 4.4 ປອນ |
| ສະຫນັບສະຫນູນລະບົບປະຕິບັດງານ | Windows 11 |
8. ການຮັບປະກັນແລະການສະຫນັບສະຫນູນ
For detailed warranty information, technical support, driver downloads, and BIOS updates, please visit the official GIGABYTE website. You can find product-specific support by navigating to the support section and searching for your model, B840M Eagle WIFI6.
GIGABYTE ຢ່າງເປັນທາງການ Webເວັບໄຊ: https://www.gigabyte.com/
Always ensure you are downloading software and drivers from the official manufacturer's website to prevent security risks.


