ແນະນຳ
The GAMDIAS Aura GC10m V2 WH is a micro-tower computer case designed for Micro-ATX and Mini-ITX motherboards. It features a dual-chamber design, panoramic tempered glass panels, and comes equipped with three Addressable RGB (ARGB) fans to enhance system aesthetics and cooling. This manual provides essential information for the proper installation, operation, and maintenance of your computer case.
ຮູບພາບ: ທາງຫນ້າ view of the GAMDIAS Aura GC10m V2 WH Micro-Tower Computer Case, showcasing its tempered glass panels and pre-installed ARGB fans.
ການຕິດຕັ້ງແລະການຕິດຕັ້ງ
ກ່ອນທີ່ຈະເລີ່ມການຕິດຕັ້ງ, ໃຫ້ແນ່ໃຈວ່າທ່ານມີອຸປະກອນ ແລະ ເຄື່ອງມືທີ່ຈຳເປັນທັງໝົດແລ້ວ. ໃຫ້ອ້າງອີງເຖິງຄູ່ມືການຕິດຕັ້ງສະເພາະຂອງເມນບອດ ແລະ ສ່ວນປະກອບຕ່າງໆ.
1. ການກະກຽມກໍລະນີ
Carefully remove the tempered glass side and front panels. These are typically secured with thumbscrews or a latch mechanism. Place them on a soft, flat surface to prevent scratches.

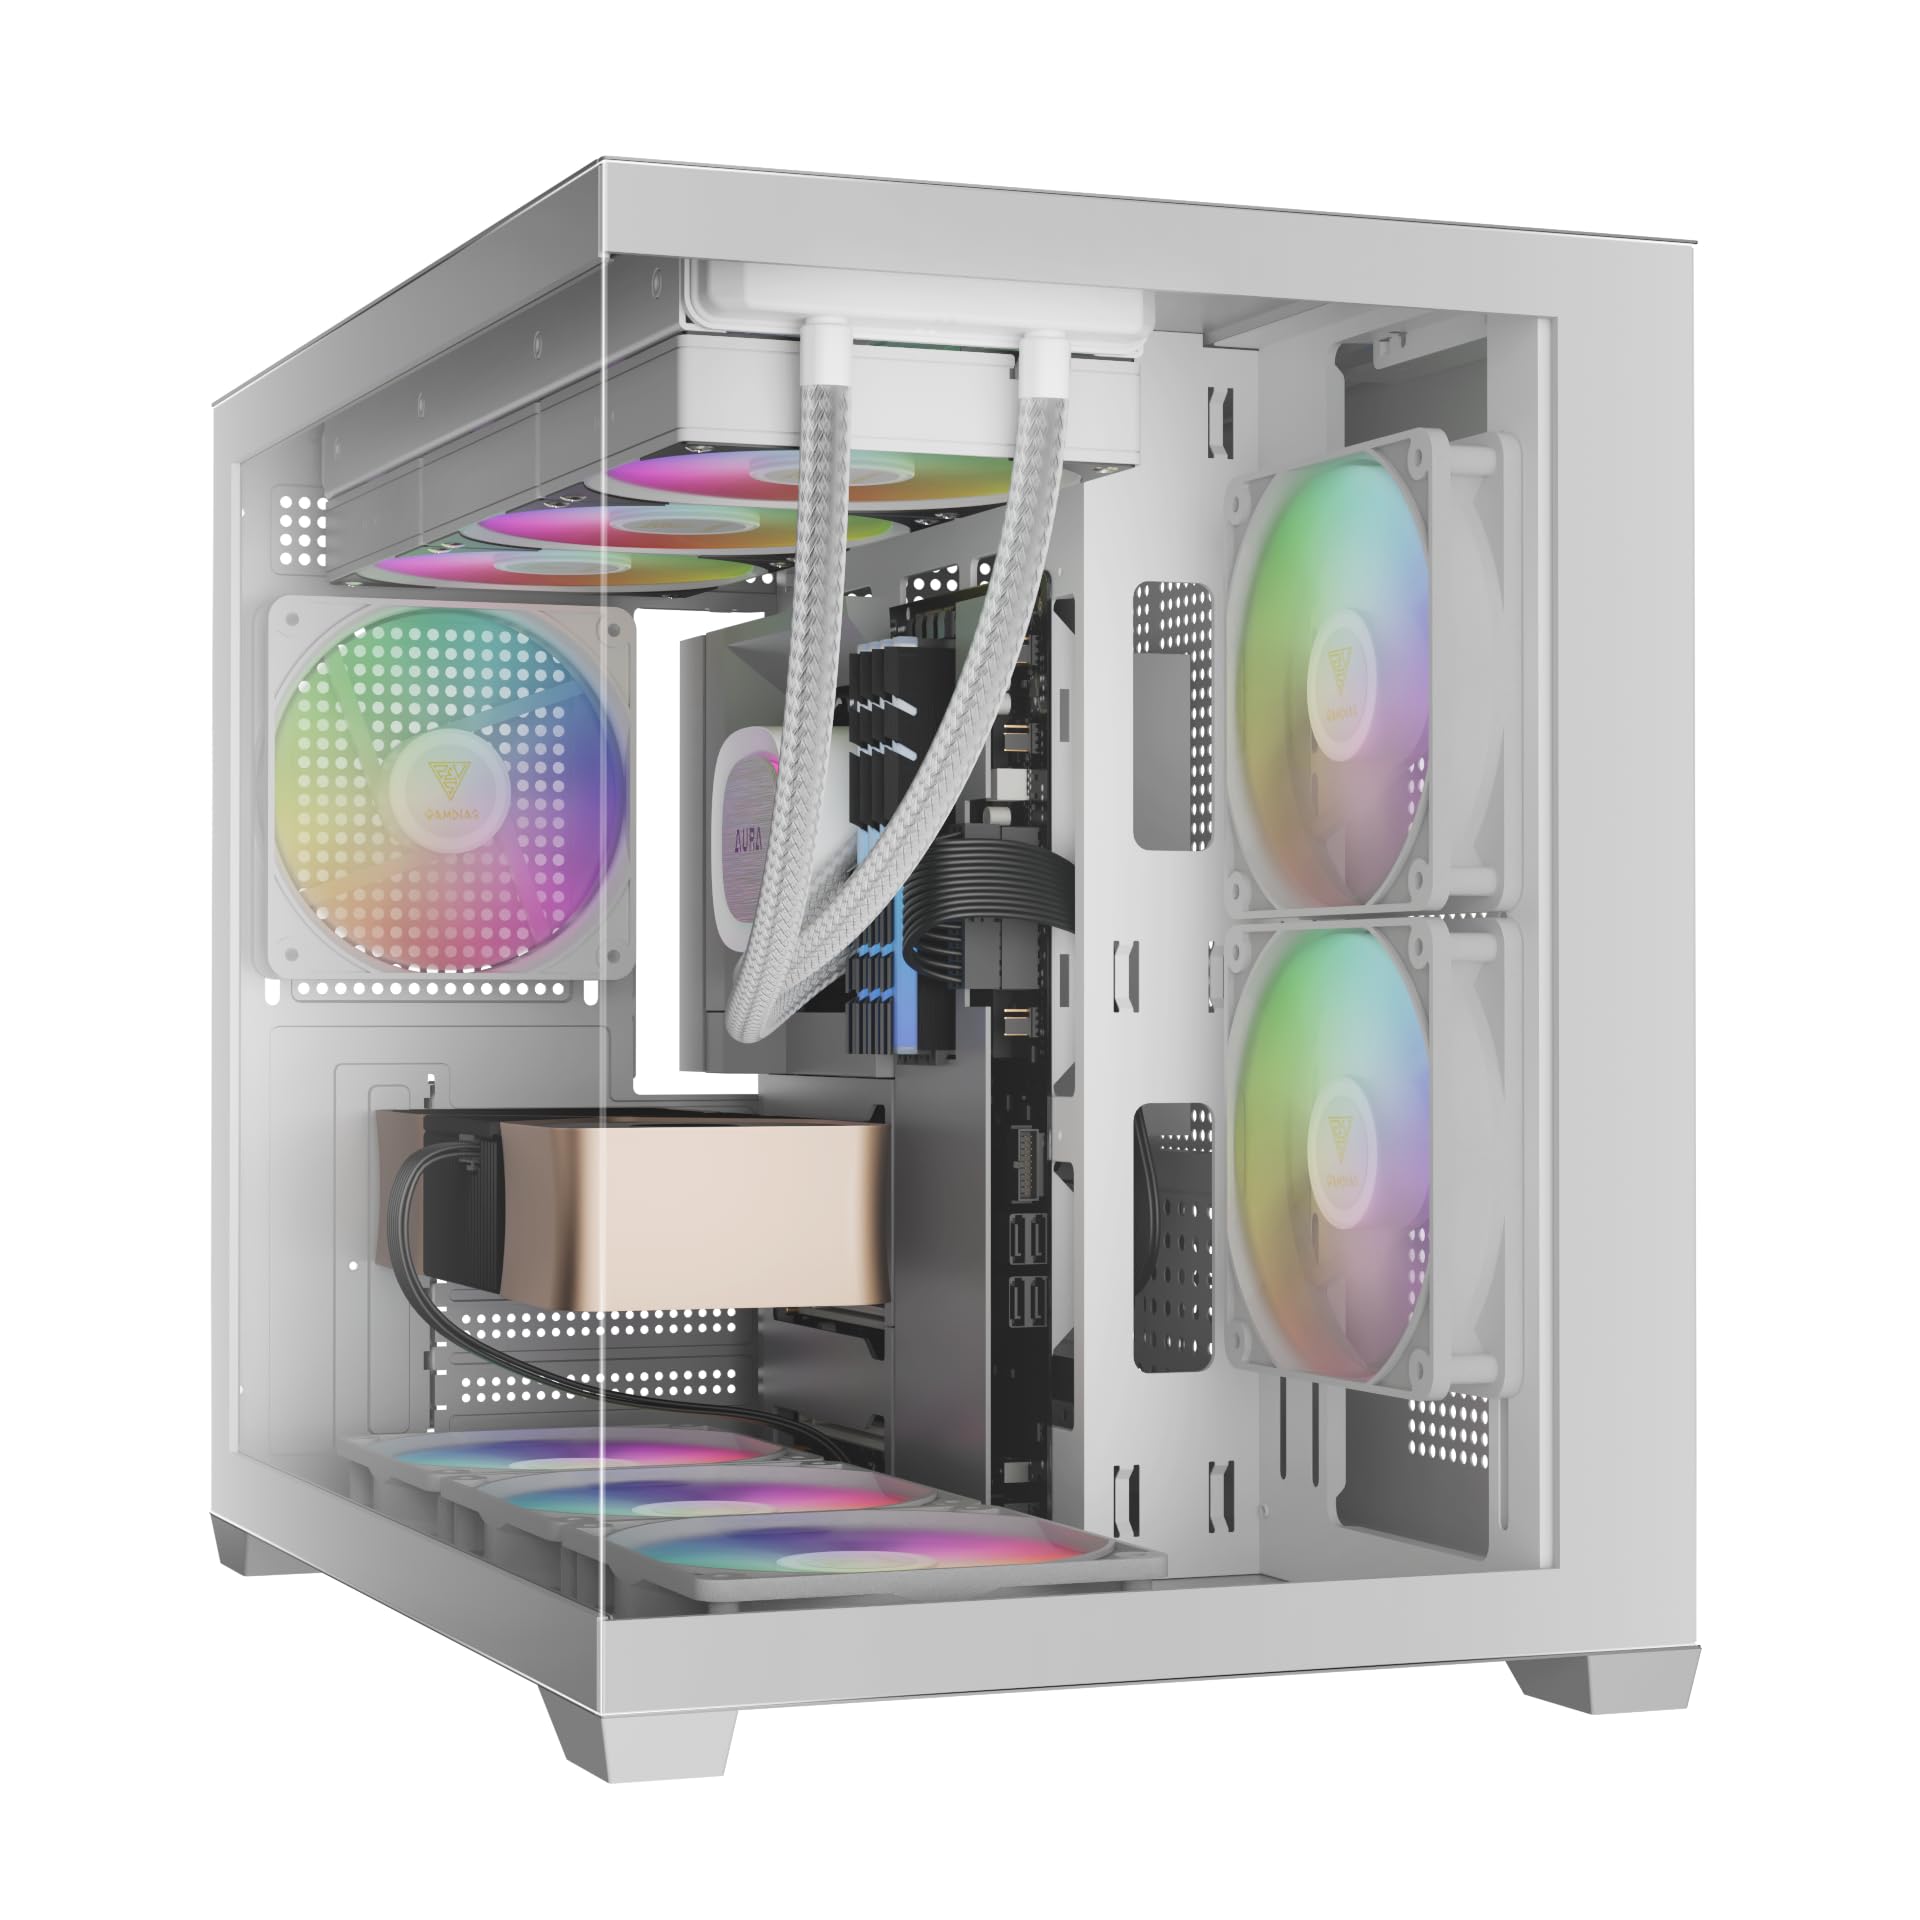
ຮູບພາບ: ມຸມ view of the case with the tempered glass side panel removed, showing the internal structure and fan mounts.
2. ການຕິດຕັ້ງເມນບອດ
- ຕິດຕັ້ງແຜ່ນປ້ອງກັນ I/O (ຖ້າບໍ່ໄດ້ຕິດກັບເມນບອດຂອງທ່ານລ່ວງໜ້າ) ເຂົ້າກັບຊ່ອງເປີດດ້ານຫຼັງຂອງເຄສ.
- Align your Micro-ATX or Mini-ITX motherboard with the standoffs inside the case.
- Secure the motherboard using the provided screws.

ຮູບພາບ: ພາຍໃນ view of the case, highlighting the motherboard tray area and fan mounting points.
3. ການຕິດຕັ້ງຫນ່ວຍບໍລິການສະຫນອງພະລັງງານ (PSU).
- Install your PSU into its designated compartment, typically at the rear bottom of the case.
- ຮັບປະກັນ PSU ດ້ວຍ screws ຈາກດ້ານຫລັງຂອງກໍລະນີ.
- Ensure the PSU fan faces the correct direction for optimal airflow (usually downwards if there's a vent, or upwards if not).

Image: Rear internal view of the case, showing the PSU mounting area and cable routing options.
4. ການຕິດຕັ້ງ Drive
- 3.5" / 2.5" Drive Bay (HDD Cage): Locate the HDD cage. Install one 3.5" HDD or one 2.5" SSD/HDD.
- 2.5" Drive Bays: The case supports three additional 2.5" SSDs/HDDs. Mount these drives to the designated brackets or locations within the case.
5. ການຕິດຕັ້ງພັດລົມແລະ radiator
The case comes with three pre-installed ARGB fans (two side, one rear). Additional fans or radiators can be installed in the following locations:
- ເທິງ: Supports 3 x 120mm or 2 x 140mm fans; 360mm or 280mm radiators.
- ດ້ານ: Supports 2 x 120mm or 2 x 140mm fans; 240mm radiators. (Pre-installed 2 x 120mm ARGB fans)
- ລຸ່ມ: ຮອງຮັບພັດລົມຂະໜາດ 120 ມມ 3 ໂຕ ຫຼື 140 ມມ 2 ໂຕ.
- ດ້ານຫຼັງ: Supports 1 x 120mm or 1 x 140mm fan; 120mm radiators. (Pre-installed 1 x 120mm ARGB fan)

ຮູບພາບ: ພາຍໃນ view showing the pre-installed ARGB fans on the side and rear, illustrating fan placement.
6. Connecting Front I/O Ports and ARGB
Connect the following cables from the case to your motherboard:
- USB 2.0: Connect the USB 2.0 header cable.
- ປະເພດ -C: Connect the USB Type-C header cable (if your motherboard supports it).
- ສຽງ HD: Connect the HD Audio header cable.
- ເປີດ/ຕັ້ງຄ່າໃໝ່/ໄຟ LED: Connect the front panel power, reset, HDD LED, and power LED cables according to your motherboard manual.
- ARGB Fans: Connect the ARGB fan cables to your motherboard's 5V ARGB header or to the integrated ARGB controller (if applicable). The case includes an LED Switch Button for controlling ARGB lighting if connected to the case's internal controller.

ຮູບພາບ: ເທິງ view of the case, showing the front I/O panel with USB ports and the LED switch button.
ການດໍາເນີນງານ
ເປີດເຄື່ອງ
Once all components are installed and connected, close the side panels. Connect your monitor, keyboard, mouse, and power cable. Press the power button on the front panel of the case to start your system.
ການຄວບຄຸມໄຟ ARGB
ພັດລົມ ARGB ທີ່ຕິດຕັ້ງໄວ້ລ່ວງໜ້າສາມາດຄວບຄຸມໄດ້ສອງວິທີຄື:
- ປຸ່ມສະຫຼັບ LED: If the ARGB fans are connected to the case's internal controller, press the dedicated LED Switch Button on the front I/O panel to cycle through various lighting effects and colors.
- ຊອບແວເມນບອດ: If the ARGB fans are connected directly to a compatible 5V ARGB header on your motherboard, you can control the lighting effects using your motherboard's proprietary RGB software (e.g., ASUS Aura Sync, MSI Mystic Light, Gigabyte RGB Fusion, ASRock Polychrome Sync).
ບໍາລຸງຮັກສາ
ການບຳລຸງຮັກສາເປັນປະຈຳຊ່ວຍຮັບປະກັນປະສິດທິພາບທີ່ດີທີ່ສຸດ ແລະ ອາຍຸການໃຊ້ງານທີ່ຍາວນານຂອງອຸປະກອນຄອມພິວເຕີຂອງທ່ານ.
- ການກັ່ນຕອງຂີ້ຝຸ່ນ: The case features removable dust filters (e.g., on the top and bottom). Periodically remove and clean these filters with compressed air or water (ensure they are completely dry before reinstallation).
- ການອະນາໄມກໍລະນີ: ໃຊ້ອ່ອນ, ງamp cloth to clean the exterior surfaces of the case. For tempered glass panels, use a glass cleaner and a microfiber cloth. Avoid abrasive cleaners.
- ການກຳຈັດຝຸ່ນພາຍໃນ: Every few months, open the case and use compressed air to remove dust from internal components, especially fan blades and heatsinks.
ການແກ້ໄຂບັນຫາ
ຖ້າທ່ານພົບບັນຫາ, ໃຫ້ພິຈາລະນາວິທີແກ້ໄຂທົ່ວໄປຕໍ່ໄປນີ້:
- ລະບົບບໍ່ເປີດ:
- ໃຫ້ແນ່ໃຈວ່າ PSU ໄດ້ເປີດແລະເຊື່ອມຕໍ່ຢ່າງຖືກຕ້ອງກັບເຕົ້າສຽບຂອງຝາ.
- Verify all power cables (24-pin ATX, CPU, GPU, drives) are securely connected.
- Check that the front panel power button cable is correctly connected to the motherboard.
- ARGB Fans Not Lighting Up/Spinning:
- Confirm ARGB cables are securely connected to a 5V ARGB header on the motherboard or the case's controller.
- Ensure fan power cables are connected to appropriate fan headers on the motherboard or PSU.
- If using motherboard software, verify it is installed and configured correctly.
- ພອດ I/O ດ້ານໜ້າບໍ່ເຮັດວຽກ:
- Check that the USB and HD Audio cables from the front panel are correctly connected to their respective headers on the motherboard.
For persistent issues, consult your motherboard manual or contact GAMDIAS support.
ຂໍ້ມູນຈໍາເພາະ
| ຕົວແບບ | AURA GC10 V2 WH |
| ປະເພດກໍລະນີ | Micro-Tower |
| ຮອງຮັບເມນບອດ | Micro-ATX, Mini-ITX |
| ຂະໜາດ (LxWxH) | 42 x 29 x 37 cm |
| ນ້ຳໜັກ | 5 ກິໂລ |
| ຂັບລົດ Bays | 1 x 3.5" or 1 x 2.5" (HDD Cage), 3 x 2.5" |
| ຜອດ I/O | 1 x Type-C, 1 x USB 2.0, 1 x HD Audio, 1 x LED Switch Button |
| ພັດລົມທີ່ຕິດຕັ້ງໄວ້ລ່ວງໜ້າ | 2 x 120mm ARGB (Side), 1 x 120mm ARGB (Rear) |
| ສະຫນັບສະຫນູນພັດລົມ |
|
| ສະຫນັບສະຫນູນ radiator |
|
| ຈຳກັດຄວາມສູງຂອງ CPU Cooler | 165ມມ |
| VGA Length Limit | 400ມມ |
| PSU Length Limit | 160ມມ |
ຂໍ້ມູນການຮັບປະກັນ
For detailed warranty terms and conditions, please refer to the official GAMDIAS webເວັບໄຊ ຫຼືບັດຮັບປະກັນລວມຢູ່ໃນຜະລິດຕະພັນຂອງທ່ານ. ຮັກສາຫຼັກຖານການຊື້ຂອງທ່ານສໍາລັບການຮ້ອງຂໍການຮັບປະກັນ.
ການຊ່ວຍເຫຼືອລູກຄ້າ
If you require further assistance or have questions regarding your GAMDIAS Aura GC10m V2 WH computer case, please contact GAMDIAS customer support.
- ຜູ້ຜະລິດ: GAMDIAS TAIWAN
- ທີ່ຢູ່: No. 113, Jian 2nd Rd., Zhonghe, Dist., New Taipei City 235, Taiwan
- ຜູ້ນໍາເຂົ້າ (ອິນເດຍ): Allway Distributions Pvt Ltd, No-49, H.B. Samajha Road, Baswangudi , Bengaluru- 560004
- ຜູ້ຕິດຕໍ່ຜູ້ນຳເຂົ້າ (ອິນເດຍ): 8904307700
- ທາງການ Webເວັບໄຊ: www.gamdias.com (ກະລຸນາກວດສອບເຈົ້າຫນ້າທີ່ website for the most up-to-date support contact information and resources.)


