1. ບົດແນະນຳ
This manual provides essential information for setting up, operating, and maintaining your CRUA 27-inch 4K UHD 60Hz IPS Monitor (Model CR270H). Please read these instructions carefully before using the monitor to ensure proper functionality and to prevent damage.
2. ເນື້ອໃນຊຸດ
ກວດສອບວ່າລາຍການທັງຫມົດທີ່ລະບຸໄວ້ຂ້າງລຸ່ມນີ້ແມ່ນມີຢູ່ໃນຊຸດຂອງທ່ານ. ຖ້າລາຍການໃດຂາດຫາຍໄປຫຼືເສຍຫາຍ, ກະລຸນາຕິດຕໍ່ຝ່າຍຊ່ວຍເຫຼືອລູກຄ້າ.
- CRUA 27-inch Monitor
- ຖານຕິດຕາມກວດກາ
- Monitor Support Arm
- ສາຍ DP (ສາຍ DisplayPort)
- Type-C Data Transmission Cable
- ຫນ່ວຍບໍລິການສະຫນອງພະລັງງານ
- ຄູ່ມືຜູ້ໃຊ້ (ເອກະສານນີ້)
3. ຄໍາແນະນໍາການຕິດຕັ້ງ
3.1 ການປະກອບຂາຕັ້ງ
- Carefully remove the monitor from its packaging, placing it face down on a soft, clean surface to prevent screen damage.
- Attach the monitor support arm to the monitor panel. Ensure it clicks securely into place.
- Attach the monitor base to the support arm. Tighten any screws if provided, typically located on the underside of the base.
- ວາງຈໍສະແດງຜົນທີ່ປະກອບໃສ່ໃນພື້ນທີ່ຮາບພຽງທີ່ຫມັ້ນຄົງ.
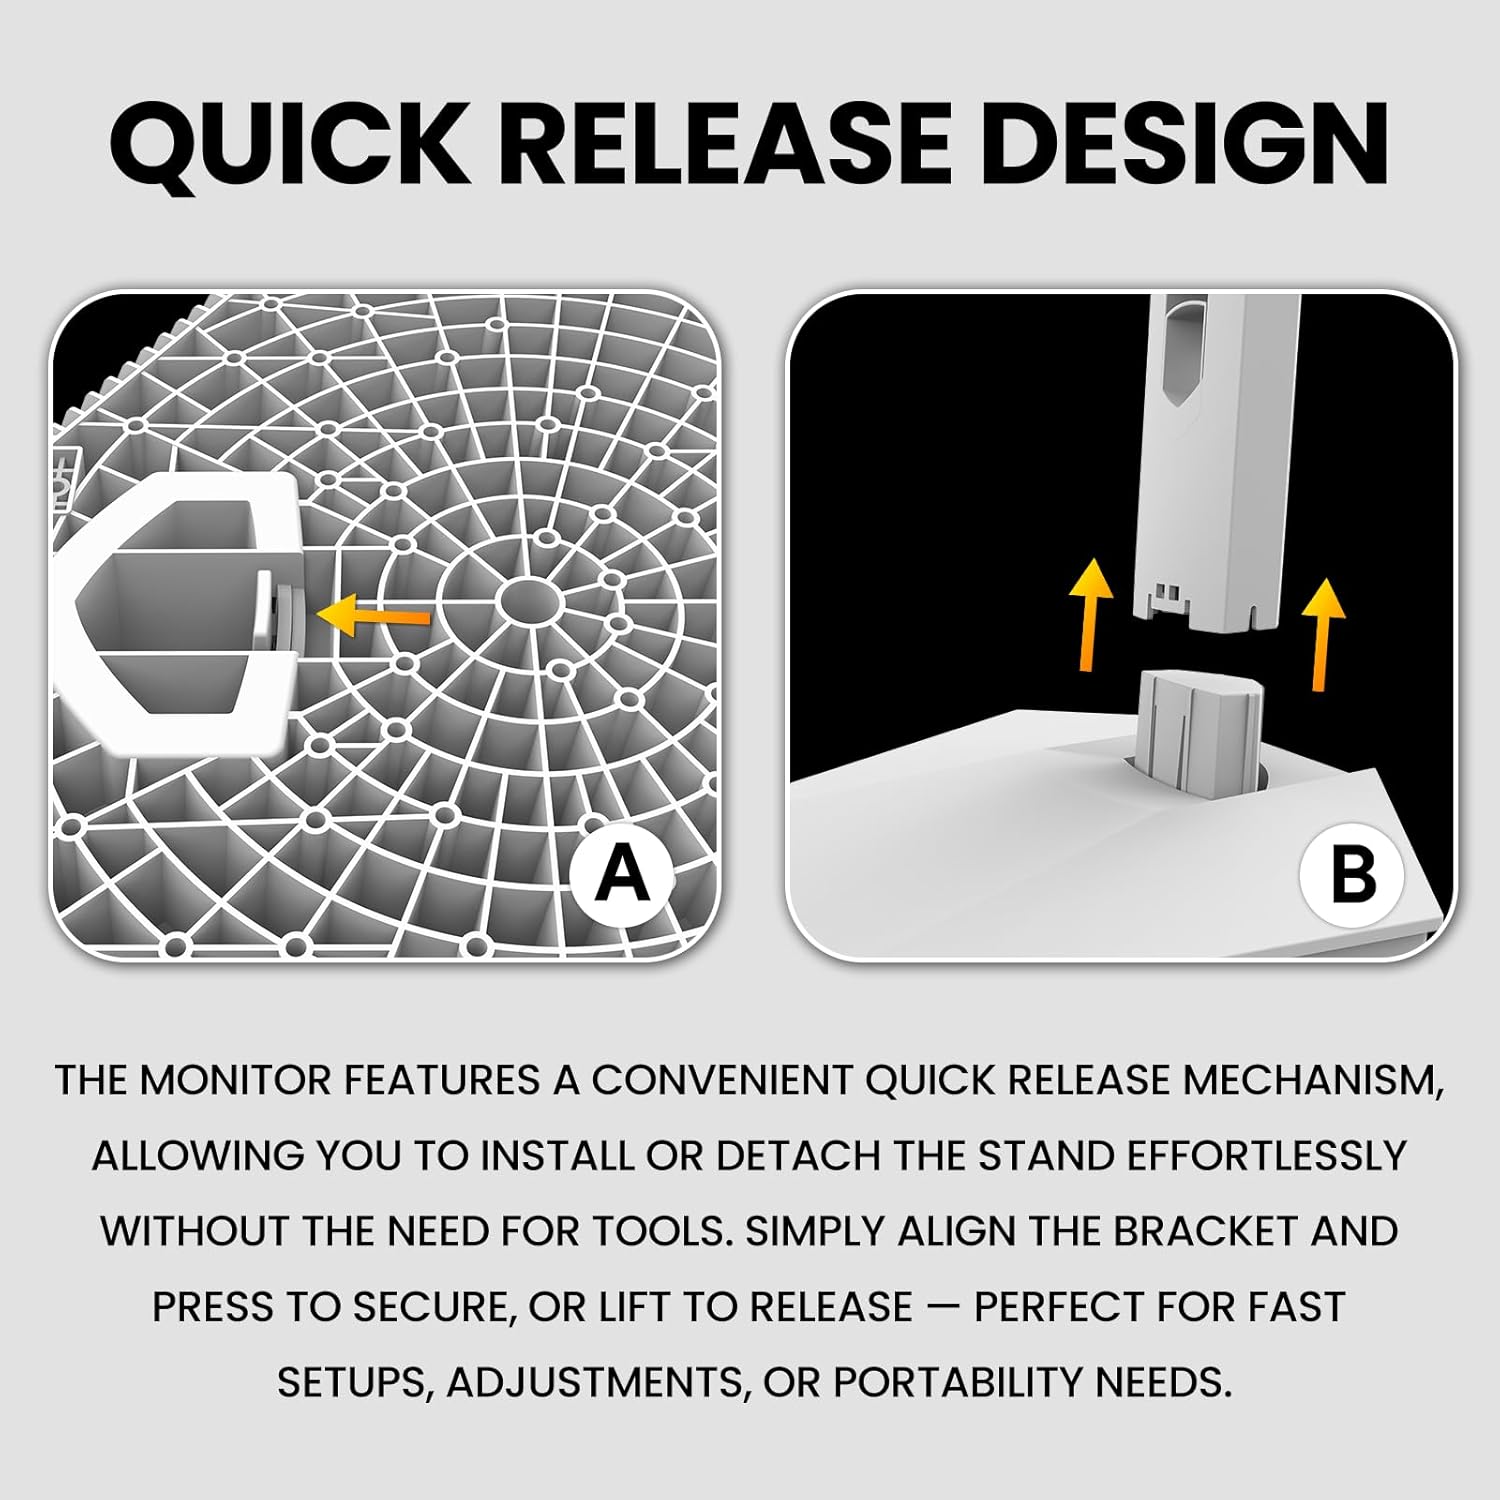
Figure 3.1: Quick Release Design for Stand Assembly. Align the bracket and press to secure, or lift to release.
3.2 ເຊື່ອມຕໍ່ກັບຄອມພິວເຕີ້
The monitor supports DisplayPort (DP 1.4), HDMI (HDMI 2.0), and USB Type-C connections.
- ກວດໃຫ້ແນ່ໃຈວ່າທັງຈໍ ແລະຄອມພິວເຕີຂອງທ່ານປິດຢູ່.
- Connect one end of the appropriate video cable (DP, HDMI, or Type-C) to the corresponding port on the monitor.
- Connect the other end of the video cable to the video output port on your computer.
- Connect the power supply unit to the monitor's power input, then plug the power cord into an electrical outlet.
- (Optional) For USB Type-C connectivity, use the provided Type-C cable to connect your device. This port supports charging and data transfer.

Figure 3.2: Monitor Connectivity Ports. Includes DisplayPort, HDMI, USB Type-C, and Audio Out.
3.3 ການຕິດຝາ (ທາງເລືອກ)
The monitor supports VESA wall mounts with a 75mm x 75mm pattern.
- Remove the stand from the monitor if it is already attached.
- ແນບຕົວຍຶດຕິດຝາທີ່ເຂົ້າກັນໄດ້ກັບ VESA ຂອງທ່ານ (ບໍ່ລວມ) ໃສ່ກັບຮູສະກູສີ່ຮູຢູ່ດ້ານຫຼັງຂອງຈໍພາບ.
- ປະຕິບັດຕາມຄໍາແນະນໍາທີ່ສະຫນອງໃຫ້ກັບການຕິດຝາຂອງທ່ານສໍາລັບການຕິດຕັ້ງທີ່ປອດໄພ.

Figure 3.3: VESA Wall Mount (75x75mm) and Tilt Adjustment.
4. ຄໍາແນະນໍາການດໍາເນີນງານ
4.1 ເປີດ/ປິດ
- To power on the monitor, press the power button located on the back or bottom of the monitor.
- ເພື່ອປິດເຄື່ອງ, ໃຫ້ກົດປຸ່ມເປີດປິດຄ້າງໄວ້ຈົນກ່ວາຈໍສະແດງຜົນຈໍສະແດງຜົນປິດ.
4.2 ການສະແດງຜົນເທິງໜ້າຈໍ (OSD) ເມນູນໍາທາງ
The OSD menu allows you to adjust various monitor settings. Use the control buttons (typically located on the back or bottom of the monitor) to navigate.
- ກົດປຸ່ມຄວບຄຸມເພື່ອເປີດໃຊ້ເມນູ OSD.
- ໃຊ້ປຸ່ມທິດທາງເພື່ອນຳທາງຜ່ານຕົວເລືອກເມນູ.
- ກົດປຸ່ມເລືອກ/ຢືນຢັນເພື່ອເຂົ້າສູ່ເມນູຍ່ອຍ ຫຼື ຢືນຢັນການຕັ້ງຄ່າ.
- ກົດປຸ່ມອອກ/ກັບຄືນ ເພື່ອກັບຄືນຫາເມນູກ່ອນໜ້ານີ້ ຫຼື ອອກຈາກ OSD.
4.3 ການຕັ້ງຄ່າຮູບ
Adjust display characteristics such as brightness, contrast, color temperature, and aspect ratio.
- ຄວາມສະຫວ່າງ: ປັບຄວາມສະຫວ່າງໂດຍລວມຂອງໜ້າຈໍ.
- ກົງກັນຂ້າມ: ຄວບຄຸມຄວາມແຕກຕ່າງລະຫວ່າງພື້ນທີ່ສະຫວ່າງ ແລະ ມືດທີ່ສຸດຂອງຮູບພາບ.
- ອຸນຫະພູມສີ: Selects preset color temperatures (e.g., Warm, Cool, User) or allows manual adjustment.
- ອັດຕາສ່ວນ: ກຳນົດອັດຕາສ່ວນການສະແດງຜົນ (ເຊັ່ນ: 16:9, 4:3).
- ການກັ່ນຕອງແສງສີຟ້າ: Reduces blue light emission for eye comfort during extended use.

Figure 4.1: Monitor displaying vibrant colors, indicating 120% sRGB color gamut, 8-bit color depth, and 16.7 million colors.
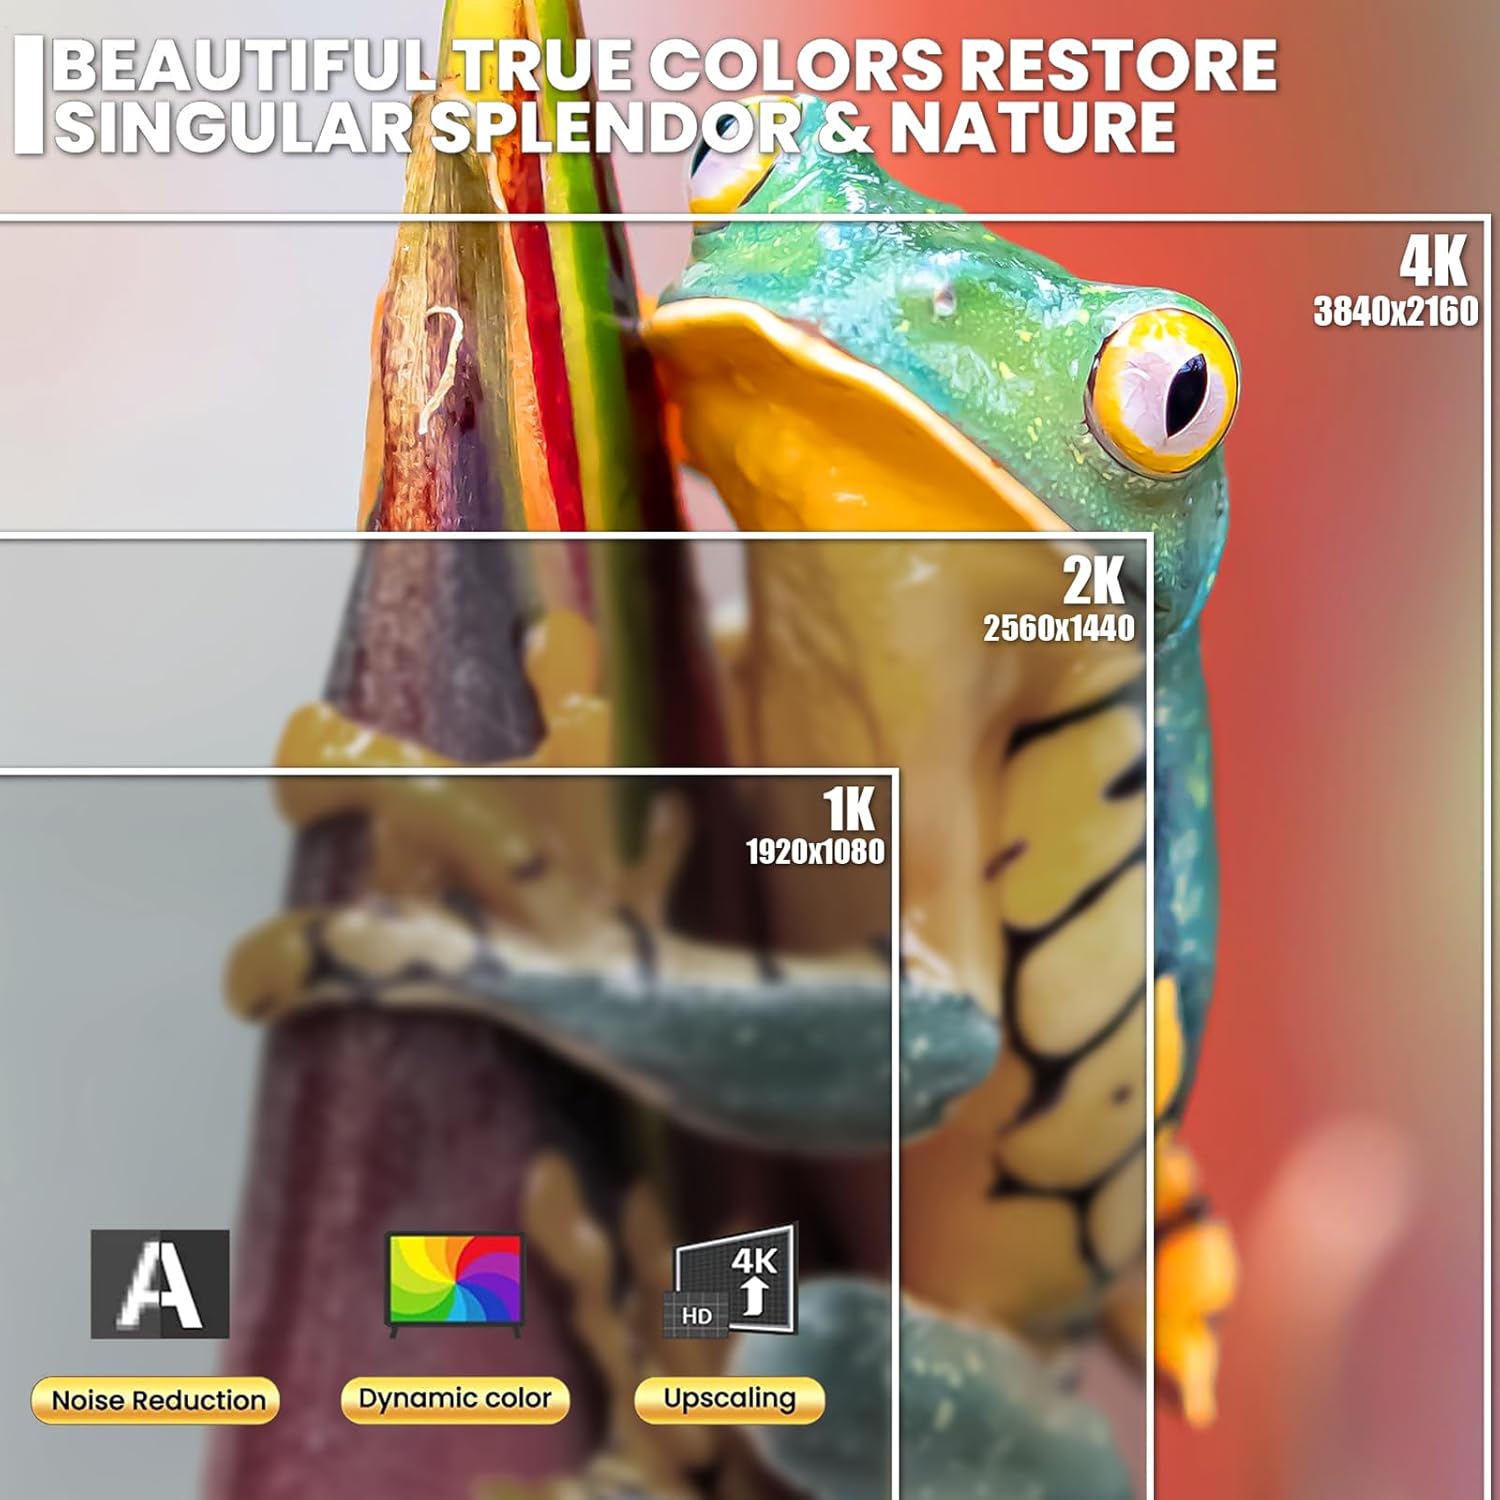
Figure 4.2: Visual comparison of 4K (3840x2160), 2K (2560x1440), and 1K (1920x1080) resolutions, demonstrating clarity and detail.
4.4 ການຕັ້ງຄ່າສຽງ
The monitor includes built-in speakers. Adjust volume through the OSD menu or your connected device.
- ປະລິມານ: Adjusts the output level of the built-in speakers.
- ປິດສຽງ: Toggles sound output on or off.
4.5 AMD FreeSync
This monitor supports AMD FreeSync technology, which synchronizes the monitor's refresh rate with your AMD graphics card's frame rate to reduce screen tearing and stuttering.
- Ensure your graphics card supports AMD FreeSync.
- Enable FreeSync in your graphics card's control panel.
- Activate FreeSync in the monitor's OSD menu if available.

Figure 4.3: Visual representation of 60Hz versus 30Hz refresh rates, illustrating reduced ghosting and blur at higher refresh rates.
5. ບໍາລຸງຮັກສາ
5.1 ການທໍາຄວາມສະອາດ Monitor
- ປິດຈໍສະແດງຜົນສະເໝີ ແລະຖອດສາຍໄຟອອກກ່ອນທຳຄວາມສະອາດ.
- ໃຊ້ຜ້າແພທີ່ອ່ອນໆ ທີ່ບໍ່ມີເສັ້ນດ່າງ dampຜະສົມດ້ວຍນ້ໍາຫຼືເຄື່ອງເຮັດຄວາມສະອາດຫນ້າຈໍອ່ອນໆທີ່ບໍ່ມີການຂັດ.
- ຢ່າສີດນໍ້າສະອາດໃສ່ໜ້າຈໍໂດຍກົງ. ທາໃສ່ຜ້າກ່ອນ.
- ຫຼີກເວັ້ນການໃຊ້ benzene, thinner, ເຄື່ອງເຮັດຄວາມສະອາດທີ່ມີອາໂມເນຍ, ຫຼືວັດສະດຸຂັດ, ເພາະວ່າສິ່ງເຫຼົ່ານີ້ສາມາດທໍາລາຍຫນ້າຈໍຫຼື c.asing.
5.2 ການເກັບຮັກສາ
- ຖ້າເກັບຮັກສາຈໍພາບໄວ້ເປັນເວລາດົນ, ໃຫ້ຖອດສາຍໄຟທັງໝົດອອກ ແລະ ບັນຈຸມັນໄວ້ໃນກ່ອງບັນຈຸເດີມຖ້າເປັນໄປໄດ້.
- ເກັບຮັກສາໄວ້ໃນບ່ອນທີ່ເຢັນ, ແຫ້ງ, ຫ່າງຈາກແສງແດດໂດຍກົງແລະອຸນຫະພູມທີ່ສຸດ.
6. ການແກ້ໄຂບັນຫາ
| ບັນຫາ | ສາເຫດທີ່ເປັນໄປໄດ້ | ການແກ້ໄຂ |
|---|---|---|
| ບໍ່ມີຮູບພາບໃນ ໜ້າ ຈໍ |
|
|
| ຮູບພາບມົວຫຼືບິດເບືອນ |
|
|
| ບໍ່ມີສຽງຈາກ ລຳ ໂພງ |
|
|
| Screen tearing or stuttering (with AMD GPU) |
|
|
7. ຂໍ້ມູນຈໍາເພາະ
| ຄຸນສົມບັດ | ລາຍລະອຽດ |
|---|---|
| ໝາຍເລກຕົວແບບ | CR270H |
| ຂະໜາດໜ້າຈໍ | 27 ນິ້ວ |
| ປະເພດແຜງ | IPS |
| ຄວາມລະອຽດ | 3840 x 2160 (4K UHD) |
| ອັດຕາການໂຫຼດຂໍ້ມູນຄືນໃໝ່ | 60Hz |
| ອັດຕາສ່ວນ | 16:9 |
| ຄວາມສະຫວ່າງ | 300 cd/m² |
| ອັດຕາສ່ວນກົງກັນຂ້າມ | 1000:1 |
| ສີ Gamut | 120% sRGB |
| ການເຊື່ອມຕໍ່ | 1x DisplayPort 1.4, 1x HDMI 2.0, 1x USB Type-C (charging & data), Audio Out |
| ລຳໂພງໃນຕົວ | ແມ່ນແລ້ວ |
| AMD FreeSync | ສະຫນັບສະຫນູນ |
| ຄວາມເຂົ້າກັນໄດ້ຂອງ VESA Mount | 75mm x 75mm |
| ຂະຫນາດຜະລິດຕະພັນ (ໂດຍບໍ່ມີການຢືນ) | 2.6 x 24 x 14 ນິ້ວ (ປະມານ) |
| ນ້ໍາຫນັກລາຍການ | 12.52 ປອນ (ປະມານ) |
8. ການຮັບປະກັນແລະການສະຫນັບສະຫນູນ
CRUA provides high-quality computer monitors and customer service. For warranty information or technical support, please refer to the warranty card included with your product or visit the official CRUA webເວັບໄຊ.
If you have any questions or encounter issues not covered in this manual, please contact CRUA customer support.
- ສະຫນັບສະຫນູນອອນໄລນ໌: Visit the CRUA Store on Amazon
- ຕິດຕໍ່: Refer to your product packaging or CRUA's official webເວັບໄຊສໍາລັບຂໍ້ມູນຕິດຕໍ່ໂດຍກົງ.


