1. ບົດແນະນຳ
This manual provides essential information for setting up, operating, maintaining, and troubleshooting your NIMO 15.6-inch FHD Business Laptop. Please read this guide thoroughly to ensure optimal performance and longevity of your device. Keep this manual for future reference.
2. ສິ່ງທີ່ຢູ່ໃນກ່ອງ
ກວດສອບວ່າລາຍການທັງຫມົດແມ່ນມີຢູ່ໃນການຫຸ້ມຫໍ່:
- 1 x Nimo N154 Laptop
- 1 x ເຄື່ອງສາກໄຟໄວ Type-C 65W PD
- 1 x ຄູ່ມືຜູ້ໃຊ້ (ເອກະສານນີ້)
- Windows 11 Home (ຕິດຕັ້ງໄວ້ລ່ວງໜ້າ)
3. ຜະລິດຕະພັນເກີນview
Familiarize yourself with the components and ports of your NIMO laptop.
ຮູບພາບ: ທາງຫນ້າ view of the NIMO 15.6-inch FHD Business Laptop, showcasing ຈໍສະແດງຜົນແລະແປ້ນພິມ.
3.1. ພອດ ແລະຕົວເຊື່ອມຕໍ່
The NIMO N154 laptop features a variety of ports for connecting peripherals and external devices.

Image: Diagram illustrating the various ports on the left and right sides of the NIMO laptop, including USB, HDMI, Type-C, and audio jack.
- ຊ້າຍ:
- Kensington Lock: For securing your laptop.
- Headphone Combo Jack: For audio output and microphone input.
- USB 3.0 Port (x2): For high-speed data transfer.
- USB 2.0 Port (x1): For connecting standard USB devices.
- Micro SD Card Reader: For expanding storage or transferring files ຈາກບັດຄວາມຊົງຈໍາ.
- ເບື້ອງຂວາ:
- Type-C Port (Charge Only): For connecting the 65W PD charger.
- USB 3.0 Port (x1): For high-speed data transfer.
- HDMI Port: For connecting to external displays.
- Type-C Port (Multifunction): Supports data transfer and display output.
- Charge LED Indicator: Shows charging status.
4. ຕັ້ງຄ່າ
4.1. ການເປີດ ແລະສາກເບື້ອງຕົ້ນ
- ແກະກ່ອງ: ເອົາແລັບທັອບ ແລະອຸປະກອນເສີມທັງໝົດອອກຈາກເຄື່ອງຫຸ້ມຫໍ່ຢ່າງລະມັດລະວັງ.
- ເຊື່ອມຕໍ່ພະລັງງານ: Plug the 65W Type-C PD Fast Charger into a power outlet and then connect the Type-C connector to the designated "Charge Only" Type-C port on the laptop.
- ສາກແບັດເຕີຣີ: Allow the laptop to charge for at least 30 minutes before initial use, or until the charge LED indicates a full charge.
- ເປີດ: Open the laptop lid and press the power button, typically located on the top right of the keyboard or side.

Image: The 65W Type-C PD Fast Charger, illustrating its compact design and universal compatibility.
4.2. ການຕິດຕັ້ງ Windows 11
Follow the on-screen instructions to complete the Windows 11 initial setup:
- ເລືອກພາກພື້ນ ແລະຮູບແບບແປ້ນພິມຂອງທ່ານ.
- ເຊື່ອມຕໍ່ກັບເຄືອຂ່າຍ Wi-Fi.
- ເຂົ້າສູ່ລະບົບດ້ວຍບັນຊີ Microsoft ຂອງທ່ານ ຫຼືສ້າງອັນໃໝ່.
- ຕັ້ງຄ່າ PIN ສໍາລັບການເຂົ້າສູ່ລະບົບໄວ.
- Review and accept privacy settings.
5. ຄໍາແນະນໍາການດໍາເນີນງານ
5.1. ເຄື່ອງອ່ານລາຍນິ້ວມື
The integrated fingerprint sensor allows for secure and quick login without passwords.
- ຕັ້ງຄ່າ: Navigate to Windows Settings > Accounts > Sign-in options > Fingerprint recognition (Windows Hello).
- ລົງທະບຽນລາຍນິ້ວມື: Follow the on-screen prompts to register your fingerprint. You may need to scan your finger multiple times from different angles.
- ການນຳໃຊ້: To log in, simply place your registered finger on the fingerprint sensor when prompted.

Image: Close-up of the laptop's touchpad area showing the fingerprint reader, and a separate image of the webcam with a privacy shield.
5.2. Backlit Keyboard
The backlit keyboard enhances visibility in low-light conditions.
- Toggle Backlight: Use the dedicated function key (often Fn + Fx, where Fx is a key with a keyboard backlight icon) to cycle through backlight brightness levels or turn it off. Refer to your keyboard for the specific key combination.
5.3. Webcam Privacy Shield
The laptop includes a physical webcam privacy shield for enhanced security.
- ເປີດໃຊ້/ປິດໃຊ້ງານ: Slide the physical switch located next to the webກ້ອງເພື່ອປົກປິດ ຫຼືເປີດເຜີຍເລນກ້ອງຖ່າຍຮູບ.
5.4. Connecting External Displays
You can extend your workspace by connecting an external monitor or projector.
- ເຊື່ອມຕໍ່ສາຍ: Use an HDMI cable to connect your external display to the laptop's HDMI port, or a compatible Type-C to DisplayPort/HDMI adapter for the multifunction Type-C port.
- Configure Display: ກົດ ປຸ່ມ Windows + P to open the Project menu. Select your preferred display mode (e.g., Duplicate, Extend, Second screen only).
6. ບໍາລຸງຮັກສາ
6.1. ເຮັດຄວາມສະອາດແລັບທັອບຂອງເຈົ້າ
- ໜ້າຈໍ: ໃຊ້ຜ້າແພອ່ອນໆ ທີ່ບໍ່ມີເສັ້ນດ່າງ ງampສໍາເລັດດ້ວຍນ້ໍາຫຼືເຄື່ອງເຮັດຄວາມສະອາດຫນ້າຈໍ. ຢ່າສີດຂອງແຫຼວໂດຍກົງໃສ່ຫນ້າຈໍ.
- Keyboard ແລະ Chassis: ໃຊ້ຜ້າອ່ອນ, ແຫ້ງ. ສໍາລັບຝຸ່ນ stubborn, a ເລັກນ້ອຍ damp ຜ້າທີ່ມີການແກ້ໄຂສະບູອ່ອນໆສາມາດນໍາໃຊ້ໄດ້, ຮັບປະກັນວ່າບໍ່ມີນ້ໍາເຂົ້າໄປໃນຊ່ອງເປີດ.
- ພອດ: ໃຊ້ອາກາດບີບອັດເພື່ອລ້າງຂີ້ຝຸ່ນອອກຈາກທ່າເຮືອ.
6.2. ການດູແລຫມໍ້ໄຟ
- ຫຼີກລ້ຽງການປະຈຸຫມໍ້ໄຟຢ່າງເຕັມທີ່ເລື້ອຍໆ.
- ເກັບຮັກສາແລັບທັອບໃນບ່ອນເຢັນ ແລະແຫ້ງ ຖ້າບໍ່ໄດ້ໃຊ້ເປັນເວລາດົນ.
- ຢ່າເຮັດໃຫ້ແລັບທັອບມີອຸນຫະພູມສູງເກີນໄປ.
6.3. ການປັບປຸງຊອບແວ
- ກວດສອບ ແລະຕິດຕັ້ງການອັບເດດ Windows ເປັນປະຈຳເພື່ອຮັບປະກັນຄວາມໝັ້ນຄົງ ແລະຄວາມປອດໄພຂອງລະບົບ. ໄປທີ່ Settings > Windows Update.
- Keep device drivers updated for optimal performance.
7. ການແກ້ໄຂບັນຫາ
ພາກສ່ວນນີ້ແກ້ໄຂບັນຫາທົ່ວໄປທີ່ທ່ານອາດຈະພົບ.
7.1. ແລັບທັອບບໍ່ເປີດ
- ໃຫ້ແນ່ໃຈວ່າເຄື່ອງສາກໄຟໄດ້ເຊື່ອມຕໍ່ກັບທັງຄອມພິວເຕີໂນດບຸກ ແລະ ປລັກໄຟທີ່ໃຊ້ງານໄດ້ຢ່າງແໜ້ນໜາແລ້ວ.
- ກວດສອບວ່າປລັກສຽບໄຟເຮັດວຽກໄດ້ໂດຍການສຽບໃສ່ອຸປະກອນອື່ນ.
- Allow the laptop to charge for at least 30 minutes if the battery is completely drained.
- Try a hard reset by holding the power button for 15-20 seconds.
7.2. Display Issues (No Image, Flickering)
- If an external monitor is connected, disconnect it to see if the laptop's screen works.
- Adjust screen brightness using the function keys (e.g., Fn + F5/F6).
- ຣີສະຕາດແລັບທັອບ.
- If connected to an external display, ensure the cable is properly seated and try a different cable or port.
7.3. ບັນຫາການເຊື່ອມຕໍ່ Wi-Fi
- Ensure Wi-Fi is enabled in Windows Settings > Network & Internet > Wi-Fi.
- ຣີສະຕາດເຣົາເຕີ ແລະໂມເດັມຂອງທ່ານ.
- ລືມເຄືອຂ່າຍ ແລະເຊື່ອມຕໍ່ຄືນໃໝ່.
- ອັບເດດໄດເວີ Wi-Fi ຂອງທ່ານ.
7.4. ປະສິດທິພາບຊ້າ
- ປິດແອັບພລິເຄຊັນທີ່ບໍ່ຈໍາເປັນທີ່ເຮັດວຽກຢູ່ໃນພື້ນຫຼັງ.
- ກວດສອບຕົວຈັດການໜ້າວຽກ (Ctrl+Shift+Esc) ສຳລັບຂະບວນການທີ່ໃຊ້ CPU, RAM ຫຼື ການໃຊ້ດິສກ໌ສູງ.
- ຮັບປະກັນພື້ນທີ່ຫວ່າງພຽງພໍໃນ SSD ຂອງທ່ານ.
- ດໍາເນີນການທໍາຄວາມສະອາດແຜ່ນແລະ defragmentation (ສໍາລັບ HDD, ເຖິງແມ່ນວ່ານີ້ແມ່ນ SSD).
- ສະແກນຫາ malware ຫຼືໄວຣັສ.
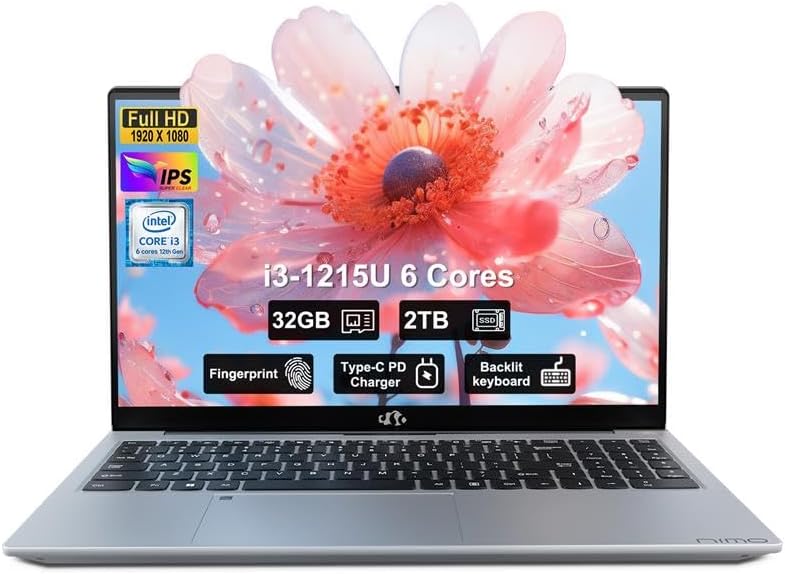
8. ຂໍ້ມູນຈໍາເພາະ
Detailed technical specifications for the NIMO N154 Laptop.

Image: Diagram illustrating the Intel Core i3-1215U processor with details on cores, threads, power consumption, and Turbo Boost frequency.

Image: Visual representation of 32GB DDR4 RAM and 2TB PCIe 4.0 SSD, highlighting dual RAM channel capability.
| ຄຸນສົມບັດ | ຂໍ້ມູນຈໍາເພາະ |
|---|---|
| ຊື່ຕົວແບບ | ນິໂມ N154 |
| ຂະໜາດໜ້າຈໍ | 15.6 ນິ້ວ |
| ຄວາມລະອຽດໜ້າຈໍ | 1920 x 1080 ພິກເຊວ (FHD IPS) |
| ໂຮງງານຜະລິດ | Intel Core i3-1215U (6-core, 8-thread, up to 4.4GHz) |
| RAM | 32 GB DDR4 (3200 MHz) |
| ການເກັບຮັກສາ | 2 TB PCIe SSD |
| Graphics Coprocessor | ປະສົມປະສານ Intel Graphics |
| ລະບົບປະຕິບັດການ | ໜ້າຫຼັກ Windows 11 |
| ປະເພດໄຮ້ສາຍ | 802.11a/b/g/n/ac (Wi-Fi 6) |
| ພອດ USB | 2x USB 3.0, 1x USB 2.0, 2x Type-C (1x Charge Only, 1x Multifunction) |
| ພອດ HDMI | 1x HDMI 2.1 |
| ຄຸນນະສົມບັດພິເສດ | Backlit Keyboard, Fingerprint Reader, HD Audio, Memory Card Slot, Numeric Keypad, Webcam Privacy Shield |
| ອາຍຸແບັດເຕີຣີ (ສະເລ່ຍ) | 5 ຊົ່ວໂມງ |
| ນ້ໍາຫນັກລາຍການ | 3.8 ປອນ |
| ຂະໜາດສິນຄ້າ (LxWxH) | 14.07 x 8.98 x 0.76 ນິ້ວ |
| ສີ | ເງິນ |
9. ການຮັບປະກັນແລະການສະຫນັບສະຫນູນ
Nimo Direct Inc. is committed to customer satisfaction.
- ການຮັບປະກັນຂອງຜູ້ຜະລິດ: Your NIMO laptop is covered by a comprehensive 2-Year Manufacturer's Warranty. This warranty covers defects in materials and workmanship under normal use.
- ນະໂຍບາຍການສົ່ງຄືນ: We offer 90-Day Hassle-Free Returns. If you are not satisfied with your purchase, you may return it within 90 days of receipt.
- ການຊ່ວຍເຫຼືອລູກຄ້າ: Our dedicated US support team is available to provide swift issue resolution or immediate replacements. For assistance, please refer to the contact information provided on the NIMO official webເວັບໄຊ ຫຼືເອກະສານການຊື້ຂອງທ່ານ.

Image: Illustration of NIMO's after-sales support, including partial US assembly, 90-day free returns, 2-year after-sales support, and 24/7 customer service.


