1. ບົດແນະນຳ
The avedio links USB2.0 Video Capture Card is designed to convert analog RCA composite and S-Video inputs into high-definition USB output. This device allows you to digitize content from various analog sources such as camcorders, set-top boxes, DV camcorders, DVD players, VHS, VCD, VCR, and DVR systems. The maximum output resolution supported is 1920x1080 at 30Hz. Please note that this device is compatible only with NTSC/PAL formats.
This capture card is compatible with Windows and macOS operating systems and supports popular video capture software like OBS and Potplayer. It is an ideal solution for video production, screen recording, and preserving old analog media in a digital format.
2. ສິ່ງທີ່ຢູ່ໃນກ່ອງ
Upon unpacking your avedio links USB2.0 Video Capture Card, please verify that all the following items are included:
- RCA & S-Video to USB Capture Card (1 unit)
- USB A to Type-C converter (1 unit)
- CD (1 unit) - Note: Software can also be downloaded from the manufacturer's webເວັບໄຊ.
- S-Video Cable (1 unit)
- RCA Converter (1 unit)
- ຄູ່ມືຜູ້ໃຊ້ (1 ຫນ່ວຍ)
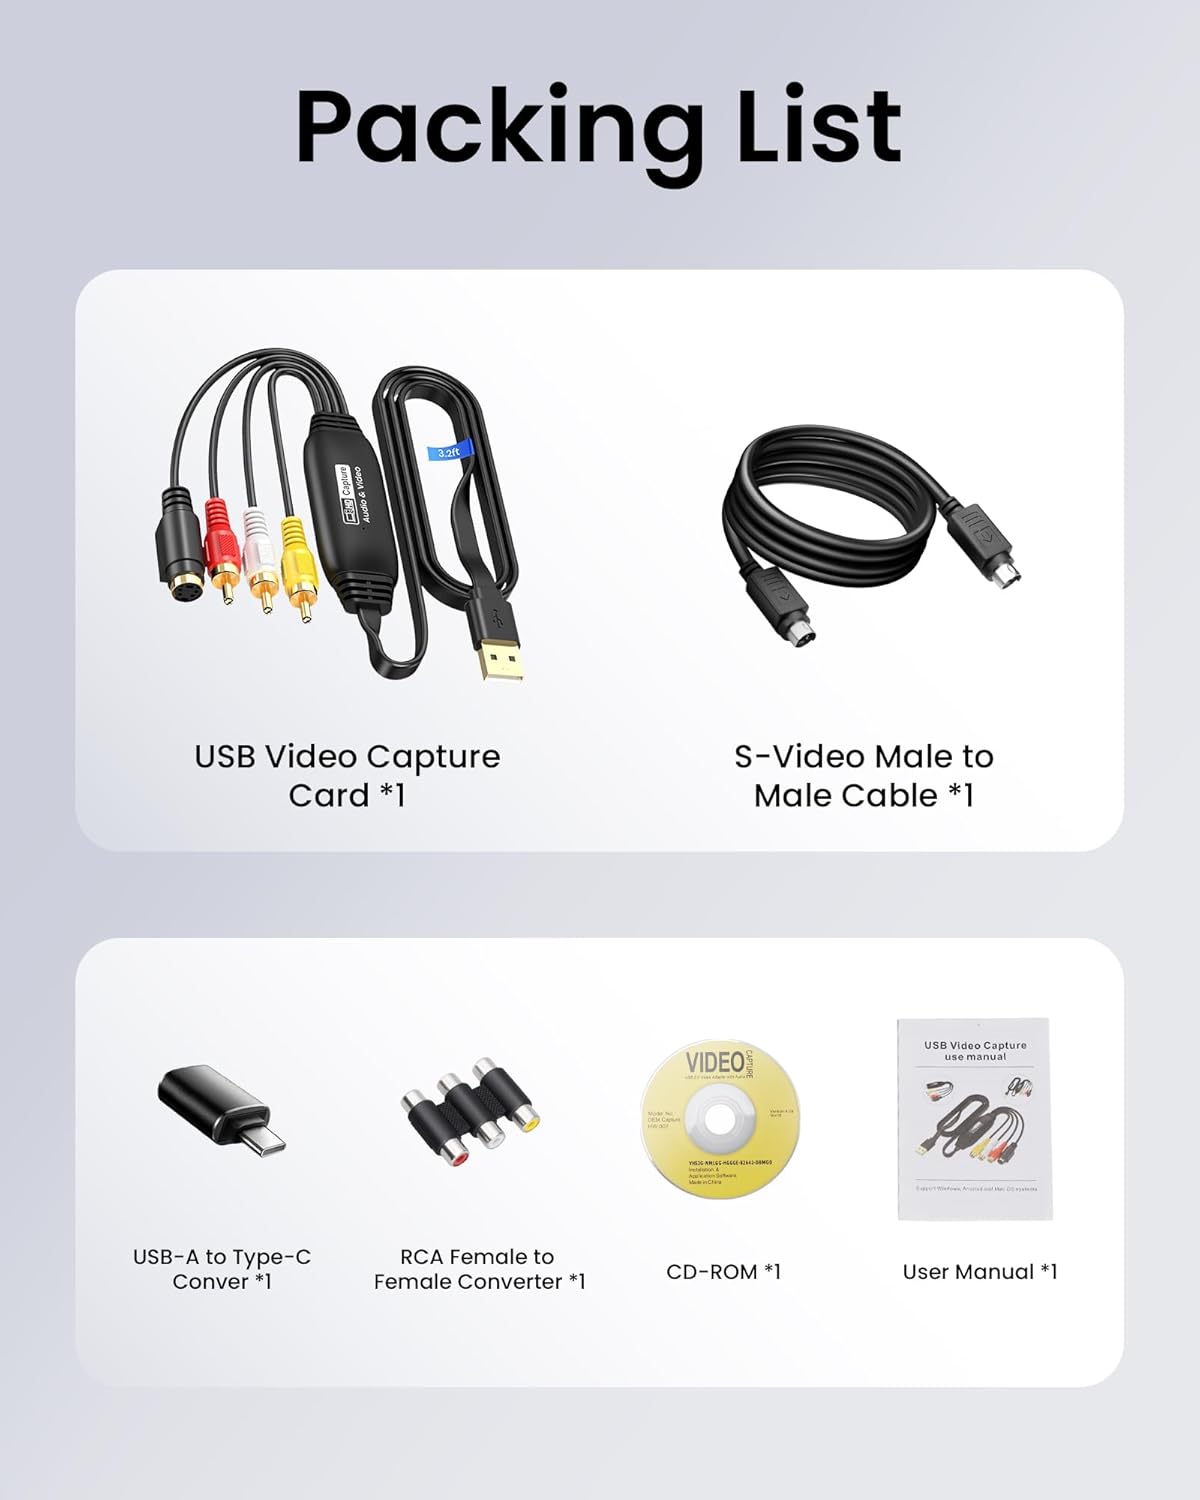
Image: Contents of the product packaging.
3. ຄໍາແນະນໍາການຕິດຕັ້ງ
Follow these steps to connect your avedio links USB2.0 Video Capture Card and prepare for video capture:
- ເຊື່ອມຕໍ່ແຫຼ່ງອະນາລັອກ: Connect the RCA (yellow for video, white for left audio, red for right audio) or S-Video cables from your analog device (e.g., VCR, DVD player, camcorder) to the corresponding input ports on the avedio links capture card.
- ເຊື່ອມຕໍ່ກັບຄອມພິວເຕີ: Plug the USB-A connector of the capture card into an available USB port on your computer. If your computer only has USB-C ports, use the provided USB-A to Type-C converter. The 3.2ft/1m extended USB cable offers flexibility in placement.
- ຕິດຕັ້ງຊອບແວ: Insert the provided CD into your computer's CD drive to install the necessary drivers and software. Alternatively, download the latest software (e.g., OBS Studio) from the manufacturer's official website or the software provider's webເວັບໄຊ.
- ເປີດຕົວຊອບແວ: Open your chosen video capture software (e.g., OBS Studio, Potplayer).

Image: Direct plug-in design showing RCA and S-Video connections to a source device and USB connection to a laptop.
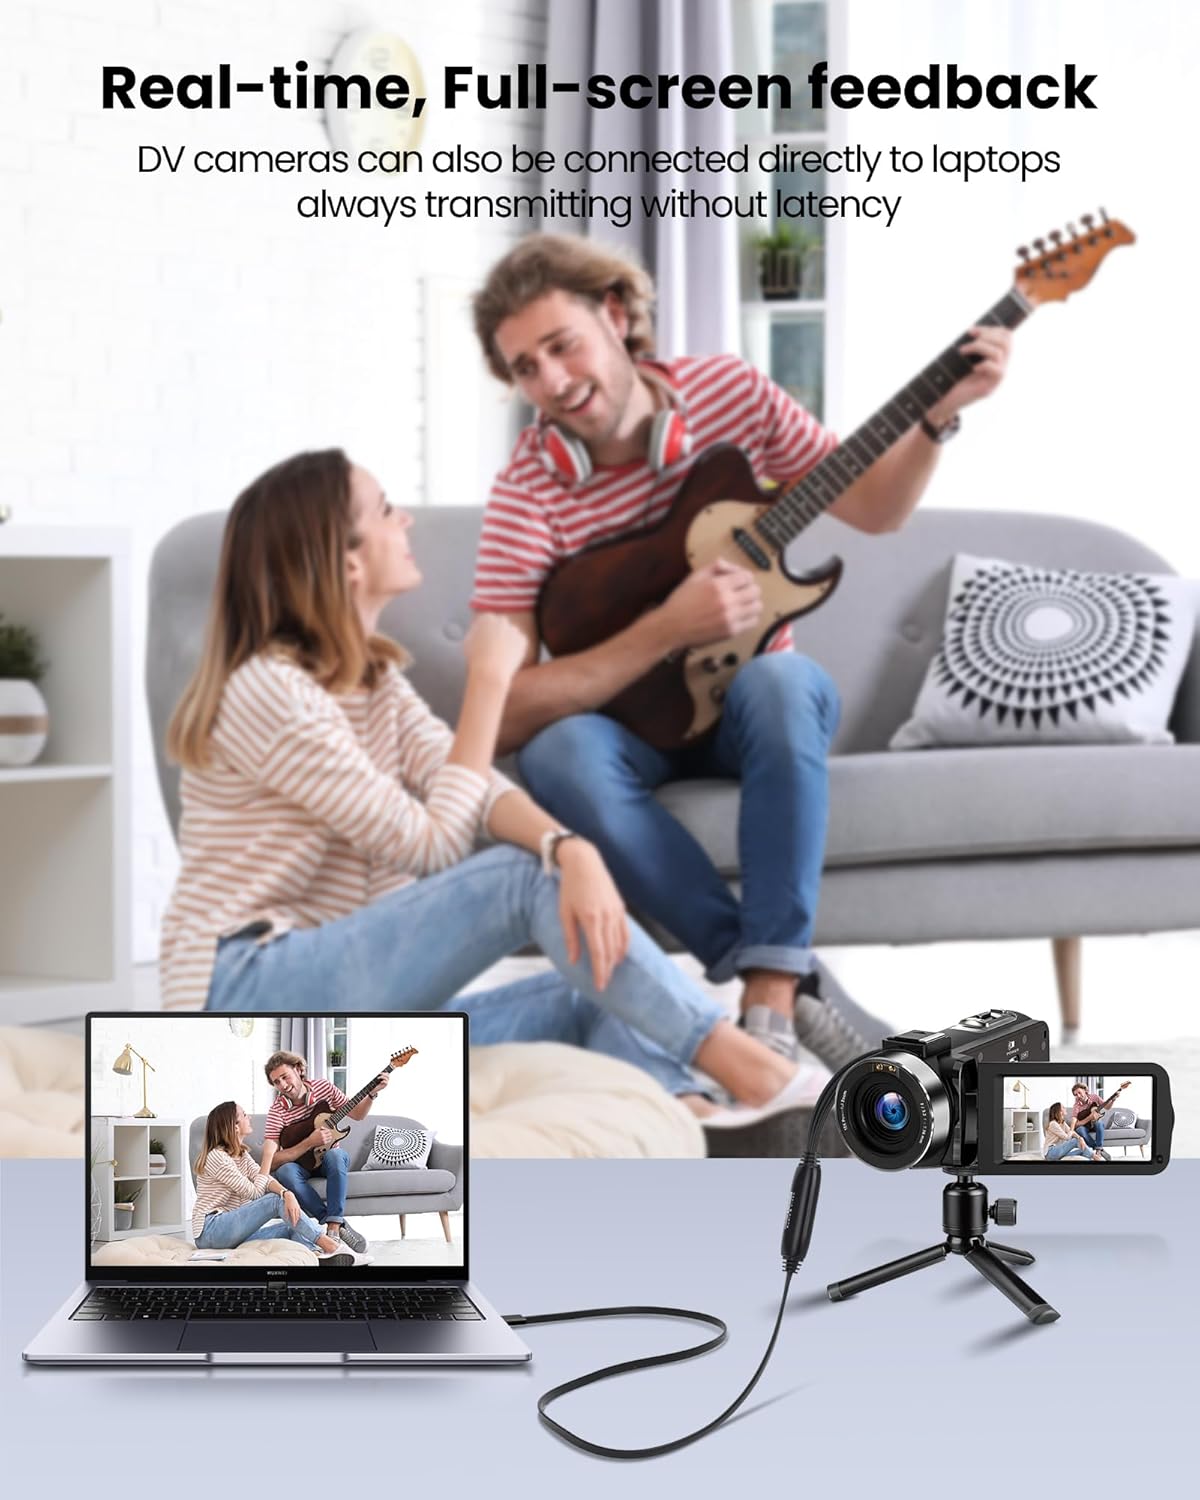
Image: The 3.3ft/1m extended USB cable for flexible connection.
Video: Connection Steps and OBS Setups
This video demonstrates the physical connection steps for the VHS to Digital Converter and initial setup within OBS Studio.
4. Operating Instructions (Using OBS Studio)
This section outlines the basic steps for capturing video using OBS Studio. For detailed instructions, refer to the OBS Studio Operation Guide video.
- ເພີ່ມແຫຼ່ງຂໍ້ມູນ: In OBS Studio, navigate to the 'Sources' panel. Click the '+' button and select 'Video Capture Device'.
- Create/Select Device: Choose 'Create new' and name your source (e.g., 'VHS Capture'). Click 'OK'.
- ເລືອກອຸປະກອນ: In the properties window, select 'USB Video' from the 'Device' dropdown list.
- Configure Resolution/FPS: Set 'Resolution/FPS Type' to 'Custom'. Choose '1920x1080' for 'Resolution' and '30' for 'FPS'.
- ໂModeດອອກສຽງ: Under 'Audio Output Mode', select 'Output desktop audio (WaveOut)' to hear the audio during capture.
- ເລີ່ມການບັນທຶກ: Once the video feed appears in the preview window, click 'Start Recording' in the 'Controls' panel to begin capturing your analog content.
- ຢຸດການບັນທຶກ: Click 'Stop Recording' when you are finished. Your captured video will be saved to the default recording path configured in OBS settings.
Video: OBS Studio Operation Guide for RCA Capture Card
This video provides a step-by-step guide on how to configure and use OBS Studio with the RCA Capture Card for video recording.

Image: Step 1: Adding sources to the scene in OBS Studio.

Image: Step 2: Configuring the Video Capture Source in OBS Studio.

Image: Step 3: Determining the desired audio output mode in OBS Studio.
5. ຄວາມເຂົ້າກັນໄດ້
The avedio links USB2.0 Video Capture Card offers broad compatibility with various devices and operating systems:
- ແຫຼ່ງປ້ອນຂໍ້ມູນ: Compatible with devices featuring RCA (composite) or S-Video output, including TV boxes, DV cameras, game consoles, camcorders, VHS players, and DVD players.
- ອຸປະກອນອອກ: Connects to laptops and personal computers via USB A or Type-C.
- ລະບົບປະຕິບັດການ: Supports Windows and macOS.
- ຊອບແວ: Works with popular video capture software such as OBS Studio, Potplayer, Xsplit, VLC, and Skype.

Image: Wide compatibility with various input and output devices.

Image: Compatible with multiple systems and software.
6. ຂໍ້ມູນຈໍາເພາະ
| ຄຸນສົມບັດ | ຂໍ້ມູນຈໍາເພາະ |
|---|---|
| ໝາຍເລກຕົວແບບ | AL-RCAUSB-TC |
| ອິນເຕີເຟດຂາເຂົ້າ | RCA (Composite), S-Video |
| Output Interface | USB 2.0 (USB-A, with Type-C converter) |
| ຄວາມລະອຽດຜົນຜະລິດສູງສຸດ | 1920x1080 @ 30Hz |
| ຮູບແບບທີ່ເຂົ້າກັນໄດ້ | NTSC/PAL |
| ຄວາມຍາວສາຍ | 3.2ft / 1m (USB cable) |
| ລະບົບປະຕິບັດການ | Windows, macOS |
| ນ້ໍາຫນັກລາຍການ | 6.7 ອອນ |
| ຂະໜາດແພັກເກັດ | 8.46 x 6.1 x 0.83 ນິ້ວ |
7. ການແກ້ໄຂບັນຫາ
- ບໍ່ມີສັນຍານວິດີໂອ:
- Ensure all RCA or S-Video cables are securely connected to both the source device and the capture card.
- Verify that the source device (VCR, DVD player, etc.) is powered on and playing content.
- In your capture software, confirm that 'USB Video' is selected as the correct video capture device.
- Check the input format (NTSC/PAL) of your source and ensure it is supported by the capture card.
- ບໍ່ມີສຽງ:
- Ensure the white and red RCA audio cables are correctly connected.
- In your capture software's audio settings, select the appropriate audio input (e.g., 'Digital Audio Interface' or 'USB Audio Device').
- Check your computer's sound settings to ensure the correct playback device is selected and volume is not muted.
- ຄຸນນະພາບວິດີໂອບໍ່ດີ:
- The output quality is limited by the original analog source. Analog signals inherently have lower resolution than modern digital formats.
- Ensure the capture software settings (resolution, FPS) match the capabilities of the capture card and your desired output.
- If using S-Video, ensure the S-Video cable is properly connected, as it generally provides better quality than composite RCA.
- ຊອບແວບໍ່ຮັບຮູ້ອຸປະກອນ:
- ລອງສຽບສາຍ USB ເຂົ້າໄປໃນຜອດ USB ອື່ນໃນຄອມພິວເຕີຂອງທ່ານ.
- Restart your computer and the capture software.
- Reinstall the drivers for the capture card.
8. ບໍາລຸງຮັກສາ
To ensure the longevity and optimal performance of your avedio links USB2.0 Video Capture Card, follow these maintenance guidelines:
- ການເກັບຮັກສາ: ເກັບຮັກສາອຸປະກອນໄວ້ໃນບ່ອນທີ່ເຢັນ, ແຫ້ງ, ຫ່າງຈາກແສງແດດໂດຍກົງ ແລະອຸນຫະພູມທີ່ຮ້າຍກາດ.
- ທໍາຄວາມສະອາດ: ໃຊ້ຜ້າອ່ອນແລະແຫ້ງເພື່ອທຳຄວາມສະອາດດ້ານນອກຂອງອຸປະກອນ. ຫຼີກລ່ຽງການໃຊ້ນ້ຳຢາທຳຄວາມສະອາດ ຫຼື ຕົວລະລາຍ.
- ການຈັດການ: Handle the cables and connectors with care to prevent damage. Avoid bending cables sharply or pulling them forcefully.
- ອັບເດດຊອບແວ: Periodically check for updates to your video capture software (e.g., OBS Studio) to ensure compatibility and access to the latest features and bug fixes.
9. ການຮັບປະກັນແລະການສະຫນັບສະຫນູນ
For warranty information and technical support, please refer to the documentation included with your product or visit the official avedio links webເວັບໄຊ.
ທາງການ Webເວັບໄຊ: avediolinks.com
ສະຫນັບສະຫນູນອີເມວ: support@avediolinks.com


