1. ບົດແນະນຳ
This manual provides detailed instructions for the installation, operation, and maintenance of the ZDMTDKXT X99M Motherboard. This motherboard is designed to support Intel LGA 2011-3 socket processors, including Xeon E5 V3 and V4 series, and features DDR3 ECC RAM support. Please read this manual thoroughly before proceeding with installation to ensure proper setup and optimal performance.
2. ຄຸນນະສົມບັດທີ່ສໍາຄັນ
- ເຕົ້າຮັບ CPU: LGA 2011-3, supporting Intel Xeon E5 V3 and V4 series processors.
- ໜ່ວຍຄວາມຈຳ: 4 x DDR3 memory slots, supporting up to 128GB ECC RAM in quad-channel configuration.
- ຊ່ອງຂະຫຍາຍ: Multiple PCIe slots including 1 x PCIe x16, 1 x PCIe x4, 1 x PCIe x1, and 2 x M.2 ports for NVMe storage.
- ການເກັບຮັກສາ: Multiple SATA 3.0 ports for traditional storage devices.
- ການເຊື່ອມຕໍ່: Integrated Gigabit Ethernet (RTL8111) and various USB 2.0 and USB 3.0 ports.
- ສຽງ: 6-Channel HD Audio Codec for high-quality sound.
- ປັດໄຈແບບຟອມ: M-ATX (24.5CM x 19CM) for compact system builds.
3. ແຜນຜັງ motherboard ແລະອົງປະກອບ
Familiarize yourself with the motherboard's layout and key components before installation.

ຮູບທີ 3.1: Labeled diagram of the ZDMTDKXT X99M Motherboard, highlighting the CPU socket, DDR3 RAM slots, various PCIe expansion slots, SATA ports, USB headers, and power supply connections. This view ສະຫນອງຫຼາຍກວ່າview of all major components and their locations.
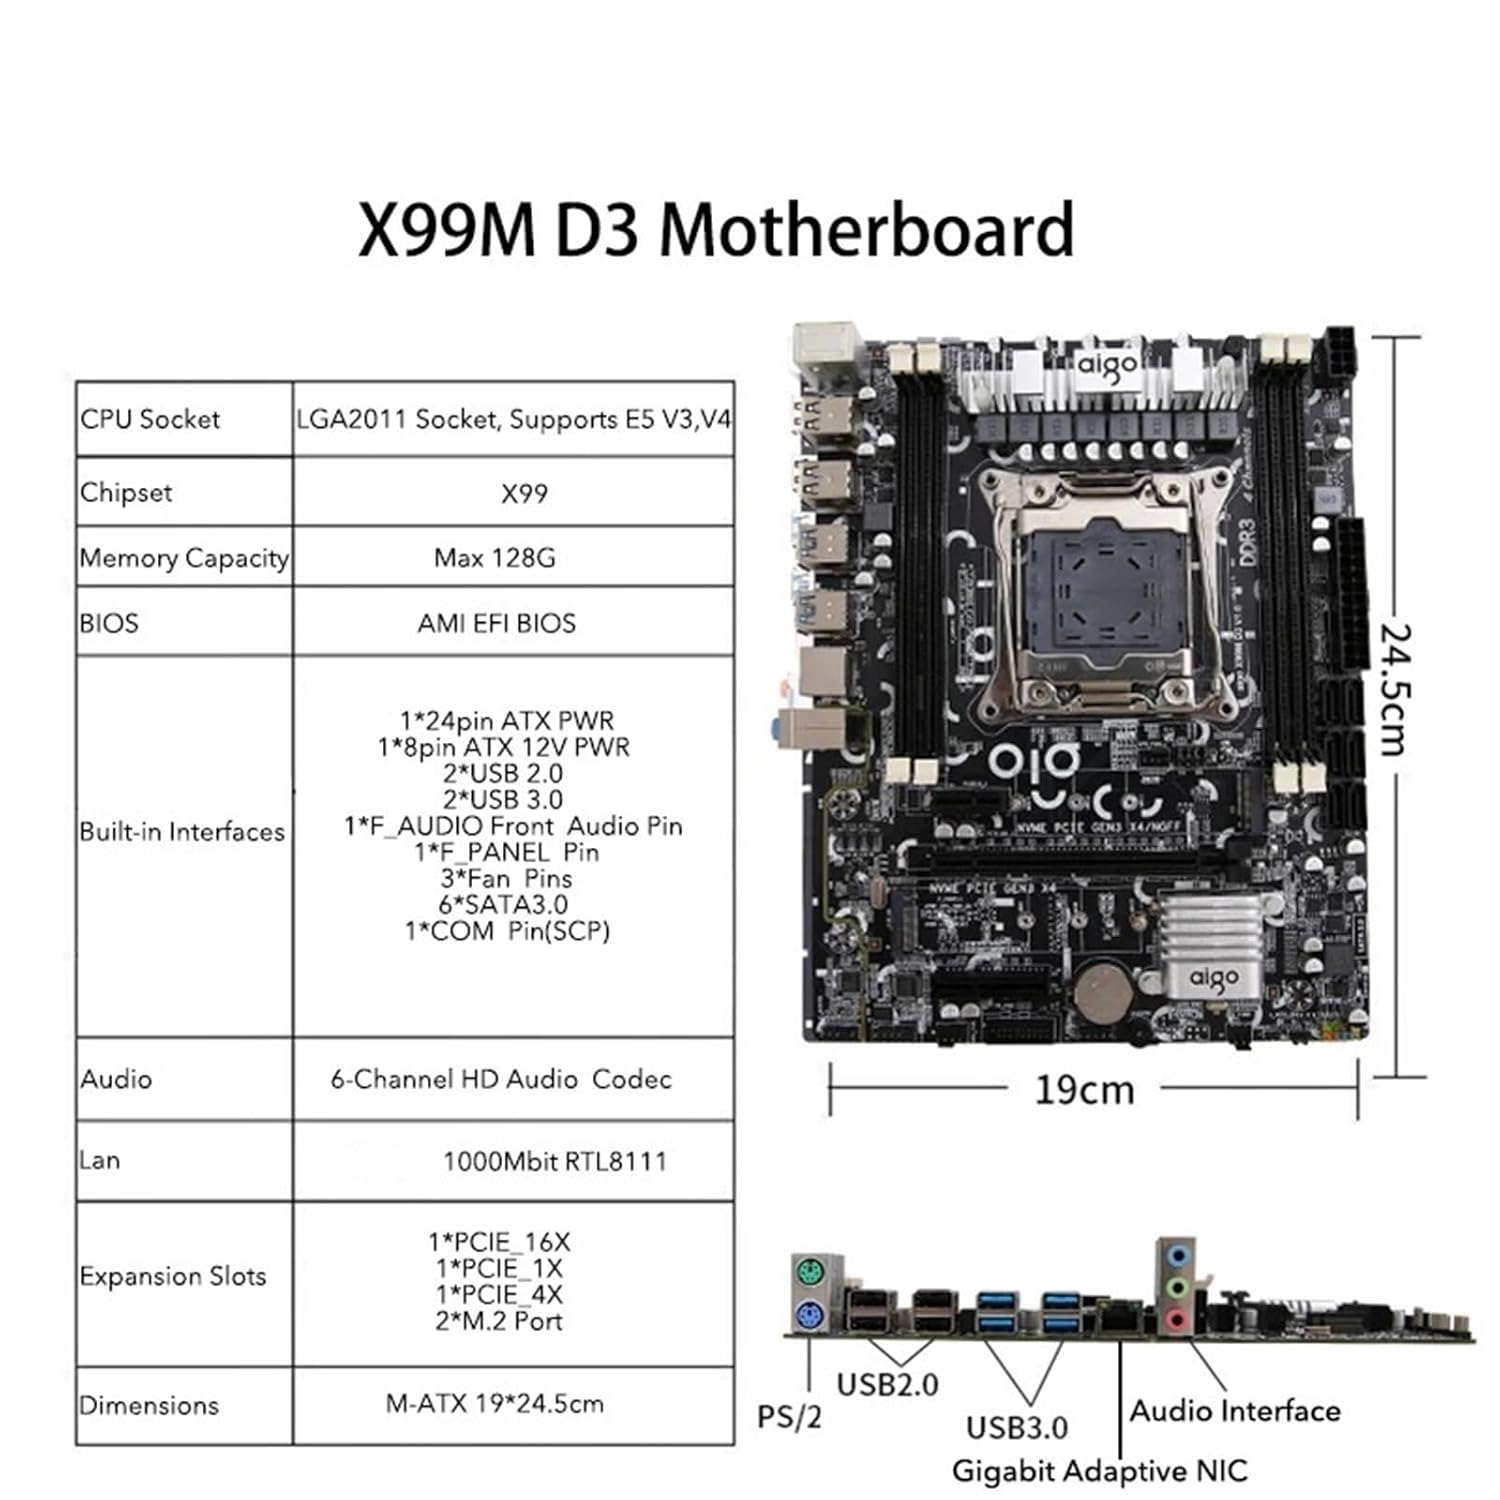
ຮູບທີ 3.2: ເກີນview of the ZDMTDKXT X99M Motherboard, accompanied by a table summarizing its key specifications including CPU socket type (LGA2011 Socket, Supports E5 V3,V4), Chipset (X99), Max Memory Capacity (128G), BIOS type (AMI EFI BIOS), Built-in Interfaces, Audio, LAN, Expansion Slots, and Dimensions (M-ATX 19*24.5cm).

ຮູບທີ 3.3: A detailed close-up of the LGA 2011-3 CPU socket and the four DDR3 memory slots on the ZDMTDKXT X99M Motherboard. This image emphasizes the robust design around the processor area.

ຮູບທີ 3.4: This image provides another close-up of the CPU socket and RAM area, specifically noting the motherboard's support for four-channel DDR3 memory and its capability for overclocking, indicating performance-oriented features.
4. ການຕິດຕັ້ງແລະການຕິດຕັ້ງ
4.1 ຂໍ້ຄວນລະວັງຄວາມປອດໄພ
- ສະເຫມີຕັດການເຊື່ອມຕໍ່ການສະຫນອງພະລັງງານກ່ອນທີ່ຈະຕິດຕັ້ງຫຼືເອົາອົງປະກອບໃດໆ.
- ໃສ່ສາຍແຂນຕ້ານສະຖິດເພື່ອປ້ອງກັນການໄຫຼຂອງໄຟຟ້າສະຖິດ (ESD) ຄວາມເສຍຫາຍຕໍ່ອົງປະກອບ.
- ຈັບອົງປະກອບໂດຍແຄມຂອງພວກມັນ, ຫຼີກເວັ້ນການຕິດຕໍ່ກັບ pins ຫຼືວົງຈອນ.
4.2 ການຕິດຕັ້ງ CPU
- ຊອກຫາຊັອກເກັດ LGA 2011-3 ຢູ່ໃນເມນບອດ.
- Gently push down the load lever and pull it away from the socket to open the CPU retention mechanism.
- ວາງ CPU ກັບຊັອກເກັດຢ່າງລະມັດລະວັງ, ໃຫ້ແນ່ໃຈວ່າສາມຫຼ່ຽມຄໍາໃນ CPU ກົງກັບສາມຫຼ່ຽມຢູ່ໃນເຕົ້າຮັບ. ຢ່າບັງຄັບ CPU ເຂົ້າໄປໃນບ່ອນ.
- Lower the load plate and push the load lever back into its locked position.
4.3 ການຕິດຕັ້ງ RAM
- ເປີດຄລິບຢູ່ທັງສອງສົ້ນຂອງຊ່ອງຄວາມຈຳ DDR3.
- ວາງໂມດູນໜ່ວຍຄວາມຈຳກັບຊ່ອງສຽບ, ຮັບປະກັນວ່າຮອຍບັ້ງຢູ່ໃນໂມດູນກົງກັບກະແຈໃນຊ່ອງສຽບ.
- ກົດລົງໃຫ້ແໜ້ນທັງສອງສົ້ນຂອງໂມດູນໜ່ວຍຄວາມຈຳຈົນກວ່າຄລິບຈະເຂົ້າໃສ່.
4.4 ການເຊື່ອມຕໍ່ພະລັງງານ
- ເຊື່ອມຕໍ່ຕົວເຊື່ອມຕໍ່ໄຟຫຼັກ ATX 24-pin ຈາກແຫຼ່ງຈ່າຍໄຟຂອງທ່ານເຂົ້າກັບພອດທີ່ສອດຄ້ອງກັນຢູ່ເທິງເມນບອດ.
- Connect the 8-pin ATX 12V CPU power connector to the port near the CPU socket.
4.5 ການຕິດຕັ້ງອຸປະກອນການເກັບຮັກສາ
- SATA Drives: Connect SATA data cables from your storage drives (HDDs/SSDs) to the SATA 3.0 ports on the motherboard. Connect power cables from your power supply to the drives.
- NVMe M.2 Drives: Insert the M.2 drive into one of the M.2 slots, securing it with the provided screw.
4.6 ບັດຂະຫຍາຍ
Insert graphics cards or other PCIe expansion cards into the appropriate PCIe slots (e.g., PCIe x16 for graphics cards), ensuring they are fully seated and secured with a screw to the chassis.
5. ຄໍາແນະນໍາການດໍາເນີນງານ
5.1 First Boot
- ຫຼັງຈາກອົງປະກອບທັງໝົດຖືກຕິດຕັ້ງ ແລະເຊື່ອມຕໍ່ແລ້ວ, ໃຫ້ເຊື່ອມຕໍ່ຈໍພາບ, ແປ້ນພິມ, ແລະເມົ້າຂອງທ່ານ.
- Connect the power cord to the power supply and turn on the power switch.
- ກົດປຸ່ມເປີດປິດໃນກໍລະນີຄອມພິວເຕີຂອງທ່ານ.
- ລະບົບຄວນເປີດເຄື່ອງ ແລະ ສະແດງໜ້າຈໍເລີ່ມຕົ້ນຂອງ BIOS/UEFI.
5.2 ການຕັ້ງຄ່າ BIOS/UEFI
To enter the BIOS/UEFI setup utility, press the designated key (usually DEL or F2) during the boot process. From here, you can configure boot order, system time, and other advanced settings. The X99M uses an AMI EFI BIOS.
5.3 ການຕິດຕັ້ງລະບົບປະຕິບັດການ
Once in the BIOS, set your preferred boot device (e.g., USB drive or DVD-ROM with OS installer) as the primary boot option. Save changes and exit BIOS to begin the operating system installation process.
6. ບໍາລຸງຮັກສາ
- ການກຳຈັດຂີ້ຝຸ່ນ: Regularly clean dust from inside your computer case using compressed air. Pay special attention to CPU heatsinks, fan blades, and motherboard surfaces to prevent overheating.
- ການຄຸ້ມຄອງສາຍໄຟ: Ensure all cables are neatly routed to improve airflow and prevent accidental disconnections.
- ອັບເດດ BIOS: ກວດສອບຜູ້ຜະລິດເປັນໄລຍະ website for BIOS updates. Updates can improve stability, compatibility, and performance. Follow update instructions carefully.
- ການກວດສອບອົງປະກອບ: Ensure all components (RAM, expansion cards, storage drives) are securely seated in their respective slots.
7. ການແກ້ໄຂບັນຫາ
7.1 ບໍ່ມີພະລັງງານ / ບໍ່ມີ Boot
- Check all power connections: 24-pin ATX, 8-pin CPU, and power supply cable to the wall outlet.
- ໃຫ້ແນ່ໃຈວ່າສະວິດການສະຫນອງພະລັງງານຢູ່ໃນຕໍາແຫນ່ງ 'ON'.
- ກວດສອບວ່າສາຍປຸ່ມເປີດເຄື່ອງດ້ານໜ້າຖືກເຊື່ອມຕໍ່ກັບຫົວແມ່ບອດຢ່າງຖືກຕ້ອງ.
- ທົດສອບການສະຫນອງພະລັງງານກັບລະບົບອື່ນຫຼືເຄື່ອງທົດສອບການສະຫນອງພະລັງງານຖ້າມີ.
7.2 ບໍ່ມີຈໍສະແດງຜົນ
- Ensure the monitor is powered on and connected to the correct video output (graphics card or integrated graphics, if applicable).
- ຣີເຊັດບັດກາຟິກໃນຊ່ອງ PCIe ຂອງມັນ.
- Try a different video cable or monitor.
- If using multiple RAM sticks, try booting with only one stick installed, rotating through them to identify a faulty module.
7.3 ຄວາມບໍ່ໝັ້ນຄົງຂອງລະບົບ / ການຂັດຂ້ອງ
- ກວດສອບອຸນຫະພູມ CPU ແລະ GPU ໂດຍໃຊ້ຊອບແວຕິດຕາມກວດກາ. ຄວາມຮ້ອນເກີນໄປສາມາດເຮັດໃຫ້ເກີດຄວາມບໍ່ໝັ້ນຄົງໄດ້.
- ຮັບປະກັນວ່າໄດເວີທັງໝົດ (ຊິບເຊັດ, ກຣາບຟິກ, ແລະອື່ນໆ) ອັບເດດແລ້ວ.
- ເປີດໃຊ້ເຄື່ອງມືການວິນິດໄສຄວາມຈຳເພື່ອກວດເບິ່ງຄວາມຜິດພາດຂອງ RAM.
- Verify that your power supply provides sufficient wattage ສໍາລັບອົງປະກອບທັງຫມົດ.
8. ຂໍ້ມູນຈໍາເພາະ
| ຄຸນສົມບັດ | ຂໍ້ມູນຈໍາເພາະ |
|---|---|
| ຍີ່ຫໍ້ | ZDMTDKXT |
| ຕົວແບບ | X99M (hongxkai) |
| ເຕົ້າສຽບ CPU | LGA 2011-3 |
| CPU ທີ່ຮອງຮັບ | Intel Xeon E5 V3/V4 Series |
| ຊິບເຊັດ | X99 |
| Memory Slots | 4 x DDR3 |
| ຄວາມອາດສາມາດຫນ່ວຍຄວາມຈໍາສູງສຸດ | 128GB (4 x 32GB DDR3 ECC RAM) |
| BIOS | AMI EFI BIOS |
| VGA Slot | 1 x PCIe x16 |
| ສະລັອດຕິງຂະຫຍາຍ | 1 x PCIe x16, 1 x PCIe x4, 1 x PCIe x1, 2 x M.2 Ports |
| ການໂຕ້ຕອບການເກັບຮັກສາ | Multiple SATA 3.0 ports, 2 x NVMe M.2 ports |
| LAN | 1000Mbit Gigabit Ethernet (RTL8111) |
| ສຽງ | 6-Channel HD Audio Codec |
| ພອດພະລັງງານ | 24-Pin ATX, 8-Pin ATX 12V |
| ການໂຕ້ຕອບໃນຕົວ | 2*USB 2.0, 2*USB 3.0, F. AUDIO Front Audio Pin, PANEL Pin, Fan Pins, SATA3.0, COM Pin (SCP) |
| ຂະ ໜາດ ເມນບອດ | M-ATX (24.5CM x 19CM) |
9. ການຮັບປະກັນແລະການສະຫນັບສະຫນູນ
ສຳລັບຂໍ້ມູນການຮັບປະກັນ ແລະ ການຊ່ວຍເຫຼືອດ້ານເຕັກນິກ, ກະລຸນາອ້າງອີງເອກະສານທີ່ມາພ້ອມກັບການຊື້ຂອງທ່ານ ຫຼື ຕິດຕໍ່ຮ້ານຄ້າປີກຂອງທ່ານ. ເກັບຫຼັກຖານການຊື້ຂອງທ່ານໄວ້ເພື່ອການຮຽກຮ້ອງການຮັບປະກັນ.