1. ບົດແນະນຳ
The GOBOULT Crown R Pro 2 Smartwatch is designed to enhance your daily life with advanced features and health monitoring capabilities. It features a 1.43-inch HD AMOLED display, Bluetooth Calling 5.2, and a comprehensive health suite. This manual provides instructions for setup, operation, and maintenance of your smartwatch.

Image: The GOBOULT Crown R Pro 2 Smartwatch, showcasing ການອອກແບບ sleek ແລະການສະແດງທີ່ສົດໃສຂອງຕົນ.
2. ສິ່ງທີ່ຢູ່ໃນກ່ອງ
ກະລຸນາກວດເບິ່ງເນື້ອໃນຂອງແພັກເກດເມື່ອ unboxing:
- GOBOULT Crown R Pro 2 Smartwatch
- ສາຍສາກ
- ຄູ່ມືຜູ້ໃຊ້
- ບັດຮັບປະກັນ
3. ການເລີ່ມຕົ້ນ
3.1. ການສາກອຸປະກອນ
Before initial use, fully charge your smartwatch. Connect the magnetic charging cable to the charging points on the back of the watch and plug the USB end into a power adapter (not included) or a computer's USB port.
- Charging Time: Approximately 150 minutes for a full charge.
- Battery Life: Up to 7 days on a single charge, depending on usage.
3.2. ເປີດ / ປິດພະລັງງານ
- ເປີດ: Press and hold the side button for a few seconds until the GOBOULT logo appears.
- ປິດພະລັງງານ: ກົດປຸ່ມຂ້າງຄ້າງໄວ້, ຈາກນັ້ນເລືອກຕົວເລືອກ 'ປິດເຄື່ອງ' ໃນໜ້າຈໍ.
3.3. ການຕິດຕັ້ງແອັບ ແລະ ການຈັບຄູ່
To unlock the full potential of your smartwatch, download and install the companion application on your smartphone.
- Scan the QR code in the manual or search for the 'BoultFit' app (or similar, as specified in the included manual) on your smartphone's app store (Google Play Store or Apple App Store).
- Install the application and create an account or log in.
- ໃຫ້ແນ່ໃຈວ່າ Bluetooth ຖືກເປີດໃຊ້ຢູ່ໃນໂທລະສັບສະຫຼາດຂອງທ່ານ.
- Open the app, navigate to 'Device' or 'Add Device', and select 'GOBOULT Crown R Pro 2' from the list of available devices.
- ຢືນຢັນຄຳຮ້ອງຂໍການຈັບຄູ່ທັງໃນໂທລະສັບສະຫຼາດ ແລະ ໂມງອັດສະລິຍະຂອງທ່ານ.
4. Smartwatch Features and Operation
4.1. ຈໍສະແດງຜົນ ແລະ ໜ້າປັດໂມງ
The smartwatch features a 1.43-inch HD AMOLED display with 600 Nits brightness for clear visibility in various lighting conditions.
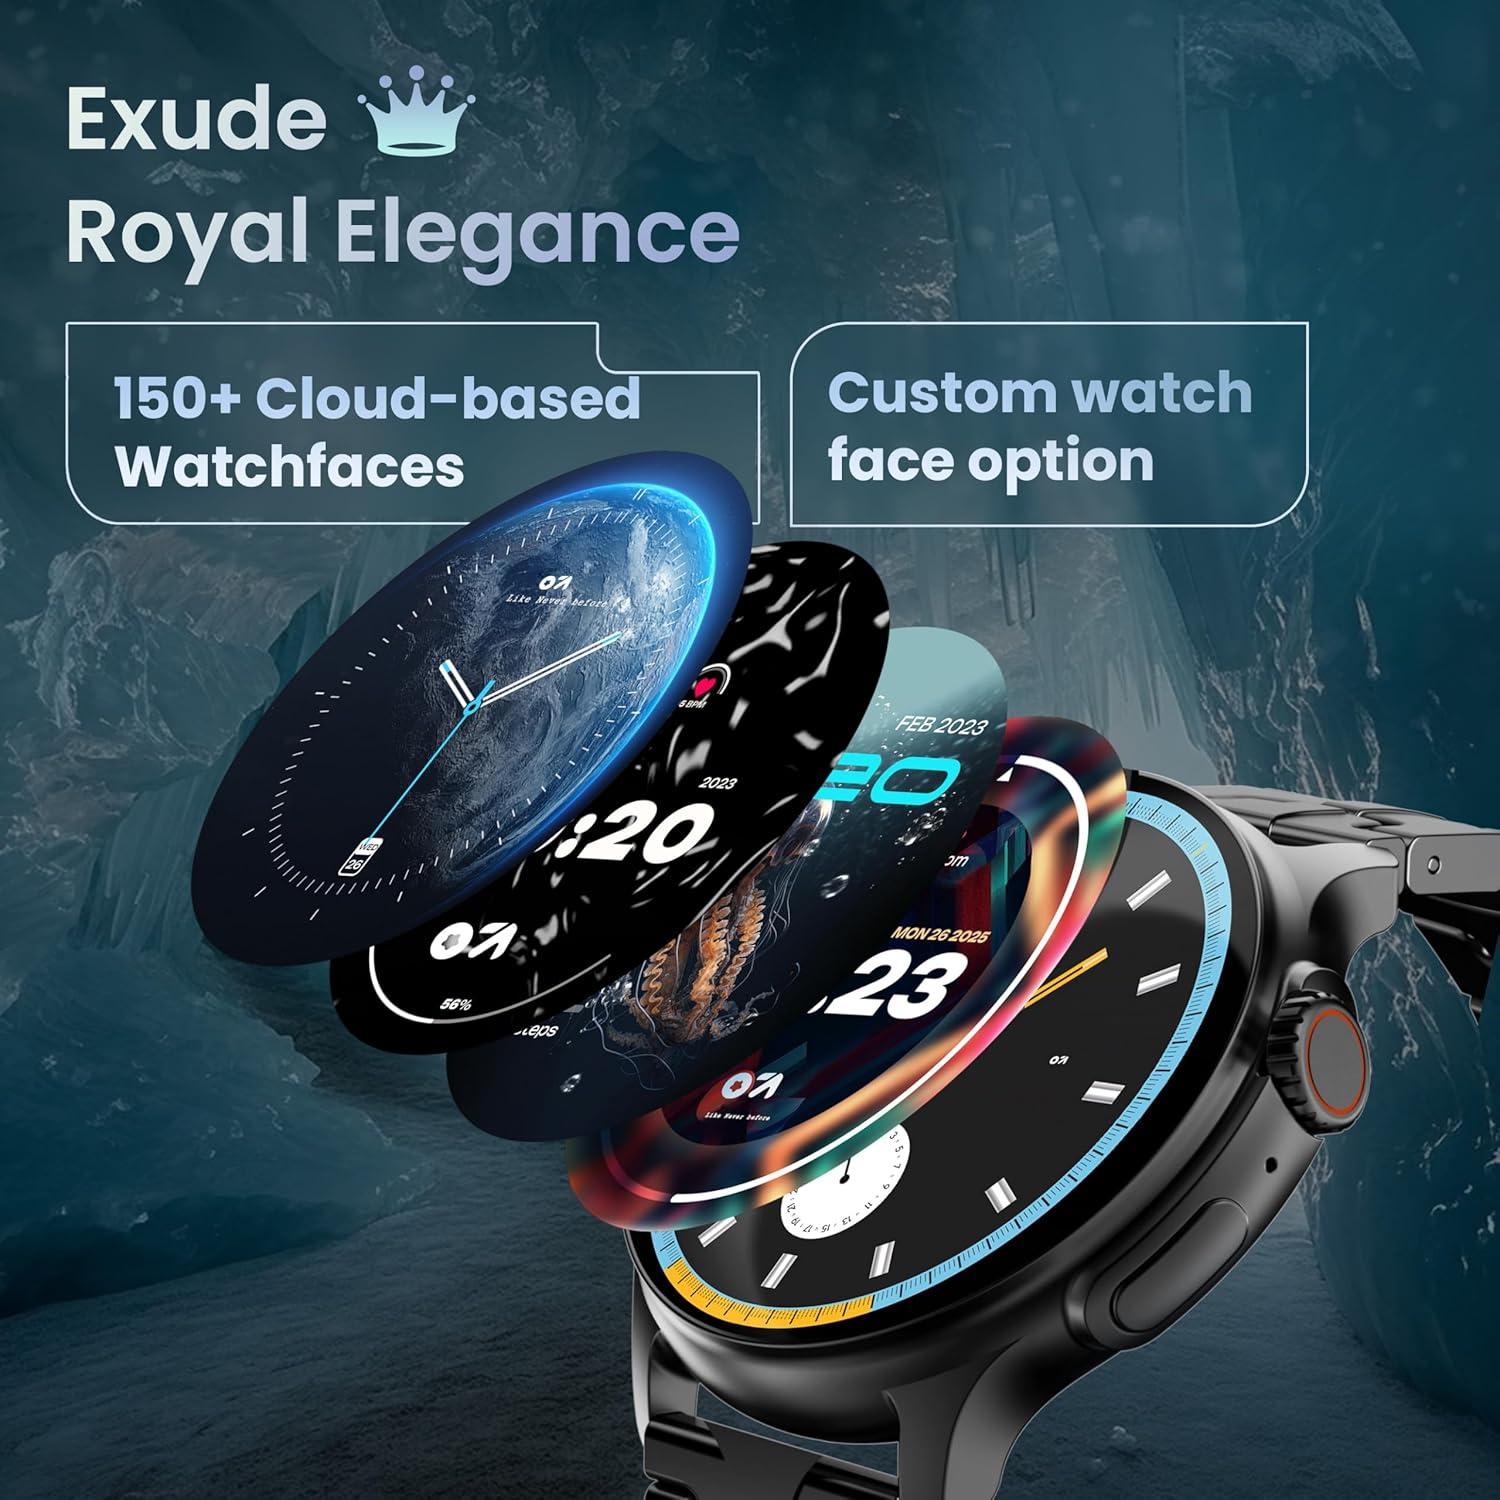
Image: A selection of over 150 watch faces available for customization.
- ປ່ຽນໜ້າໂມງ: Long-press the home screen to access watch face options. Swipe left or right to browse and tap to select. More watch faces are available through the companion app.
4.2. ການນໍາທາງ ແລະການຄວບຄຸມ
Navigate the smartwatch interface using touch gestures and the functional 'Working Crown'.

Image: Detail of the working crown, used for navigation and customization.
- ປັດລົງ: ເຂົ້າເຖິງການຕັ້ງຄ່າດ່ວນ (ເຊັ່ນ: ຄວາມສະຫວ່າງ, DND, ຕົວປະຢັດແບັດເຕີຣີ).
- ເລື່ອນຂຶ້ນ: View ການແຈ້ງເຕືອນ.
- ປັດຊ້າຍ/ຂວາ: Access widgets and main features (e.g., activity, heart rate, weather).
- Working Crown: Rotate to scroll through menus or lists. Press to return to the home screen or confirm selections.
4.3. ໂທ Bluetooth
The smartwatch supports Bluetooth Calling v5.2, allowing you to make and receive calls directly from your wrist.

Image: Illustration of the smartwatch's Bluetooth calling capabilities with integrated microphone and speaker.
- ຮັບສາຍ: Tap the green phone icon on the screen when a call comes in.
- ໂທອອກ: Access the dial pad or contacts list from the smartwatch menu.
- ການປະຕິເສດການໂທ: Tap the red phone icon.
4.4. ຮູບແບບກິລາ
Track over 120 sports and fitness activities with detailed analytics.

Image: The smartwatch interface showing active sports tracking and various sports icons.
- Access the 'Sports' menu to select your desired activity.
- The watch will record data such as duration, calories burned, and heart rate during your workout.
4.5. ການຕິດຕາມສຸຂະພາບ
Monitor key health metrics in real-time.

Image: The health suite features, including heart rate, SpO2, and sleep monitoring.
- ຕິດຕາມອັດຕາການເຕັ້ນຫົວໃຈ: Provides 24x7 heart rate tracking.
- ເຄື່ອງກວດຄວາມອີ່ມຕົວຂອງອົກຊີໃນເລືອດ SpO2: ວັດແທກລະດັບອົກຊີເຈນໃນເລືອດ.
- ການຕິດຕາມການນອນ: ຕິດຕາມຮູບແບບການນອນ ແລະຄຸນນະພາບ.
- ການຕິດຕາມຮອບວຽນປະຈຳເດືອນຂອງຜູ້ຍິງ: Helps track and predict menstrual cycles.
- ຕົວຕິດຕາມການເຄື່ອນໄຫວ: ບັນທຶກບາດກ້າວ, ໄລຍະທາງ, ແລະ ແຄລໍຣີທີ່ເຜົາຜານຕະຫຼອດມື້.
- ການຝຶກອົບຮົມລົມຫາຍໃຈ: ການຝຶກຫາຍໃຈແບບມີການແນະນຳເພື່ອການຜ່ອນຄາຍ.
4.6. AI Voice Assistant
Control your smartwatch hands-free using voice commands.

Image: The AI voice assistant feature, activated by pressing a button for 3 seconds.
- Press the dedicated button (or specified gesture) for 3 seconds to activate the AI voice assistant.
- Use voice commands to ask questions, set reminders, or manage tasks.
4.7. Notifications and Utilities
Receive SMS and push notifications directly on your wrist. The smartwatch also includes useful utilities.

Image: The 'Find My Phone' feature, which causes the connected phone to ring or vibrate.
- ການແຈ້ງເຕືອນ: Ensure notification permissions are enabled in the companion app for your desired applications.
- ເຄື່ອງຄິດໄລ່: Access the calculator from the app menu for quick calculations.
- ຊອກຫາໂທລະສັບຂອງຂ້ອຍ: Use this feature from the smartwatch to make your connected phone ring or vibrate, helping you locate it.
4.8. ກັນນໍ້າ ແລະຝຸ່ນ (IP67)
The smartwatch is IP67 rated, providing protection against dust and temporary immersion in water.
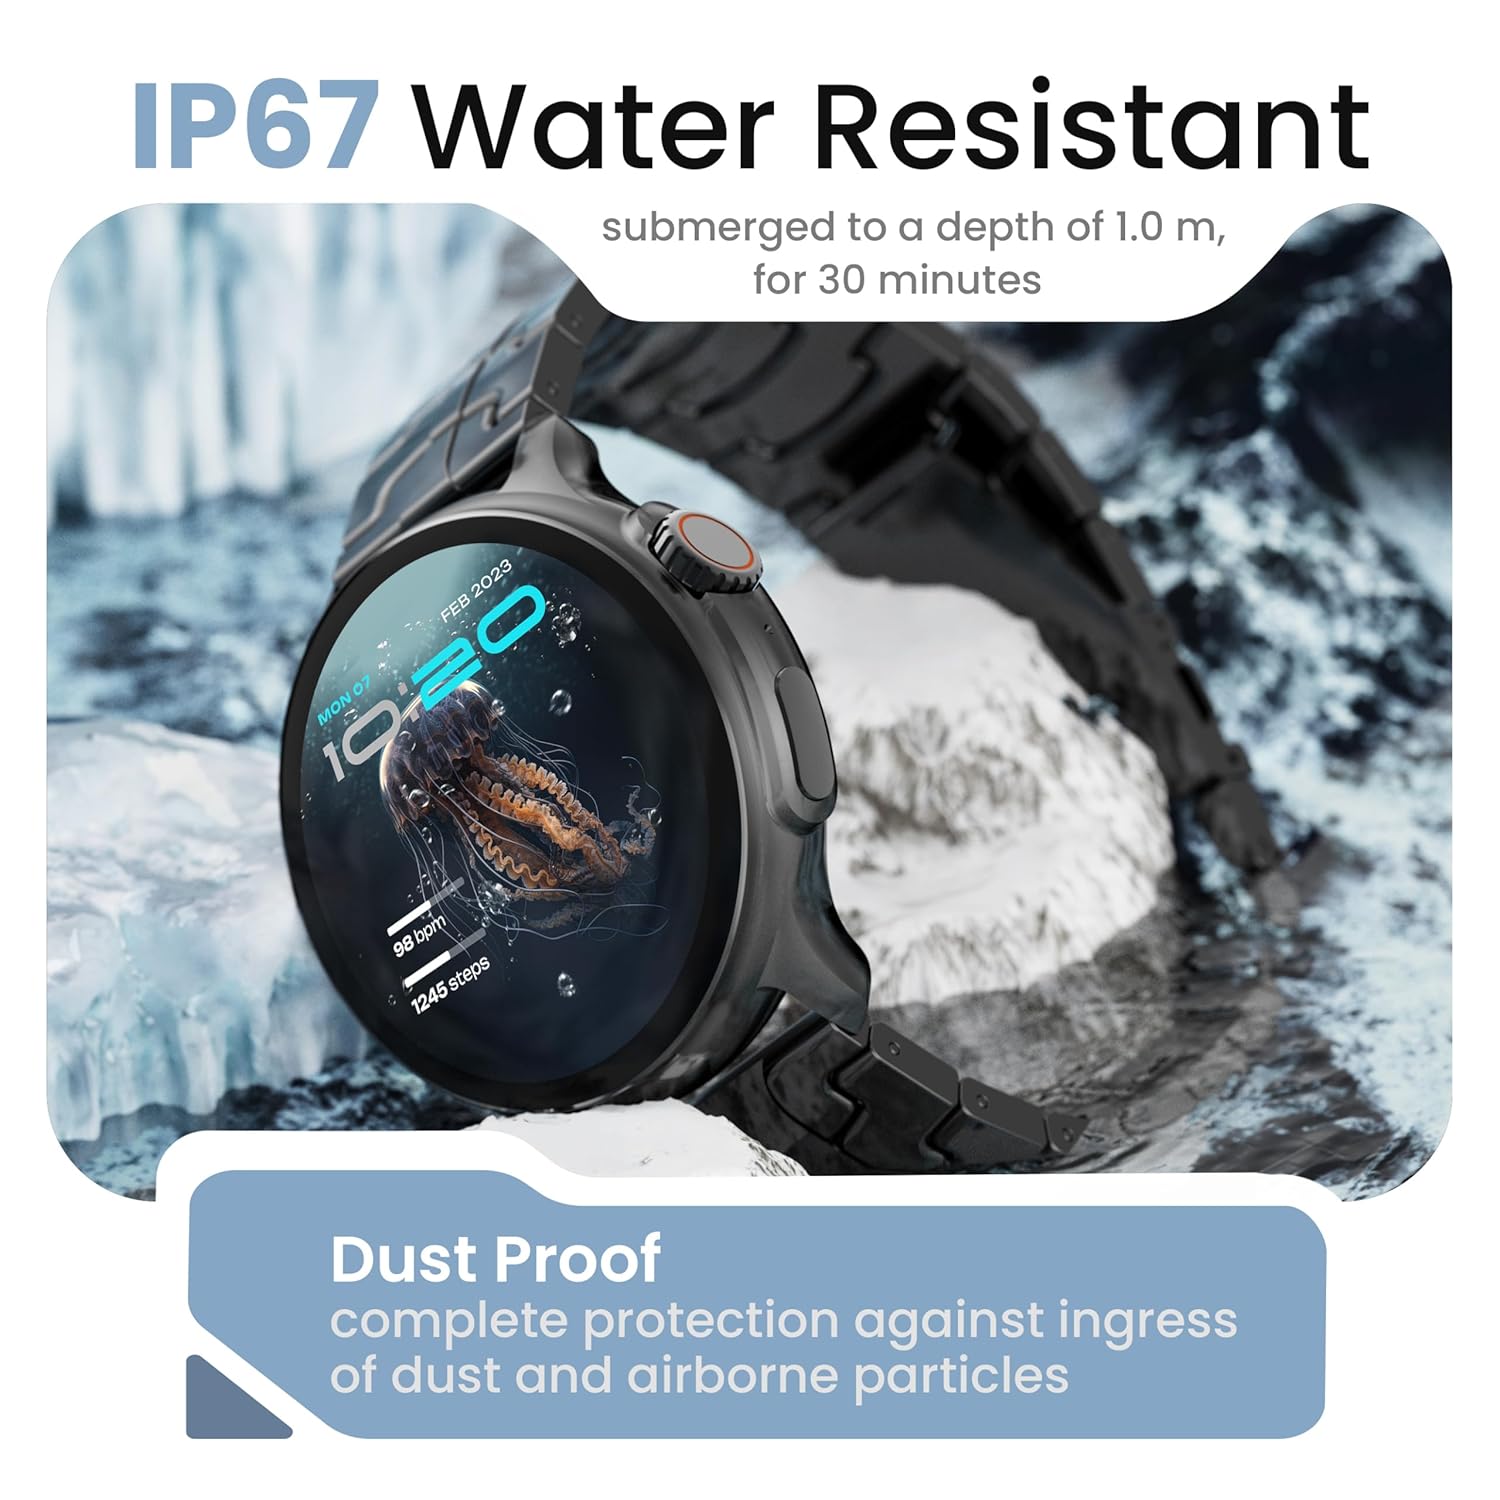
Image: The smartwatch demonstrating its IP67 water resistance, capable of being submerged up to 1 meter for 30 minutes.
- The device is resistant to sweat, splashes, and brief immersion in water up to 1 meter for 30 minutes.
- Avoid using the watch in hot water, saunas, or steam rooms.
- Do not press buttons while the watch is submerged.
5. ການດູແລແລະບໍາລຸງຮັກສາ
- ທໍາຄວາມສະອາດ: ເຊັດໂມງ ແລະ ສາຍເປັນປະຈຳດ້ວຍຜ້າອ່ອນໆແຫ້ງ. ຖ້າຈຳເປັນ, ໃຫ້ໃຊ້ຜ້າເຊັດເບົາໆ.amp ຜ້າແລະແຫ້ງຢ່າງລະອຽດ.
- ຫຼີກເວັ້ນສານເຄມີ: ຢ່າໃຊ້ສານເຄມີທີ່ຮຸນແຮງ, ສານລະລາຍເຮັດຄວາມສະອາດ, ຫຼື ຜົງຊັກຟອກທີ່ແຮງ, ເພາະວ່າສິ່ງເຫຼົ່ານີ້ສາມາດທຳລາຍຜິວໜ້າ ແລະ ປະທັບຕາຂອງໂມງໄດ້.
- ການເກັບຮັກສາ: ເກັບຮັກສາ smartwatch ໃນບ່ອນທີ່ເຢັນ, ແຫ້ງໃນເວລາທີ່ບໍ່ໄດ້ໃຊ້.
- ການສາກໄຟ: ໃຊ້ພຽງແຕ່ສາຍສາກທີ່ໃຫ້ມາ.
6. ການແກ້ໄຂບັນຫາ
6.1. Smartwatch Not Turning On
- ກວດໃຫ້ແນ່ໃຈວ່າໂມງຖືກສາກເຕັມແລ້ວ. ເຊື່ອມຕໍ່ມັນກັບເຄື່ອງສາກຢ່າງໜ້ອຍ 30 ນາທີ.
- Press and hold the side button for an extended period (10-15 seconds) to force a restart.
6.2. ບໍ່ສາມາດຈັບຄູ່ກັບໂທລະສັບສະຫຼາດໄດ້
- ໃຫ້ແນ່ໃຈວ່າ Bluetooth ຖືກເປີດໃຊ້ງານຢູ່ໃນໂທລະສັບສະຫຼາດ ແລະ ໂມງອັດສະລິຍະຂອງທ່ານ.
- Make sure the smartwatch is within the Bluetooth range of your phone (typically 10 meters).
- ຣີສະຕາດທັງສະມາດໂຟນ ແລະໂມງອັດສະລິຍະຂອງທ່ານ.
- ລຶບລ້າງແຄສ Bluetooth ໃນໂທລະສັບຂອງທ່ານ (ຖ້າມີ) ແລະລອງຈັບຄູ່ອີກຄັ້ງ.
- ໃຫ້ແນ່ໃຈວ່າແອັບຊ່ວຍເຫຼືອໄດ້ຮັບການອັບເດດເປັນເວີຊັນລ່າສຸດແລ້ວ.
6.3. ຂໍ້ມູນສຸຂະພາບທີ່ບໍ່ຖືກຕ້ອງ
- ໃຫ້ແນ່ໃຈວ່າໂມງຖືກໃສ່ຢູ່ໃນຂໍ້ມືຂອງເຈົ້າຢ່າງສະບາຍ, ບໍ່ແຫນ້ນເກີນໄປຫຼືວ່າງເກີນໄປ.
- ເຮັດຄວາມສະອາດເຊັນເຊີຢູ່ດ້ານຫຼັງຂອງໂມງ.
- ຫຼີກເວັ້ນການເຄື່ອນໄຫວຫຼາຍເກີນໄປໃນລະຫວ່າງການວັດແທກ.
- Note that smartwatch health data is for reference only and should not be used for medical diagnosis.
6.4. ການແຈ້ງເຕືອນບໍ່ປາກົດຂຶ້ນ
- Check if notification permissions are granted for the companion app and individual applications on your smartphone.
- Ensure the smartwatch is connected to your phone via Bluetooth.
- Disable 'Do Not Disturb' mode on both your phone and smartwatch.
7. ຂໍ້ມູນຈໍາເພາະ
| ຍີ່ຫໍ້ | GOBOLT |
| ຊື່ຕົວແບບ | R Pro 2 |
| ຂະຫນາດຈໍສະແດງຜົນ | 1.43 ນິ້ວ |
| ປະເພດການສະແດງ | HD AMOLED |
| ຄວາມສະຫວ່າງ | 600 ນິດ |
| ລຸ້ນ Bluetooth | 5.2 |
| ການຕໍ່ຕ້ານນ້ໍາ | IP67 |
| ອາຍຸແບັດເຕີຣີ (ສະເລ່ຍ) | 7 ມື້ |
| ເວລາສາກແບັດເຕີຣີ | 150 ນາທີ |
| ລະບົບປະຕິບັດການ | Android (ເຂົ້າກັນໄດ້) |
| ນ້ໍາຫນັກລາຍການ | 56.5 g |
| ອົງປະກອບລວມ | Smartwatch, Charging Cable, User Manual, Warranty Card |
8. ການຮັບປະກັນແລະການສະຫນັບສະຫນູນ
8.1. ຂໍ້ມູນການຮັບປະກັນ
Your GOBOULT Crown R Pro 2 Smartwatch comes with a standard manufacturer's warranty. Please refer to the included Warranty Card for specific terms, conditions, and duration of the warranty.
8.2. ການຊ່ວຍເຫຼືອລູກຄ້າ
For any product-related queries, technical assistance, or warranty claims, please contact GOBOULT customer support through the following channels:
- Webເວັບໄຊ: Visit the official GOBOULT webເວັບໄຊທ໌ສໍາລັບ FAQs ແລະຊັບພະຍາກອນສະຫນັບສະຫນູນ.
- ອີເມວ: ອ້າງອີງໃສ່ບັດຮັບປະກັນຂອງເຈົ້າ ຫຼືເຈົ້າໜ້າທີ່ webເວັບໄຊທ໌ສໍາລັບທີ່ຢູ່ອີເມວການບໍລິການລູກຄ້າ.
- ໂທລະສັບ: Contact numbers may be available on the official GOBOULT website or warranty card.
Please have your product model number (R Pro 2) and purchase details ready when contacting support.


