1. ບົດແນະນຳ
The Mastech MS8233B is a compact, handheld digital multimeter designed for measuring AC/DC voltage, DC current, resistance, diode, continuity, and temperature. It features a 2000-count display, data hold function, and low battery indication, making it suitable for various electrical testing applications in domestic and electronics environments.
2. ຂໍ້ມູນຄວາມປອດໄພ
To ensure safe operation and service of the meter, please read this manual thoroughly before use. Failure to observe safety warnings can result in severe injury or death.
- ຕ້ອງຮັບປະກັນວ່າມິເຕີຢູ່ໃນສະພາບດີກ່ອນການນຳໃຊ້ສະເໝີ.
- ຫ້າມໃຊ້ຫຼາຍກ່ວາ voltage, which is 600V CAT III.
- ໃຊ້ຄວາມລະມັດລະວັງໃນເວລາທີ່ເຮັດວຽກກັບ voltages ຂ້າງເທິງ 30V AC RMS, ສູງສຸດ 42V, ຫຼື 60V DC, ເນື່ອງຈາກວ່າເຫຼົ່ານີ້ເຮັດໃຫ້ເກີດອັນຕະລາຍຊ໊ອກ.
- ສະເຫມີຕັດການເຊື່ອມຕໍ່ນໍາການທົດສອບຈາກວົງຈອນກ່ອນທີ່ຈະປ່ຽນຫນ້າທີ່.
- ໃຫ້ປ່ຽນແບັດເຕີຣີທັນທີເມື່ອໄຟສະແດງວ່າແບັດເຕີຣີຕໍ່າປະກົດຂຶ້ນ.
- Do not operate the meter if the battery cover is not properly closed.
- ປະຕິບັດຕາມລະຫັດຄວາມປອດໄພທ້ອງຖິ່ນ ແລະແຫ່ງຊາດ.
3. ຜະລິດຕະພັນເກີນview
The Mastech MS8233B Digital Multimeter features a clear display, a rotary function switch, and dedicated input jacks for various measurements.

ຮູບທີ 3.1: ດ້ານໜ້າ view of the Mastech MS8233B Digital Multimeter. This image displays the LCD screen, rotary function switch, input jacks, and control buttons.
3.1 ອົງປະກອບ
- ຈໍ LCD: ສະແດງໃຫ້ເຫັນການອ່ານການວັດແທກ, ຫນ່ວຍງານ, ແລະຕົວຊີ້ວັດການເຮັດວຽກ.
- ສະວິດໝຸນໜ້າທີ່: Used to select the desired measurement function (e.g., V~, V-, A-, Ω, Diode, Continuity, Temp).
- ປຸ່ມຖື: ຢຸດການອ່ານປັດຈຸບັນຢູ່ໃນຈໍສະແດງຜົນ.
- ປຸ່ມ Backlight: Activates the display backlight for improved visibility in low-light conditions.
- ຊ່ອງສຽບຂາເຂົ້າ VΩmA: ການປ້ອນຂໍ້ມູນທາງບວກສໍາລັບ voltage, resistance, diode, continuity, and current measurements up to 200mA.
- COM Input Jack: ການປ້ອນຂໍ້ມູນທົ່ວໄປ (ລົບ) ສຳລັບການວັດແທກທັງໝົດ.
- ຊ່ອງສຽບຂາເຂົ້າ 10A: Positive input for high current measurements (up to 10A).
4. ຕັ້ງຄ່າ
4.1 ການຕິດຕັ້ງຫມໍ້ໄຟ
The MS8233B requires 2 LR44 batteries for operation. Ensure the batteries are installed correctly before first use or when replacing them.
- ປິດມັນຕິມີເຕີ ແລະ ຖອດສາຍທົດສອບທັງໝົດອອກ.
- ຊອກຫາຊ່ອງໃສ່ຫມໍ້ໄຟຢູ່ດ້ານຫຼັງຂອງເຄື່ອງວັດແທກ.
- ໃຊ້ screwdriver ເພື່ອເປີດຝາປິດຊ່ອງຫມໍ້ໄຟ.
- Insert the 2 LR44 batteries, observing the correct polarity (+ and -).
- ປ່ຽນຝາປິດຊ່ອງໃສ່ໝໍ້ໄຟ ແລະຍຶດມັນດ້ວຍສະກູ.
5. ຄໍາແນະນໍາການດໍາເນີນງານ
Before taking any measurements, ensure the test leads are properly connected to the meter and the circuit under test.
5.1 ການດໍາເນີນງານທົ່ວໄປ
- Turn the rotary switch from the "OFF" position to the desired measurement function.
- Connect the test leads to the appropriate input jacks and the circuit.
- ອ່ານຄ່າການວັດແທກຢູ່ໜ້າຈໍ LCD.
- To turn off the meter, rotate the switch back to the "OFF" position.
5.2 DC Voltagການວັດແທກ e (V-)
- ຕັ້ງສະວິດ rotary ເປັນ DC Vol ທີ່ຕ້ອງການtagຊ່ວງ e (ຕົວຢ່າງ, 200mV, 2V, 20V, 200V, 600V).
- ເຊື່ອມຕໍ່ຫົວການທົດສອບສີແດງກັບຊ່ອງສຽບ VΩmA ແລະການທົດສອບສີດໍານໍາໄປສູ່ຊ່ອງສຽບ COM.
- ເຊື່ອມຕໍ່ສາຍທົດສອບຜ່ານອົງປະກອບ ຫຼື ວົງຈອນທີ່ຈະວັດແທກ.
5.3 AC Voltage ການວັດແທກ (V~)
- ຕັ້ງຄ່າສະຫຼັບ rotary ກັບ AC Vol ທີ່ຕ້ອງການtage ຊ່ວງ (ຕົວຢ່າງ: 200V, 600V).
- ເຊື່ອມຕໍ່ຫົວການທົດສອບສີແດງກັບຊ່ອງສຽບ VΩmA ແລະການທົດສອບສີດໍານໍາໄປສູ່ຊ່ອງສຽບ COM.
- ເຊື່ອມຕໍ່ຕົວນໍາການທົດສອບໃນທົ່ວ AC voltage ແຫຼ່ງ.
5.4 DC Current Measurement (A-)
- ຕັ້ງສະວິດໝຸນໄປຫາຊ່ວງກະແສໄຟຟ້າ DC ທີ່ຕ້ອງການ (ເຊັ່ນ: 200µA, 2mA, 20mA, 200mA, 10A).
- For currents up to 200mA, connect the red test lead to the VΩmA jack. For currents up to 10A, connect the red test lead to the 10A jack. Always connect the black test lead to the COM jack.
- Connect the meter in series with the circuit to measure the current.
- ຂໍ້ຄວນລະວັງ: Do not attempt to measure currents exceeding 200mA through the VΩmA jack or 10A through the 10A jack.
5.5 ການວັດແທກຄວາມຕ້ານທານ (Ω)
- ຕັ້ງສະວິດໝຸນໄປທີ່ລະດັບຄວາມຕ້ານທານທີ່ຕ້ອງການ (ເຊັ່ນ: 200Ω, 2kΩ, 20kΩ, 200kΩ, 2MΩ).
- ເຊື່ອມຕໍ່ຫົວການທົດສອບສີແດງກັບຊ່ອງສຽບ VΩmA ແລະການທົດສອບສີດໍານໍາໄປສູ່ຊ່ອງສຽບ COM.
- Connect the test leads across the resistor or component to be measured. Ensure the circuit is de-energized.
5.6 ທົດສອບ Diode
- ຕັ້ງສະວິດໝຸນໄປທີ່ສັນຍາລັກ Diode.
- ເຊື່ອມຕໍ່ຫົວການທົດສອບສີແດງກັບຊ່ອງສຽບ VΩmA ແລະການທົດສອບສີດໍານໍາໄປສູ່ຊ່ອງສຽບ COM.
- ເຊື່ອມຕໍ່ສາຍທົດສອບສີແດງເຂົ້າກັບຂົ້ວບວກ ແລະ ສາຍທົດສອບສີດຳເຂົ້າກັບຂົ້ວລົບຂອງໄດໂອດ. ໜ້າຈໍຈະສະແດງແຮງດັນໄປໜ້າtage ຫຼຸດລົງ.
- Reverse the leads. An open circuit (OL) reading indicates a good diode. A reading in both directions or no reading indicates a faulty diode.
5.7 ການທົດສອບຄວາມຕໍ່ເນື່ອງ
- ຕັ້ງສະວິດໝຸນໄປທີ່ສັນຍາລັກຄວາມຕໍ່ເນື່ອງ.
- ເຊື່ອມຕໍ່ຫົວການທົດສອບສີແດງກັບຊ່ອງສຽບ VΩmA ແລະການທົດສອບສີດໍານໍາໄປສູ່ຊ່ອງສຽບ COM.
- Connect the test leads across the circuit or component. If the resistance is less than approximately 60Ω, the buzzer will sound, indicating continuity.
5.8 ການວັດແທກອຸນຫະພູມ
While the product title mentions temperature, the MS8233B model's detailed specifications do not explicitly list a temperature function. If your specific unit includes this feature, typically you would:
- Set the rotary switch to the Temperature function (usually marked with °C or °F).
- Connect a K-type thermocouple (if included) to the VΩmA and COM jacks, observing polarity.
- Place the thermocouple probe at the point where temperature needs to be measured.
5.9 ຟັງຊັນການຖືຂໍ້ມູນ
- Press the "HOLD" button to freeze the current reading on the display.
- Press the "HOLD" button again to release the reading and resume live measurements.
5.10 ຟັງຊັນ Backlight
- Press the backlight button (often marked with a sun symbol) to turn on the display backlight.
- Press the button again to turn off the backlight.
6. ບໍາລຸງຮັກສາ
6.1 ການທົດແທນຫມໍ້ໄຟ
When the low battery indicator appears on the display, replace the batteries as described in Section 4.1. Always use 2 new LR44 batteries.
6.2 ການທໍາຄວາມສະອາດ
ເຊັດກໍລະນີທີ່ມີໂຄສະນາamp ຜ້າແລະຢາຊັກຜ້າອ່ອນໆ. ຢ່າໃຊ້ສານຂັດຫຼືສານລະລາຍ. ໃຫ້ແນ່ໃຈວ່າເຄື່ອງວັດແທກແຫ້ງຫມົດກ່ອນການນໍາໃຊ້.
7. ການແກ້ໄຂບັນຫາ
- ບໍ່ມີຈໍສະແດງຜົນ/Fint Display: ກວດສອບການຕິດຕັ້ງແບັດເຕີຣີ ແລະ ການສາກໄຟ. ປ່ຽນແບັດເຕີຣີຖ້າຈຳເປັນ.
- "OL" or "1" on Display: Indicates an over-range condition or open circuit. Select a higher range or check connections.
- ການອ່ານທີ່ບໍ່ຖືກຕ້ອງ: Ensure correct function selection, proper lead connection, and that the circuit is de-energized for resistance/diode tests.
- No Continuity Buzzer: Check if the resistance is above 60Ω or if the function is correctly selected.
8. ຂໍ້ມູນຈໍາເພາະ
ຕາຕະລາງຕໍ່ໄປນີ້ສະແດງໃຫ້ເຫັນລາຍລະອຽດທາງເທັກນິກສຳລັບເຄື່ອງວັດໄຟຟ້າດິຈິຕອລ Mastech MS8233B.
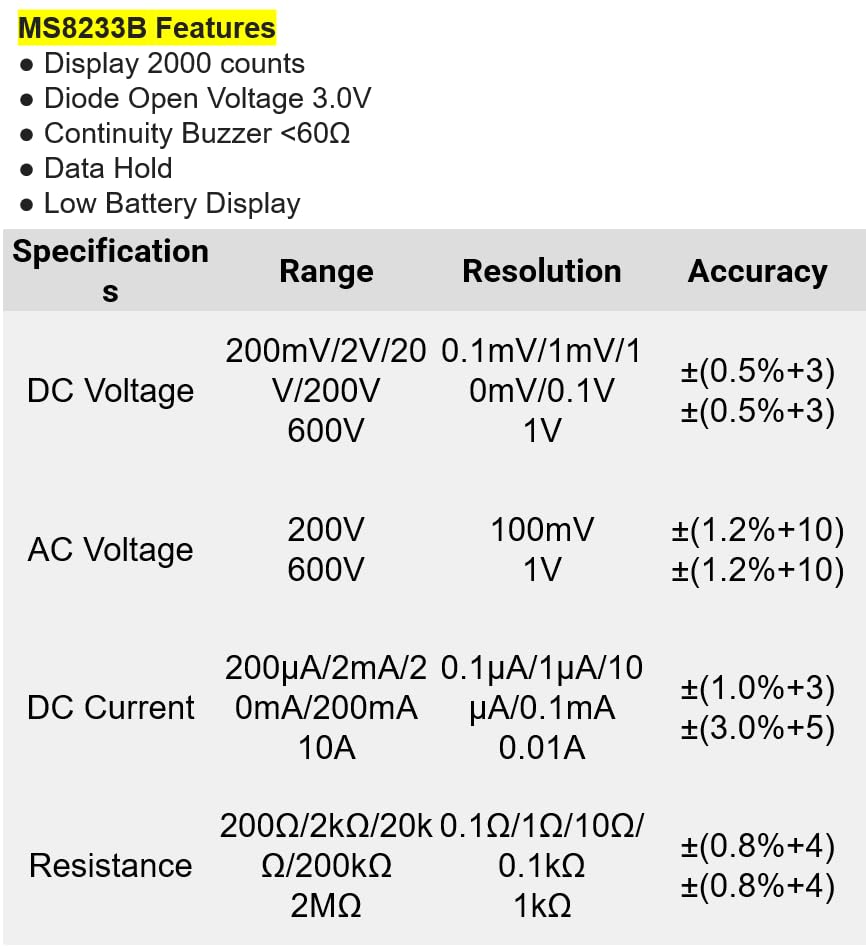
ຮູບທີ 8.1: Detailed specifications for the Mastech MS8233B, including ranges, resolutions, and accuracies for various measurements.
| ຂໍ້ມູນຈໍາເພາະ | ມູນຄ່າ |
|---|---|
| ຈໍສະແດງຜົນ | 2000 ນັບ |
| Diode ເປີດ Voltage | 3.0V |
| Buzzer ຄວາມຕໍ່ເນື່ອງ | <60Ω |
| ການຖືຂໍ້ມູນ | ແມ່ນແລ້ວ |
| ຈໍສະແດງແບັດເຕີຣີຕ່ ຳ | ແມ່ນແລ້ວ |
| ຊິງຕັນດີຊີ Voltage ຂອບເຂດ | 200mV, 2V, 20V, 200V, 600V |
| AC Voltage ຂອບເຂດ | 200V, 600V |
| Range DC ໃນປະຈຸບັນ | 200µA, 2mA, 20mA, 200mA, 10A |
| ຊ່ວງຄວາມຕ້ານທານ | 200Ω, 2kΩ, 20kΩ, 200kΩ, 2MΩ |
| ການຈັດອັນດັບຄວາມປອດໄພ | CAT III 600V |
| ແຫຼ່ງພະລັງງານ | ແບັດເຕີຣີ 2 ກ້ອນ LR44 (ລວມຢູ່) |
| ຂະໜາດສິນຄ້າ | 20 x 15 x 25 cm |
| ນ້ໍາຫນັກລາຍການ | 1 ກິໂລກຣາມ |
| ຜູ້ຜະລິດ | MASTECH |
| ໝາຍເລກຕົວແບບ | YQ-MS8233B |
| ປະເທດຕົ້ນກໍາເນີດ | ໄຕ້ຫວັນ |

ຮູບທີ 8.2: A comparison table showing features across various Mastech digital multimeter models, including the MS8233B.
9. ການຮັບປະກັນແລະການສະຫນັບສະຫນູນ
For warranty information, technical support, or service inquiries, please refer to the documentation provided with your purchase or contact your retailer. Keep your purchase receipt as proof of purchase for any warranty claims.


