ຄູ່ມືຜູ້ໃຊ້ໂປເຈັກເຕີຂະໜາດນ້ອຍ BlitzWolf BW-VT2
Your comprehensive guide to setting up, operating, and maintaining your BlitzWolf BW-VT2 Mini Projector.
1. ຜະລິດຕະພັນເກີນview
1.1 ເນື້ອໃນຊຸດ
ກະລຸນາກວດສອບວ່າລາຍການທັງໝົດມີຢູ່ໃນຊຸດຂອງທ່ານ:
- BlitzWolf BW-VT2 Mini Projector
- ການຄວບຄຸມໄລຍະໄກ
- Power Adapter
- ສາຍ HDMI
- ຄູ່ມືຜູ້ໃຊ້ (ເອກະສານນີ້)
1.2 ຮູບແບບອຸປະກອນ
Familiarize yourself with the various parts and ports of your projector.
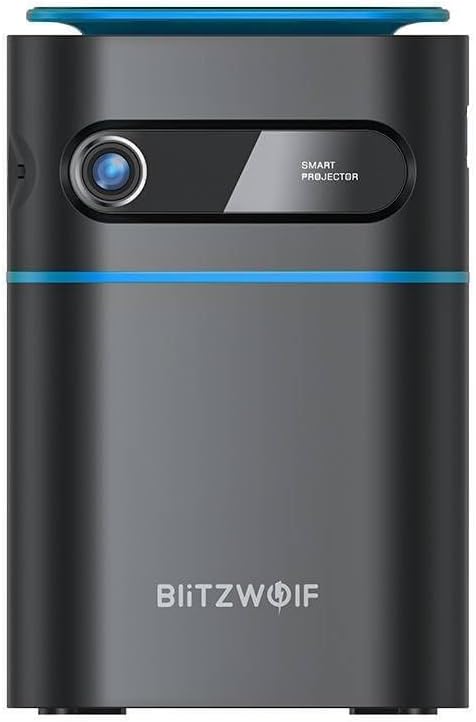
ຮູບ 1.1: ດ້ານຫນ້າ View. This image displays the front of the BlitzWolf BW-VT2 Mini Projector, highlighting the projection lens and the 'SMART PROJECTOR' branding.

Figure 1.2: Projector with Remote Control. This image shows the BlitzWolf BW-VT2 Mini Projector alongside its dedicated remote control, illustrating the compact size of both devices.
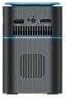
ຮູບ 1.3: ດ້ານຫລັງ View. The rear of the projector is shown, featuring ventilation grilles and various input/output ports.

ຮູບ 1.4: ຂ້າງ View. This image highlights the side of the projector where additional connectivity options such as USB and HDMI ports are located.

ຮູບທີ 1.5: ທາງເທິງ View. The top surface of the projector is visible, featuring the integrated touch control panel for direct interaction.
1.3 ພອດແລະການຄວບຄຸມ
- HDMI Port: Connect to laptops, game consoles, Blu-ray players, etc.
- ພອດ USB: ເຊື່ອມຕໍ່ USB flash drives ສໍາລັບການຫຼິ້ນມີເດຍ.
- Audio Out (3.5mm) Port: ເຊື່ອມຕໍ່ລຳໂພງ ຫຼືຫູຟັງພາຍນອກ.
- DC ຢູ່ໃນຜອດ: ເຊື່ອມຕໍ່ອະແດບເຕີໄຟ.
- ປຸ່ມເປີດປິດ: ເປີດ/ປິດໂປຣເຈັກເຕີ.
- Focus Wheel: ປັບຄວາມຊັດເຈນຂອງຮູບພາບ.
- ແຕະແຜງຄວບຄຸມ: Navigate menus and control playback directly on the device.
2. ຄູ່ມືການຕິດຕັ້ງ
2.1 ການເປີດເຄື່ອງ
- ເຊື່ອມຕໍ່ອະແດບເຕີໄຟກັບຜອດ DC IN ໃນໂປເຈັກເຕີ.
- ສຽບອະແດບເຕີໄຟໃສ່ກັບປລັກສຽບໃສ່ຝາ.
- Press and hold the Power Button on the projector or the remote control until the device powers on.
2.2 ການຈັດວາງເບື້ອງຕົ້ນ
ສໍາລັບທີ່ດີທີ່ສຸດ viewing experience, consider the following:
- ວາງໂປເຈັກເຕີຢູ່ເທິງພື້ນທີ່ຮາບພຽງທີ່ຫມັ້ນຄົງ.
- Ensure there is adequate ventilation around the projector to prevent overheating.
- ວາງໂປເຈັກເຕີ້ຕັ້ງສາກກັບໜ້າຜິວໂປເຈັກເຕີ້ (ຝາ ຫຼື ໜ້າຈໍ) ເພື່ອໃຫ້ໄດ້ຮູບພາບຮູບສີ່ແຈສາກ.
- Adjust the distance to achieve your desired screen size.
2.3 ການປັບໂຟກັດ
After powering on, adjust the focus to ensure a clear image:
- Rotate the focus wheel located near the lens until the projected image appears sharp and clear.
2.4 ຕັ້ງຄ່າຄວບຄຸມໄລຍະໄກ
Insert batteries into the remote control before first use:
- ເປີດຝາປິດຂອງແບັດເຕີຣີຢູ່ດ້ານຫຼັງຂອງການຄວບຄຸມໄລຍະໄກ.
- ໃສ່ແບັດເຕີຣີ AAA ສອງກ້ອນ (ບໍ່ລວມ), ຮັບປະກັນວ່າຂົ້ວທີ່ຖືກຕ້ອງ (+/-).
- ປິດຝາປິດຊ່ອງໃສ່ຫມໍ້ໄຟ.
3. ຄໍາແນະນໍາການດໍາເນີນງານ
3.1 ການນໍາທາງ
You can navigate the projector's interface using either the remote control or the touch control panel on top of the device.
- ການຄວບຄຸມໄລຍະໄກ: Use the directional buttons (up, down, left, right) to move through menus and the 'OK' button to select.
- ແຕະແຜງຄວບຄຸມ: Swipe and tap on the touch-sensitive surface to navigate.
3.2 ອຸປະກອນເຊື່ອມຕໍ່
The BW-VT2 supports various input sources:
- ການປ້ອນ HDMI: Connect your laptop, game console, or other HDMI-enabled devices using an HDMI cable. Select the HDMI input source from the projector's menu.
- ການປ້ອນຂໍ້ມູນ USB: Insert a USB flash drive into the USB port. The projector's media player will typically detect the drive automatically, allowing you to browse and play supported media files (ວິດີໂອ, ຮູບພາບ, ເພງ).
- ການເຊື່ອມຕໍ່ Wi-Fi: Navigate to the 'Settings' menu, then 'Network' or 'Wi-Fi'. Select your Wi-Fi network and enter the password to connect the projector to the internet. This enables access to online streaming apps and updates.
3.3 Android OS Features
As an Android-powered projector, the BW-VT2 offers smart functionalities:
- ການເຂົ້າເຖິງແອັບ: Download and install various streaming apps (e.g., Netflix, YouTube) directly from the pre-installed app store or by sideloading APKs.
- ການຕັ້ງຄ່າ: Customize display settings, audio output, network configurations, and system preferences through the Android settings menu.
- ການສະທ້ອນໜ້າຈໍ: Utilize built-in screen mirroring features (e.g., Miracast, AirPlay compatible apps) to project content from your smartphone or tablet wirelessly.
3.4 ສຽງອອກ
The projector has built-in speakers, but you can also connect external audio devices:
- 3.5mm ສຽງອອກ: Connect headphones or external speakers via the 3.5mm audio jack for enhanced sound.
4. ບໍາລຸງຮັກສາ
ການບໍາລຸງຮັກສາທີ່ເຫມາະສົມຮັບປະກັນອາຍຸຍືນແລະການປະຕິບັດທີ່ດີທີ່ສຸດຂອງໂປເຈັກເຕີຂອງທ່ານ.
4.1 ການອະນາໄມເລນ
To maintain clear image quality, clean the projector lens regularly:
- ໃຊ້ຜ້າອ່ອນໆທີ່ບໍ່ມີຂົນທີ່ອອກແບບມາສະເພາະສຳລັບເລນແວ່ນຕາ.
- ຄ່ອຍໆເຊັດເລນດ້ວຍການເຄື່ອນໄຫວເປັນວົງມົນ.
- Avoid using abrasive cleaners or excessive force, which can scratch the lens.
4.2 ລະບາຍອາກາດ
Ensure proper airflow to prevent overheating:
- Do not block the ventilation vents on the projector.
- ໃຊ້ໂປເຈັກເຕີໃນພື້ນທີ່ທີ່ມີລະບາຍອາກາດດີ.
- Periodically clean dust from the vents using a soft brush or compressed air.
4.3 ການເກັບຮັກສາ
When not in use, store your projector properly:
- Store the projector in a cool, dry place, away from direct sunlight and extreme temperatures.
- Use the original packaging or a protective case to prevent dust accumulation and physical damage.
5. ການແກ້ໄຂບັນຫາ
ອ້າງອີງໃສ່ພາກນີ້ສໍາລັບບັນຫາທົ່ວໄປແລະການແກ້ໄຂຂອງພວກເຂົາ.
| ບັນຫາ | ສາເຫດທີ່ເປັນໄປໄດ້ | ການແກ້ໄຂ |
|---|---|---|
| ໂປຣເຈັກເຕີເປີດບໍ່ໄດ້. | ບໍ່ມີການເຊື່ອມຕໍ່ໄຟຟ້າ; ອະແດບເຕີໄຟຟ້າມີບັນຫາ. | Ensure power adapter is securely connected to both projector and outlet. Try a different outlet. |
| ບໍ່ມີຮູບທີ່ຄາດໄວ້. | Incorrect input source selected; loose HDMI/USB cable. | Verify the correct input source is selected in the menu. Check cable connections. |
| ຮູບພາບແມ່ນມົວ. | Focus not adjusted; projector too close/far. | Rotate the focus wheel until the image is clear. Adjust projection distance if necessary. |
| ບໍ່ມີສຽງ. | Volume too low; external audio device not connected properly. | Increase volume. Check connections to external speakers/headphones. Ensure audio output is set correctly in settings. |
| ບັນຫາການເຊື່ອມຕໍ່ Wi-Fi. | ລະຫັດຜ່ານບໍ່ຖືກຕ້ອງ; ບັນຫາ router; ສັນຍານລົບກວນ. | Re-enter Wi-Fi password. Restart router. Move projector closer to router. |
| ການຄວບຄຸມໄລຍະໄກບໍ່ເຮັດວຽກ. | ຫມໍ້ໄຟທີ່ຕາຍແລ້ວ; ຂັດຂວາງ; ບໍ່ໄດ້ຈັບຄູ່ທາງໄກ. | Replace batteries. Ensure no obstruction between remote and projector. |
6. ຂໍ້ກໍານົດດ້ານວິຊາການ
Key specifications of the BlitzWolf BW-VT2 Mini Projector:
| ຄຸນສົມບັດ | ຂໍ້ມູນຈໍາເພາະ |
|---|---|
| ຍີ່ຫໍ້ | BlitzWolf |
| ໝາຍເລກຕົວແບບ | BW-VT2EU |
| ສີ | ດຳ |
| ເຕັກໂນໂລຊີການເຊື່ອມຕໍ່ | HDMI, USB, VGA, Wi-Fi |
| ຄວາມລະອຽດການສະແດງ | 1920 x 1080 (Full HD) |
| ປະເພດການສະແດງ | LCD, LED |
| ປັດໄຈແບບຟອມ | ແບບພົກພາ |
| ຄຸນນະສົມບັດພິເສດ | Portable, Android OS, Wi-Fi, HDMI, USB, VGA |
| ອຸປະກອນທີ່ເຂົ້າກັນໄດ້ | Laptops, Smartphones, Game Consoles, Blu-ray Players, Media Players, Wi-Fi enabled devices |
| ການນໍາໃຊ້ທີ່ແນະນໍາ | Home Cinema |
7. ການຮັບປະກັນແລະການສະຫນັບສະຫນູນ
7.1 ການຮັບປະກັນຂອງຜູ້ຜະລິດ
The BlitzWolf BW-VT2 Mini Projector comes with a ການຮັບປະກັນຂອງຜູ້ຜະລິດ 2 ປີ. ການຮັບປະກັນນີ້ກວມເອົາຂໍ້ບົກພ່ອງຂອງວັດສະດຸແລະການເຮັດວຽກພາຍໃຕ້ການນໍາໃຊ້ປົກກະຕິ. ກະລຸນາຮັກສາຫຼັກຖານການຊື້ຂອງທ່ານສໍາລັບການຮຽກຮ້ອງການຮັບປະກັນ.
7.2 ສະຫນັບສະຫນູນລູກຄ້າ
If you encounter issues not covered in the troubleshooting section or require further assistance, please contact BlitzWolf customer support. Refer to the product packaging or the official BlitzWolf webເວັບໄຊສໍາລັບຂໍ້ມູນຕິດຕໍ່ໃນປະຈຸບັນຫຼາຍທີ່ສຸດ.