1. ບົດແນະນຳ
The Midiplus Routist R2 is a compact and versatile 2-input, 2-output USB audio interface designed for high-quality audio recording, live streaming, and podcasting. It features XLR/TRS combo inputs, 48V phantom power for condenser microphones, and an OTG port for direct mobile device connectivity. With 24-bit/96kHz audio resolution, the Routist R2 provides clear and professional sound for various applications.
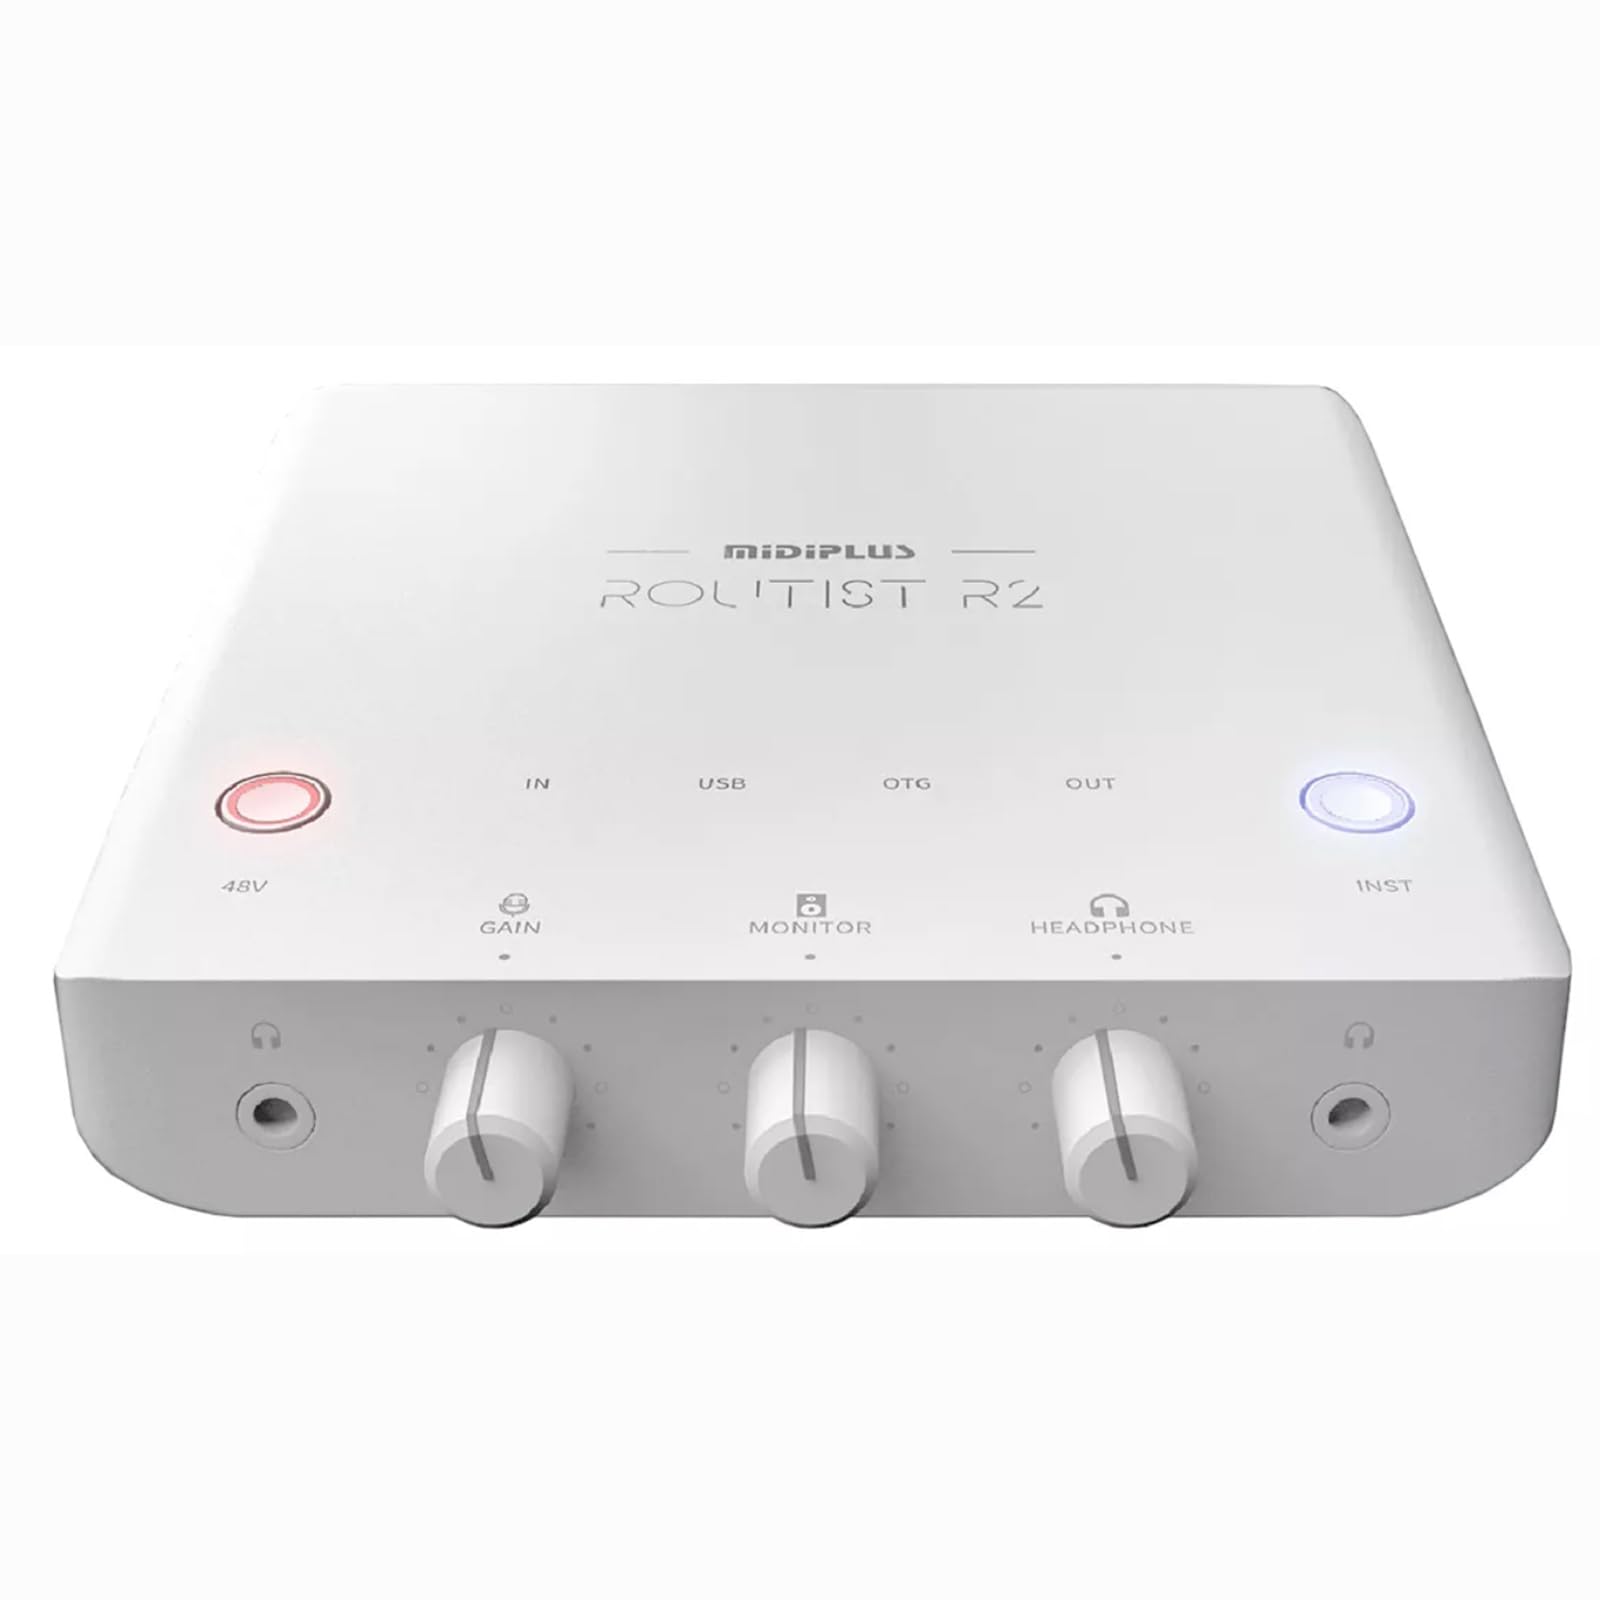
ຮູບພາບ 1.1: ເທິງລົງລຸ່ມ view of the Midiplus Routist R2 USB Audio Interface. This image displays the overall design and the layout of the main controls on the top panel.
2. ການຄວບຄຸມແລະການເຊື່ອມຕໍ່
Familiarize yourself with the various controls and connection points on your Routist R2 interface.
2.1 ແຜງຄວບຄຸມດ້ານໜ້າ
- ປຸ່ມ 48V: Activates +48V phantom power for condenser microphones connected to Input 1. An indicator light will illuminate when active.
- ປຸ່ມເພີ່ມ: Adjusts the input gain level for the connected microphone or instrument. Turn clockwise to increase gain.
- ປຸ່ມຕິດຕາມ: Controls the output level for the monitor outputs (speakers).
- HEADPHONE Knob: Adjusts the volume for the connected headphones.
- INST Button: Toggles Input 2 between Line-level and Instrument (Hi-Z) mode. Use Instrument mode for direct connection of guitars or basses.

Image 2.1: Diagram illustrating the front panel controls of the Routist R2, including the 48V button, GAIN, MONITOR, HEADPHONE knobs, and INST button.
2.2 Rear and Side Panel Connections
- INPUT 1 (XLR/TRS Combo): Connects microphones (XLR) or line-level instruments (TRS).
- INPUT 2 (TRS): Connects line-level instruments or, when INST button is active, high-impedance instruments like guitars.
- ພອດ USB: Connects the Routist R2 to your computer for power and data transfer.
- ພອດ OTG: Connects to compatible mobile phones for direct audio input/output.
- MONITOR Outputs (TRS L/R): Connects to active studio monitors for audio playback.
- PHONE Output (3.5mm): Connects to the headset jack of a mobile phone for analog audio signal transmission.
- HEADPHONE Output (3.5mm): Connects to stereo headphones for monitoring.

Image 2.2: Diagram illustrating the rear and side panel connections of the Routist R2, including USB, OTG, Monitor, Phone, and Input ports.
3. ຄູ່ມືການຕິດຕັ້ງ
Follow these steps to set up your Midiplus Routist R2 audio interface.
3.1 ການເຊື່ອມຕໍ່ຄອມພິວເຕີ
- Connect the Routist R2 to your computer using a standard USB cable. The device is bus-powered, so no external power supply is needed.
- ສໍາລັບ Windows: Download and install the latest ASIO driver from the official Midiplus website for low-latency performance.
- ສໍາລັບ macOS: The Routist R2 is class-compliant and does not require additional drivers. It will work immediately upon connection.
- Select the Routist R2 as your audio input and output device in your operating system's sound settings and your Digital Audio Workstation (DAW) software.
3.2 Mobile Phone Connection (OTG)
- Connect your mobile phone to the OTG port on the Routist R2 using a compatible OTG cable.
- Ensure your mobile device supports OTG audio input/output.
- The Routist R2 will be recognized as an external audio device by your phone for streaming or recording applications.
3.3 ການເຊື່ອມຕໍ່ໄມໂຄຣໂຟນ ແລະ ອຸປະກອນຕ່າງໆ
- ໄມໂຄຣໂຟນ: Connect an XLR microphone to INPUT 1. If using a condenser microphone, press the 48V button to supply phantom power.
- Instrument (Guitar/Bass): Connect your instrument to INPUT 2 using a TRS cable. Press the INST button to activate Hi-Z mode for optimal impedance matching.
- Line-Level Device: Connect line-level devices (e.g., synthesizers, drum machines) to INPUT 1 (TRS) or INPUT 2 (TRS) with the INST button deactivated.
3.4 Connecting Monitoring Devices
- ຈໍສະແດງຜົນສະຕູດິໂອ: Connect your active studio monitors to the MONITOR Outputs (TRS L/R).
- ຫູຟັງ: ເຊື່ອມຕໍ່ຫູຟັງຂອງທ່ານກັບ HEADPHONE Output (3.5mm).
- Mobile Phone Headset: For specific mobile streaming setups, connect a mobile phone headset to the PHONE Output (3.5mm).
4. ຄໍາແນະນໍາການດໍາເນີນງານ
This section details how to operate your Routist R2 for various audio tasks.
4.1 Adjusting Input Levels
- Before recording, speak into your microphone or play your instrument at the loudest expected level.
- Adjust the corresponding ໄດ້ຮັບ knob until the input level indicators on your DAW or the Routist R2 (if present) show a strong signal without clipping (red light). Aim for peaks around -6dB to -3dB.
4.2 ການຕິດຕາມສຽງ
- ໃຊ້ MONITOR knob to control the overall playback volume through your studio monitors.
- ໃຊ້ ຫູຟັງ knob to adjust the volume for your headphones.
- The Routist R2 typically offers direct monitoring, allowing you to hear your input signal with zero latency before it goes through your computer. Consult your DAW's settings for further monitoring options.
4.3 ການບັນທຶກ ແລະ ການຖ່າຍທອດ
- Once connected and levels are set, open your preferred DAW (e.g., Ableton Live, Logic Pro, Cubase) or streaming software (e.g., OBS, Streamlabs).
- Select the Routist R2 as your audio input and output device within the software's preferences.
- Create new audio tracks and arm them for recording, ensuring the correct input channel is selected.
- For mobile streaming, ensure your streaming application recognizes the Routist R2 via the OTG connection.
5. ບໍາລຸງຮັກສາ
Proper care ensures the longevity and optimal performance of your Routist R2.
- ທໍາຄວາມສະອາດ: Use a soft, dry cloth to wipe the exterior of the device. Avoid abrasive cleaners, solvents, or waxes.
- ການເກັບຮັກສາ: Store the Routist R2 in a cool, dry place away from direct sunlight, extreme temperatures, and high humidity.
- ການຈັດການ: Avoid dropping the device or subjecting it to strong impacts. Do not attempt to open the casing, ຍ້ອນວ່າສິ່ງນີ້ຈະເຮັດໃຫ້ການຮັບປະກັນເປັນໂມຄະ.
- ການລະບາຍອາກາດ: Ensure the device has adequate ventilation and is not covered during operation to prevent overheating.
6. ການແກ້ໄຂບັນຫາ
If you encounter issues with your Routist R2, refer to the following common problems and solutions.
| ບັນຫາ | ສາເຫດທີ່ເປັນໄປໄດ້ | ການແກ້ໄຂ |
|---|---|---|
| ບໍ່ມີສຽງຈາກຈໍພາບ/ຫູຟັງ. | Incorrect volume settings, wrong output selected, faulty cables. | Check MONITOR/HEADPHONE knobs. Ensure Routist R2 is selected as output in OS/DAW. Verify cable connections. |
| No input signal detected. | Incorrect input selected, GAIN too low, 48V not active (for condenser mics), INST button incorrect. | Check GAIN knob. Ensure correct input channel is selected in DAW. Activate 48V for condenser mics. Toggle INST button for instruments. |
| ສຽງບິດເບືອນ ຫຼືບໍ່ມີສຽງດັງ. | GAIN too high, faulty cable, ground loop. | Reduce GAIN to prevent clipping. Try different cables. Ensure proper grounding. |
| ອຸປະກອນບໍ່ຮັບຮູ້ໂດຍຄອມພິວເຕີ. | Driver issue (Windows), faulty USB cable/port. | Reinstall Windows ASIO driver. Try a different USB port or cable. Restart computer. |
| High latency (delay) during recording. | Buffer size too high in DAW, incorrect driver (Windows). | Reduce buffer size in your DAW's audio settings. Ensure ASIO driver is installed and selected on Windows. |
7. ຂໍ້ມູນຈໍາເພາະ
| ໝາຍເລກຕົວແບບ | K-MPST-R2 |
| ການເຊື່ອມຕໍ່ | USB, XLR, TRS, OTG |
| ວັດສະດຸປ້ອນ | 1 x XLR/TRS Combo, 1 x TRS (Line/Instrument) |
| ຜົນໄດ້ຮັບ | 2 x TRS Monitor, 1 x 3.5mm Headphone, 1 x 3.5mm Phone Out |
| ພະລັງງານ Phantom | +48V (USB Bus Powered) |
| ຄວາມລະອຽດສຽງ | 24-ບິດ / 96kHz |
| ລະບົບປະຕິບັດການທີ່ເຂົ້າກັນໄດ້ | Windows (ASIO driver required), macOS (Class-compliant) |
| ອຸປະກອນທີ່ເຂົ້າກັນໄດ້ | Microphone, Personal Computer, Smartphone, Speaker |
| ນ້ໍາຫນັກລາຍການ | 1 ກິໂລ |
| ຂະໜາດແພັກເກັດ | 12 x 12 x 4.7 cm |
| ປະເທດຕົ້ນກໍາເນີດ | ຈີນ |
8. ການຮັບປະກັນແລະການສະຫນັບສະຫນູນ
ສຳລັບຂໍ້ມູນການຮັບປະກັນ ແລະ ການຊ່ວຍເຫຼືອດ້ານເຕັກນິກ, ກະລຸນາອ້າງອີງເຖິງ Midiplus ຢ່າງເປັນທາງການ webເວັບໄຊ ຫຼືຕິດຕໍ່ຕົວແທນຈໍາໜ່າຍທີ່ໄດ້ຮັບອະນຸຍາດຂອງທ່ານ. ຮັກສາໃບຮັບເງິນການຊື້ຂອງທ່ານໄວ້ເປັນຫຼັກຖານການຊື້ສໍາລັບການຮຽກຮ້ອງການຮັບປະກັນໃດໆ.


