1. ບົດແນະນຳ
The MINIX C1 is a versatile USB-C to HDMI wireless extender designed for seamless screen mirroring and extension. It offers a plug-and-play experience without the need for drivers, apps, or Wi-Fi logins, providing a direct and reliable connection for various devices including laptops, PCs, smartphones, and game consoles. This manual provides detailed instructions for setting up, operating, and maintaining your MINIX C1 extender.
2. ເນື້ອໃນຊຸດ
- MINIX C1 Transmitter (USB-C)
- MINIX C1 Receiver (HDMI with USB-A power)

Image: The MINIX C1 package includes the USB-C transmitter and the HDMI receiver with an integrated USB-A power cable.
3. ຜະລິດຕະພັນເກີນview
3.1 ເຄື່ອງສົ່ງສັນຍານ (TX)
The Transmitter (TX) features a USB-C connector and is designed to connect to your source device (e.g., laptop, smartphone). It wirelessly sends the video and audio signal to the Receiver.
3.2 ຜູ້ຮັບ (RX)
The Receiver (RX) features an HDMI output for connecting to a display (e.g., TV, monitor, projector) and a USB-A cable for power. It receives the wireless signal from the Transmitter and outputs it to the connected display. A 'Pair/Reset' button is located on the side of the receiver.

ຮູບພາບ: ລາຍລະອຽດ view of the MINIX C1 Transmitter and Receiver, highlighting their respective ports (USB-C, HDMI, USB for power) and dimensions.
4. ຄໍາແນະນໍາການຕິດຕັ້ງ
The MINIX C1 is designed for a quick and easy plug-and-play setup.
4.1 ການເຊື່ອມຕໍ່ຕົວຮັບ (RX)
- Connect the HDMI end of the Receiver (RX) to an available HDMI input port on your TV, monitor, or projector.
- Connect the USB-A power cable from the Receiver (RX) to a USB-A power source (e.g., TV's USB port, USB wall adapter, power bank) with a minimum output of 5V/0.5A. The receiver requires external power to function.
4.2 ການເຊື່ອມຕໍ່ເຄື່ອງສົ່ງສັນຍານ (TX)
- Connect the USB-C end of the Transmitter (TX) to the USB-C port of your source device (e.g., laptop, PC, smartphone, game console).
4.3 ການຈັບຄູ່ (ຖ້າຈຳເປັນ)
The MINIX C1 units are typically pre-paired from the factory. If the devices do not connect automatically after 12 seconds, you may need to re-pair them:
- Ensure both the Transmitter and Receiver are powered on and connected to their respective devices.
- Press and hold the 'Pair/Reset' button on the side of the Receiver (RX) until the indicator light changes.
- Within a few seconds, the Transmitter (TX) and Receiver (RX) should establish a connection, and your screen will be mirrored or extended.

Image: The MINIX C1 in action, showing the transmitter plugged into a laptop and the receiver connected to a desktop monitor, wirelessly extending the display.

Image: Visual representation of the MINIX C1's ease of use, emphasizing its plug-and-play functionality without requiring logins or additional applications.
5. ຄໍາແນະນໍາການດໍາເນີນງານ
5.1 ການສະທ້ອນໜ້າຈໍ
By default, the MINIX C1 will mirror your source device's screen to the connected display. This means whatever is shown on your laptop, PC, or smartphone screen will be duplicated on the larger display.
5.2 Screen Extension
For Windows and macOS users, you can configure your display settings to extend your screen. This allows you to have different content on your source device and the external display, increasing ພື້ນທີ່ເຮັດວຽກຂອງທ່ານ.
- Windows: Right-click on your desktop, select 'Display settings', and choose 'Extend these displays' from the 'Multiple displays' dropdown.
- macOS: Go to 'System Settings' (or 'System Preferences'), then 'Displays', and uncheck 'Mirror displays' to enable extended desktop mode.

Image: A visual guide demonstrating the ability to either mirror the laptop screen onto an external monitor or extend the desktop across multiple displays.
5.3 Instant Swap and Share
The MINIX C1 allows for quick switching between multiple transmitters (sold separately) connected to different source devices. Simply plug in another transmitter to a different device, and the receiver will automatically switch to the active signal, making it ideal for collaborative environments.
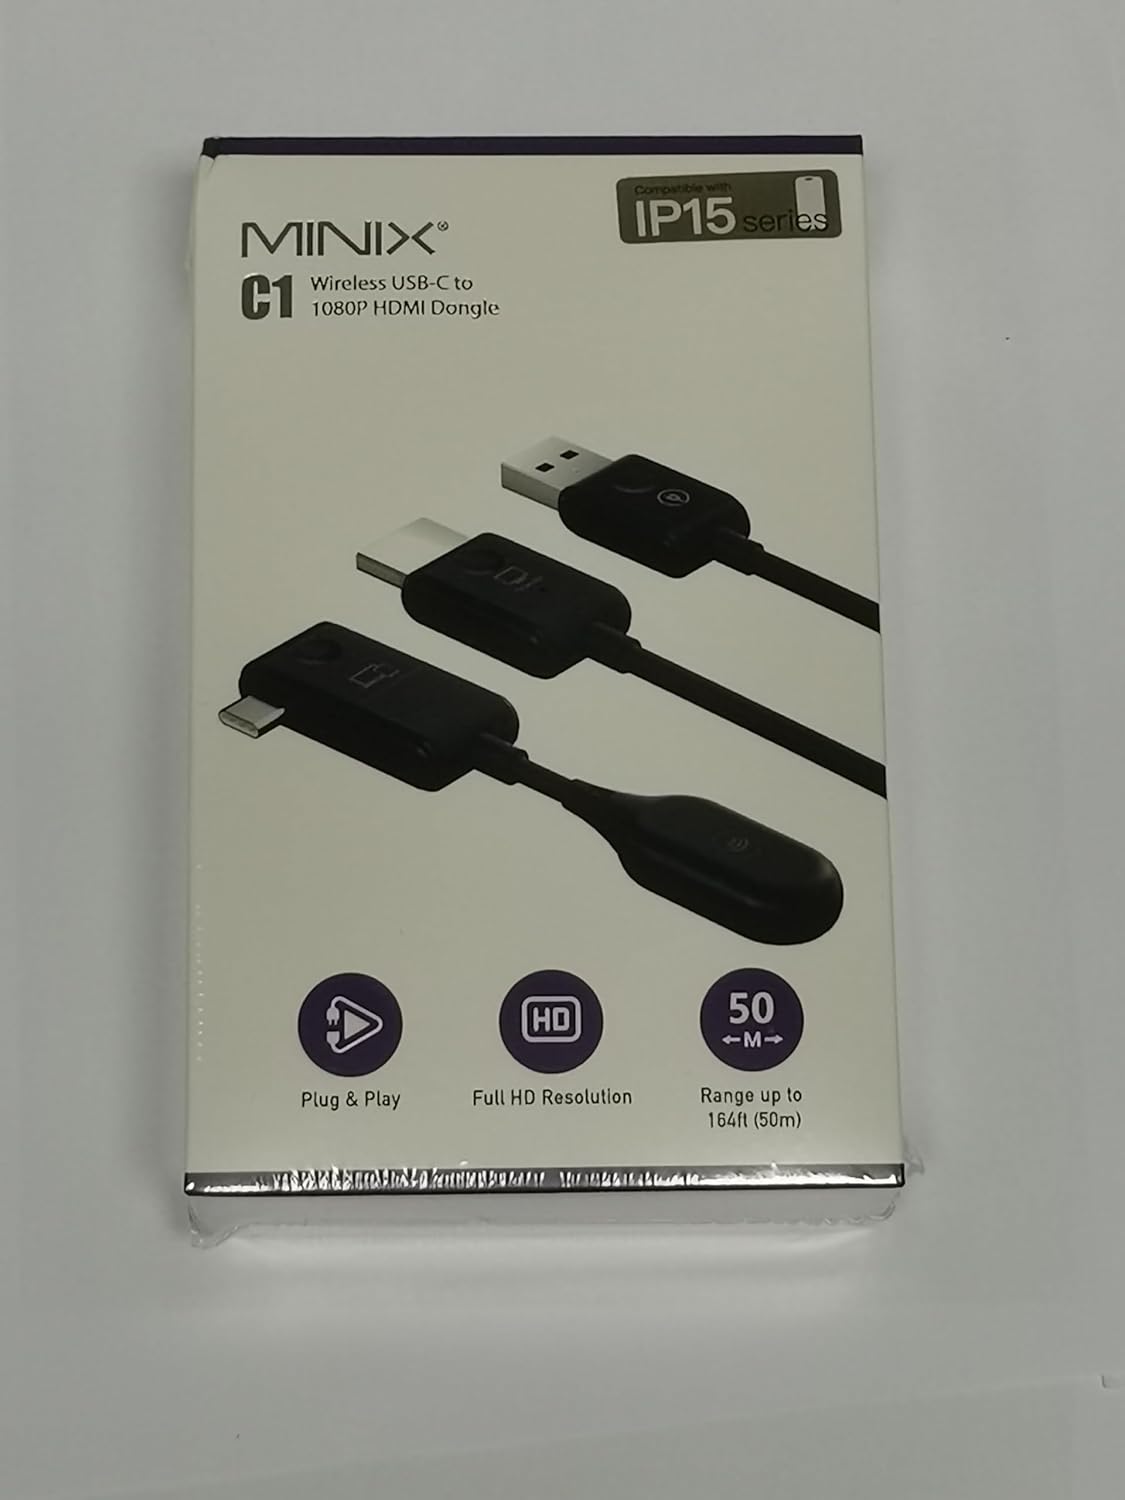
Image: A hand inserting the MINIX C1 transmitter into a laptop, illustrating the ease of instant swapping and sharing content on a larger screen.
6. ຄຸນນະສົມບັດທີ່ສໍາຄັນ
- Seamless Setup: No drivers or apps required. Plug-and-play functionality ensures a direct, reliable connection in approximately 12 seconds.
- iPhone 15 Compatibility: Seamlessly connects with the new USB-C port on iPhone 15 models, offering cross-platform compatibility beyond Apple iOS AirPlay limitations.
- Full HD 1080P@60Hz: Experience stunning video quality with ultra-high-definition resolution at 60Hz, ensuring sharp and vibrant visuals.
- Low Latency Transmission: Enjoy swift and low-latency (<0.25 second) transmission with a 5GHz connection, ideal for high-bandwidth activities like gaming and video streaming.
- ຂະຫຍາຍໄລຍະໄຮ້ສາຍ: Utilizes a 2.4/5GHz transmission protocol for robust and reliable signals. The wireless transmission distance can reach up to 50m (164ft) in an open environment, with optimal performance within 25m. Effective distance through walls is within 10m (32ft).

Image: The MINIX C1 demonstrating compatibility with iPhone 15, allowing users to mirror content from their phone to a larger display.

Image: A graphic illustrating the MINIX C1's extended wireless transmission range of up to 50 meters (164 feet) in an open environment.
7. ຂໍ້ມູນຈໍາເພາະ
| ຄຸນສົມບັດ | ລາຍລະອຽດ |
|---|---|
| ຂະໜາດສິນຄ້າ | 2.2 x 0.55 x 1.39 ນິ້ວ |
| ນ້ໍາຫນັກລາຍການ | 0.96 ອອນ |
| ໝາຍເລກຕົວແບບ | C1 |
| ອຸປະກອນທີ່ເຂົ້າກັນໄດ້ | Laptops, PCs, Smartphones, Game Consoles, iPhones (including iPhone 15) |
| ການນໍາໃຊ້ສະເພາະ | Laptop, Cell Phone |
| ປະເພດຕົວເຊື່ອມຕໍ່ | HDMI, USB ປະເພດ C |
| ສີ | ດຳ |
| ຜູ້ຜະລິດ | ບໍລິສັດ ມິນິກ ເທັກໂນໂລຢີ ຈຳກັດ |
| ຄວາມລະອຽດວິດີໂອ | 1080P @ 60Hz |
| ອະນຸສັນຍາໄຮ້ສາຍ | 2.4/5GHz |
| Range ໄຮ້ສາຍ | Up to 50m (164ft) in open environment; within 10m (32ft) through walls |
| ການປ້ອນຂໍ້ມູນພະລັງງານຂອງຕົວຮັບ | 5V/0.5A (ຜ່ານ USB-A) |
8. ການແກ້ໄຂບັນຫາ
If you encounter issues with your MINIX C1, please refer to the following common solutions:
| ບັນຫາ | ສາເຫດ / ການແກ້ໄຂທີ່ເປັນໄປໄດ້ |
|---|---|
| ບໍ່ມີສັນຍານສະແດງ |
|
| Intermittent signal / Poor quality |
|
| ບໍ່ມີສຽງ |
|
| Device gets warm | The operating surface temperature can reach approximately 60°C (140°F). This is normal. Ensure proper heat dissipation and do not cover the device during operation. |
9. ບໍາລຸງຮັກສາ
To ensure the longevity and optimal performance of your MINIX C1:
- ຮັກສາອຸປະກອນໃຫ້ສະອາດໂດຍການເຊັດດ້ວຍຜ້າອ່ອນ, ແຫ້ງ.
- ຫຼີກເວັ້ນການເປີດເຜີຍອຸປະກອນກັບອຸນຫະພູມທີ່ຮຸນແຮງ, ຄວາມຊຸ່ມຊື່ນ, ຫຼືແສງແດດໂດຍກົງ.
- ຢ່າພະຍາຍາມຖອດປະກອບ ຫຼືສ້ອມແປງອຸປະກອນດ້ວຍຕົນເອງ. ອ້າງອີງເຖິງພະນັກງານບໍລິການທີ່ມີຄຸນວຸດທິ.
- Ensure proper ventilation during operation, especially for the receiver, as its surface temperature can reach up to 60°C (140°F).
10. ການຮັບປະກັນແລະການສະຫນັບສະຫນູນ
For warranty information and technical support, please visit the official MINIX webສະຖານທີ່:
- ທາງການ Webເວັບໄຊ: www.minix.com.hk
- MINIX Forum: www.theminixforum.com
- ເຟສບຸກ: www.facebook.com/minixtech
ກະລຸນາຮັກສາຫຼັກຖານການຊື້ຂອງທ່ານສໍາລັບການຮຽກຮ້ອງການຮັບປະກັນ.
11. ຂໍ້ມູນຄວາມປອດໄພ
- ຢ່າປ່ອຍໃຫ້ອຸປະກອນຖືກນ້ໍາຫຼືຄວາມຊຸ່ມຊື່ນ.
- ຫຼີກລ້ຽງການຫຼຸດລົງຫຼືອຸປະກອນທີ່ມີການກະທົບຢ່າງຮຸນແຮງ.
- Use only the specified power requirements for the receiver (5V/0.5A USB-A).
- ເກັບຮັກສາອຸປະກອນໃຫ້ຫ່າງຈາກແຫຼ່ງຄວາມຮ້ອນ ແລະ ແປວໄຟ.
- ຫ້າມກີດຂວາງການເປີດລະບາຍອາກາດ.
- ກຳຈັດຂີ້ເຫຍື້ອເອເລັກໂຕຣນິກຢ່າງມີຄວາມຮັບຜິດຊອບຕາມລະບຽບການຂອງທ້ອງຖິ່ນ.


