1. ບົດແນະນຳ
This manual provides detailed instructions for the safe and efficient operation of your Weytoll 4-in-1 MIG/MMA/MAG/TIG 160A Welding Machine. Please read this manual thoroughly before using the equipment to ensure proper setup, operation, and maintenance. Keep this manual for future reference.
2. ຄໍາແນະນໍາຄວາມປອດໄພ
ຄໍາເຕືອນ: ການເຊື່ອມໂລຫະສາມາດເປັນອັນຕະລາຍ. ປະຕິບັດຕາມຄວາມລະມັດລະວັງດ້ານຄວາມປອດໄພສະເໝີເພື່ອປ້ອງກັນການບາດເຈັບ ຫຼືເສຍຊີວິດ.
- ການປົກປ້ອງຕາ: ໃສ່ໝວກກັນກະທົບທີ່ມີແວ່ນຕາທີ່ເໝາະສົມເພື່ອປົກປ້ອງດວງຕາຂອງທ່ານຈາກແສງອາກ.
- ການປົກປ້ອງຮ່າງກາຍ: ໃສ່ເຄື່ອງນຸ່ງທີ່ທົນໄຟ, ຖົງມື ແລະ ເກີບນິລະໄພ ເພື່ອປ້ອງກັນประกายໄຟ, ຄວາມຮ້ອນ ແລະ ໄຟຟ້າຊັອດ.
- ການລະບາຍອາກາດ: ຮັບປະກັນການລະບາຍອາກາດທີ່ພຽງພໍເພື່ອເອົາຄວັນເຊື່ອມ ແລະທາດອາຍພິດອອກ, ເຊິ່ງອາດເປັນອັນຕະລາຍຕໍ່ສຸຂະພາບຂອງທ່ານ.
- ການປ້ອງກັນໄຟ: ໃຫ້ມີເຄື່ອງດັບເພີງຢູ່ໃກ້ໆ. ເອົາວັດສະດຸໄວໄຟທັງໝົດອອກຈາກບໍລິເວນເຊື່ອມໂລຫະ.
- ຄວາມປອດໄພທາງໄຟຟ້າ: ໃຫ້ແນ່ໃຈວ່າເຄື່ອງເຊື່ອມໄດ້ຕໍ່ສາຍດິນຢ່າງຖືກຕ້ອງ. ຢ່າໃຊ້ງານໃນສະພາບທີ່ປຽກຊຸ່ມ. ກວດສອບສາຍໄຟວ່າມີຄວາມເສຍຫາຍຫຼືບໍ່ກ່ອນການນຳໃຊ້ແຕ່ລະຄັ້ງ.
- ຖັງແກັສ: If using shielding gas, secure cylinders properly and handle them with care.
- ເດັກນ້ອຍ ແລະ ຜູ້ຕິດຕາມ: ຮັກສາເດັກນ້ອຍແລະບຸກຄະລາກອນທີ່ບໍ່ໄດ້ຮັບອະນຸຍາດຢູ່ຫ່າງຈາກພື້ນທີ່ເຊື່ອມ.
3. ເນື້ອໃນຊຸດ
Upon unpacking, verify that all items listed below are present and undamaged. If any items are missing or damaged, contact your supplier immediately.

Figure 3.1: Included accessories with the welding machine.
- 1 x Weytoll Welding Machine
- 1 x ຜູ້ຖືເອເລັກໂຕຣດ
- 1 x 300A Welding Clamp (ດິນ Clamp)
- 1 x Roll of Welding Wire
- 1 x Welding Mask
- 1 x Steel Brush
- 1 x ຄູ່ມືຜູ້ໃຊ້ (ຄູ່ມືນີ້)
4. ຄຸນລັກສະນະຂອງຜະລິດຕະພັນ
The Weytoll 4-in-1 Welding Machine is designed for versatility and performance, offering multiple welding processes in a compact unit.

ຮູບ 4.1: ເກີນview of the welding machine's key features.
- Multifunctional Welding: Supports MIG (Gas & Gasless), MMA (Stick), MAG, and TIG welding processes.
- ຈໍດິຈິຕອນ: Large digital screen for clear display of welding current/voltage and convenient operation.
- ພາລາມິເຕີທີ່ສາມາດປັບໄດ້: ການເຊື່ອມໂລຫະ voltage and wire feed speed are adjustable to match material thickness.
- ການປົກປ້ອງຫຼາຍ: Equipped with over-temperature, over-current, and over-voltage protection for enhanced safety and reliability.
- IGBT Technology: Utilizes IGBT high-frequency inverter technology for stable electric arc, minimal splashing, and strong welding ability.
- ຄວາມເຢັນປະສິດທິພາບ: Features multiple exhaust holes and a built-in high-efficiency cooling fan to dissipate heat and extend machine lifespan.
5. ຕັ້ງຄ່າ
5.1 ການເຊື່ອມຕໍ່ພະລັງງານ
- Ensure the power switch on the machine is in the "OFF" position.
- Connect the power cable to a suitable 220V power outlet. The machine requires a stable power supply.
5.2 ດິນ Clamp ການເຊື່ອມຕໍ່
- ເຊື່ອມຕໍ່ດິນ clamp cable to the appropriate terminal on the front panel of the welding machine.
- ຕິດດິນ clamp ຕິດກັບຊິ້ນວຽກ ຫຼື ໂຕະເຊື່ອມຢ່າງປອດໄພ, ຮັບປະກັນການຕິດຕໍ່ທາງໄຟຟ້າທີ່ດີ.
5.3 Welding Wire Installation (MIG/MAG)

Figure 5.1: Automatic wire feeding mechanism and installation steps.
- Open the side cover of the machine to access the wire feeder compartment.
- Place the welding wire spool onto the spindle, ensuring it rotates freely.
- Thread the welding wire through the wire feeder mechanism, ensuring it passes through the drive rollers and into the liner.
- Adjust the tension of the drive rollers to prevent slipping or crushing of the wire.
- ປິດຝາດ້ານຂ້າງ.
5.4 Gas Connection (MIG/MAG with Gas)
- Connect the gas hose from your shielding gas cylinder (e.g., CO2 for MIG solid wire) to the gas input port on the rear of the welding machine.
- ຮັບປະກັນວ່າຈຸດເຊື່ອມຕໍ່ທັງໝົດແມ່ນແໜ້ນໜາເພື່ອປ້ອງກັນການຮົ່ວໄຫຼຂອງອາຍແກັສ.
- Open the gas cylinder valve and adjust the flow rate using a regulator.
6. ຄໍາແນະນໍາການດໍາເນີນງານ
6.1 ການເປີດເຄື່ອງ ແລະ ການເລືອກໂໝດ

Figure 6.1: Front and rear panel controls.
- Turn the power switch to the "ON" position. The digital display will illuminate.
- Use the mode selection button (often labeled "MMA-TIG one piece switching" or similar) to choose your desired welding process: MIG, MMA, MAG, or TIG.
6.2 ການປັບຕົວພາລາມິເຕີ
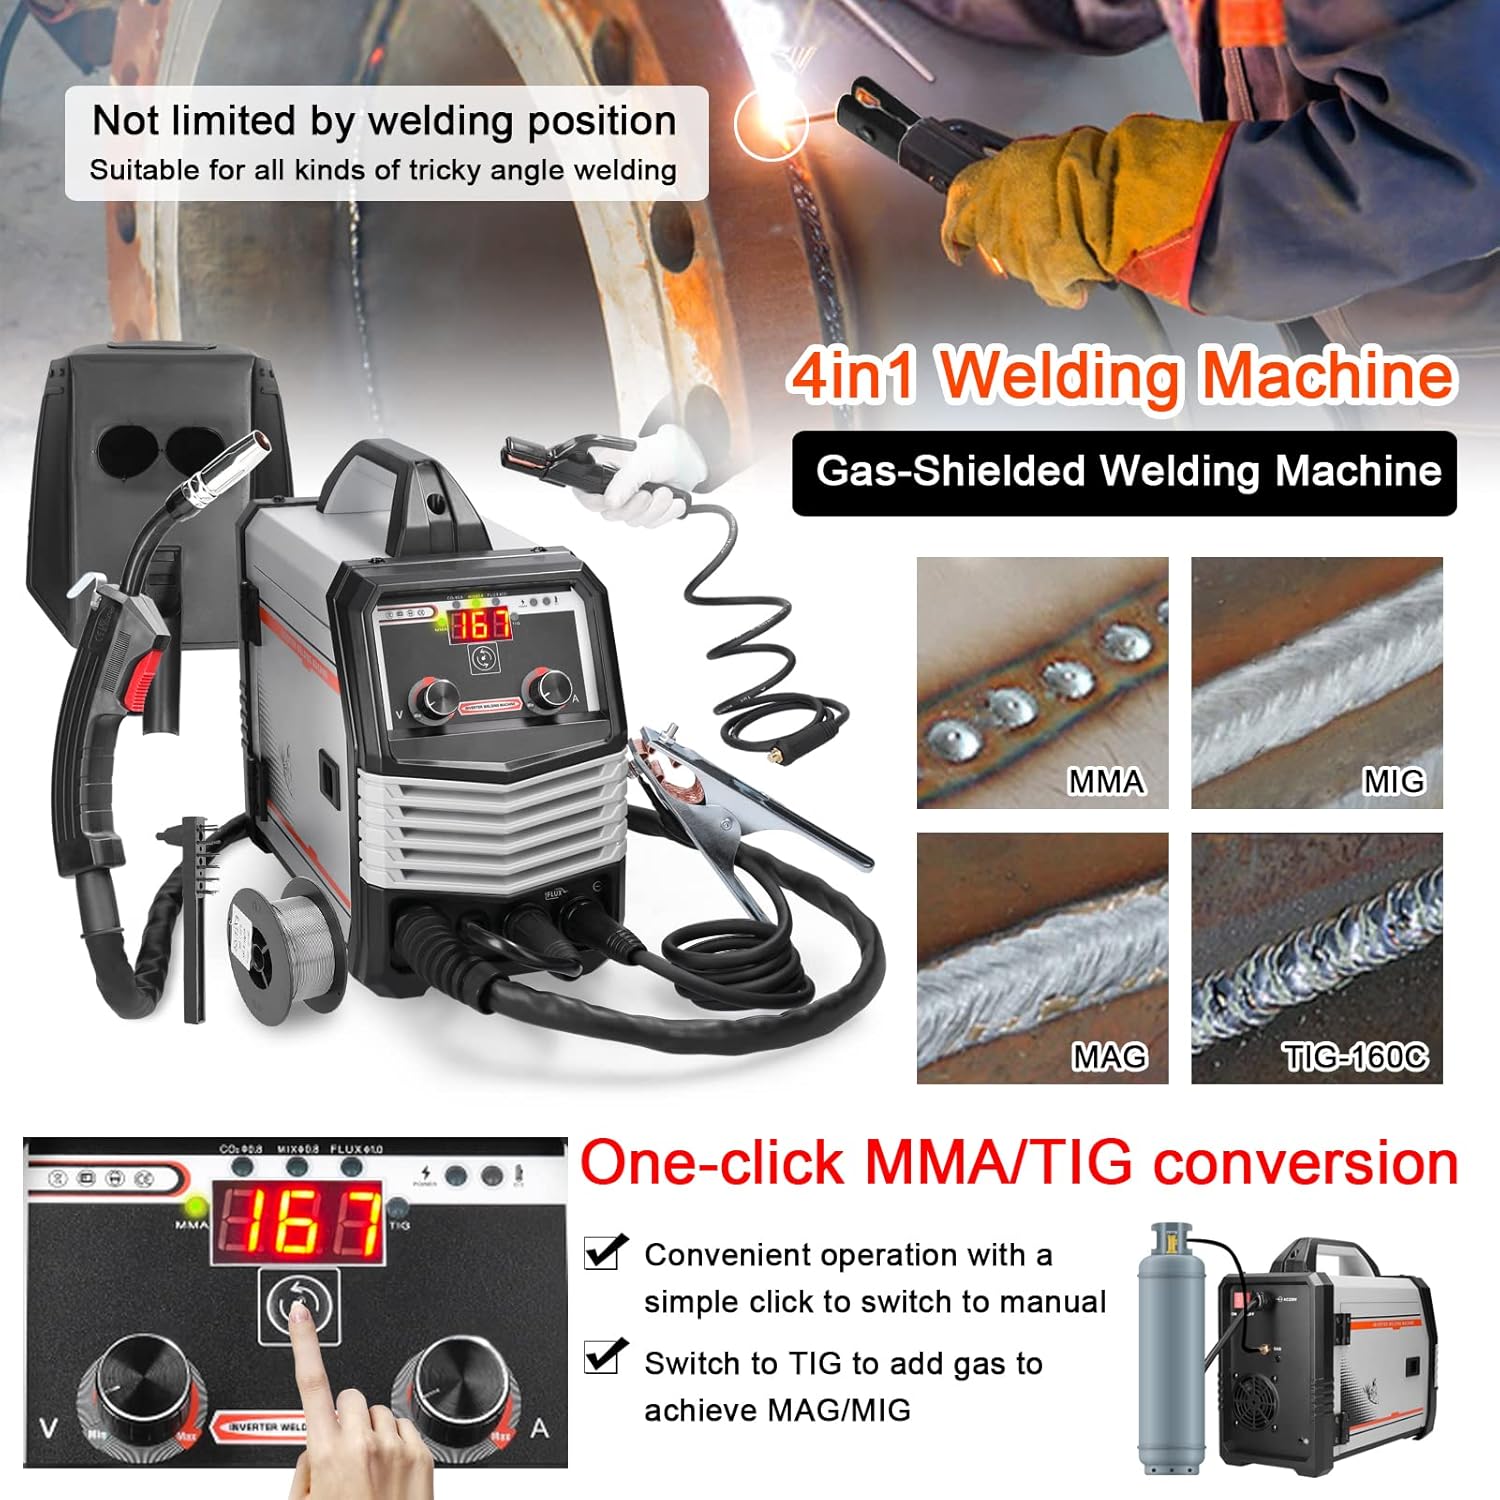
Figure 6.2: One-click mode conversion and weld examples.
- ປັດຈຸບັນ/Voltage: Use the control knobs on the front panel to adjust the welding current (A) and voltage (V) according to the material thickness and welding process. The digital display will show the current settings.
- Wire Feed Speed (MIG/MAG): Adjust the wire feed speed knob. This is often linked to voltage for optimal MIG/MAG performance.
6.3 Welding Process Specifics
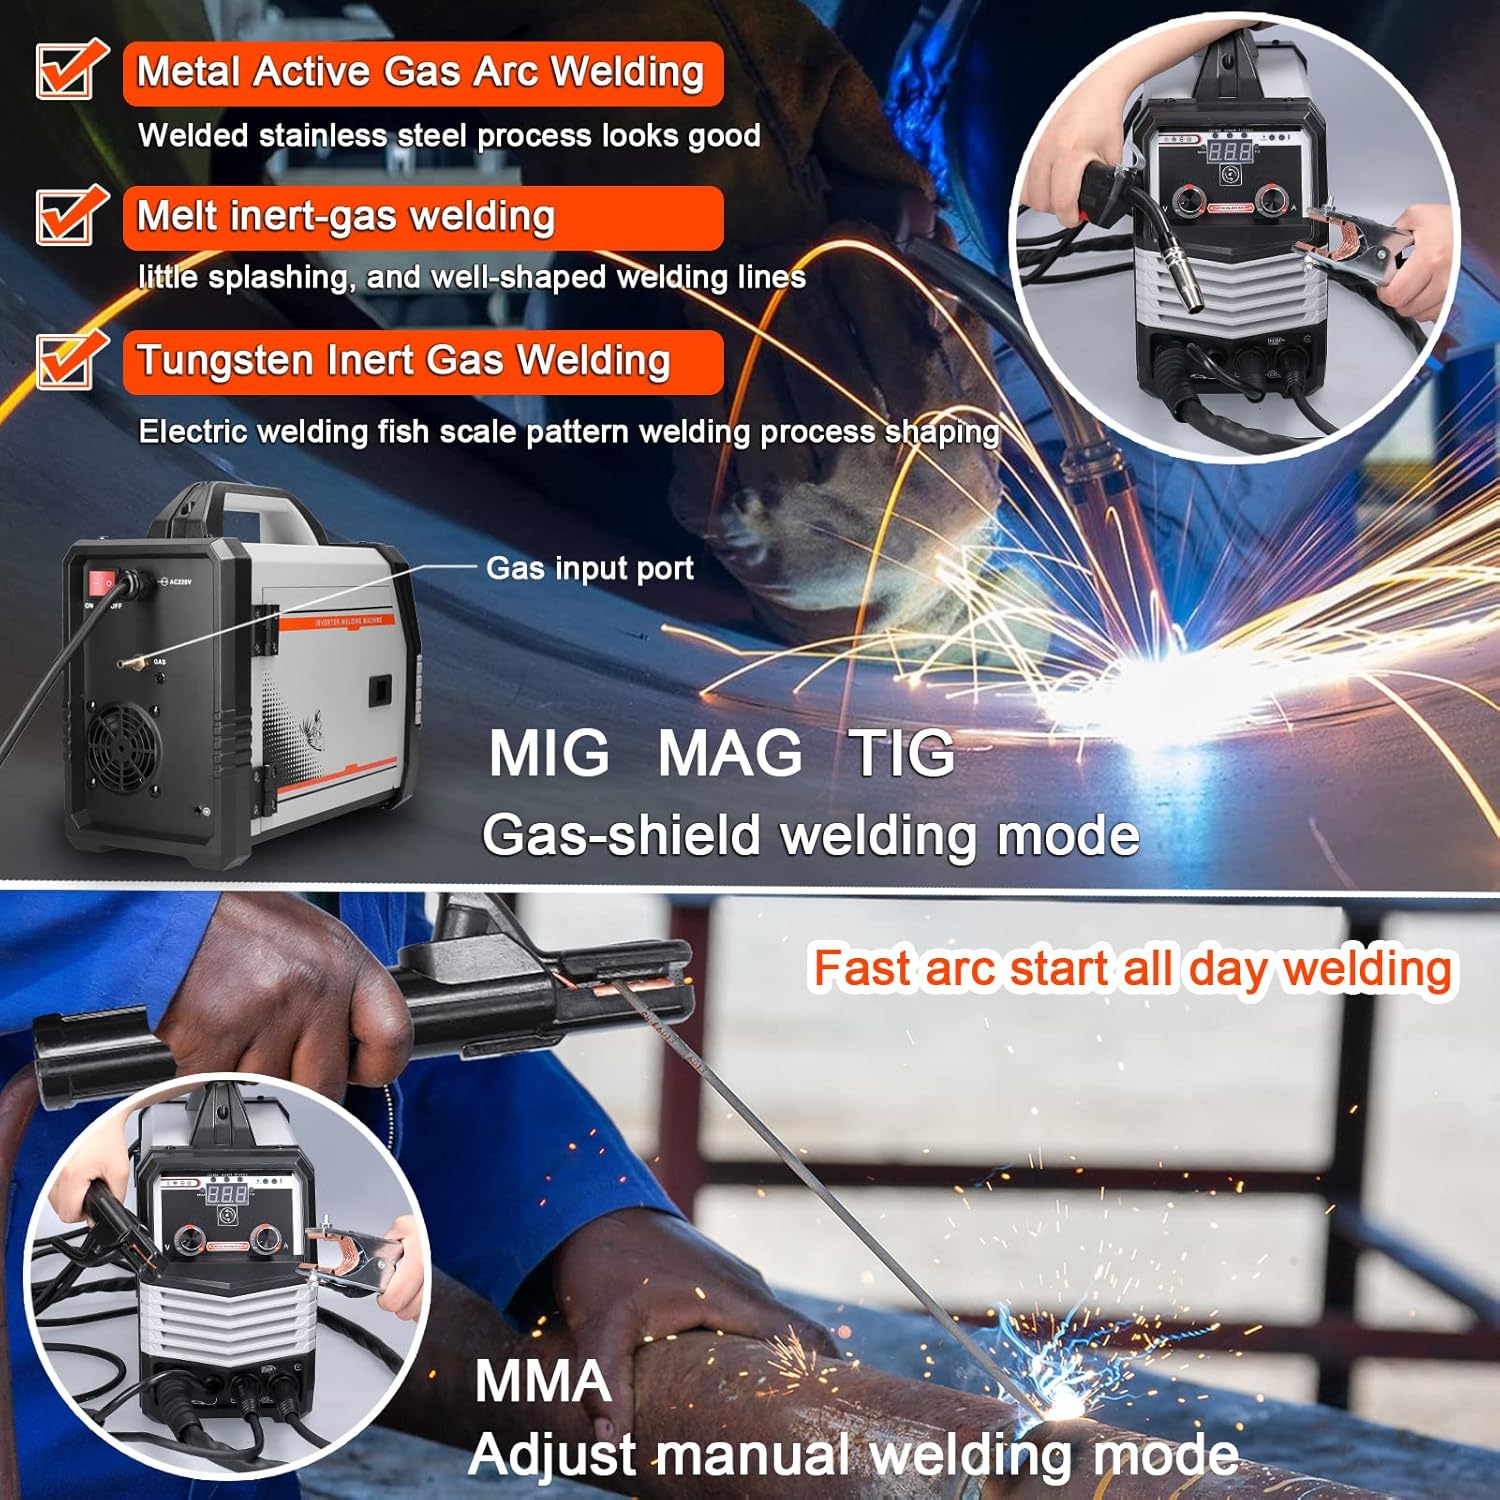
Figure 6.3: MIG/MAG/TIG and MMA welding in action.
6.3.1 MIG/MAG Welding (Gas-Shielded)
- Ensure gas cylinder is connected and gas flow is set.
- Use solid wire (e.g., 0.8mm for CO2 gas).
- Press the trigger on the MIG torch to initiate the arc and wire feed.
6.3.2 Gasless MIG Welding (Flux-Cored)
- No shielding gas required. Use flux-cored wire (e.g., 0.8mm - 1.0mm).
- Ensure polarity is set correctly for flux-cored wire (refer to wire manufacturer's instructions).
- Press the trigger on the MIG torch to initiate the arc and wire feed.
6.3.3 ການເຊື່ອມໂລຫະ MMA (ແບບຕິດ)
- ເຊື່ອມຕໍ່ສາຍເຄເບີ້ນຂອງຕົວຍຶດເອເລັກໂຕຣດເຂົ້າກັບຂົ້ວບວກ (+) ແລະສາຍດິນamp to the negative (-) terminal (or vice-versa, depending on electrode type).
- ໃສ່ເອເລັກໂຕຣດເຂົ້າໄປໃນຕົວຍຶດ.
- Strike the arc by lightly touching and quickly lifting the electrode from the workpiece.
- Recommended electrode thickness: 1.6mm - 3.2mm.
6.3.4 ການເຊື່ອມໂລຫະ TIG
- Connect the TIG torch (not included in standard package) and gas supply (Argon).
- Ensure the tungsten electrode is properly ground.
- Initiate the arc (lift arc or high-frequency start, depending on machine features).
6.4 Welding Current Setting Reference
Refer to the table below for recommended welding current and voltage settings based on electrode diameter for MMA welding.

Figure 6.4: Reference table for welding current settings.
| Electrode dia. (ມມ) | ແນະນຳກະແສເຊື່ອມ (A) | ແນະນໍາການເຊື່ອມໂລຫະ voltage (V) |
|---|---|---|
| 1.0 | 20~60 | 20.8~22.4 |
| 1.6 | 44~84 | 21.76~23.36 |
| 2.0 | 60~100 | 22.4~24.0 |
| 2.5 | 80~120 | 23.2~24.8 |
| 3.2 | 108~148 | 23.32~24.92 |
| 4.0 | 140~180 | 24.6~27.2 |
| 5.0 | 180~220 | 27.2~28.8 |
7. ບໍາລຸງຮັກສາ
ການບຳລຸງຮັກສາເປັນປະຈຳຮັບປະກັນອາຍຸການໃຊ້ງານທີ່ຍາວນານ ແລະ ປອດໄພຂອງເຄື່ອງເຊື່ອມຂອງທ່ານ.
- ທໍາຄວາມສະອາດ: Regularly clean the machine's exterior with a dry cloth. Use compressed air to blow out dust from inside the machine, especially the cooling vents, at least once a month or more frequently in dusty environments. Ensure the machine is unplugged before cleaning.
- ການກວດສອບສາຍ: Inspect all welding cables, power cords, and gas hoses for cuts, abrasions, or loose connections before each use. Replace damaged components immediately.
- Wire Feeder: Clean the wire feeder rollers and guide tubes regularly to prevent wire feeding issues. Check for wear on the drive rollers.
- Torch/Electrode Holder: Clean the MIG torch nozzle and contact tip. Replace worn contact tips. Ensure the MMA electrode holder jaws are clean and grip electrodes securely.
- ການເກັບຮັກສາ: Store the welding machine in a clean, dry environment when not in use.
8. ການແກ້ໄຂບັນຫາ
ພາກສ່ວນນີ້ແກ້ໄຂບັນຫາທົ່ວໄປທີ່ທ່ານອາດຈະພົບ. ສໍາລັບບັນຫາທີ່ບໍ່ໄດ້ລະບຸໄວ້ຢູ່ທີ່ນີ້, ໃຫ້ຕິດຕໍ່ຝ່າຍຊ່ວຍເຫຼືອລູກຄ້າ.
| ບັນຫາ | ສາເຫດທີ່ເປັນໄປໄດ້ | ການແກ້ໄຂ |
|---|---|---|
| ເຄື່ອງບໍ່ເປີດ | No power supply; Power switch off; Faulty power cable/plug | Check power outlet; Ensure switch is ON; Inspect and replace cable if damaged. |
| No welding arc (MMA) | Poor ground connection; Incorrect current setting; Wet electrode; Faulty electrode holder | Ensure good ground contact; Adjust current; Use dry electrodes; Check electrode holder. |
| Wire not feeding (MIG/MAG) | Wire spool tangled; Drive rollers loose/worn; Contact tip clogged; Liner blocked | Untangle wire; Adjust/replace rollers; Clean/replace contact tip; Clean/replace liner. |
| ຄຸນນະພາບການເຊື່ອມທີ່ບໍ່ດີ | Incorrect settings (current/voltage/wire speed); Improper technique; Contaminated workpiece; Insufficient gas flow (MIG/MAG) | Adjust settings; Practice technique; Clean workpiece; Check gas supply and flow rate. |
| ເປີດໃຊ້ການປ້ອງກັນຄວາມຮ້ອນເກີນແລ້ວ | Exceeded duty cycle; Insufficient ventilation; Blocked cooling vents | ປ່ອຍໃຫ້ເຄື່ອງເຢັນລົງ; ຮັບປະກັນການລະບາຍອາກາດທີ່ເໝາະສົມ; ທຳຄວາມສະອາດຊ່ອງລະບາຍຄວາມຮ້ອນ. |
9. ຂໍ້ມູນຈໍາເພາະ
Technical specifications for the Weytoll 4-in-1 Welding Machine.
| ພາລາມິເຕີ | ມູນຄ່າ |
|---|---|
| ຕົວແບບ | Schweißgerät 4in1 |
| ການປ້ອນຂໍ້ມູນ Voltage | 220V |
| ປັດຈຸບັນຜົນໄດ້ຮັບ (A) | 20A-300A |
| Power Capacity (KVA) | 7.4 |
| ຄວາມຖີ່ (HZ) | 50/60 |
| ຜົນໄດ້ຮັບ Voltage (V) | 16.5-24 |
| ຮອບວຽນໜ້າທີ່ຈັດອັນດັບ (%) | 60 |
| ປັດໄຈພະລັງງານ | 0.85 |
| ປະສິດທິພາບ (%) | 85 |
| Wire Feeding Style | ພາຍໃນ |
| Wire Feed Speed (m/min) | 3.6-12 |
| Post-Flux Time (S) | 0.5±1 |
| ລະດັບ insulation | F |
| Housing Protection Index | IP21 |
| Max Wire Spool Size | Φ200 |
| ອຸນຫະພູມສະພາບແວດລ້ອມ | -10 ℃ ກັບ 40 ℃ |
| ລະດັບຄວາມສູງ | ≤ 1000 ແມັດ |
| Relative Humidity (40°C) | ≤ 50% |
| Relative Humidity (20°C) | ≤ 90% |
| ຂະໜາດລາຍການ | 375 x 245 x 160 ມມ |
| ນ້ໍາຫນັກລາຍການ | 6740 g |
| ຂະໜາດແພັກເກັດ | 470 x 225 x 400 ມມ |
| ນ້ໍາຫນັກຊຸດ | 7000 g |
10. ການຮັບປະກັນແລະການສະຫນັບສະຫນູນ
ສຳລັບຂໍ້ມູນການຮັບປະກັນ ຫຼື ການຊ່ວຍເຫຼືອດ້ານເຕັກນິກ, ກະລຸນາອ້າງອີງເອກະສານທີ່ສະໜອງໃຫ້ພ້ອມກັບການຊື້ຂອງທ່ານ ຫຼື ຕິດຕໍ່ຜູ້ຂາຍຍ່ອຍ/ຜູ້ຜະລິດໂດຍກົງ. ເກັບຫຼັກຖານການຊື້ຂອງທ່ານໄວ້ເພື່ອການຮຽກຮ້ອງການຮັບປະກັນ.
Manufacturer: Weytoll


