1. ບົດແນະນຳ
Thank you for choosing the MOUNTUP Freestanding Monitor Stand. This manual provides detailed instructions for the assembly, operation, and maintenance of your new monitor stand. Designed for ergonomic viewing and space-saving, this stand is compatible with 13-32 inch flat or curved screens weighing up to 17.6 lbs, supporting VESA patterns 75x75 mm and 100x100 mm.

Figure 1: MOUNTUP Freestanding Monitor Stand (Model MU1003)
This image shows the complete MOUNTUP Freestanding Monitor Stand, featuring a black VESA mounting plate attached to a vertical black pole, which is securely mounted on a rectangular black tempered glass base.
2. ຄຸນລັກສະນະຂອງຜະລິດຕະພັນ
- ຄວາມເຂົ້າກັນໄດ້ຂອງໜ້າຈໍ: Supports one 13-32 inch flat or curved screen up to 17.6 lbs. Compatible with VESA patterns 75x75 mm and 100x100 mm.
- ການປັບຕົວແບບ Ergonomic:
- ອຽງ: +30°/-30° for optimal viewມຸມ.
- ໝູນ: +25°/-25° for flexible screen positioning.
- ໝຸນ: 360° for easy switching between landscape and portrait modes.
- ການປັບຄວາມສູງ: Up to 6.89 inches to fit various sitting positions.
- ການອອກແບບເອກະລາດ: No drilling or clamping required, providing convenience and protecting your desk surface. Features a heavy tempered glass base for stability and an elegant look.
- ການຄຸ້ມຄອງສາຍໄຟ: Integrated cable clips keep wires organized for a clean and clutter-free workspace.
- ການກໍ່ສ້າງທີ່ທົນທານ: Made from durable metal and tempered glass for long-lasting use.

Figure 2: Product Dimensions and VESA Compatibility
This image illustrates the key dimensions of the monitor stand, including a total height of 17.3 inches, a base width of 7.9 inches, and a base depth of 11.8 inches. It also highlights the maximum monitor size of 32 inches, a weight capacity of 17.6 lbs, and VESA compatibility for 75x75 mm and 100x100 mm patterns.
3. ເນື້ອໃນຊຸດ
Please verify that all components are present and in good condition before beginning assembly. If any parts are missing or damaged, please contact customer support.
- Monitor Stand Base (Tempered Glass)
- Vertical Support Pole
- ແຜ່ນຍຶດຕິດ VESA
- ຊຸດອຸປະກອນຕິດຕັ້ງ (ສະກູ, ແຜ່ນຮອງ, ຕົວກັ້ນ)
- ເຄື່ອງມືປະກອບ (ເຊັ່ນ: Allen wrench)
- ຄູ່ມືແນະ ນຳ (ເອກະສານນີ້)
4. ການຕິດຕັ້ງແລະການຕິດຕັ້ງ
The MOUNTUP monitor stand is designed for quick and easy assembly, typically within 5 minutes. Follow these steps for a secure setup:
- ຕິດເສົາຮອງຮັບໃສ່ກັບພື້ນຖານ: Secure the vertical support pole to the tempered glass base using the provided screws and tools. Ensure it is firmly tightened for stability.
- ແນບແຜ່ນ VESA ໃສ່ Monitor: Align the VESA mounting plate with the VESA holes on the back of your monitor. Use the appropriate screws, washers, and spacers from the hardware kit to securely attach the plate to your monitor. Ensure the screws are tightened sufficiently but do not overtighten.
- Mount Monitor to Stand: Carefully slide the VESA plate with the attached monitor onto the vertical support pole. Ensure the monitor is properly seated and secured by the safety lock mechanism.
For detailed visual instructions, please refer to the included quick start guide or the official product assembly video if available.
5. ຄໍາແນະນໍາການດໍາເນີນງານ
The MOUNTUP monitor stand offers various adjustments to achieve your ideal ergonomic viewຕໍາແຫນ່ງ.
5.1 ການປັບຄວາມສູງ
To adjust the monitor's height, loosen the knob on the back of the vertical pole, slide the monitor up or down to the desired level, and then re-tighten the knob to secure it. The stand offers multiple height levels for precise positioning.

Figure 3: 6-Level Height Adjustment
This image displays the monitor stand with a monitor attached, illustrating the six distinct height levels available for adjustment, ranging from 7.3 inches to 14.3 inches from the desk surface to the center of the VESA plate.
5.2 ການປັບຕົວອຽງ
The monitor can be tilted +30°/-30° to reduce glare and optimize viewing comfort. Use the provided Allen wrench to loosen the bolt on the VESA plate mechanism, adjust the tilt angle, and then firmly tighten the bolt to secure the monitor in place.
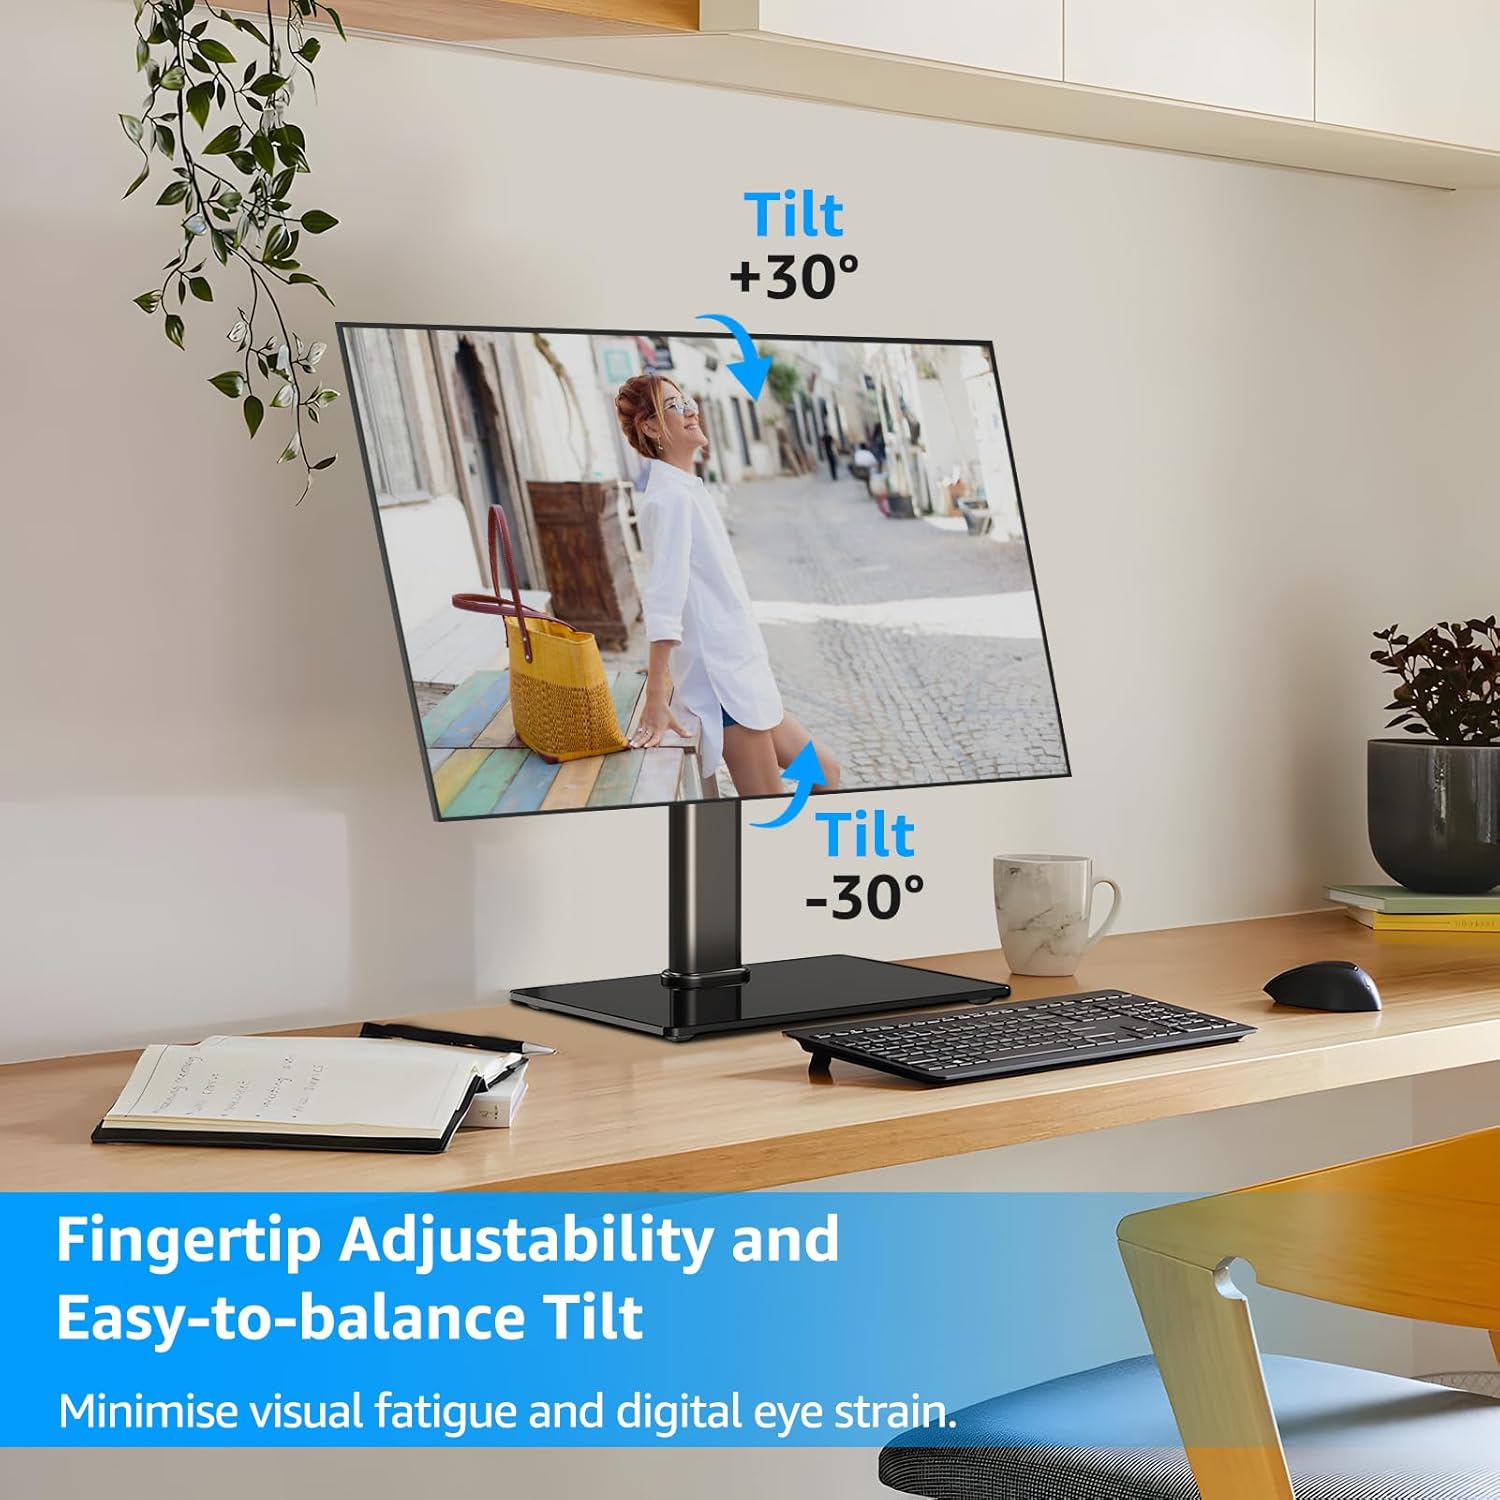
ຮູບ 4: ຊ່ວງການປັບຕົວອຽງ
This image shows a monitor on the stand, demonstrating the ability to tilt the screen both upwards (+30°) and downwards (-30°) to achieve an ergonomic viewing angle and minimize eye strain.
5.3 ການປັບການຫມຸນ
Swivel the monitor +25°/-25° left or right to share your screen or adjust your viewໃນມຸມໂດຍບໍ່ມີການຍ້າຍຂາຕັ້ງທັງຫມົດ.

Figure 5: Swivel Adjustment Range
This image illustrates the monitor stand's swivel capability, allowing the screen to rotate +25° to the right and -25° to the left, enabling flexible screen positioning on a desk.
5.4 ການປັບການໝຸນ
Rotate the monitor 360° to easily switch between landscape and portrait orientations, ideal for different tasks like coding or document viewing.
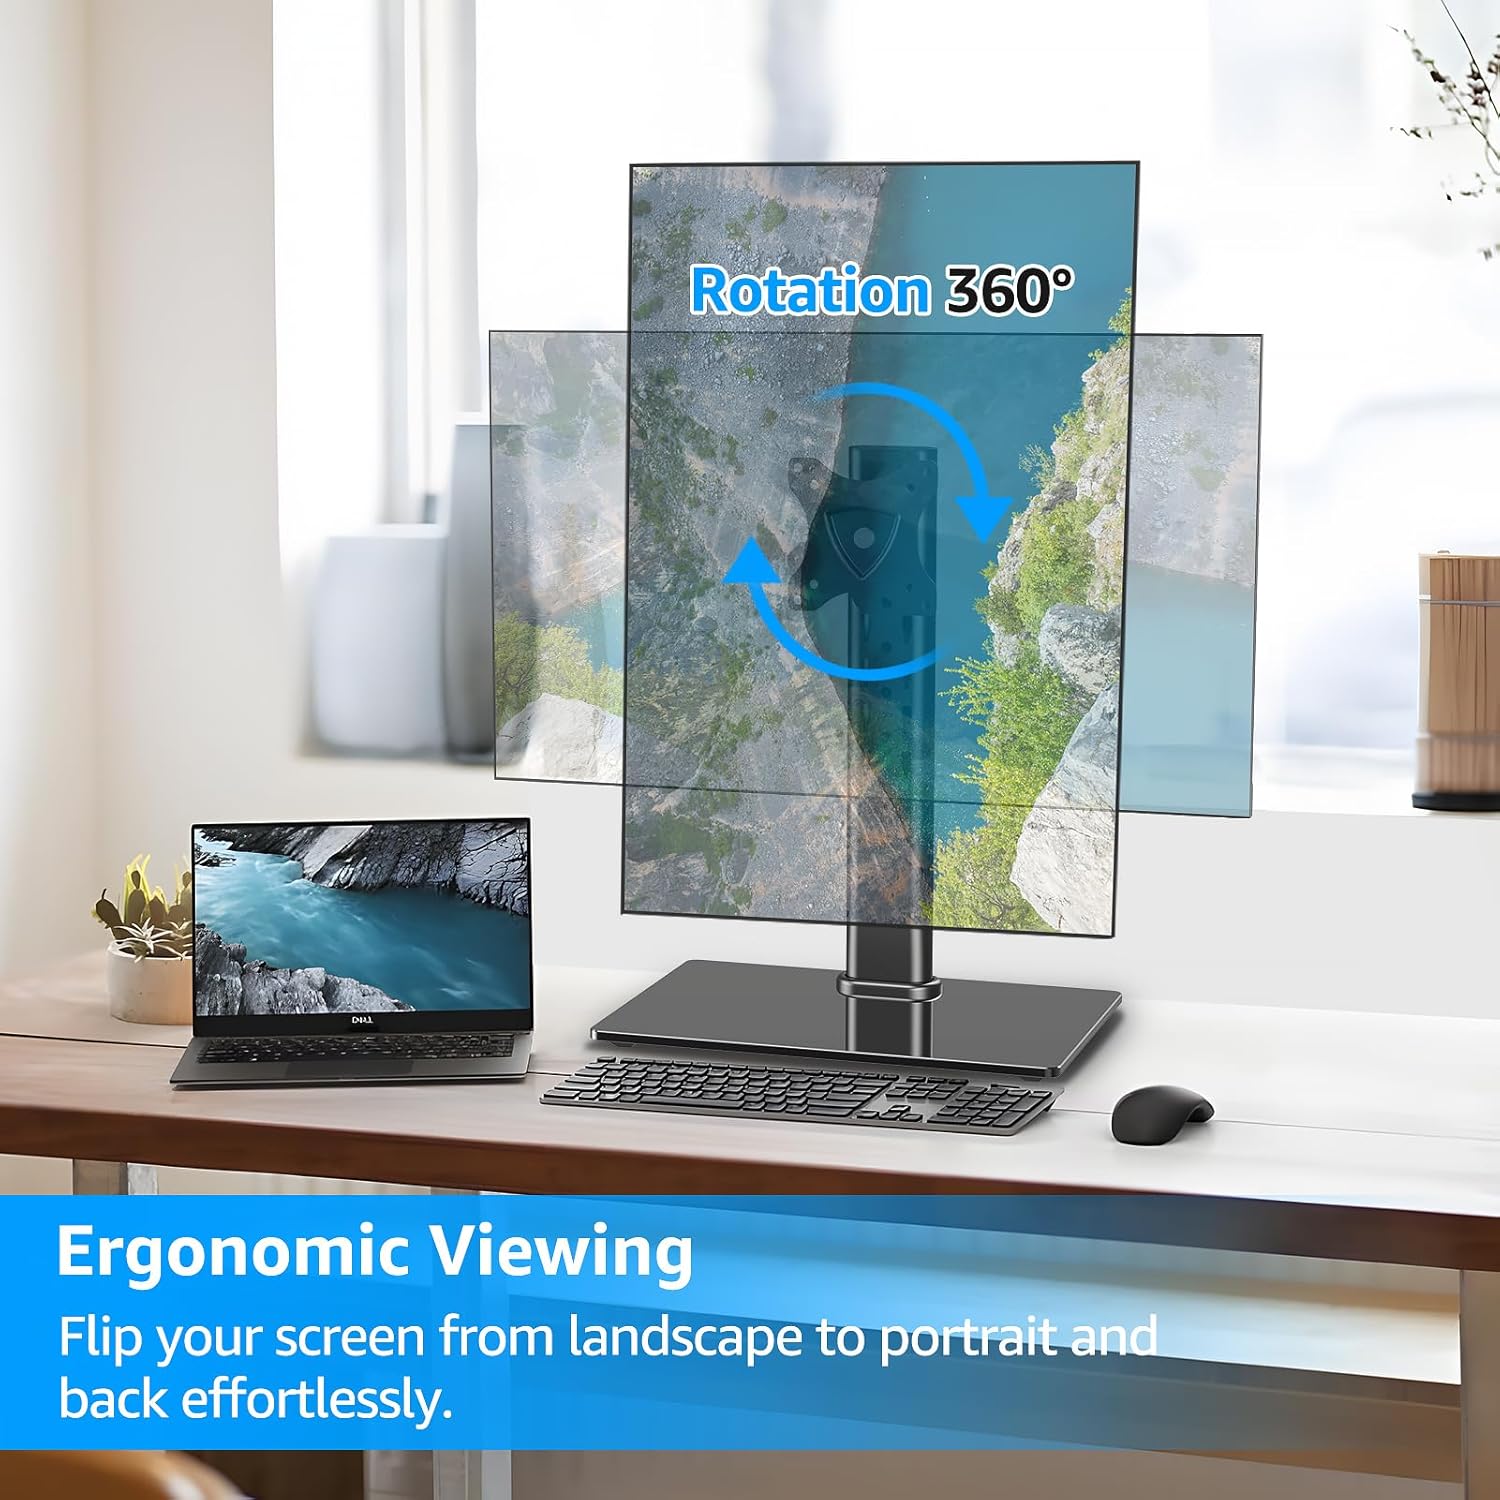
ຮູບທີ 6: ຄວາມສາມາດໃນການໝຸນ 360°
This image demonstrates the monitor stand's full 360° rotation feature, allowing the user to effortlessly switch the monitor between landscape and portrait orientations for various viewຄວາມຕ້ອງການ.
5.5 ການຈັດການສາຍ
Utilize the integrated cable clips on the vertical pole to route and organize your monitor cables, maintaining a tidy and professional workspace.

Figure 7: Cable Management and Anti-Slip Feet
This image highlights the cable management feature on the back of the monitor stand's pole, showing cables neatly routed. It also shows the rubber anti-slip feet on the base for added stability.
5.6 ຄູ່ມືວິດີໂອການໃຊ້ງານ
For a visual demonstration of the stand's functions and adjustments, please watch the official product video below:
Video 1: MOUNTUP Monitor Stand Functionality
This video demonstrates the various ergonomic adjustments of the MOUNTUP monitor stand, including swivel, rotation, tilt, and height adjustment, showcasing how to achieve optimal viewing comfort and a clutter-free setup.
6. ບໍາລຸງຮັກສາ
To ensure the longevity and optimal performance of your MOUNTUP monitor stand, follow these simple maintenance guidelines:
- ທໍາຄວາມສະອາດ: Wipe the stand and base with a soft, damp cloth. Avoid using abrasive cleaners or solvents that could damage the finish or tempered glass.
- ການກວດກາແຕ່ລະໄລຍະ: ກວດສອບສະກູ ແລະ ຈຸດເຊື່ອມຕໍ່ທັງໝົດເປັນໄລຍະເພື່ອຮັບປະກັນວ່າພວກມັນຍັງແໜ້ນດີ. ຂັນຄືນຖ້າຈຳເປັນເພື່ອຮັກສາຄວາມໝັ້ນຄົງ.
- ການລະບາຍສີ: No lubrication is typically required for the adjustment mechanisms. If any movement becomes stiff, ensure no debris is obstructing the mechanism.
7. ການແກ້ໄຂບັນຫາ
| ບັນຫາ | ສາເຫດທີ່ເປັນໄປໄດ້ | ການແກ້ໄຂ |
|---|---|---|
| Monitor is not stable or wobbles. | Loose connections; uneven surface; monitor too heavy. | Ensure all screws are securely tightened. Place the stand on a flat, stable surface. Verify monitor weight is within the 17.6 lbs limit. |
| ມີຄວາມຫຍຸ້ງຍາກໃນການປັບຄວາມອຽງ. | Tilt bolt not sufficiently loosened or tightened. | Use the provided Allen wrench to loosen the tilt bolt on the VESA plate mechanism. Adjust the monitor to the desired angle, then firmly tighten the bolt. For stubborn adjustments, ensure the wrench is fully engaged and apply adequate force. |
| Monitor slides down after height adjustment. | Height adjustment knob not tightened enough. | Ensure the height adjustment knob on the vertical pole is fully tightened after setting the desired height. |
| VESA plate does not fit monitor. | ຮູບແບບ VESA ບໍ່ຖືກຕ້ອງ ຫຼືຂະໜາດຈໍພາບ. | Verify your monitor's VESA pattern is either 75x75 mm or 100x100 mm. Confirm your monitor size is between 13-32 inches. |
8. ຂໍ້ມູນຈໍາເພາະ
| ຄຸນສົມບັດ | ລາຍລະອຽດ |
|---|---|
| ຍີ່ຫໍ້ | mountUP |
| ໝາຍເລກຕົວແບບ | MU1003 |
| ຂະຫນາດຫນ້າຈໍເຂົ້າກັນໄດ້ | 13-32 ນິ້ວ |
| ຄວາມອາດສາມາດນ້ໍາຫນັກ | ສູງເຖິງ 17.6 lbs |
| ຄວາມເຂົ້າກັນໄດ້ຂອງ VESA | 75x75 ມມ, 100x100 ມມ |
| ມຸມອຽງ | +30° / -30° |
| ມຸມຫມຸນ | +25° / -25° |
| ພືດຫມູນວຽນ | 360° |
| ການປັບຄວາມສູງ | ເຖິງ 6.89 ນິ້ວ |
| ວັດສະດຸ | ໂລຫະ, ແກ້ວທີ່ມີຄວາມແຂງແກ່ນ |
| ສີ | ດຳ |
| ປະເພດການຕິດຕັ້ງ | Tabletop Mount (Freestanding) |
9. ການຮັບປະກັນແລະການສະຫນັບສະຫນູນ
MOUNTUP provides a ສະຫນັບສະຫນູນຜູ້ຜະລິດ 3 ປີ for this product. If you encounter any issues or have questions regarding your monitor stand, please do not hesitate to contact our friendly technical support team.
For support, please visit the official MOUNTUP webເວັບໄຊ ຫຼືອ້າງອີງເຖິງຂໍ້ມູນການຕິດຕໍ່ທີ່ສະໜອງໃຫ້ໃນເອກະສານການຊື້ຂອງທ່ານ.


