1. ບົດແນະນຳ
The EDISION Picco S2 Pro is a Full HD DVB-S2 H.265/HEVC digital satellite receiver designed for receiving satellite signals. This dynamically designed receiver features a built-in card reader, Multistream support, and on-board Wi-Fi for accessing various internet applications. It also includes a 2-in-1 universal remote control and H.265 media player capabilities.

Image: EDISION Picco S2 Pro product packaging.
2. ຜະລິດຕະພັນເກີນview
2.1 ລັກສະນະທີ່ສໍາຄັນ
- DVB-S2 H.265/HEVC digital satellite receiver for satellite channels.
- On-board Wi-Fi, card reader, Multistream, Unicable & SCR Unicable 2 support.
- USB connection for PVR (Personal Video Recorder), Timeshift, Playback, software updates, and backup function.
- Internet connection for applications: YouTube, Stalker TV, Xtream, WebTV, Shoutcast, Dailymotion, Weather.
- H.265 media player (supports MP3/AC3/AAC/JPEG/PNG/MP4/MOV/AVI/MKV/MPG/MPEG/Xvid/DviX).
- Ergonomic 2-in-1 universal remote control for set-top box and TV, with 4 programmable buttons for TV.
2.2 ເນື້ອໃນຊຸດ
ໃຫ້ແນ່ໃຈວ່າທຸກລາຍການຢູ່ໃນຊຸດ:

Image: EDISION Picco S2 Pro package contents.
- EDISION Picco S2 Pro Receiver
- 2-in-1 Universal Remote Control
- Power Supply Unit (PSU 12V/1A)
- ແບັດເຕີຣີ 2x AAA
- ຄູ່ມືຜູ້ໃຊ້ດ່ວນ
2.3 ແຜງດ້ານໜ້າ ແລະ ດ້ານຂ້າງ
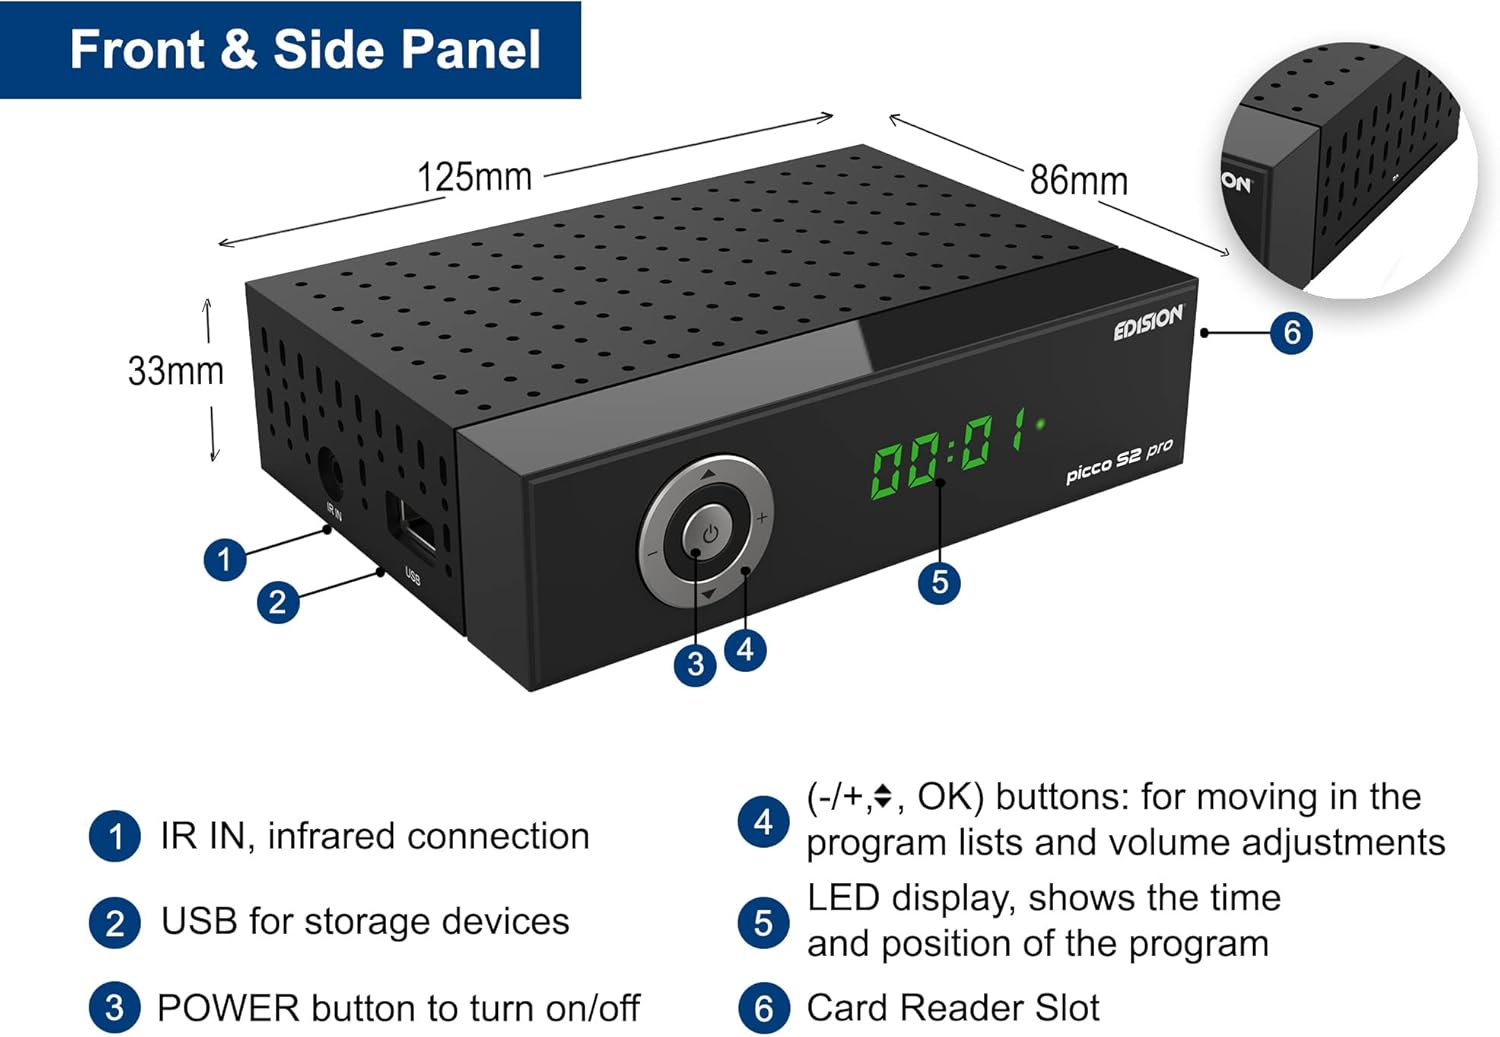
Image: Front and side panel layout with dimensions and labeled components.
- IR IN: Infrared connection for external IR sensor.
- USB: For storage devices (PVR, media playback, software updates).
- ປຸ່ມ POWER: ເພື່ອເປີດ/ປິດອຸປະກອນ.
- (-/+, OK) buttons: For navigating program lists and adjusting volume.
- ຈໍ LED: Shows the time and current program position.
- Card Reader Slot: For conditional access cards.
2.4 ການເຊື່ອມຕໍ່ແຜງດ້ານຫລັງ

Image: Rear panel connections with labeled ports.
- LNB IN (13V/18V 400mA Max): DVB-S2 tuner to receive satellite channels.
- S/PDIF: Coaxial audio connection.
- HDMI: HDMI connection, up to Full HD 1080p.
- ຫົວຂໍ້: ການເຊື່ອມຕໍ່ໂທລະພາບແບບອະນາລັອກ.
- ຊິງຕັນດີຊີ 12V: Connection for external power supply.
2.5 2-in-1 Universal Remote Control

Image: EDISION 2-in-1 Universal Remote Control.
The remote control is designed for both the set-top box (STB) and your TV. It comes pre-programmed with the 4 most important functions for SAMSUNG and LG TVs. You can program these 4 buttons as desired for other TV brands.
3. ຕັ້ງຄ່າ
3.1 ການເຊື່ອມຕໍ່ຕົວຮັບ
Follow these steps to connect your EDISION Picco S2 Pro receiver:
- Satellite Dish Connection: Connect the LNB cable from your satellite dish to the 'LNB IN' port on the rear panel of the receiver.
- ການເຊື່ອມຕໍ່ໂທລະທັດ:
- For High Definition (HD) output, connect an HDMI cable from the 'HDMI' port on the receiver to an HDMI input on your television.
- For Standard Definition (SD) output, connect a SCART cable from the 'SCART' port on the receiver to the SCART input on your television.
- Audio System Connection (Optional): If you have an external audio system, connect it to the 'S/PDIF' coaxial audio output for digital audio.
- ການເຊື່ອມຕໍ່ພະລັງງານ: Connect the provided 12V/1A power adapter to the 'DC 12V' input on the receiver, then plug the adapter into a wall outlet.

Image: Receiver connected to a television, showing the main menu interface.
3.2 ການເປີດເຄື່ອງເບື້ອງຕົ້ນ
After connecting all cables, press the POWER button on the front panel or the remote control to turn on the receiver. The LED display will show the current status. Follow the on-screen instructions for initial setup, which typically includes language selection, country, and satellite scanning.
4. ຄໍາແນະນໍາການດໍາເນີນງານ
4.1 ການດໍາເນີນງານພື້ນຖານ
- ຊອກຫາຊ່ອງ: Access the 'Installation' menu to perform an automatic or manual channel scan for available satellite channels.
- ການນໍາທາງຊ່ອງ: Use the CH+/CH- buttons on the remote to change channels. Use the numeric keypad to directly enter channel numbers.
- ການຄວບຄຸມລະດັບສຽງ: Use the VOL+/VOL- buttons to adjust the volume.
- ການເຂົ້າເຖິງເມນູ: Press the 'MENU' button to access the main menu for settings, applications, and other functions.
4.2 Wi-Fi & Internet Applications
The built-in Wi-Fi allows you to connect the receiver to your home network and access various online applications:
- YouTube
- Stalker TV
- Xtream
- WebTV
- ສຽງດັງ
- Dailymotion
- ພະຍາກອນອາກາດ

Image: Stalker TV application logo, one of the supported internet applications.
4.3 Media Playback & PVR
Connect a USB storage device to the USB port on the front panel to utilize the following functions:
- PVR (ເຄື່ອງບັນທຶກວິດີໂອສ່ວນຕົວ): Record live TV programs.
- Timeshift: Pause, rewind, and fast-forward live TV.
- ການຫຼິ້ນສື່: Play various media files including MP3, AC3, AAC, JPEG, PNG, MP4, MOV, AVI, MKV, MPG, MPEG, Xvid, and DviX.
- Software Updates & Backup: Use the USB port for convenient software updates and system backups.
5. ບໍາລຸງຮັກສາ
To ensure optimal performance and longevity of your receiver:
- ທໍາຄວາມສະອາດ: Use a soft, dry cloth to clean the exterior of the receiver. Do not use liquid cleaners or aerosols.
- ການລະບາຍອາກາດ: Ensure the receiver has adequate ventilation. Do not block the ventilation holes.
- ອັບເດດຊອບແວ: Regularly check for and install online software updates to improve performance and add new features. These can typically be found in the system settings menu or via USB.
- ປິດພະລັງງານ: If the receiver will not be used for an extended period, disconnect it from the power supply.
6. ການແກ້ໄຂບັນຫາ
If you encounter issues with your EDISION Picco S2 Pro, consider the following basic troubleshooting steps:
- ບໍ່ມີພະລັງງານ: Check if the power adapter is securely connected to both the receiver and the wall outlet. Ensure the outlet is functional.
- ບໍ່ມີສັນຍານ: Verify that the satellite LNB cable is correctly connected to the 'LNB IN' port. Check your satellite dish alignment.
- ບໍ່ມີຮູບພາບ/ສຽງ: Ensure the HDMI or SCART cable is securely connected to both the receiver and the TV. Check the TV's input source selection.
- ການຄວບຄຸມໄລຍະໄກບໍ່ເຮັດວຽກ: Check the batteries in the remote control and replace them if necessary. Ensure there are no obstructions between the remote and the receiver's IR sensor.
- ບັນຫາການເຊື່ອມຕໍ່ອິນເຕີເນັດ: Verify your Wi-Fi network is active and the receiver is correctly connected. Re-enter Wi-Fi credentials if needed.
- System Freeze/Unresponsive: Try restarting the receiver by unplugging it from the power outlet for a few seconds and then plugging it back in.
For persistent issues, consult the detailed user manual (if available) or contact EDISION customer support.
7. ຂໍ້ມູນຈໍາເພາະ
| ຄຸນສົມບັດ | ຂໍ້ມູນຈໍາເພາະ |
|---|---|
| ຍີ່ຫໍ້ | ເອດິຊັນ |
| ສີ | ດຳ |
| ເຕັກໂນໂລຊີການເຊື່ອມຕໍ່ | HDMI, SCART, USB, Wi-Fi |
| ພອດ USB ທັງໝົດ | 1 |
| ພອດ HDMI ທັງໝົດ | 1 |
| ຮູບແບບການອອກສຽງ | ສະເຕຣິໂອ |
| ອຸປະກອນທີ່ເຂົ້າກັນໄດ້ | Television with HDMI, SCART, or 3RCA connection |
| ຮູບແບບສຽງທີ່ຮອງຮັບ | Various formats (MP3/AC3/AAC) |
| ສະບັບtage | 12 ໂວນ (DC) |
| ການນໍາໃຊ້ຜະລິດຕະພັນທີ່ແນະນໍາ | Watching high-definition satellite channels |
| ໝາຍເລກຕົວແບບ | 01-07-0028 |
| ຜູ້ຜະລິດ | EDISION |
| ປະເທດຕົ້ນກໍາເນີດ | ຈີນ |
| ອົງປະກອບຫມໍ້ໄຟ | ດ່າງ |
| ແບັດເຕີຣີທີ່ສາມາດສາກໄດ້ | ບໍ່ |
| ການມີອາໄຫຼ່ | ບໍ່ມີຂໍ້ມູນ |
| ການປັບປຸງຊອບແວຮັບປະກັນຈົນກ່ວາ | ບໍ່ມີຂໍ້ມູນ |
8. ການຮັບປະກັນແລະການສະຫນັບສະຫນູນ
Information regarding specific warranty terms and conditions for the EDISION Picco S2 Pro is not available in the provided product details. For warranty claims or technical support, please refer to the documentation included with your purchase or contact EDISION customer service directly.
Spare parts availability and guaranteed software update periods are also not specified in the available information.