1. ບົດແນະນຳ
This manual provides detailed instructions for the installation, operation, and maintenance of the Supermicro X13SEI-F Server Motherboard. This motherboard is designed for high-performance server applications, supporting Intel Xeon processors with an LGA4677 socket and DDR5 memory.
Please read this manual thoroughly before attempting to install or operate the motherboard to ensure proper setup and to prevent damage to the components.
2. ຂໍ້ມູນຄວາມປອດໄພ
ປະຕິບັດຕາມຄວາມລະມັດລະວັງດ້ານຄວາມປອດໄພຕໍ່ໄປນີ້ເພື່ອປ້ອງກັນການບາດເຈັບ ແລະຄວາມເສຍຫາຍຂອງອຸປະກອນ:
- Always disconnect the power cord from the power supply before installing or removing any components.
- Wear an anti-static wrist strap when handling the motherboard and other components to prevent electrostatic discharge (ESD).
- Ensure the installation environment is dry and free from static electricity.
- ຢ່າປ່ອຍໃຫ້ເມນບອດມີຄວາມຊຸ່ມຊື່ນ ຫຼືອຸນຫະພູມສູງສຸດ.
- ຈັບເມນບອດໂດຍຂອບຂອງມັນເພື່ອຫຼີກເວັ້ນການສໍາຜັດກັບອົງປະກອບທີ່ລະອຽດອ່ອນ.
- Refer to the power supply unit's manual for specific safety guidelines related to power connections.
3. ເນື້ອໃນຊຸດ
Verify that all items are present and in good condition. If any items are damaged or missing, contact your vendor.
- Supermicro X13SEI-F Server Motherboard
- I / O ໄສ້
- ສາຍ SATA (ປະລິມານອາດຈະແຕກຕ່າງກັນ)
- Quick Reference Guide / User Manual (this document)
- Driver CD/DVD or USB drive (or download instructions)
4. ຜະລິດຕະພັນເກີນview
The Supermicro X13SEI-F is a high-performance server motherboard featuring the LGA4677 socket, designed to support Intel Xeon Scalable processors. It offers robust memory capabilities with 8 DDR5 DIMM slots, supporting up to 4800MHz memory speed. The board also includes multiple PCIe slots for expansion.
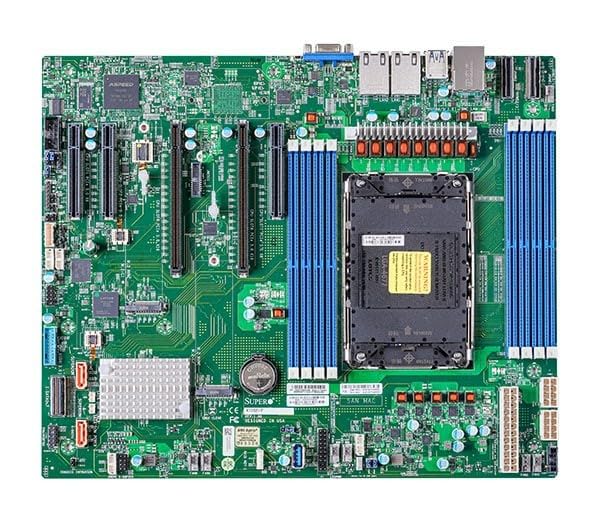
Figure 1: Supermicro X13SEI-F Server Motherboard. This image displays the overall layout of the motherboard, including the CPU socket, DIMM slots, and various connectors.
4.1 ລັກສະນະທີ່ສໍາຄັນ
- ເຕົ້າຮັບ CPU: LGA4677 for Intel Xeon Scalable Processors
- ຊິບເຊັດ: Intel C621
- ໜ່ວຍຄວາມຈຳ: 8x DDR5 DIMM slots, up to 4800MHz
- ຊ່ອງຂະຫຍາຍ: Multiple PCIe slots (specific configuration depends on model variant)
- ການເກັບຮັກສາ: Support for various storage interfaces (SATA, NVMe - specific details in specifications)
- ເຄືອຂ່າຍ: Integrated LAN controllers
5. ການຕິດຕັ້ງແລະການຕິດຕັ້ງ
Before beginning installation, ensure your system case is compatible with the motherboard's form factor and that you have all necessary components.
5.1 ການຕິດຕັ້ງ CPU (LGA4677)
- ຊອກຫາຊັອກເກັດ LGA4677 ໃນເມນບອດ.
- Carefully open the CPU socket retention mechanism according to the instructions provided with your CPU or motherboard.
- Align the CPU with the socket, ensuring the triangular mark on the CPU matches the mark on the socket. Do not force the CPU into the socket.
- ຄ່ອຍໆຫຼຸດ CPU ລົງໃນຊັອກເກັດ.
- Close the CPU socket retention mechanism until it locks securely.
- ຕິດຕັ້ງ CPU cooler ຕາມຄໍາແນະນໍາຂອງຜູ້ຜະລິດ.
5.2 ການຕິດຕັ້ງ RAM (DDR5)
- Locate the 8 DDR5 DIMM slots on the motherboard.
- ເປີດຄລິບເກັບຮັກສາໄວ້ຢູ່ທັງສອງສົ້ນຂອງຊ່ອງສຽບ DIMM.
- ວາງຈຸດໃສ່ໃນໂມດູນຄວາມຈຳ DDR5 ດ້ວຍກະແຈໃນຊ່ອງສຽບ DIMM.
- Insert the memory module firmly into the slot until the retention clips snap into place. Ensure both clips are closed.
- For optimal performance, refer to the motherboard's manual for recommended memory population order.
ການຕິດຕັ້ງກາດ PCIe 5.3
- Identify the appropriate PCIe slot for your expansion card (e.g., GPU, RAID card).
- Remove the corresponding expansion slot cover from your chassis.
- Align the PCIe card with the slot and press down firmly until it is fully seated.
- Secure the card with a screw or retention clip to the chassis.
5.4 ການຕິດຕັ້ງອຸປະກອນການເກັບຮັກສາ
- SATA Drives: Connect SATA data cables from the motherboard's SATA ports to your SATA hard drives or SSDs. Connect power cables from the PSU to the drives.
- NVMe M.2 Drives: Locate the M.2 slots. Insert the M.2 drive at an angle, then push it down and secure it with the provided screw or retention mechanism.
5.5 ການເຊື່ອມຕໍ່ພະລັງງານ
- ເຊື່ອມຕໍ່ຕົວເຊື່ອມຕໍ່ໄຟ ATX 24-pin ຈາກແຫຼ່ງສະໜອງໄຟຂອງທ່ານໄປຫາເຕົ້າສຽບໄຟຫຼັກໃນເມນບອດ.
- Connect the 8-pin (or 4+4 pin) EPS 12V CPU power connector(s) to the corresponding sockets near the CPU.
- ໃຫ້ແນ່ໃຈວ່າການເຊື່ອມຕໍ່ພະລັງງານທັງຫມົດແມ່ນປອດໄພ.
5.6 ການເຊື່ອມຕໍ່ກະດານດ້ານຫນ້າ
Connect the front panel cables (Power LED, HDD LED, Power Switch, Reset Switch, USB, Audio) from your chassis to the corresponding headers on the motherboard. Refer to the motherboard's silkscreen labels or the detailed manual for exact pin configurations.
6. ຄໍາແນະນໍາການດໍາເນີນງານ
6.1 First Boot
- After completing all hardware installations, connect the monitor, keyboard, and mouse.
- Connect the power cord to the power supply and turn on the power switch on the PSU.
- ກົດປຸ່ມເປີດປິດຢູ່ເທິງຕົວເຄື່ອງຂອງທ່ານ.
- The system should power on, and you should see the BIOS/UEFI POST screen.
6.2 ການຕັ້ງຄ່າ BIOS/UEFI
ເພື່ອເຂົ້າໄປໃນອຸປະກອນການຕັ້ງຄ່າ BIOS/UEFI, ກົດປຸ່ມ DEL or F2 key repeatedly during the POST process. Within the BIOS/UEFI, you can configure:
- ສັ່ງບູດ
- ເວລາແລະວັນທີຂອງລະບົບ
- CPU and memory settings
- Storage configurations (RAID, AHCI)
- ການຄວບຄຸມຄວາມໄວພັດລົມ
- ການຕັ້ງຄ່າຄວາມປອດໄພ
ບັນທຶກການປ່ຽນແປງກ່ອນທີ່ຈະອອກຈາກ BIOS/UEFI.
6.3 ການຕິດຕັ້ງລະບົບປະຕິບັດການ
Insert your operating system installation media (USB drive or DVD) and set it as the primary boot device in the BIOS/UEFI. Follow the on-screen instructions to install your preferred operating system. After installation, install all necessary drivers from the Supermicro website or the provided driver media.
7. ບໍາລຸງຮັກສາ
7.1 ການທໍາຄວາມສະອາດ
- Regularly clean dust from the motherboard and system components using compressed air.
- ກວດໃຫ້ແນ່ໃຈວ່າລະບົບປິດ ແລະຖອດປລັກອອກກ່ອນທຳຄວາມສະອາດ.
- ຫຼີກເວັ້ນການນໍາໃຊ້ເຄື່ອງເຮັດຄວາມສະອາດຂອງແຫຼວໂດຍກົງໃສ່ອົງປະກອບ.
7.2 ການອັບເດດເຟີມແວ
Periodically check the Supermicro website for updated BIOS/UEFI firmware. Firmware updates can improve system stability, performance, and compatibility. Follow the specific instructions provided by Supermicro for updating the firmware to avoid system damage.
8. ການແກ້ໄຂບັນຫາ
ພາກນີ້ສະຫນອງການແກ້ໄຂບັນຫາທົ່ວໄປທີ່ທ່ານອາດຈະພົບ.
8.1 No Power / No POST (Power-On Self-Test)
- ກວດເບິ່ງການເຊື່ອມຕໍ່ພະລັງງານ: Ensure the 24-pin ATX and 8-pin EPS 12V power connectors are securely seated.
- ກວດສອບ PSU: Test the power supply unit (PSU) with another system or a PSU tester.
- ອົງປະກອບ Reseat: Reseat the CPU, RAM modules, and any expansion cards.
- ລຶບລ້າງ CMOS: Refer to the motherboard manual for instructions on how to clear the CMOS (Complementary Metal-Oxide-Semiconductor) settings, which can resolve boot issues.
- ການຕັ້ງຄ່າຂັ້ນຕ່ຳ: Try booting with only the CPU, one RAM stick, and the necessary power connections.
8.2 ບໍ່ມີການສະແດງຜົນອອກ
- ຕິດຕາມກວດກາການເຊື່ອມຕໍ່: Ensure the monitor is properly connected to the graphics output (either integrated or discrete GPU) and is powered on.
- ບັດກາຟິກ: If using a discrete graphics card, ensure it is fully seated in its PCIe slot and has all necessary power connectors from the PSU.
- ຮູບພາບປະສົມປະສານ: If your CPU supports integrated graphics, try connecting the monitor to the motherboard's video output to rule out a discrete GPU issue.
8.3 Operating System Not Booting
- Boot Order: Check the BIOS/UEFI settings to ensure the correct boot device (e.g., SSD, HDD) is selected as the primary boot option.
- Drive Connections: Verify that your storage drives are properly connected (data and power).
- ການຕິດຕັ້ງລະບົບປະຕິບັດການ: If the OS is newly installed, ensure the installation process completed successfully and all drivers are installed.
9. ຂໍ້ມູນຈໍາເພາະ
| ຄຸນສົມບັດ | ລາຍລະອຽດ |
|---|---|
| ຍີ່ຫໍ້ | ຊຸບເປີໄມໂຄ |
| ຊື່ຕົວແບບ | MBD-X13SEI-F-B |
| ເຕົ້າສຽບ CPU | LGA 4677 |
| ໂປເຊດເຊີທີ່ເຂົ້າກັນໄດ້ | Intel Xeon Scalable |
| ປະເພດຊິບເຊັດ | Intel C621 |
| ເທກໂນໂລຍີຫນ່ວຍຄວາມຈໍາ RAM | DDR5 |
| ຄວາມໄວຄວາມຈໍາ | 4800 MHz |
| ສະລັອດຕິງ RAM | 8x DDR5 DIMM slots |
| ຂະໜາດສິນຄ້າ (LxWxH) | 16 x 12 x 5 ນິ້ວ |
| ນ້ໍາຫນັກລາຍການ | 3.19 ປອນ |
| ວັນທີທີ່ມີໃຫ້ທໍາອິດ | ວັນທີ 20 ມັງກອນ 2023 |
Note: Specifications are subject to change without notice. For the most current information, please refer to the official Supermicro product page.
10. ການຮັບປະກັນແລະການສະຫນັບສະຫນູນດ້ານວິຊາການ
10.1 ຂໍ້ມູນການຮັບປະກັນ
Supermicro products are covered by a limited warranty. For detailed warranty terms and conditions, including duration and coverage, please visit the official Supermicro website or consult the warranty card included with your product. Keep your proof of purchase for warranty claims.
10.2 ສະຫນັບສະຫນູນດ້ານວິຊາການ
For technical assistance, driver downloads, BIOS updates, and further product information, please visit the official Supermicro support webເວັບໄຊ:
https://www.supermicro.com/support
Before contacting support, please have your motherboard model number (MBD-X13SEI-F-B) and serial number ready.