ແນະນຳ
This manual provides detailed instructions for the setup, operation, maintenance, and troubleshooting of your Pokitter Go Pro Mini Portable Projector. Please read this manual thoroughly before using the product to ensure proper functionality and to extend the lifespan of your device.
The Pokitter Go Pro is a compact and powerful portable projector featuring integrated Android TV 10.0, Google Assistant, 200 ANSI lumens brightness, 1080p Full HD resolution with 4K support, dual-band 2.4G/5G WiFi, and a maximum projection size of 120 inches. It is designed for versatile entertainment, offering a cinematic experience on the go.
ເນື້ອໃນຊຸດ
ກະລຸນາກວດສອບວ່າລາຍການທັງໝົດມີຢູ່ໃນຊຸດ:
- Pokitter Go Pro Mini Portable Projector
- ການຄວບຄຸມໄລຍະໄກ
- Power Adapter
- ຄູ່ມືຜູ້ໃຊ້ (ເອກະສານນີ້)
- ແບກສາຍພັນ

Image: The Pokitter Go Pro Mini Portable Projector, highlighting its compact design and integrated handle for easy portability.
ສິນຄ້າເກີນview
ດ້ານໜ້າ View
The front of the projector features the projection lens and ventilation grilles.
ຫລັງ View
The rear panel typically includes various ports for connectivity.
- HDMI Port: ສຳລັບເຊື່ອມຕໍ່ອຸປະກອນພາຍນອກເຊັ່ນ: ແລັບທັອບ, ເຄື່ອງຫຼິ້ນເກມ ຫຼື ເຄື່ອງຫຼິ້ນ Blu-ray.
- ພອດ USB: For connecting USB drives for media playback or external peripherals.
- ສຽງອອກ (ແຈັກ 3.5 ມມ): ສໍາລັບການເຊື່ອມຕໍ່ລໍາໂພງພາຍນອກຫຼືຫູຟັງ.
- DC ໃນ: ພອດປ້ອນພະລັງງານ.
ເທິງ View
The top surface may include control buttons or indicators.
ຂ້າງ View
The sides often feature additional ventilation and a carrying handle.
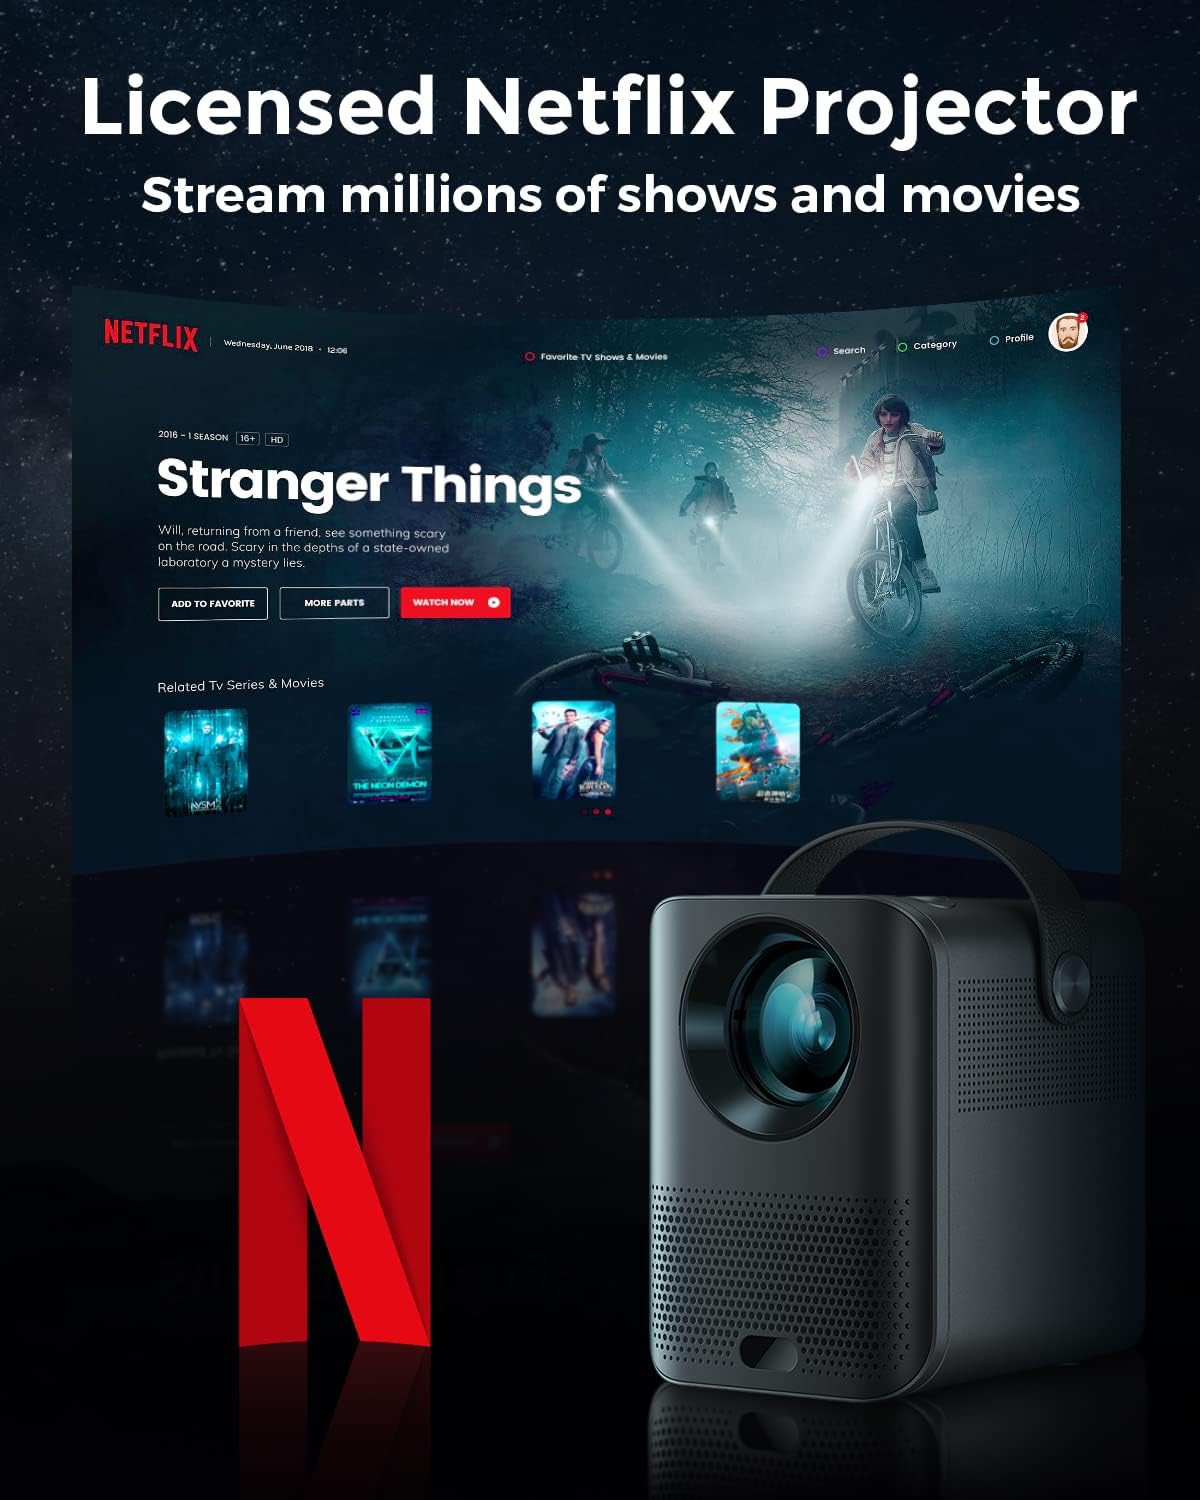
Image: The Pokitter Go Pro projector showcasing its integrated Netflix license and streaming capabilities.

Image: A size comparison of the Pokitter Go Pro projector with a smartphone, illustrating its mini and portable form factor.
ຕັ້ງຄ່າ
1. ການເຊື່ອມຕໍ່ພະລັງງານ
- ເຊື່ອມຕໍ່ອະແດບເຕີໄຟເຂົ້າກັບພອດ DC In ໃນໂປເຈັກເຕີ.
- ສຽບອະແດບເຕີໄຟໃສ່ກັບປລັກສຽບໃສ່ຝາ.
- ໄຟຕົວຊີ້ວັດພະລັງງານຈະສະຫວ່າງ.
2. ການເປີດເຄື່ອງເບື້ອງຕົ້ນ
- ກົດປຸ່ມເປີດປິດຢູ່ໂປເຈັກເຕີ ຫຼືຣີໂໝດຄວບຄຸມເພື່ອເປີດອຸປະກອນ.
- Allow a few moments for the Android TV system to boot up.
3. ການປັບຈຸດສຸມ
Use the focus ring (if mechanical) or the remote control's focus buttons to achieve a clear image. The Pokitter Go Pro features automatic vertical keystone correction up to 40 degrees.

Image: Illustration of the automatic keystone correction feature, which adjusts the image for optimal viewing even when the projector is not perfectly aligned.
4. Screen Size Adjustment
Adjust the distance between the projector and the projection surface to achieve the desired screen size. The projector supports a screen size up to 120 inches.

Image: Guide for optimal projection distances to achieve screen sizes of 40, 80, and 120 inches.
5. ການເຊື່ອມຕໍ່ເຄືອຂ່າຍ (Wi-Fi)
- Navigate to the Wi-Fi settings in the Android TV interface.
- ເລືອກເຄືອຂ່າຍ Wi-Fi ທີ່ທ່ານຕ້ອງການຈາກບັນຊີລາຍຊື່.
- ໃສ່ລະຫັດຜ່ານຖ້າຖືກຖາມ.
- The projector supports dual-band 2.4G and 5G Wi-Fi for stable and fast transmission.

Image: The Pokitter Go Pro projector demonstrating its 2.4/5GHz WiFi capabilities for seamless wireless screen casting from various devices.
ຄໍາແນະນໍາການດໍາເນີນງານ
ການນໍາໃຊ້ການຄວບຄຸມໄລຍະໄກ
The included remote control allows full navigation and control of the Android TV interface. Key functions include:
- ປຸ່ມເປີດປິດ: ເປີດ/ປິດໂປຣເຈັກເຕີ.
- ແຜ່ນ ນຳ ທາງ: For moving through menus.
- ປຸ່ມຕົກລົງ: ຢືນຢັນການເລືອກ.
- ປຸ່ມກັບຄືນ: ກັບໄປໜ້າຈໍກ່ອນໜ້າ.
- ປຸ່ມຫນ້າທໍາອິດ: ກັບໄປໜ້າຈໍຫຼັກ Android TV.
- ປຸ່ມລະດັບສຽງ: ປັບລະດັບສຽງ.
- ປຸ່ມຜູ້ຊ່ວຍ Google: ເປີດໃຊ້ຄຳສັ່ງສຽງ.
ການໂຕ້ຕອບ Android TV
The Pokitter Go Pro runs on Android TV 10.0, providing access to a wide range of streaming applications such as Netflix, YouTube, Amazon Prime Video, and Disney+.
- ການນຳທາງແອັບ: Use the remote's navigation pad to select and open applications.
- ການຖ່າຍທອດເນື້ອຫາ: Log in to your streaming accounts to access content.
- ຜູ້ຊ່ວຍ Google: Press the Google Assistant button on the remote and speak your commands to search for content, control playback, or get information.

ຮູບພາບ: ຫຼາຍກວ່າview of the Pokitter Go Pro's key features, including its Android TV operating system, Google Assistant integration, and display capabilities.
Screen Mirroring (Chromecast Built-in)
The projector features built-in Chromecast for easy screen mirroring from compatible devices (smartphones, tablets, laptops).
- ໃຫ້ແນ່ໃຈວ່າອຸປະກອນຂອງທ່ານ ແລະ ໂປຣເຈັກເຕີໄດ້ເຊື່ອມຕໍ່ກັບເຄືອຂ່າຍ Wi-Fi ດຽວກັນ.
- Open a Chromecast-enabled app on your device (e.g., YouTube, Netflix).
- ແຕະໄອຄອນ Cast (ປົກກະຕິແລ້ວເປັນສີ່ຫຼ່ຽມທີ່ມີສັນຍາລັກ Wi-Fi) ພາຍໃນ app ໄດ້.
- Select your Pokitter Go Pro projector from the list of available devices.
- The content from your device will be mirrored or cast to the projector.

Image: Demonstrating the Chromecast built-in feature, allowing users to stream content from their smartphone to the projector's large display.
Connecting External Devices (HDMI/USB)
- HDMI: Connect an HDMI cable from your external device (e.g., laptop, game console) to the HDMI port on the projector. The projector will automatically switch to the HDMI input or you may need to select it from the input source menu.
- USB: Insert a USB flash drive into the USB port. The Android TV system will typically prompt you to open a file browser to access media files ໃນໄດ.
ບໍາລຸງຮັກສາ
ການເຮັດຄວາມສະອາດເລນ
ໃຊ້ຜ້າອ່ອນໆທີ່ບໍ່ມີຂົນທີ່ອອກແບບມາສະເພາະສຳລັບເລນ optical ເພື່ອເຊັດເລນໂປເຈັກເຕີຢ່າງອ່ອນໂຍນ. ຢ່າໃຊ້ນໍ້າຢາເຮັດຄວາມສະອາດທີ່ມີສີຂັດ ຫຼື ໃຊ້ແຮງເກີນໄປ ເພາະມັນສາມາດເຮັດໃຫ້ເລນຂູດໄດ້.
ການທໍາຄວາມສະອາດຮ່າງກາຍຂອງໂປເຈັກເຕີ
ເຊັດດ້ານນອກຂອງໂປເຈັກເຕີດ້ວຍຜ້າອ່ອນ, ແຫ້ງ. ສໍາລັບ stains stubborn, a ເລັກນ້ອຍ damp cloth can be used, followed by a dry cloth. Avoid getting liquids inside the projector.
ລະບາຍອາກາດ
Ensure that the ventilation grilles are not blocked during operation to prevent overheating. The Pokitter Go Pro features a dust-proof design to maintain picture quality.

Image: An internal diagram of the Pokitter Go Pro, illustrating its dust-proof design for long-lasting, flawless picture quality.
ການເກັບຮັກສາ
ເມື່ອບໍ່ໄດ້ໃຊ້ງານເປັນເວລາດົນ, ໃຫ້ເກັບຮັກສາໂປເຈັກເຕີໄວ້ໃນບ່ອນທີ່ເຢັນ, ແຫ້ງ, ຫ່າງຈາກແສງແດດໂດຍກົງ ແລະ ອຸນຫະພູມສູງເກີນໄປ. ແນະນຳໃຫ້ໃຊ້ການຫຸ້ມຫໍ່ຕົ້ນສະບັບ ຫຼື ກ່ອງປ້ອງກັນ.
ການແກ້ໄຂບັນຫາ
| ບັນຫາ | ສາເຫດທີ່ເປັນໄປໄດ້ | ການແກ້ໄຂ |
|---|---|---|
| ບໍ່ມີພະລັງງານ | ສາຍໄຟບໍ່ໄດ້ເຊື່ອມຕໍ່; ປລັກສຽບໄຟມີບັນຫາ. | ໃຫ້ແນ່ໃຈວ່າສາຍໄຟເຊື່ອມຕໍ່ຢ່າງປອດໄພ. ລອງປລັກສຽບໄຟອື່ນ. |
| ບໍ່ມີຮູບພາບ / ຮູບພາບມົວ | Lens out of focus; Incorrect input source; Obstruction in projection path. | Adjust focus using the remote or focus ring. Select correct input source. Remove any obstructions. |
| ບໍ່ມີສຽງ | Volume too low; Muted; External speakers not connected properly. | Increase volume. Unmute the projector. Check external speaker connections. |
| ບັນຫາການເຊື່ອມຕໍ່ Wi-Fi | ລະຫັດຜ່ານບໍ່ຖືກຕ້ອງ; ເຣົາເຕີ້ຢູ່ໄກເກີນໄປ; ການລົບກວນເຄືອຂ່າຍ. | Verify Wi-Fi password. Move projector closer to router. Restart router and projector. |
| ການຄວບຄຸມໄລຍະໄກບໍ່ເຮັດວຽກ | ແບັດເຕີຣີໝົດ; ມີສິ່ງກີດຂວາງລະຫວ່າງຣີໂໝດ ແລະ ໂປເຈັກເຕີ. | ປ່ຽນແບັດ. ຮັບປະກັນສາຍສາຍຕາທີ່ຊັດເຈນຕໍ່ກັບເຄື່ອງຮັບ IR ຂອງໂປເຈັກເຕີ. |
ຂໍ້ມູນຈໍາເພາະ
- ຕົວແບບ: F1A
- ຍີ່ຫໍ້: Pokitter
- ເທັກໂນໂລຍີການສະແດງ: LED
- ຄວາມລະອຽດເດີມ: 1920 x 1080 (Full HD)
- ຄວາມລະອຽດສູງສຸດທີ່ຮອງຮັບ: 3840 x 2160 (4K)
- ຄວາມສະຫວ່າງ: ເຖິງ 200 ANSI Lumens
- ຂະໜາດການຄາດຄະເນ: ເຖິງ 120 ນິ້ວ
- ລະບົບປະຕິບັດການ: Android TV 10.0
- ຜູ້ຊ່ວຍສຽງ: ຜູ້ຊ່ວຍ Google ໃນຕົວ
- ການເຊື່ອມຕໍ່ແບບໄຮ້ສາຍ: 2.4G/5G Dual-band Wi-Fi, Bluetooth 5.1
- ພອດເຊື່ອມຕໍ່: HDMI, USB, 3.5mm Audio Out, DC In
- ລໍາໂພງ: Integrated (2x5W as per infographic)
- Average Lifespan (Light Source): 50,000 ຊົ່ວໂມງ
- ປັດໄຈແບບຟອມ: ແບບພົກພາ
- ປະເພດການຕິດຕັ້ງ: Table Mount

Image: An illustration of the projector's internal speaker system, designed to provide true-to-life sound for a cinematic viewປະສົບການ.
ການຮັບປະກັນແລະການສະຫນັບສະຫນູນ
The Pokitter Go Pro Mini Portable Projector comes with a ຮັບປະກັນ 2 ປີ. For any questions or professional assistance regarding this product, please contact Pokitter customer support. We are committed to supporting our customers.
For the latest support information, FAQs, and contact details, please visit the official Pokitter webເວັບໄຊ ຫຼືອ້າງອີງເຖິງຂໍ້ມູນການຕິດຕໍ່ທີ່ສະໜອງໃຫ້ກັບການຊື້ຂອງທ່ານ.


