1. ບົດແນະນຳ
ຂອບໃຈສໍາລັບການຊື້asing the YOWHICK Mini Projector. This manual provides essential information for setting up, operating, and maintaining your projector to ensure optimal performance and longevity. Please read this manual thoroughly before use and keep it for future reference.

ດ້ານໜ້າ view of the YOWHICK Mini Projector, showcasinເລນ ແລະ ລະບາຍອາກາດຂອງມັນ.
2. ຂໍ້ມູນຄວາມປອດໄພ
- ຢ່າເບິ່ງໂດຍກົງໃນເລນໂປເຈັກເຕີເມື່ອ lamp ແມ່ນຢູ່.
- ຮັບປະກັນການລະບາຍອາກາດທີ່ເຫມາະສົມຮອບໂປເຈັກເຕີເພື່ອປ້ອງກັນຄວາມຮ້ອນເກີນ.
- ຢ່າເຮັດໃຫ້ໂປເຈັກເຕີຖືກຝົນຫຼືຄວາມຊຸ່ມຊື່ນ.
- ໃຊ້ພຽງແຕ່ອະແດັບເຕີໄຟທີ່ໃຫ້ມາກັບໂປເຈັກເຕີ.
- When connecting the power cable, firmly insert it into the power port while holding the projector with one hand.
- ຫຼີກເວັ້ນການວາງໂປເຈັກເຕີຢູ່ເທິງພື້ນຜິວທີ່ບໍ່ຫມັ້ນຄົງ.
3. ເນື້ອໃນຊຸດ
ກະລຸນາກວດເບິ່ງວ່າລາຍການທັງໝົດແມ່ນລວມຢູ່ໃນຊຸດ:
- YOWHICK Mini Projector
- ການຄວບຄຸມໄລຍະໄກ
- ສາຍ HDMI
- ສາຍ AV
- ສາຍໄຟ
- ຄູ່ມືຜູ້ໃຊ້
4. ຜະລິດຕະພັນເກີນview
4.1. ສ່ວນປະກອບ

ຂ້າງ view of the projector, showing various input ports.
The projector features a compact design with a prominent lens, control buttons on the top panel, and various input/output ports on the side and rear. These include HDMI, USB, AV, and VGA ports for diverse connectivity options.

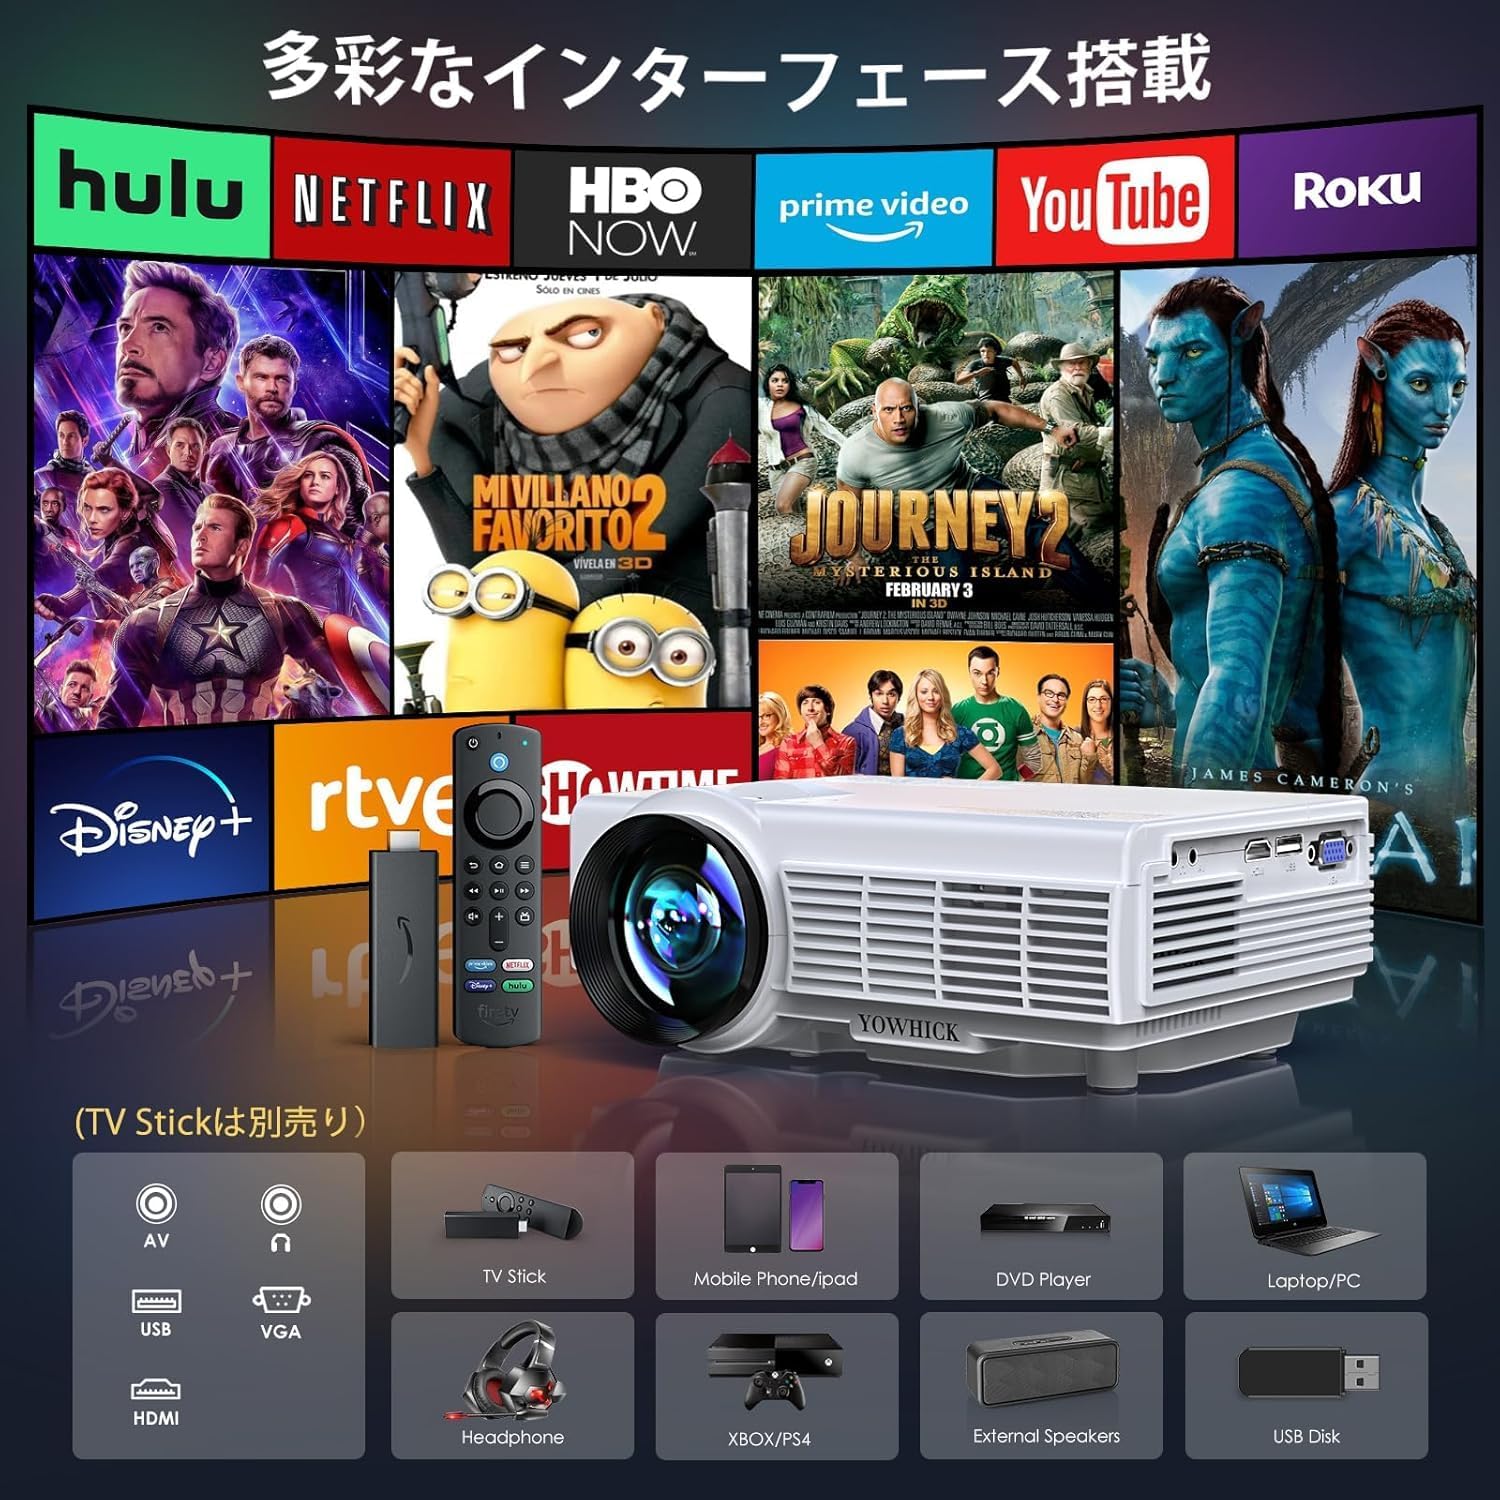
Illustration of the projector's diverse interface options, including HDMI, USB, AV, and VGA, connecting to devices like TV sticks, mobile phones, DVD players, and laptops.
5. ຕັ້ງຄ່າ
5.1. ການເຊື່ອມຕໍ່ພະລັງງານ
Connect the power cable to the projector's power input and then to a power outlet. Ensure the connection is secure.
5.2. Placement and Projection
Place the projector on a stable surface. The optimal projection distance is between 1.5m and 3m. The projector supports a maximum screen size of 300 inches and a minimum of 33 inches, making it suitable for various room sizes.
The projector displaying various screen sizes (33, 60, 300 inches) at different projection distances (1.1m, 1.9m, 5m).
The projector also supports ceiling projection. Simply place the projector vertically to project images onto the ceiling, creating an immersive viewປະສົບການ.
5.3. ຈຸດສຸມແລະການແກ້ໄຂ Keystone
Adjust the focus ring on the projector lens until the image is clear. Use the keystone correction dial to adjust the image shape until it is rectangular. Ensure the projector is horizontal to the screen for best results before fine-tuning focus.

Diagram illustrating the focus and keystone adjustment mechanisms on the projector, showing how to correct image blur and trapezoidal distortion.
5.4. ການເຊື່ອມຕໍ່
The projector supports various wired and wireless connections.
5.4.1. Wireless Connection (Wi-Fi)
The projector supports both 2.4G and 5G Wi-Fi for high-speed wireless mirroring.

Image showing a smartphone wirelessly connected to the projector, demonstrating 5G and 2.4G high-speed Wi-Fi capabilities for smooth streaming.
Connecting with iOS Devices:
- Connect the projector to your home Wi-Fi router.
- From the signal source menu, select "Screen Mirroring" and then enter the "iOS Screen Mirroring" interface.
- ເຊື່ອມຕໍ່ອຸປະກອນ iOS ຂອງທ່ານກັບເຣົາເຕີ Wi-Fi ດຽວກັນ.
- On your iOS device, enable Screen Mirroring and select "YOWHICK-XXXXXX" from the search results to connect.
Connecting with Android Devices:
- Connect the projector to your home Wi-Fi router.
- From the signal source menu, select "Screen Mirroring" and then enter the "Android Screen Mirroring" interface.
- Connect your Android device to the same Wi-Fi router.
- On your Android device, activate the "Multi-screen" function and select "YOWHICK-XXXXXX" from the search results to connect.
Connecting with PC (Windows):
- From the main menu, select "Screen Mirroring" and then enter the "Android Screen Mirroring" interface.
- Power on your computer and connect it to your home Wi-Fi router. Then press "Win + P".
- Select "Connect to a wireless display".
- Click on the projector name "YOWHICK-XXXXXX" to connect.
5.4.2. ການເຊື່ອມຕໍ່ບູທູດ
The projector is equipped with Bluetooth 5.3, allowing instant connection to your favorite Bluetooth headphones, speakers, or wireless earphones for an immersive audio experience.

The projector wirelessly connected to an external Bluetooth speaker and headphones, highlighting its Bluetooth 5.3 capability for enhanced audio.
5.4.3. ການເຊື່ອມຕໍ່ແບບມີສາຍ
Connect devices such as PCs, laptops, TV boxes, smartphones (with adapter), DVD players, USB memory sticks, Amazon Google Chromecast, X-Box, PS3/PS4, etc., via the HDMI, USB, or AV input terminals.
6. ຄໍາແນະນໍາການດໍາເນີນງານ
6.1. ການດໍາເນີນງານພື້ນຖານ
Use the power button on the projector or the remote control to turn the unit on or off. Navigate menus using the directional buttons and confirm selections with the OK button.
6.2. ການຄັດເລືອກແຫຼ່ງ
Press the 'Source' button on the remote or projector to cycle through available input sources (HDMI, USB, AV, Screen Mirroring).
6.3. ຟັງຊັນຊູມ
The projector features a zoom function that allows you to adjust the projection screen size from 100% down to 50% without moving the projector. This function is available when playing videos or displaying images from a signal source.

Illustration demonstrating the projector's zoom function, allowing adjustment of screen size from 100% to 50%.
6.4. ສຽງອອກ
The projector has built-in dual speakers for clear and powerful sound. For an enhanced audio experience, connect external speakers or headphones via Bluetooth or the audio output port.

Diagram showing the internal dual speaker structure of the projector, designed for high-quality audio reproduction.
7. ບໍາລຸງຮັກສາ
7.1. ທໍາຄວາມສະອາດ
Regularly clean the projector lens with a soft, lint-free cloth. For the projector body, use a dry cloth. Periodically check and clean the air filter (located on the underside) to ensure optimal airflow and prevent dust buildup.
7.2. ລະບົບເຮັດຄວາມເຢັນ
The projector features an advanced cooling system to dissipate heat efficiently, extending the lifespan of the device. Ensure the ventilation openings are not blocked during operation.

Illustration of the projector's efficient cooling system, showing airflow paths for heat dissipation.
8. ການແກ້ໄຂບັນຫາ
ພາກສ່ວນນີ້ແກ້ໄຂບັນຫາທົ່ວໄປທີ່ທ່ານອາດຈະພົບ.
| ບັນຫາ | ສາເຫດທີ່ເປັນໄປໄດ້ | ການແກ້ໄຂ |
|---|---|---|
| ຮູບມົວ | Incorrect focus or keystone adjustment. | Adjust the focus ring and keystone correction dial until the image is clear and rectangular. Ensure the projector is perpendicular to the screen. |
| ບໍ່ມີສຽງ | Volume too low, incorrect audio output setting, or external device issue. | Increase volume. Check audio settings on the projector and connected device. Ensure external speakers/headphones are properly connected or paired via Bluetooth. |
| Wi-Fi Mirroring Lag/Delay | Network speed issues or wireless interference. | Ensure a strong Wi-Fi signal. Try connecting via a wired connection (HDMI) if the issue persists. |
| Smartphone Mirroring Fails | Too much data on the phone, or phone needs a refresh. | Restart your smartphone and try mirroring again. |
| Copyrighted Content Playback | DRM restrictions on streaming services (e.g., Amazon Prime Video, Netflix). | Connect an Amazon Fire TV Stick or similar streaming device, or connect your PC via HDMI to play such content. |
9. ຂໍ້ມູນຈໍາເພາະ
| ຄຸນສົມບັດ | ຂໍ້ມູນຈໍາເພາະ |
|---|---|
| ຍີ່ຫໍ້ | YOWHICK |
| ໝາຍເລກຕົວແບບ | DQ1 |
| ຄວາມສະຫວ່າງ | 20000 Lumens |
| ຄວາມລະອຽດເດີມ | 1920 x 1080P (Full HD) |
| ຄວາມລະອຽດທີ່ຮອງຮັບ | ສູງສຸດ 4K (3840 x 2160) |
| ການເຊື່ອມຕໍ່ Wi-Fi | 2.4G & 5G Wi-Fi |
| Bluetooth | Bluetooth 5.3 |
| Function ຊູມ | ຫຼຸດ 50%. |
| ຂະໜາດການຄາດຄະເນ | 33 - 300 ນິ້ວ |
| ການໂຕ້ຕອບການປ້ອນຂໍ້ມູນ | HDMI, USB, AV, VGA |
| ສຽງ | Built-in Dual HiFi Speakers |
| ປັດໄຈແບບຟອມ | ແບບພົກພາ |
| ນ້ຳໜັກສິນຄ້າ | 804 g |
| ຂະໜາດແພັກເກັດ | 30.6 x 24.1 x 13.2 cm |
10. ການຮັບປະກັນແລະການສະຫນັບສະຫນູນ
YOWHICK provides comprehensive customer support for your product:
- ຜູ້ຜະລິດສະຫນັບສະຫນູນ: 3 ປີນັບແຕ່ມື້ຊື້.
- Free Exchange: 24 months for initial defects or natural failures under normal use.
- Money-back Guarantee: ນະໂຍບາຍການສົ່ງຄືນພາຍໃນ 30 ມື້.
- ສະຫນັບສະຫນູນດ້ານວິຊາການ: Dedicated technical support is available.
For any inquiries, exchanges, or returns, please contact us via the contact information provided on the warranty card or in the user manual (often via a QR code). We aim to provide the most reassuring customer service.


