1. ຜະລິດຕະພັນເກີນview
The Hard-Nox Collection 1-Light fixture features a double-banded frame with softly rounded edges. Both the frame and the lens are constructed of durable polycarbonate. This fixture is rated for wet locations, making it suitable for both indoor and outdoor use.
ຄຸນນະສົມບັດທີ່ສໍາຄັນ:
- ການອອກແບບທີ່ທັນສະໄຫມ: Double-banded frame with softly rounded edges.
- ການກໍ່ສ້າງທົນທານ: Frame and lens made of polycarbonate.
- Satin White Finish: Two softly rounded square bands in satin white.
- LED ປະສົມປະສານ: Includes 25W integrated LED, 90 CRI, 3000K light.
- ສະຖານທີ່ຊຸ່ມລະບຸໄວ້: cETLus Wet Location Listed, suitable for indoor or outdoor environments. Weather resistant.
2. ຂໍ້ມູນຄວາມປອດໄພ
ອ່ານຄໍາແນະນໍາດ້ານຄວາມປອດໄພທີ່ສໍາຄັນກ່ອນທີ່ຈະດໍາເນີນການຕິດຕັ້ງ
- Place wall switch in OFF position. If fixture has built-in switch or chain pull, switch or pull chain is OFF.
- Turn OFF power source at the circuit breaker before installation or maintenance.
- This fixture must have an integral photo sensor that turns the fixture off during the day and on at night. The photo sensor is not adjustable. The fixture could possibly cycle on and off due to light reflected from nearby surfaces into the photo sensor. If cycling occurs, remove the photo sensor nut and install the swivel hood and base.
- hood ແລະຖານແມ່ນສາມາດປັບໄດ້. hood ສາມາດຫມຸນໄດ້ແລະພື້ນຖານສາມາດຕັດຕາມເສັ້ນ dotted ເພື່ອຫຼຸດຜ່ອນຄວາມຍາວໂດຍລວມ. ກວດເບິ່ງການດໍາເນີນງານກ່ອນທີ່ຈະຕັດພື້ນຖານ.
- Clean only with mild soap and water. Avoid spraying with cleansers, insecticides, and pesticides that are petroleum-based hydrocarbon products. These will degrade the Luminaire.
- CAUTION: Do not turn ON without diffuser installed. Do not touch LEDs or circuit board. LED optics could be damaged. No lamp ຕ້ອງການທົດແທນ! ເຄື່ອງຈັກໄຟ LED ປະສົມປະສານທີ່ສະຫນອງ. ຫ້າມຖອດຝາປ້ອງກັນຈາກເຄື່ອງຈັກໄຟ LED.
3. ອົງປະກອບລວມ
The product package includes the fixture itself and an installation sheet.
4. ຄໍາແນະນໍາການຕິດຕັ້ງ
Refer to the detailed installation sheet image below for visual guidance on each step.

Image: Full installation sheet showing all steps and diagrams for the fixture. This includes diffuser removal, mounting, wiring, and final assembly.
Step 1: Prepare the Fixture (Refer to Diagram 1 on Installation Sheet)
Remove the diffuser. Insert a flat-bladed screwdriver into the rectangular slot and rotate the blade. The diffuser will then pop out.
Step 2: Prepare the Mounting Plate (Refer to Diagram 2 on Installation Sheet)
Remove the screws that secure the Lamp Holder Plate to the fixture body. The Lamp Holder Plate and the square fixture has the hood in the Lamp Holder Plate.
Step 3: Select Mounting Method (Refer to Diagram 3 on Installation Sheet)
Select desired mounting method: Over an outlet box or with conduit and fixture mounted directly to desired surface. If the fixture is designed to be mounted to an outlet box, remove two of the oval slots that match the outlet mounting box threaded holes and where the location will result in the desired fixture orientation. If the fixture is designed to be mounted directly to the desired surface, remove the round hole and secure the enclosure to the mounting surface with two 8 x 32 x 1/2 screws (provided). Remove two of the oval slots that are opposite of each other. Orientate the enclosure to the desired position. Mark slot location on the mounting surface. Drill out desired conduit outlet(s). Attach the enclosure to the surface with appropriate fasteners. Attach the conduit to the fixture. Use fittings suitable for a wet location if the fixture is to be installed outside.
NOTE: TO ENSURE WATER AND INSECT RESISTANT SEAL, ALL ENTRY POINTS MUST BE CAULKED.
Step 4: Wiring (Refer to Diagram 4 on Installation Sheet)
Connect the black fixture wire(s) to the black supply wire (the white fixture wire(s) to the white supply wire and the fixture ground to the supply ground wire using wire connectors (provided). Take the black fixture wire(s) and place evenly against the black wire from the conduit or outlet box. Do not twist wires together before using a wire connector. Use a wire connector that is too small and thread the connector clockwise until you feel a firm resistance. Gently try to remove the wire from the connector; if you can remove the wires carefully. Repeat process for the connection of white fixture wire(s) to white wire from outlet box or conduit and fixture ground wire and ground wire from outlet box or conduit.
Step 5: Install LED Light Engine (Refer to Diagram 5 on Installation Sheet)
Attach the driver plate to the enclosure with three (round) or four (oval) slot screws. No lamp ຕ້ອງການທົດແທນ! ເຄື່ອງຈັກໄຟ LED ປະສົມປະສານທີ່ສະຫນອງ. ຫ້າມຖອດຝາປ້ອງກັນຈາກເຄື່ອງຈັກໄຟ LED.
Step 6: Attach Diffuser (Refer to Diagram 6 on Installation Sheet)
Attach the diffuser to the fixture enclosure. Align the three or four tabs on the diffuser with the slots on the enclosure and push them into the enclosure.
Outdoor Fixtures must be caulked with an outdoor rated caulk where the base of the enclosure meets the mounting surface.
5. ຄໍາແນະນໍາການດໍາເນີນງານ
This fixture features an integrated LED light engine, which does not require lamp replacement. It also includes an integral photo sensor designed to automatically turn the light off during the day and on at night. The photo sensor is not adjustable. If the light cycles on and off due to reflected light, ensure proper placement or adjust the hood and base as described in the safety section.
6. ບໍາລຸງຮັກສາ
To clean the fixture, use only mild soap and water. Avoid spraying with cleansers, insecticides, and pesticides that contain petroleum-based hydrocarbon products, as these can degrade the luminaire's materials.
7. ການແກ້ໄຂບັນຫາ
- ແສງບໍ່ເປີດ: Ensure the power supply is active at the circuit breaker and the wall switch is in the ON position. Check all wiring connections.
- Light cycling on/off: This may be due to the photo sensor detecting reflected light. Refer to the "Safety Information" section for guidance on adjusting the hood and base or ensuring proper placement.
- Dim or inconsistent light: Verify that the fixture is receiving the correct voltage. If the issue persists, contact a qualified electrician or customer support.
For issues not covered here, please contact Progress Lighting customer support or consult a qualified electrician.
8. ຂໍ້ມູນຈໍາເພາະຂອງຜະລິດຕະພັນ
| ຜູ້ຜະລິດ | ຄວາມຄືບຫນ້າແສງສະຫວ່າງ |
| ເລກສ່ວນ | P550115-028-30 |
| ນ້ໍາຫນັກລາຍການ | 2.4 ປອນ |
| ໝາຍເລກຕົວແບບ | P550115-028-30 |
| ຂະໜາດ | Medium (10 in. diameter x 4.5 in. height) |
| ສີ | ສີຂາວ |
| ແບບ | ທັນສະໄຫມ |
| ຈົບ | Satin ສີຂາວ |
| ວັດສະດຸ | ພາດສະຕິກ (ໂພລີຄາບອນ) |
| ແຫຼ່ງພະລັງງານ | ໄຟຟ້າສາຍ |
| ສະບັບtage | 120 ໂວນ |
| ວັດtage | 25 ວັດ |
| ປະເພດຂອງ Bulb | LED (ປະສົມປະສານ) |
| ປະເພດການຕິດຕັ້ງ | Down Lighting (Wall or Ceiling Mounted) |
| ການຢັ້ງຢືນ | cETLus Wet Location Listed |
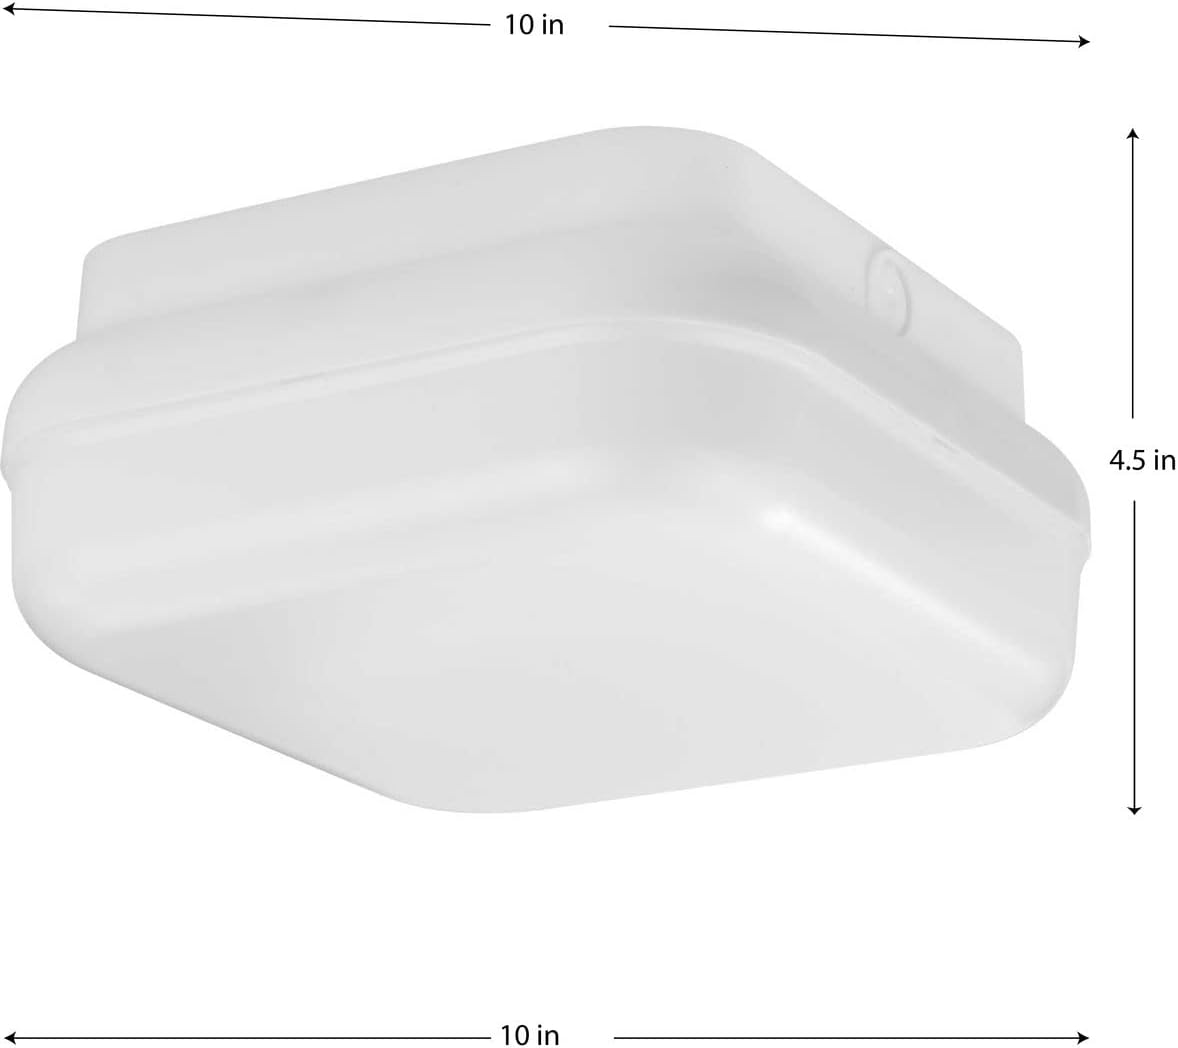
Image: Product dimensions, indicating a 10-inch width and 4.5-inch height for the fixture.
9. ການຮັບປະກັນແລະການສະຫນັບສະຫນູນ
ຜະລິດຕະພັນນີ້ມາພ້ອມກັບ a ຮັບປະກັນ 5 ປີຈໍາກັດ. For warranty claims or technical support, please contact Progress Lighting customer service. Refer to the original purchase documentation for specific warranty terms and conditions.
10. ຊັບພະຍາກອນເພີ່ມເຕີມ
ວິດີໂອຜະລິດຕະພັນຢ່າງເປັນທາງການ:
Outdoor Lighting - Sizing and Selection
This video from Progress Lighting provides guidance on sizing and selecting outdoor lighting fixtures, including considerations for entryways, garages, and hanging lights. It offers useful tips for proper placement and installation height to enhance your home's exterior.