1. ບົດແນະນຳ
Welcome to the user manual for your Ulefone Armor X9 Rugged Phone. This guide provides essential information on setting up, operating, maintaining, and troubleshooting your device. The Ulefone Armor X9 is designed for durability and performance, featuring robust protection and advanced functionalities.
Key features of your Ulefone Armor X9 include:
- IP68/IP69K Grade 360 All Round Protection: ສ້າງຂຶ້ນເພື່ອທົນທານຕໍ່ສະພາບແວດລ້ອມທີ່ຮຸນແຮງ.
- ລະບົບປະຕິບັດການ Android 11: Enjoy the latest Android experience.
- RAM 4GB + ROM 128GB: Ample memory and storage for your applications and data.
- ກ້ອງຫຼັງສາມໂຕ 16MP: Capture high-quality photos and videos.
- Massive 5580mAh Battery Capacity: Extended usage time.
- Triple Navigation System: Enhanced positioning accuracy.
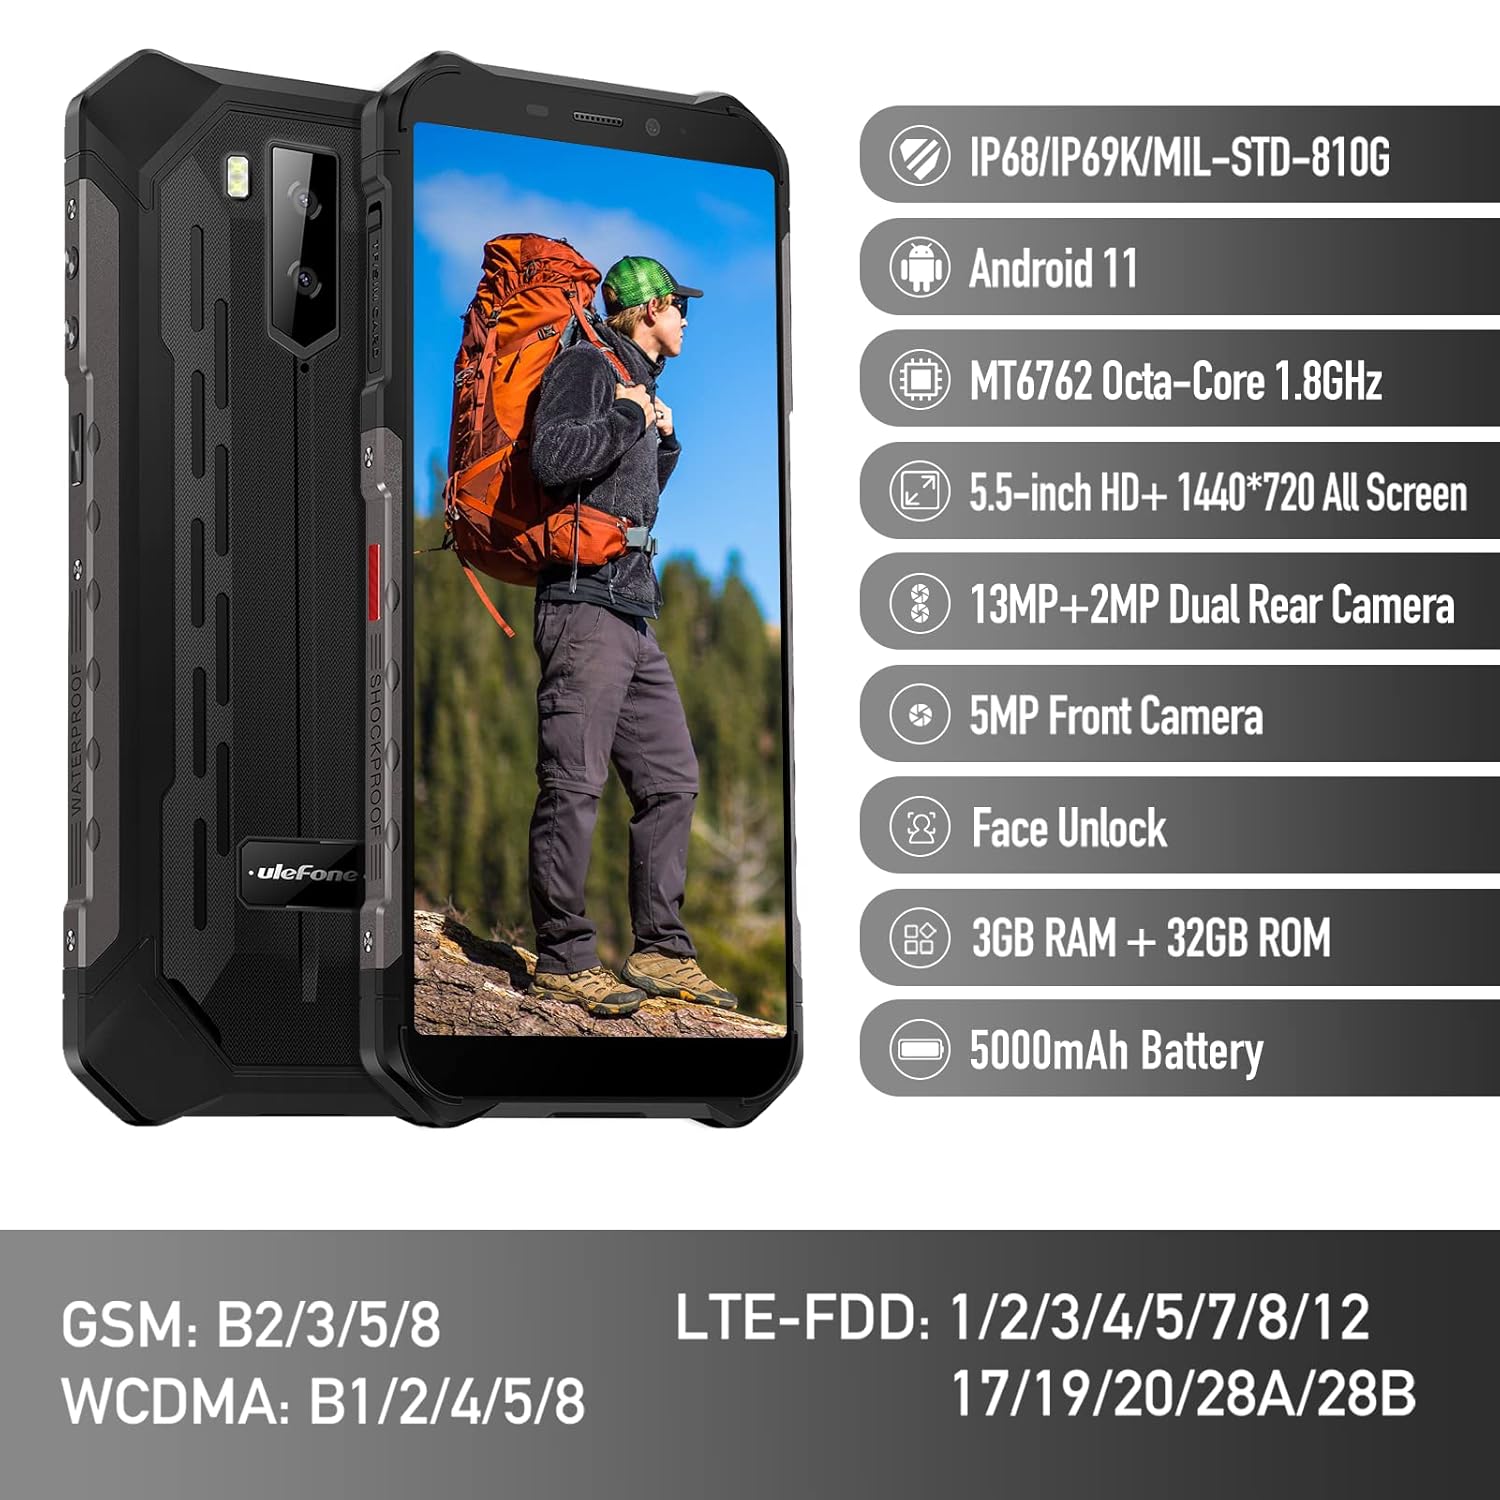
Figure 1: Ulefone Armor X9 Rugged Phone overview, highlighting its robust design and core specifications like IP68/IP69K rating, Android 11, Octa-Core processor, 5.5-inch HD+ screen, 13MP+2MP dual rear camera, 5MP front camera, Face Unlock, 3GB RAM + 32GB ROM, and 5000mAh battery.
2. ຕັ້ງຄ່າ
2.1. ການຕິດຕັ້ງ SIM ແລະບັດ TF
The Ulefone Armor X9 supports dual SIM cards and a TF (microSD) card for expandable storage. Follow these steps to install them:
- ຊອກຫາຖາດຊິມກາດຢູ່ດ້ານຂ້າງຂອງໂທລະສັບ.
- ໃຊ້ເຄື່ອງມືຖອດຊິມທີ່ສະໜອງໃຫ້ເພື່ອເປີດຖາດ.
- Carefully place your Nano-SIM cards into the designated slots (SIM1 and SIM2).
- If using a TF card, place it into the dedicated TF card slot. Note that some configurations may share a slot between SIM2 and the TF card.
- Gently push the tray back into the phone until it is flush with the device body. Ensure the tray is properly sealed to maintain water and dust resistance.

Figure 2: Illustration of the dual SIM and TF card tray, showing how to insert SIM1, SIM2, and a TF card into the Ulefone Armor X9.
2.2. ການສາກໄຟເບື້ອງຕົ້ນ
Before first use, it is recommended to fully charge your Ulefone Armor X9. Use the provided USB cable and power adapter.
- ເຊື່ອມຕໍ່ສາຍ USB ເຂົ້າກັບພອດສາກໄຟໃນໂທລະສັບຂອງທ່ານ.
- ເຊື່ອມຕໍ່ປາຍອື່ນໆຂອງສາຍ USB ກັບອະແດັບເຕີໄຟ.
- ສຽບອະແດບເຕີໄຟໃສ່ກັບປລັກສຽບໃສ່ຝາ.
- ຕົວຊີ້ວັດການສາກໄຟຈະປາກົດຢູ່ໃນຫນ້າຈໍ. ອະນຸຍາດໃຫ້ໂທລະສັບສາກໄຟຈົນກວ່າໄອຄອນແບັດເຕີຣີຈະເຕັມ.
2.3. ເປີດ / ປິດພະລັງງານ
- ເພື່ອເປີດເຄື່ອງ: Press and hold the Power button (usually on the right side) until the Ulefone logo appears.
- ປິດເຄື່ອງ: Press and hold the Power button until the power options menu appears on the screen. Select "Power off" and confirm.
- ເພື່ອເລີ່ມຕົ້ນໃໝ່: ຈາກເມນູຕົວເລືອກພະລັງງານ, ເລືອກ "Restart" ແລະຢືນຢັນ.
3. ຄໍາແນະນໍາການດໍາເນີນງານ
3.1. ການນຳທາງພື້ນຖານ (Android 11)
Your Ulefone Armor X9 runs on Android 11, offering an intuitive user interface. Common gestures and navigation include:
- ເລື່ອນຂຶ້ນ: ເຂົ້າເຖິງລິ້ນຊັກແອັບ.
- ປັດລົງ: ເປີດແຜງການແຈ້ງເຕືອນ ແລະການຕັ້ງຄ່າດ່ວນ.
- ແຕະ: ເລືອກລາຍການ ຫຼືເປີດແອັບ.
- ຂ່າວຍາວ: ເຂົ້າເຖິງເມນູບໍລິບົດ ຫຼືຍ້າຍໄອຄອນ.
- Pinch-to-Zoom: ຊູມເຂົ້າ ຫຼືອອກໃນຮູບພາບ ແລະ web ໜ້າ.

Figure 3: Screenshots of the Android 11 interface on the Ulefone Armor X9, showing settings menus, quick toggles, and the sound recorder application.

Figure 4: The 5.5-inch 18:9 All Screen display of the Ulefone Armor X9, showcasing its immersive viewing experience with an image of a skier.
3.2. ການນໍາໃຊ້ກ້ອງຖ່າຍຮູບ
Your phone is equipped with a 16MP Triple Rear Camera and a Front Camera. To use the camera:
- ເປີດແອັບພລິເຄຊັນ "ກ້ອງຖ່າຍຮູບ" ຈາກໜ້າຈໍຫຼັກ ຫຼືແຖບລິ້ນຊັກແອັບຂອງທ່ານ.
- ແຕະປຸ່ມຊັດເຕີເພື່ອຖ່າຍຮູບ.
- ສະຫຼັບລະຫວ່າງໂໝດຮູບພາບ ແລະວິດີໂອຕາມຄວາມຕ້ອງການ.
- Tap the icon to switch between the front and rear cameras.
- Explore various camera modes and settings for optimal results.
3.3. ການເຊື່ອມຕໍ່
The Ulefone Armor X9 supports various connectivity options:
- Wi-Fi: ໄປທີ່ການຕັ້ງຄ່າ > ເຄືອຂ່າຍ ແລະອິນເຕີເນັດ > Wi-Fi ເພື່ອເຊື່ອມຕໍ່ກັບເຄືອຂ່າຍທີ່ມີຢູ່.
- Bluetooth: Go to Settings > Connected devices > Bluetooth to pair with Bluetooth devices.
- GPS: The phone features AGPS for accurate location services. Ensure location services are enabled in Settings > Location.
- USB: ເຊື່ອມຕໍ່ໂທລະສັບຂອງທ່ານກັບຄອມພິວເຕີໂດຍໃຊ້ສາຍ USB ສຳລັບການໂອນຂໍ້ມູນ ຫຼື ການສາກໄຟ.
3.4. ປົດລັອກດ້ວຍໜ້າ
For convenient and secure unlocking, your Ulefone Armor X9 supports Face Unlock:
- ໄປທີ່ ການຕັ້ງຄ່າ > ຄວາມປອດໄພ > ປົດລັອກດ້ວຍໃບໜ້າ.
- ປະຕິບັດຕາມຄໍາແນະນໍາໃນຫນ້າຈໍເພື່ອລົງທະບຽນໃບຫນ້າຂອງທ່ານ.
- Ensure good lighting and hold the phone at eye level during registration.
- ເມື່ອລົງທະບຽນແລ້ວ, ທ່ານສາມາດປົດລັອກໂທລະສັບຂອງທ່ານໄດ້ໂດຍການເບິ່ງກ້ອງໜ້າ.
4. ບໍາລຸງຮັກສາ
4.1. ການທໍາຄວາມສະອາດແລະການດູແລ
To maintain the performance and appearance of your rugged phone:
- ເຊັດໜ້າຈໍ ແລະ ຮ່າງກາຍດ້ວຍຜ້າອ່ອນໆ, ທີ່ບໍ່ມີເສັ້ນດ່າງ.
- ສໍາລັບຝຸ່ນ stubborn, ໃຊ້ d ເລັກນ້ອຍamp ຜ້າ. ຫຼີກເວັ້ນການສານເຄມີທີ່ຮຸນແຮງຫຼືວັດສະດຸຂັດ.
- Ensure all port covers are securely closed to maintain water and dust resistance, especially after charging or using headphones.

Figure 5: The Ulefone Armor X9's 360° All Protection Design, showcasing its superior materials and superb durability against impacts and harsh conditions.
4.2. Water and Dust Resistance (IP68/IP69K)
The Ulefone Armor X9 is rated IP68/IP69K, meaning it is resistant to dust and water immersion. However, this resistance is not permanent and may decrease over time with normal wear. To ensure optimal protection:
- Do not intentionally submerge the phone in water for extended periods or beyond specified depths.
- Avoid exposing the phone to high-pressure water or extreme temperatures.
- Ensure all port covers are tightly sealed before exposure to water or dust.
- ຖ້າໂທລະສັບປຽກ, ເຊັດໃຫ້ແຫ້ງຢ່າງລະອຽດກ່ອນທີ່ຈະສາກໄຟ ຫຼືເປີດພອດຕ່າງໆ.
4.3. ການດູແລຫມໍ້ໄຟ
To prolong the life of your 5580mAh Lithium Polymer battery:
- ຫຼີກລ່ຽງອຸນຫະພູມທີ່ຮຸນແຮງ (ຮ້ອນ ຫຼື ເຢັນ) ເພາະມັນສາມາດເຮັດໃຫ້ປະສິດທິພາບຂອງແບັດເຕີຣີຫຼຸດລົງໄດ້.
- Use only the original charger and cable or certified compatible accessories.
- ຢ່າປ່ອຍໃຫ້ແບັດເຕີຣີໝົດເລື້ອຍໆ. ໃຫ້ສາກໄຟກ່ອນທີ່ມັນຈະຮອດລະດັບຕໍ່າຫຼາຍ.
5. ການແກ້ໄຂບັນຫາ
If you encounter issues with your Ulefone Armor X9, try the following troubleshooting steps:
5.1. ໂທລະສັບບໍ່ເປີດ
- Ensure the battery is charged. Connect the phone to a charger for at least 30 minutes.
- ກົດປຸ່ມເປີດປິດຄ້າງໄວ້ 10-15 ວິນາທີເພື່ອບັງຄັບໃຫ້ຣີສະຕາດ.
5.2. ບັນຫາການສາກໄຟ
- Verify that the charging cable and adapter are working correctly. Try a different charger if available.
- ກວດໃຫ້ແນ່ໃຈວ່າຊ່ອງສາກໄຟສະອາດ ແລະ ບໍ່ມີສິ່ງເສດເຫຼືອ.
- Make sure the charging cable is fully inserted into the port. Some rugged phone ports may require a firm connection due to protective covers.
5.3. SIM/TF Card Not Detected
- Ensure the SIM/TF card is correctly inserted into the tray and the tray is fully seated.
- ຣີສະຕາດໂທລະສັບ.
- Check if the SIM card is active with your network provider.
5.4. App Crashes or Freezing
- ປິດ ແລະເປີດແອັບທີ່ມີບັນຫາຄືນໃໝ່.
- ລຶບລ້າງແຄສ ແລະຂໍ້ມູນຂອງແອັບ (ການຕັ້ງຄ່າ > ແອັບ > [ຊື່ແອັບ] > ບ່ອນເກັບຂໍ້ມູນ ແລະແຄດ).
- ກວດໃຫ້ແນ່ໃຈວ່າແອັບໄດ້ຖືກອັບເດດເປັນເວີຊັນຫຼ້າສຸດ.
- ຣີສະຕາດໂທລະສັບ.
5.5. ຣີເຊັດເປັນຄ່າໂຮງງານ
ຖ້າບັນຫາຍັງຄົງຢູ່, ການຣີເຊັດເປັນຄ່າໂຮງງານອາດຈະແກ້ໄຂພວກມັນໄດ້. ຄຳເຕືອນ: ນີ້ຈະລຶບຂໍ້ມູນທັງໝົດໃນໂທລະສັບຂອງທ່ານ. ສໍາຮອງຂໍ້ມູນທີ່ສໍາຄັນກ່ອນທີ່ຈະດໍາເນີນການ.
- ໄປທີ່ Settings > System > Reset options.
- ເລືອກ "ລຶບຂໍ້ມູນທັງໝົດ (ຣີເຊັດເປັນຄ່າໂຮງງານ)".
- ຢືນຢັນການຕັດສິນໃຈຂອງທ່ານແລະໃສ່ລະຫັດ PIN / ລະຫັດຜ່ານຂອງທ່ານຖ້າຖືກເຕືອນ.
6. ຂໍ້ມູນຈໍາເພາະ
Below are the detailed specifications for the Ulefone Armor X9:

Figure 6: Details of the Ulefone Armor X9's Octa-Core Processor, highlighting its power-efficient yet powerful performance, along with 3GB RAM and 32GB ROM, and support for up to 256GB TF card extendable storage.
| ຄຸນສົມບັດ | ຂໍ້ມູນຈໍາເພາະ |
|---|---|
| ລະບົບປະຕິບັດການ | Android 11.0 |
| RAM | 3 GB (Note: Feature bullets mention 4GB RAM, please verify actual model) |
| ຄວາມອາດສາມາດເກັບຮັກສາຫນ່ວຍຄວາມຈໍາ | 32 GB (Expandable with TF card up to 256GB. Feature bullets mention 128GB ROM, please verify actual model) |
| ຕົວແບບ CPU | MT6762 Octa-Core 1.8GHz (Note: Specifications list 'Snapdragon', but image indicates MT6762. Please verify actual model) |
| ຂະໜາດສິນຄ້າ | 15.8 x 7.75 x 1.38 cm |
| ນ້ໍາຫນັກລາຍການ | 472 g |
| ໝໍ້ໄຟ | 1 Lithium Polymer battery (5580mAh, included) |
| ການສື່ສານໄຮ້ສາຍ | Cellular, Bluetooth, USB, Wi-Fi |
| GPS | AGPS |
| ຄຸນນະສົມບັດພິເສດ | Rear Camera, Face Unlock, IP68/IP69K, MIL-STD-810G |
| ຈໍສະແດງຜົນ | 5.5-inch HD+ 1440*720 All Screen |
| ກ້ອງຫຼັງ | 13MP+2MP Dual Rear Camera (Note: Feature bullets mention 16MP Triple Rear Camera, please verify actual model) |
| ກ້ອງໜ້າ | ກ້ອງໜ້າ 5MP |
| ສີ | ດຳ |
| ຜູ້ຜະລິດ | Ulefone |
Note: Specifications are based on available product data and may vary slightly. Please refer to your product packaging for the most accurate information. There are discrepancies between feature bullets, specifications, and image text regarding RAM, ROM, CPU, and camera megapixels. This manual uses the most frequently cited or detailed information, with notes for clarification.
7. ການຮັບປະກັນແລະການສະຫນັບສະຫນູນ
7.1. ຂໍ້ມູນການຮັບປະກັນ
Your Ulefone Armor X9 is covered by a manufacturer's warranty. The specific terms and duration of the warranty may vary by region and retailer. Please refer to the warranty card included in your product packaging or contact your point of purchase for detailed information regarding warranty coverage and claims.
7.2. ການຊ່ວຍເຫຼືອລູກຄ້າ
For technical assistance, troubleshooting beyond this manual, or warranty inquiries, please contact Ulefone customer support or your authorized dealer. You can typically find contact information on the official Ulefone webເວັບໄຊທ໌ຫຼືໃນເອກະສານຜະລິດຕະພັນຂອງທ່ານ.
- Visit the official Ulefone website for FAQs, software updates, and support contact details.
- ຮັກສາໃບຮັບເງິນຊື້ ແລະໝາຍເລກຊີຣຽວຂອງຜະລິດຕະພັນໄວ້ໃຫ້ສະດວກເມື່ອຕິດຕໍ່ກັບຝ່າຍຊ່ວຍເຫຼືອ.


