1. ບົດແນະນຳ
ຂອບໃຈສໍາລັບການຊື້asing the Optoma X309ST projector. This manual provides essential information for safely installing, operating, and maintaining your device. Please read this manual thoroughly before using the projector to ensure optimal performance and longevity.
ແມ່ນຫຍັງຢູ່ໃນກ່ອງ
- Optoma X309ST Projector
- ສາຍໄຟ
- ການຄວບຄຸມໄລຍະໄກ (ມີຫມໍ້ໄຟ)
- ສາຍ VGA
- ຄູ່ມືຜູ້ໃຊ້ (ເອກະສານນີ້)
- ບັດຮັບປະກັນ
2. ຂໍ້ມູນຄວາມປອດໄພ
ຄຳເຕືອນ: ເພື່ອປ້ອງກັນໄຟໄໝ້ ຫຼື ໄຟຟ້າຊັອດ, ຫ້າມໃຫ້ອຸປະກອນນີ້ຖືກຝົນ ຫຼື ຄວາມຊຸ່ມ.
- ຫ້າມປິດຊ່ອງລະບາຍອາກາດ. ຮັບປະກັນພື້ນທີ່ພຽງພໍຮອບໆໂປເຈັກເຕີເພື່ອການໄຫຼວຽນຂອງອາກາດທີ່ເໝາະສົມ.
- ຢ່າເບິ່ງໂດຍກົງໃນເລນໂປເຈັກເຕີເມື່ອ lamp ເປີດຢູ່. ແສງສະຫວ່າງທີ່ສະຫວ່າງສາມາດທຳລາຍຕາຂອງທ່ານໄດ້.
- ໃຊ້ພຽງແຕ່ສາຍໄຟທີ່ໃຫ້ມາກັບໂປເຈັກເຕີ.
- ຢ່າພະຍາຍາມບໍລິການຜະລິດຕະພັນນີ້ດ້ວຍຕົນເອງ. ອ້າງເຖິງການບໍລິການທັງtoົດໃຫ້ກັບພະນັກງານບໍລິການທີ່ມີຄຸນວຸດທິ.
- ຮັກສາໂປເຈັກເຕີໃຫ້ຫ່າງຈາກນ້ໍາຫຼືຄວາມຊຸ່ມຊື່ນ.
- ຫຼີກເວັ້ນການວາງໂປເຈັກເຕີຢູ່ເທິງພື້ນຜິວທີ່ບໍ່ຫມັ້ນຄົງ.
3. ຜະລິດຕະພັນເກີນview
ສ່ວນປະກອບຂອງໂປເຈັກເຕີ

ຮູບທີ 3.1: ເທິງ view of the Optoma X309ST projector. This image displays the control panel with buttons for power, menu navigation, and source selection, along with the focus and zoom adjustment rings located near the lens.

ຮູບທີ 3.2: ດ້ານໜ້າ view of the Optoma X309ST projector. The main projection lens is visible, flanked by ventilation grilles on either side, designed for efficient heat dissipation.
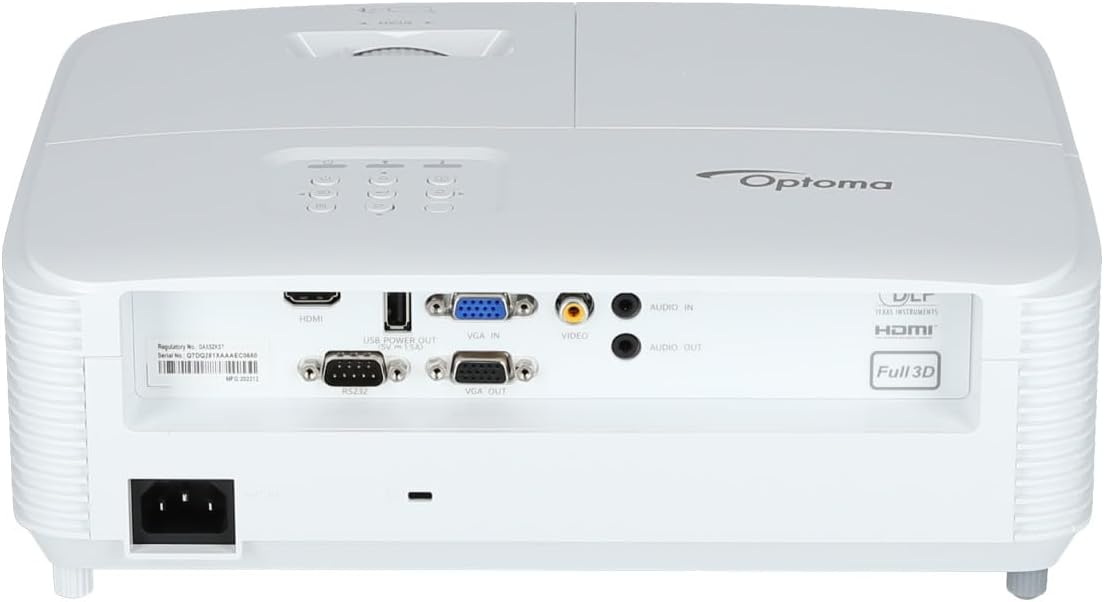
ຮູບທີ 3.3: ຫລັງ view of the Optoma X309ST projector. This image highlights the various connectivity ports including HDMI, VGA In, VGA Out, USB Power Out, Audio In, Audio Out, Video (RCA Composite), and the RS-232 control port, along with the power input.
ກະດານຄວບຄຸມ
The control panel on the top of the projector allows for basic operation without the remote control. It includes buttons for:
- ພະລັງງານ: ເປີດ ຫຼືປິດໂປຣເຈັກເຕີ.
- ເມນູ: ເຂົ້າເຖິງເມນູການສະແດງເທິງໜ້າຈໍ (OSD).
- ລູກສອນນໍາທາງ: Used to navigate through menu options and adjust settings.
- ທີ່ມາ: Selects the input source (HDMI, VGA, etc.).
- ຊິ້ງຂໍ້ມູນຄືນໃໝ່: Optimizes the image for analog sources.
4. ຕັ້ງຄ່າ
4.1 ການຈັດວາງໂປຣເຈັກເຕີ
The Optoma X309ST is a short-throw projector, designed to project large images from a short distance. Place the projector on a stable, flat surface or mount it securely. Ensure the projection surface (screen or wall) is flat and clear of obstructions.
- For optimal image quality, position the projector perpendicular to the screen.
- Maintain adequate ventilation space around the projector (at least 30 cm / 12 inches).
4.2 ການເຊື່ອມຕໍ່ພະລັງງານ
- Connect the power cord to the AC inlet on the rear of the projector.
- ສຽບສາຍໄຟອີກດ້ານໜຶ່ງເຂົ້າໄປໃນປ້ຳໄຟຟ້າທີ່ມີສາຍດິນ.
- The power LED on the projector will illuminate, indicating standby mode.
4.3 ການເຊື່ອມຕໍ່ແຫຼ່ງປ້ອນຂໍ້ມູນ
The projector supports various input sources. Choose the appropriate cable for your device.
- HDMI: For digital video and audio. Connect an HDMI cable from your source device (e.g., laptop, Blu-ray player) to the HDMI port on the projector.
- VGA: For analog video. Connect a VGA cable from your computer to the VGA IN port on the projector. For audio, connect a 3.5mm audio cable from your computer's audio output to the AUDIO IN port.
- RCA Composite Video: For standard definition analog video. Connect an RCA composite video cable (yellow connector) to the VIDEO port. For audio, connect RCA audio cables (red/white) to the AUDIO IN ports.
- USB Power Out: This port provides 5V power for external devices like streaming sticks, but does not transmit data.
5. ການດໍາເນີນງານຂອງໂປເຈັກເຕີ
5.1 ການເປີດ/ປິດ
- ເພື່ອເປີດເຄື່ອງ: Press the Power button on the control panel or remote control. The power LED will change from red (standby) to blue (on).
- ປິດເຄື່ອງ: Press the Power button twice. The first press will display a confirmation message; press again to confirm shutdown. The power LED will return to red.
ໝາຍເຫດ: Allow the projector to cool down for a few minutes after powering off before unplugging it or moving it.
5.2 ການເລືອກແຫຼ່ງທີ່ມາຂອງຂໍ້ມູນເຂົ້າ
ກົດ ທີ່ມາ button on the control panel or remote control repeatedly to cycle through available input sources (HDMI, VGA, Video). Alternatively, use the dedicated input buttons on the remote control.
5.3 ການປັບຮູບ
- ຈຸດສຸມ: ໝຸນວົງການໂຟກັສໃສ່ເລນຈົນກວ່າຮູບຈະປາກົດຄົມຊັດ ແລະຊັດເຈນ.
- ຊູມ: Rotate the zoom ring on the lens to adjust the image size without moving the projector.
- ການແກ້ໄຂ Keystone: If the image appears trapezoidal, use the Keystone Correction function in the OSD menu to square the image. Access via the ເມນູ ປຸ່ມ.
5.4 ເມນູການສະແດງເທິງໜ້າຈໍ (OSD).
ກົດ ເມນູ button to access the OSD. Use the navigation arrows to browse categories and options. Press ເຂົ້າ or the right arrow to select an option, and the left arrow or ເມນູ again to go back or exit.
ການຕັ້ງຄ່າ OSD ທົ່ວໄປປະກອບມີ:
- ການຕັ້ງຄ່າຮູບພາບ: Brightness, Contrast, Color, Aspect Ratio, Picture Mode.
- ການຕັ້ງຄ່າການສະແດງຜົນ: Keystone, Overscan, Wall Color.
- Setup Settings: Language, Auto Power Off, High Altitude Mode.
- Lamp ການຕັ້ງຄ່າ: Lamp Hours, Lamp Mode (Bright, Eco).
6. ບໍາລຸງຮັກສາ
ການບໍາລຸງຮັກສາເປັນປົກກະຕິຮັບປະກັນປະສິດທິພາບທີ່ດີທີ່ສຸດແລະຍືດອາຍຸຂອງໂປເຈັກເຕີຂອງທ່ານ.
6.1 ການອະນາໄມໂປເຈັກເຕີ້
- ພາຍນອກ: ໃຊ້ຜ້າແພທີ່ອ່ອນນຸ້ມ ງampened with a mild, non-abrasive cleaner. Do not spray cleaner directly onto the projector.
- ເລນ: Use a lens cleaning cloth or lens paper with a specialized lens cleaning solution. Avoid touching the lens surface with your fingers.
- Grilles ລະບາຍອາກາດ: ໃຊ້ແປງອ່ອນ ຫຼືເຄື່ອງດູດຝຸ່ນທີ່ມີຢາງຕິດຂັດເພື່ອເອົາຂີ້ຝຸ່ນອອກຈາກຊ່ອງລະບາຍອາກາດ. ກວດໃຫ້ແນ່ໃຈວ່າໂປເຈັກເຕີປິດ ແລະຖອດປລັກອອກກ່ອນທຳຄວາມສະອາດ.
6.2 ລamp ການທົດແທນ
WARNING: Projector lamps operate at high temperatures and pressures. Allow the projector to cool completely before attempting lamp ການທົດແທນ. ອ້າງອີງໃສ່ຄູ່ມືການບໍລິການຢ່າງຄົບຖ້ວນສຳລັບລາຍລະອຽດ lamp replacement instructions or contact qualified service personnel.
ທamp life can vary depending on usage and lamp mode. A warning message will appear on screen when the lamp is nearing the end of its life. Only use genuine Optoma replacement lamps.
6.3 ການເຮັດຄວາມສະອາດ/ການປ່ຽນໄສ້ກອງອາກາດ
The Optoma X309ST projector is designed with a sealed optical engine, which typically means it does not have user-serviceable air filters that require regular cleaning or replacement. However, ensure the ventilation grilles remain clear of dust and debris as described in section 6.1.
7. ການແກ້ໄຂບັນຫາ
ຖ້າເຈົ້າພົບບັນຫາກັບໂປເຈັກເຕີຂອງເຈົ້າ, ໃຫ້ອ້າງອີງເຖິງບັນຫາ ແລະວິທີແກ້ໄຂບັນຫາທົ່ວໄປຕໍ່ໄປນີ້:
| ບັນຫາ | ສາເຫດທີ່ເປັນໄປໄດ້ | ການແກ້ໄຂ |
|---|---|---|
| ບໍ່ມີຮູບພາບໃນຫນ້າຈໍ. |
|
|
| ຮູບພາບແມ່ນມົວ. |
|
|
| ຮູບພາບແມ່ນ trapezoidal. |
|
|
| ໂປຣເຈັກເຕີຮ້ອນເກີນໄປ ຫຼື ປິດລົງ. |
|
|
If the problem persists after trying these solutions, please contact Optoma customer support.
8. ຂໍ້ມູນຈໍາເພາະ
| ຄຸນສົມບັດ | ລາຍລະອຽດ |
|---|---|
| ໝາຍເລກຕົວແບບ | E9PD7DQ01EZ1 |
| ຄວາມສະຫວ່າງ | 3700 ANSI Lumens |
| ຄວາມລະອຽດເດີມ | XGA (1024 x 768) |
| ອັດຕາສ່ວນຖິ້ມ | 0.617:1 Short Throw |
| ເຕັກໂນໂລຊີການເຊື່ອມຕໍ່ | HDMI, USB, VGA |
| ວັດສະດຸປ້ອນ | HDMI, VGA, RCA Composite Video, Analog Audio (3.5mm) |
| ຜົນໄດ້ຮັບ | VGA Out (Loop-Through), Analog Audio (3.5mm) |
| ຄຸນນະສົມບັດພິເສດ | USB Power Output, Built-In 10-Watt Speaker, RS-232 Controllable, IR Remote Control Included, Full 3D content support |
| ນ້ໍາຫນັກລາຍການ | 6.61 ປອນ (ປະມານ 3 ກິໂລ) |
| ຂະໜາດສິນຄ້າ (L x W x H) | 15.42 x 10.35 x 13.52 ນິ້ວ (ປະມານ 39.17 x 26.29 x 34.34 ຊມ) |
| ການນໍາໃຊ້ທີ່ແນະນໍາ | Business presentations, Education, Multimedia, Full 3D content |
9. ການຮັບປະກັນແລະການສະຫນັບສະຫນູນ
9.1 ຂໍ້ມູນການຮັບປະກັນ
Your Optoma X309ST projector comes with a standard manufacturer's warranty. Please refer to the warranty card included in your product packaging for specific terms, conditions, and duration. Keep your proof of purchase for warranty claims.
The product includes 1 year technical support as part of the purchase.
9.2 ສະຫນັບສະຫນູນລູກຄ້າ
For technical assistance, troubleshooting beyond this manual, or warranty inquiries, please contact Optoma customer support. Visit the official Optoma webເວັບໄຊທ໌ສຳລັບຂໍ້ມູນຕິດຕໍ່, ຄຳຖາມທີ່ຖືກຖາມເລື້ອຍໆ ແລະ ການດາວໂຫຼດໄດເວີທີ່ທັນສະໄໝທີ່ສຸດ.
ທ່ານສາມາດຊອກຫາຂໍ້ມູນເພີ່ມເຕີມແລະຊັບພະຍາກອນສະຫນັບສະຫນູນໄດ້ທີ່ ຮ້ານ Optoma ໃນ Amazon or the official Optoma webເວັບໄຊ.