1. ບົດແນະນຳ
This manual provides comprehensive instructions for the installation, operation, and maintenance of your AZZA CSAZ-340F CELESTA ATX Mid Tower Gaming Case. Please read this manual thoroughly before beginning installation to ensure proper setup and to maximize the performance and longevity of your system components.

ຮູບທີ 1: The AZZA CSAZ-340F CELESTA Mid Tower ATX Case, showcasing its design and form factor.
2. ຂໍ້ມູນຄວາມປອດໄພ
- Always disconnect the power supply from the wall outlet before installing or removing any components inside the case.
- ຈັດການອົງປະກອບທັງໝົດດ້ວຍຄວາມລະມັດລະວັງເພື່ອປ້ອງກັນຄວາມເສຍຫາຍຈາກການປ່ອຍໄຟຟ້າສະຖິດ (ESD). ພິຈາລະນາໃຊ້ສາຍຮັດຂໍ້ມືຕ້ານໄຟຟ້າສະຖິດ.
- Keep the case and components away from liquids and excessive moisture.
- ຮັບປະກັນການລະບາຍອາກາດທີ່ເໝາະສົມອ້ອມຮອບກ່ອງເພື່ອປ້ອງກັນຄວາມຮ້ອນເກີນໄປ.
- Do not attempt to modify the case structure or components, as this may void your warranty and pose safety risks.
- ເກັບຮັກສາຊິ້ນສ່ວນຂະໜາດນ້ອຍ ແລະ ວັດສະດຸຫຸ້ມຫໍ່ໃຫ້ໄກຈາກເດັກນ້ອຍ.
3. ເນື້ອໃນຊຸດ
ກວດສອບວ່າລາຍການທັງຫມົດທີ່ລະບຸໄວ້ຂ້າງລຸ່ມນີ້ແມ່ນມີຢູ່ໃນຊຸດຂອງທ່ານ:
- AZZA CSAZ-340F CELESTA ATX Mid Tower Gaming Case
- Accessory Box (containing screws, standoffs, cable ties, etc.)
- ຄູ່ມືຜູ້ໃຊ້ (ເອກະສານນີ້)
4. ຂໍ້ມູນຈໍາເພາະ
The following table details the technical specifications of the AZZA CSAZ-340F CELESTA case:
| ຄຸນສົມບັດ | ຂໍ້ມູນຈໍາເພາະ |
|---|---|
| ຍີ່ຫໍ້ | AZZA |
| ຊື່ຕົວແບບ | CSAZ-340F CELESTA |
| ປະເພດກໍລະນີ | ຫໍກາງ |
| ຄວາມເຂົ້າກັນໄດ້ຂອງເມນບອດ | ATX, Micro ATX, Mini ITX |
| ສີ | ດຳ |
| ວັດສະດຸ | ໂລຫະ |
| ປະເພດການຕິດຕັ້ງການສະຫນອງພະລັງງານ | ພູລຸ່ມ |
| ວິທີການເຮັດຄວາມເຢັນ | ອາກາດ |
| Fan Size (Included/Supported) | 120mm (Rear included), Supports 120mm/140mm |
| ຄວາມຍາວສູງສຸດຂອງ GPU | 320ມມ |
| ຄວາມສູງຂອງ CPU Cooler ສູງສຸດ | 165ມມ |
| ຄວາມຍາວ PSU ສູງສຸດ | 160ມມ |
| 3.5" HDD Support | 2 |
| 2.5" SSD Support | 4/6 (depending on configuration) |
| ການສະ ໜັບ ສະ ໜູນ ພັດລົມດ້ານ ໜ້າ | 3 x 120mm ຫຼື 3 x 140mm |
| ການສະໜັບສະໜູນແຟນໆອັນດັບຕົ້ນໆ | 2 x 120mm ຫຼື 2 x 140mm |
| ຮອງຮັບພັດລົມດ້ານຫຼັງ | 1 x 120 ມມ |
| ສະຫນັບສະຫນູນ radiator ທາງຫນ້າ | Up to 280mm/360mm |
| ສະຫນັບສະຫນູນ radiator ເທິງ | 2 x 120mm (from image) |
| ສະຫນັບສະຫນູນ radiator ຫລັງ | 1 x 120mm (from image) |
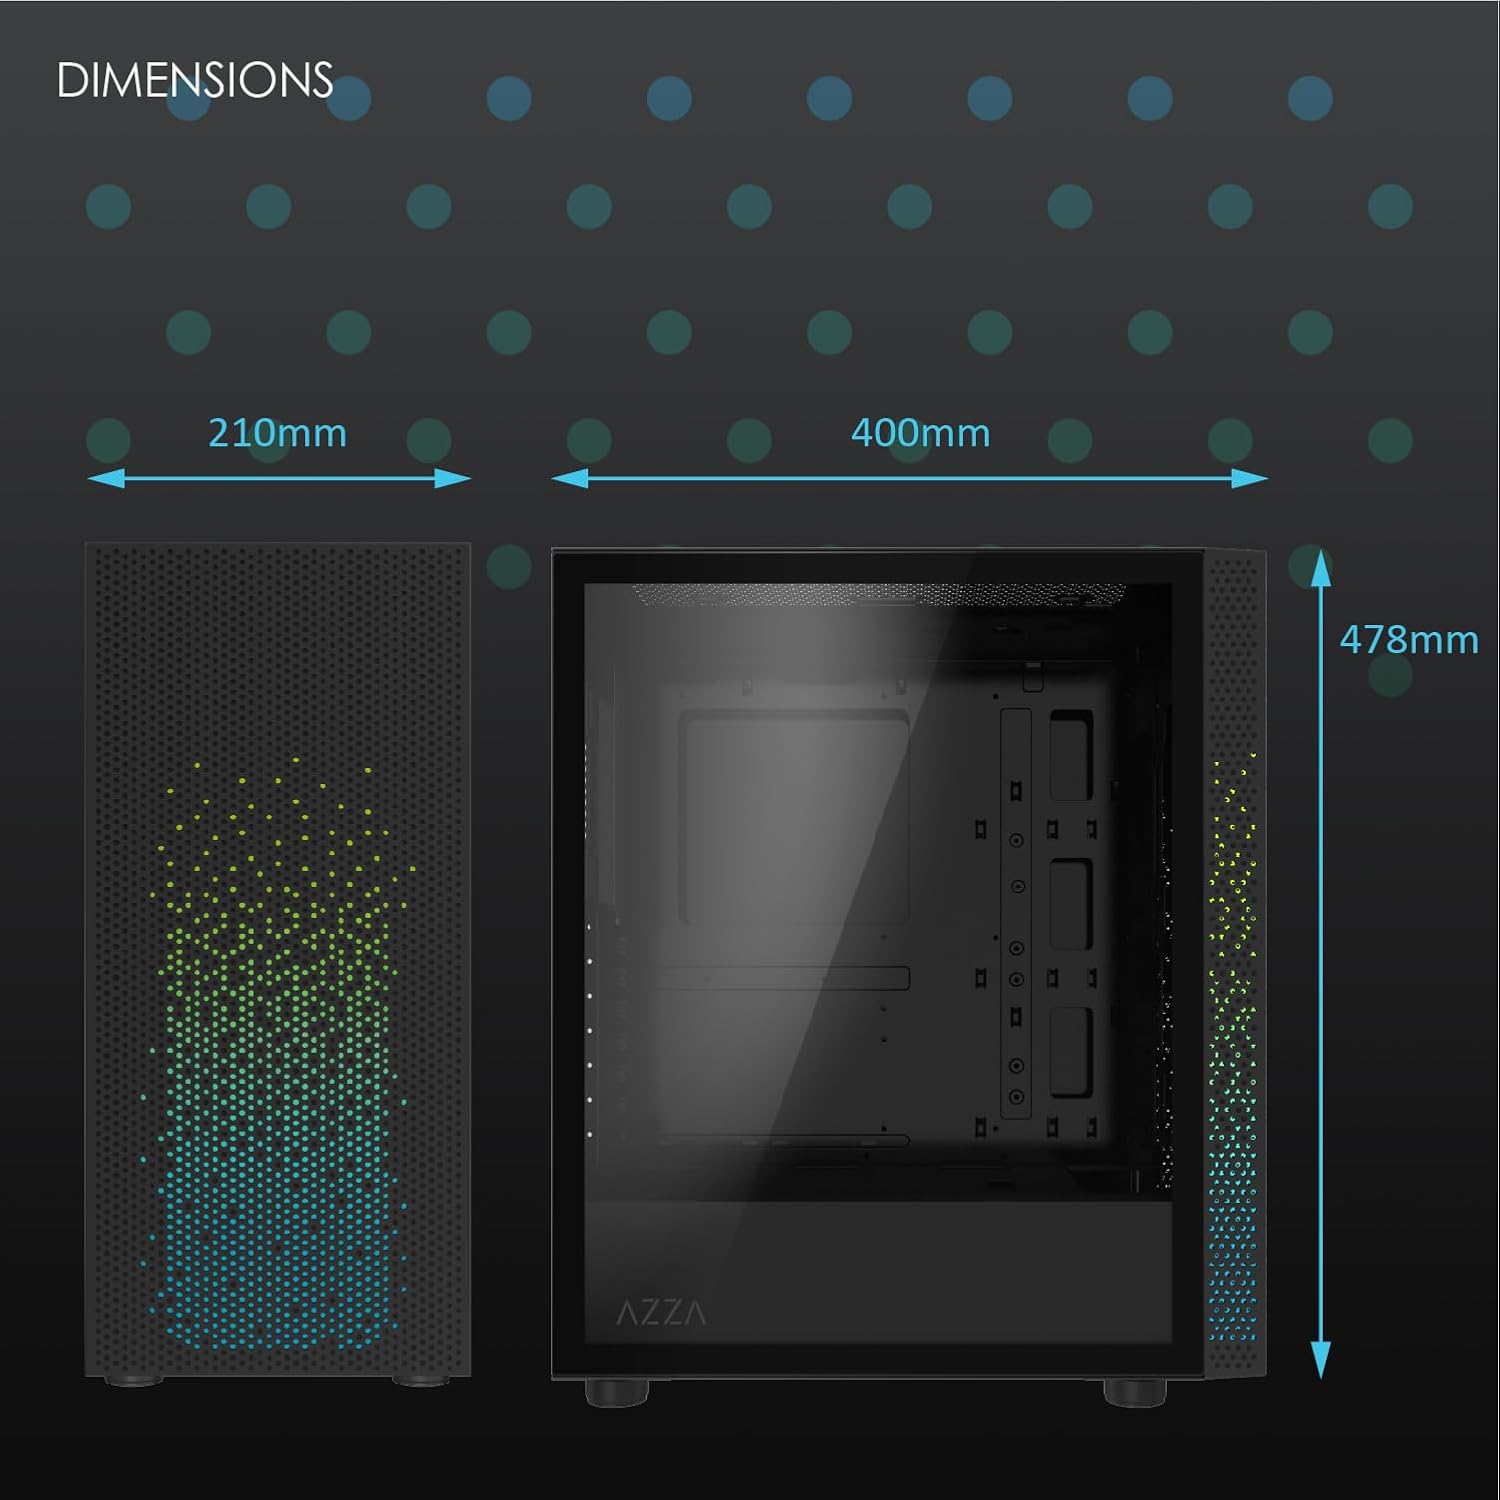
ຮູບທີ 2: Physical dimensions of the AZZA CSAZ-340F CELESTA case: 210mm (width), 400mm (depth), 478mm (height).

ຮູບທີ 3: Diagram illustrating fan and radiator mounting options for the AZZA CSAZ-340F CELESTA case, including front, top, and rear configurations.

ຮູບທີ 4: Internal component support diagram for the AZZA CSAZ-340F CELESTA, showing maximum dimensions for CPU cooler, GPU, and PSU, along with drive bay locations.
5. ການຕິດຕັ້ງແລະການຕິດຕັ້ງ
Follow these steps to install your components into the AZZA CSAZ-340F CELESTA case.
5.1 ການກະກຽມກໍລະນີ
- ວາງກະເປົ໋າໄວ້ເທິງພື້ນຜິວທີ່ຮາບພຽງ ແລະ ໝັ້ນຄົງ.
- Remove the side panels. Typically, these are secured with thumbscrews at the rear of the case.
5.2 ການຕິດຕັ້ງເມນບອດ
- ຕິດຕັ້ງແຜ່ນປ້ອງກັນ I/O (ຖ້າບໍ່ໄດ້ຕິດຕັ້ງໄວ້ລ່ວງໜ້າ) ໃສ່ທາງຫຼັງຂອງເຄສ.
- Ensure the correct standoffs are installed for your ATX, Micro-ATX, or Mini-ITX motherboard. Adjust or add standoffs as needed using the provided tools.
- ລະມັດລະວັງວາງເມນບອດຂອງທ່ານໃສ່ຈຸດຢືນ, ວາງຮູສະກູ.
- Secure the motherboard with the appropriate screws from the accessory box. Do not overtighten.
5.3 ການຕິດຕັ້ງຫນ່ວຍບໍລິການພະລັງງານ (PSU).
- Position the PSU in the bottom rear compartment of the case, ensuring the fan faces downwards (if there's a filtered vent) or upwards.
- Secure the PSU to the case with the provided screws from the rear.
- ເຊື່ອມຕໍ່ສາຍໄຟທີ່ຈຳເປັນຜ່ານຮູຕັດການຈັດການສາຍໄຟ.
5.4 ການຕິດຕັ້ງໄດຣຟ໌ເກັບຂໍ້ມູນ (HDD/SSD)
- ຮາດດິດ 3.5": Locate the drive cage. Slide the 3.5" HDDs into the drive trays and secure them, often tool-less or with screws.
- 2.5" SSDs: Mount 2.5" SSDs to the dedicated mounting points on the motherboard tray or drive cage using screws.
- Connect SATA data and power cables to the installed drives.
5.5 ການຕິດຕັ້ງບັດກາຟິກ (GPU).
- ເອົາຊ່ອງສຽບ PCIe ທີ່ຈໍາເປັນອອກຈາກດ້ານຫລັງຂອງກໍລະນີ.
- Carefully insert your graphics card into the appropriate PCIe slot on the motherboard until it clicks into place.
- ຮັບປະກັນບັດກາຟິກກັບກໍລະນີດ້ວຍສະກູ.
- Connect any required PCIe power cables from the PSU to the graphics card.
5.6 ການຕິດຕັ້ງ CPU Cooler
Install your CPU cooler according to its specific manufacturer instructions. Ensure it does not exceed the maximum height of 165mm.
5.7 ການຕິດຕັ້ງພັດລົມ ແລະລັງສີ
The case supports various fan and radiator configurations:
- ດ້ານໜ້າ: Up to 3 x 120mm or 3 x 140mm fans, or radiators up to 280mm/360mm.
- ເທິງ: Up to 2 x 120mm or 2 x 140mm fans, or 2 x 120mm radiators.
- ດ້ານຫຼັງ: 1 x 120mm fan (pre-installed) or 1 x 120mm radiator.
Mount fans and radiators using the appropriate screws and ensure proper airflow direction.
5.8 ການຈັດການສາຍ
Utilize the cable management cutouts and tie-down points behind the motherboard tray to route and secure cables. This improves airflow and aesthetics.
5.9 ສະພາສຸດທ້າຍ
- Double-check all connections and ensure no cables are obstructing fans.
- Reattach the side panels.
- Connect external peripherals (monitor, keyboard, mouse, etc.) and the power cable.
6. ປະຕິບັດລະບົບຂອງທ່ານ
Once all components are installed and connected, you can power on your system. The front panel features power and reset buttons, along with USB and audio ports for convenient access.

ຮູບທີ 5: Close-up of the AZZA CSAZ-340F CELESTA's front panel, highlighting the integrated lighting effects.
7. ບໍາລຸງຮັກສາ
- ການກັ່ນຕອງຂີ້ຝຸ່ນ: Regularly clean the dust filters (if present) to maintain optimal airflow and cooling performance.
- ທຳ ຄວາມສະອາດພາຍໃນ: Periodically open the case and use compressed air to remove dust from components and fans. Ensure the system is powered off and unplugged before cleaning.
- ການອະນາໄມພາຍນອກ: ເຊັດພື້ນຜິວພາຍນອກດ້ວຍຜ້າອ່ອນໆ, ງamp ຜ້າ. ຫຼີກເວັ້ນການສານເຄມີທີ່ຮຸນແຮງ.
8. ການແກ້ໄຂບັນຫາ
ຖ້າທ່ານພົບບັນຫາ, ພິຈາລະນາຂັ້ນຕອນການແກ້ໄຂບັນຫາທົ່ວໄປຕໍ່ໄປນີ້:
- ລະບົບບໍ່ເປີດ:
- ໃຫ້ແນ່ໃຈວ່າສາຍໄຟໄດ້ເຊື່ອມຕໍ່ກັບທັງ PSU ແລະປລັກສຽບຝາຢ່າງແໜ້ນໜາແລ້ວ.
- Check that the PSU switch is in the "ON" position.
- Verify all internal power connections (24-pin ATX, 8-pin CPU, PCIe power) are seated correctly.
- Confirm front panel power button cables are correctly connected to the motherboard.
- ບໍ່ມີການສະແດງຜົນອອກ:
- ໃຫ້ແນ່ໃຈວ່າຈໍພາບຂອງທ່ານເຊື່ອມຕໍ່ກັບກາດກຣາບຟິກ (ບໍ່ແມ່ນພອດກຣາບຟິກປະສົມປະສານຂອງເມນບອດ, ເວັ້ນເສຍແຕ່ວ່າທ່ານກຳລັງໃຊ້ກຣາບຟິກປະສົມປະສານ).
- ຣີເຊັດບັດກາຟິກໃນຊ່ອງ PCIe ຂອງມັນ.
- ກວດສອບການຄັດເລືອກການປ້ອນຂໍ້ມູນຕິດຕາມກວດກາ.
- ຄວາມຮ້ອນເກີນ:
- Verify all case fans are spinning and oriented correctly for airflow.
- Clean any dust filters and internal components.
- Ensure CPU cooler is properly seated and making good contact with the CPU.
9. ການຮັບປະກັນແລະການສະຫນັບສະຫນູນ
For warranty information and technical support, please refer to the official AZZA website or contact AZZA customer service directly. Keep your proof of purchase for warranty claims.
AZZA Official Webເວັບໄຊ: www.azza.com


