ແນະນຳ
The AXIS Q1615-LE Mk III is a high-performance 2-megapixel outdoor network camera, engineered to deliver exceptional imaging and video quality. This model integrates advanced hardware and processing capabilities, making it an ideal platform for analytics powered by artificial intelligence (AI) and deep learning. Its robust design ensures reliable operation in diverse outdoor environments.
ຄຸນນະສົມບັດທີ່ສໍາຄັນ
- Powerful AI with Deep Learning: Equipped with a dual chipset (Axis ARTPEC and DLPU) for advanced AI-based object classification.
- Granular Object Classification: Distinguishes between various vehicle types (bikes, cars, buses, trucks) and humans, reducing false alarms.
- Support for 3rd-Party AI Applications: Open Axis platform allows integration of tailor-made AI applications.
- Edge-Based Processing for Scalability: Analytics run directly on the camera, reducing server load, improving speed, and lowering costs.
- Premium Axis Q-line Camera Features: Includes high-quality imaging, OptimizedIR (up to 60m/196ft) for clear night vision, and robust outdoor ratings (IP66, IP67, NEMA 4X).
ຂໍ້ມູນຄວາມປອດໄພ
Please read all safety instructions carefully before installation and operation. Failure to follow these instructions may result in injury, damage to the product, or voiding of the warranty.
- ຄວາມປອດໄພທາງໄຟຟ້າ: Installation must be performed by qualified personnel in accordance with all local and national electrical codes. Ensure power is disconnected before any installation or maintenance.
- ການຕິດຕັ້ງ: The camera must be securely mounted to a surface capable of supporting its weight. Use appropriate fasteners for the mounting surface.
- ເງື່ອນໄຂສິ່ງແວດລ້ອມ: While designed for outdoor use, avoid exposing the camera to extreme conditions beyond its specified operating temperature and humidity ranges.
- ທໍາຄວາມສະອາດ: ໃຊ້ພຽງແຕ່ອ່ອນ, ງamp cloth for cleaning. Avoid abrasive cleaners or solvents that could damage the camera's finish or lens.
ເນື້ອໃນຊຸດ
ກວດສອບວ່າລາຍການທັງຫມົດແມ່ນມີຢູ່ໃນຊຸດກ່ອນທີ່ຈະສືບຕໍ່ການຕິດຕັ້ງ:
- AXIS Q1615-LE Mk III Network Camera
- AXIS T94Q01A Wall Mount
- ຄູ່ມືການຕິດຕັ້ງ
- Resistorx T20 Tool
- Sunshield Connector Kit
- Windows Decoder 1-user License

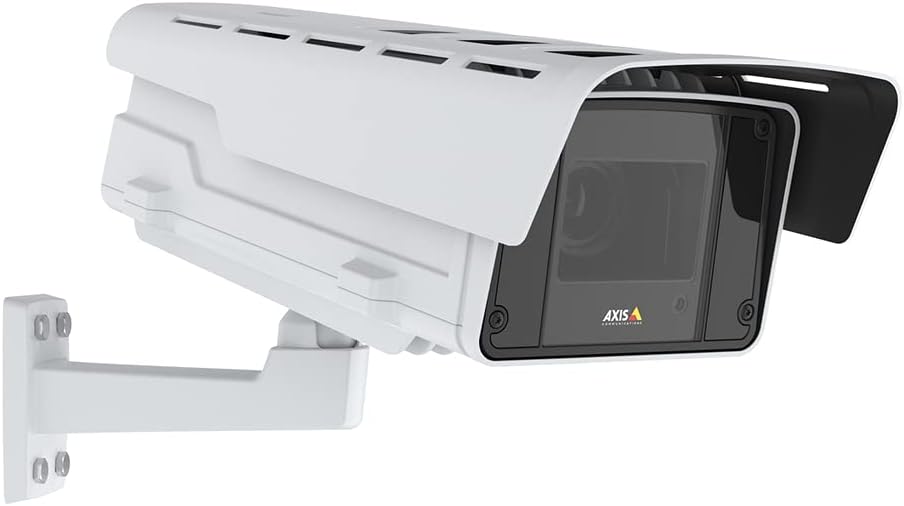
Figure 1: AXIS Q1615-LE Mk III Network Camera with included wall mount.
ຕັ້ງຄ່າ
ການຕິດຕັ້ງກ້ອງຖ່າຍຮູບ
- ເລືອກສະຖານທີ່: ເລືອກສະຖານທີ່ກາງແຈ້ງທີ່ເໝາະສົມ ເຊິ່ງສະໜອງພື້ນທີ່ທີ່ຕ້ອງການ view and is within reach of power and network connections. Ensure the mounting surface is sturdy.
- Attach Wall Mount: Use the included AXIS T94Q01A Wall Mount. Securely fasten the mount to the chosen surface using appropriate screws (not included, typically).
- Attach Camera to Mount: Align the camera with the wall mount and secure it using the provided hardware. Adjust the camera's angle for optimal viewing.
- Install Sunshield: Attach the sunshield using the Sunshield Connector Kit to protect the lens from direct sunlight and reduce glare.
ເປີດເຄື່ອງ
The AXIS Q1615-LE Mk III camera can be powered via Power over Ethernet (PoE) or a DC power supply.
- ການເຊື່ອມຕໍ່ PoE: Connect an Ethernet cable from a PoE-enabled switch or injector to the camera's Ethernet port. This provides both power and network connectivity.
- ພະລັງງານ DC: If not using PoE, connect a compatible DC power adapter (not included) to the camera's DC input port.
ການເຊື່ອມຕໍ່ເຄືອຂ່າຍ
Connect the camera to your network using a standard Ethernet cable. For initial setup, it is recommended to connect the camera directly to a computer or a local network segment where you can easily discover its IP address.
ຮູບ 2: ຂ້າງ view of the camera illustrating potential mounting and connection points.
ຄໍາແນະນໍາການດໍາເນີນງານ
Accessing the Camera Interface
- ຄົ້ນພົບກ້ອງຖ່າຍຮູບ: Use the AXIS IP Utility or AXIS Device Manager software to discover the camera on your network and find its IP address.
- ເຂົ້າສູ່ລະບົບ: ເປີດ ກ web browser and enter the camera's IP address. Log in using the default credentials (typically username 'root' and password 'pass' for first-time setup, which you will be prompted to change).
Configuring Video Settings
Once logged in, navigate to the 'Video' or 'Stream' settings to adjust parameters such as resolution, frame rate, compression, and image quality. The camera supports 1080p video capture resolution.
Using Object Analytics
The AXIS Q1615-LE Mk III features powerful AI-based object analytics. Access the 'Analytics' section in the camera's web interface to configure detection zones, set up rules for different object types (e.g., cars, bikes, humans), and define actions to be triggered upon detection (e.g., send notifications, record video).
ບໍາລຸງຮັກສາ
ທໍາຄວາມສະອາດ
ການທໍາຄວາມສະອາດເປັນປົກກະຕິຊ່ວຍຮັກສາຄຸນນະພາບຮູບພາບທີ່ດີທີ່ສຸດແລະຍືດອາຍຸຂອງກ້ອງຖ່າຍຮູບ.
- ເລນ: ເຊັດເລນດ້ວຍຜ້າອ່ອນໆທີ່ບໍ່ມີຂົນ. ສຳລັບຝຸ່ນທີ່ຝັງແໜ້ນ, ໃຫ້ໃຊ້ນ້ຳຢາທຳຄວາມສະອາດເລນທີ່ອອກແບບມາສຳລັບພື້ນຜິວທາງສາຍຕາ.
- ທີ່ຢູ່ອາໄສ: ເຮັດຄວາມສະອາດເຮືອນຂອງກ້ອງຖ່າຍຮູບດ້ວຍເຄື່ອງອ່ອນ, damp ຜ້າ. ຫຼີກເວັ້ນການນໍາໃຊ້ສານເຄມີທີ່ຮຸນແຮງຫຼືວັດສະດຸຂັດ.
ອັບເດດເຟີມແວ
ກວດສອບ Axis Communications ເປັນໄລຍະ website for firmware updates. Keeping your camera's firmware up-to-date ensures access to the latest features, performance improvements, and security patches. Follow the instructions provided by Axis for the update process.
ການແກ້ໄຂບັນຫາ
ພາກນີ້ສະຫນອງການແກ້ໄຂບັນຫາທົ່ວໄປທີ່ທ່ານອາດຈະພົບ.
- ບໍ່ມີພະລັງງານ:
- Verify that the PoE switch/injector is powered on and functioning correctly.
- If using a DC adapter, ensure it is properly connected and providing the correct voltage.
- ກວດສອບສາຍ Ethernet ວ່າສາຍມີຄວາມເສຍຫາຍ ຫຼື ການເຊື່ອມຕໍ່ວ່າງຫຼືບໍ່.
- ບໍ່ມີການເຊື່ອມຕໍ່ເຄືອຂ່າຍ:
- ໃຫ້ແນ່ໃຈວ່າສາຍ Ethernet ໄດ້ເຊື່ອມຕໍ່ກັນຢ່າງແໜ້ນໜາຢູ່ທັງສອງສົ້ນ.
- ກວດສອບສະຖານະຂອງສະວິດ/ເຣົາເຕີເຄືອຂ່າຍ.
- Verify the camera's IP address and network settings are correct and not conflicting with other devices.
- Temporarily disable any firewall on your computer during initial setup.
- ຄຸນນະພາບຮູບພາບທີ່ບໍ່ດີ:
- ເຮັດຄວາມສະອາດເລນກ້ອງຖ່າຍຮູບ.
- Adjust focus settings in the camera's web interface (Auto Focus is available).
- Check lighting conditions. Ensure OptimizedIR is enabled for low-light environments.
- Adjust video resolution and compression settings.
- False Alarms from Analytics:
- Refine detection zones and sensitivity settings in the analytics configuration.
- ໃຫ້ແນ່ໃຈວ່າກ້ອງຖ່າຍຮູບ view is clear of obstructions that might trigger false detections.
- Update camera firmware to the latest version for improved analytics performance.
For more detailed troubleshooting or issues not covered here, please refer to the comprehensive support documentation on the Axis Communications webສະຖານທີ່ຫຼືຕິດຕໍ່ສະຫນັບສະຫນູນດ້ານວິຊາການຂອງເຂົາເຈົ້າ.
ຂໍ້ມູນຈໍາເພາະ
| ຄຸນສົມບັດ | ຂໍ້ມູນຈໍາເພາະ |
|---|---|
| ຊື່ຕົວແບບ | Q1615-LE Mk III |
| ການນຳໃຊ້ພາຍໃນ/ນອກ | ກາງແຈ້ງ |
| ຄວາມລະອຽດການຖ່າຍວິດີໂອ | 1080p |
| ການແກ້ໄຂປະສິດທິພາບ | 2 MP |
| ເຕັກໂນໂລຊີການເຊື່ອມຕໍ່ | Ethernet, Wi-Fi (Wireless Communication Technology) |
| ແຫຼ່ງພະລັງງານ | DC |
| ວັດtage | 11 ວັດ |
| ການຈັດອັນດັບການປົກປ້ອງສາກົນ | IP67 |
| ຂະໜາດລາຍການ L x W x H | 27.5 x 11.5 x 11 ນິ້ວ |
| ນ້ໍາຫນັກລາຍການ | 20.1 ປອນ |
| ຄວາມໄວຊັດເຕີສູງສຸດ | 1/125000 - 2 Seconds |
| ປະເພດຈຸດສຸມ | ໂຟກັສອັດຕະໂນມັດ |
| ເຕັກໂນໂລຊີແສງສະຫວ່າງຕ່ໍາ | ມື້/ກາງຄືນ |
| ປະເພດ Alert | ການເຄື່ອນໄຫວເທົ່ານັ້ນ |
| ອົງປະກອບລວມ | AXIS T94Q01A Wall Mount, Installation Guide, Q1615-LE Mk III Network Camera, Resistorx T20 Tool, Sunshield Connector Kit, Windows Decoder 1-user License |
ການຮັບປະກັນແລະການສະຫນັບສະຫນູນ
ຂໍ້ມູນການຮັບປະກັນ
The AXIS Q1615-LE Mk III Network Camera comes with a ການຮັບປະກັນຂອງຜູ້ຜະລິດ 5 ປີ. ກະລຸນາຮັກສາຫຼັກຖານການຊື້ຂອງທ່ານສໍາລັບການຮຽກຮ້ອງການຮັບປະກັນ. ການຮັບປະກັນກວມເອົາຂໍ້ບົກພ່ອງຂອງວັດສະດຸແລະການເຮັດວຽກພາຍໃຕ້ການນໍາໃຊ້ປົກກະຕິ.
ສະຫນັບສະຫນູນດ້ານວິຊາການ
For technical assistance, product registration, or to download the latest software and documentation, please visit the official Axis Communications website. Their support resources include FAQs, troubleshooting guides, and contact information for direct technical support.
Webເວັບໄຊ: www.axis.com


