1. ຂໍ້ມູນຄວາມປອດໄພ
Read all instructions carefully before beginning installation. Failure to follow these instructions may result in electrical shock, fire, or personal injury.
- Always disconnect power at the circuit breaker or fuse box before installation or servicing.
- ສາຍໄຟທັງໝົດຕ້ອງສອດຄ່ອງກັບລະຫັດໄຟຟ້າແຫ່ງຊາດ ແລະທ້ອງຖິ່ນ. ຖ້າທ່ານບໍ່ຄຸ້ນເຄີຍກັບສາຍໄຟ, ໃຫ້ປຶກສາກັບຊ່າງໄຟຟ້າທີ່ມີຄຸນວຸດທິ.
- Ensure the installation site can support the weight of the fan (approximately 3.53 kg).
- ຫ້າມໃຊ້ພັດລົມດ້ວຍແຜ່ນໃບ ຫຼືເຮືອນທີ່ເສຍຫາຍ.
- Maintain a minimum clearance of 7 feet (2.1 meters) from the floor to the bottom edge of the fan blades.
- ຢ່າໃສ່ວັດຖຸເຂົ້າໄປໃນເສັ້ນທາງຂອງແຜ່ນພັດລົມ.
2. ເນື້ອໃນຊຸດ
Verify that all components listed below are present before beginning installation. If any parts are missing or damaged, do not proceed with installation and contact customer support.
- ມໍເຕີທີ່ຢູ່ອາໄສ
- Fan Blades (4) - Reversible white/bleached oak
- Blade Brackets (4)
- ລົງ
- ເຮືອນຍອດ
- ວົງເລັບຕິດຕັ້ງ
- ຊຸດຊຸດແສງສະຫວ່າງ
- Mushroom Globe Glass
- ໂສ້ດຶງ (2)
- ຊຸດຮາດແວ (ສະກູ, ເຄື່ອງຊັກຜ້າ, ແກ່ນສາຍໄຟ)
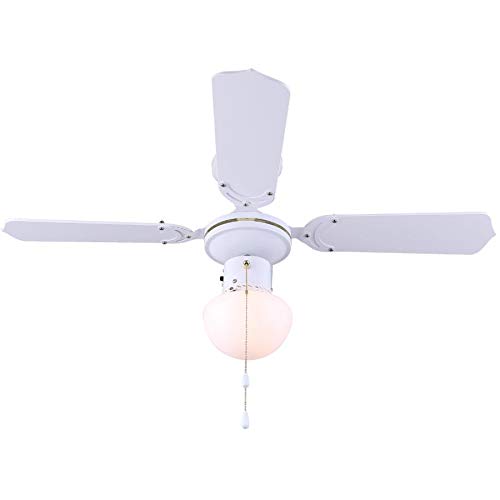
ຮູບ 2.1: ເກີນview of the Canarm Unity Ceiling Fan with Light, displaying the motor housing, four blades, and the central mushroom globe light.
3. ການຕິດຕັ້ງແລະການຕິດຕັ້ງ
ແນະນຳໃຫ້ຕິດຕັ້ງໂດຍຜູ້ຊ່ຽວຊານ. ໃຫ້ແນ່ໃຈວ່າໄຟຟ້າໄດ້ຖືກຕັດການເຊື່ອມຕໍ່ຢູ່ທີ່ເບຣກເກີກ່ອນທີ່ຈະດຳເນີນການຕໍ່ໄປ.
3.1 ການຕິດຕັ້ງພັດລົມ
- ຍຶດສາຍຍຶດຕິດໃສ່ປ່ອງແຍກເພດານ. ໃຫ້ແນ່ໃຈວ່າກ່ອງເຊື່ອມຕໍ່ຖືກຍຶດຕິດກັບໂຄງສ້າງອາຄານຢ່າງປອດໄພແລະສາມາດຮອງຮັບນ້ໍາຫນັກຂອງພັດລົມໄດ້.
- Feed the electrical wires from the junction box through the center hole of the mounting bracket.
- Attach the downrod to the motor housing, ensuring all screws are tightened.
- Carefully lift the fan assembly and hang it from the mounting bracket using the hook provided on the downrod.
3.2 ການເຊື່ອມຕໍ່ໄຟຟ້າ
Connect the fan's electrical wires to the household wiring according to the following:
- Connect the green/bare copper wire (ground) from the fan to the ground wire from the junction box.
- Connect the white wire (neutral) from the fan to the white wire from the junction box.
- Connect the black wire (hot for fan) from the fan to the black wire from the junction box.
- Connect the blue wire (hot for light) from the fan to the black or blue wire from the junction box (if separate light switch).
- Secure all connections with wire nuts and ensure no loose strands of wire are exposed.
3.3 Attaching Fan Blades
- Attach each blade to a blade bracket using the provided screws. Ensure the desired blade finish (white or bleached oak) is facing downwards.
- Secure each blade assembly to the motor housing using the screws provided. Ensure all screws are tight.
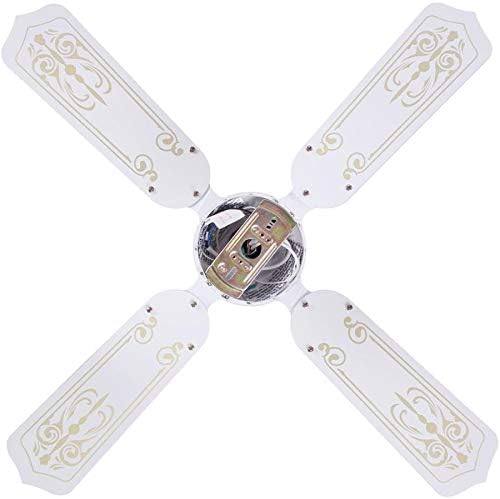

Figure 3.3: Images showing the blade attachment points on the motor housing (left) and the assembled blades from a top-down perspective (right).
3.4 ການຕິດຕັ້ງຊຸດໄຟ
- Connect the light kit wires to the corresponding wires from the fan motor housing (usually white to white, blue to black).
- Secure the light kit assembly to the bottom of the motor housing with the provided screws.
- Install the appropriate light bulb(s) (not included) into the sockets.
- Carefully attach the mushroom globe glass to the light kit by twisting or securing with screws, depending on the design.

ຮູບທີ 3.4: ໄລຍະໃກ້ view of the fan's light kit with the mushroom globe glass.
3.5 ຂັ້ນຕອນສຸດທ້າຍ
- Carefully slide the canopy up against the ceiling and secure it with the provided screws.
- ຟື້ນຟູພະລັງງານຢູ່ທີ່ຕົວຕັດວົງຈອນ.
4. ຄໍາແນະນໍາການດໍາເນີນງານ
The Canarm Unity ceiling fan is operated by two pull chains.
- ການຄວບຄຸມຄວາມໄວພັດລົມ: One pull chain controls the fan speed. Pull the chain repeatedly to cycle through the three available speeds (High, Medium, Low) and Off.
- ການຄວບຄຸມແສງ: The second pull chain controls the light. Pull the chain to turn the light On or Off.
- ການປີ້ນກັບຂອງໃບມີດ: To change the direction of the fan blades (e.g., for summer cooling or winter heat circulation), locate the slide switch on the motor housing. With the fan off, slide the switch to the opposite position. This fan features reversible white/bleached oak blades.

Figure 4.1: The Canarm Unity fan installed, demonstrating its function within a living space.
5. ບໍາລຸງຮັກສາ
ການບຳລຸງຮັກສາເປັນປະຈຳຮັບປະກັນປະສິດທິພາບທີ່ດີທີ່ສຸດ ແລະ ຍືດອາຍຸການໃຊ້ງານຂອງພັດລົມເພດານຂອງທ່ານ.
- ທໍາຄວາມສະອາດ: ແຕ່ລະໄລຍະເຮັດຄວາມສະອາດແຜ່ນພັດລົມແລະທີ່ຢູ່ອາໄສຂອງມໍເຕີດ້ວຍຄວາມອ່ອນ, ງamp ຜ້າ. ຢ່າໃຊ້ເຄື່ອງເຮັດຄວາມສະອາດຂັດຫຼືສານລະລາຍ.
- Tightening screws: Check all screws on the blade attachments and mounting hardware annually. Tighten any loose screws to prevent wobbling or noise.
- ການປ່ຽນຫລອດໄຟ: Disconnect power before replacing light bulbs. Allow bulbs to cool before handling. Use bulbs of the correct wattage and type as specified in the fan's electrical ratings.
6. ການແກ້ໄຂບັນຫາ
Before attempting any repairs, ensure power is disconnected at the circuit breaker.
| ບັນຫາ | ສາເຫດທີ່ເປັນໄປໄດ້ | ການແກ້ໄຂ |
|---|---|---|
| ພັດລົມບໍ່ເລີ່ມຕົ້ນ | No power to the fan; Loose wire connections; Motor malfunction | Check circuit breaker/fuse; Verify all wire connections are secure; Contact a qualified electrician or customer support. |
| ແສງສະຫວ່າງບໍ່ເຮັດວຽກ | Bulb faulty or loose; Loose wire connections; Light kit malfunction | Replace bulb; Tighten bulb; Check light kit wiring; Contact customer support. |
| ພັດລົມສັ່ນ | ສະກູໃບມີດວ່າງ; ໃບມີດບໍ່ສົມດຸນ; ຂາຕັ້ງວ່າງ | Tighten all blade screws; Ensure blades are balanced (balancing kit may be needed); Verify mounting bracket is secure. |
| ການດໍາເນີນງານທີ່ບໍ່ມີສຽງ | Loose screws; Motor bearings; Canopy rubbing ceiling | Check and tighten all screws; Ensure canopy is not touching the ceiling; If motor noise persists, contact customer support. |
7. ຂໍ້ມູນຈໍາເພາະ
| ຍີ່ຫໍ້ | Canarm |
| ໝາຍເລກຕົວແບບ | CF2336411L |
| ຂະໜາດສິນຄ້າ | 91.44 x 91.44 x 20.32 ຊມ (36 x 36 x 8 ນິ້ວ) |
| ນ້ໍາຫນັກລາຍການ | 3.53 ກິໂລ |
| ສີ | ສີຂາວ |
| ຈໍານວນແຜ່ນໃບ | 4 |
| ສໍາເລັດຮູບແຜ່ນ | Reversible White/Bleached Oak |
| ຈໍານວນຄວາມໄວ | 3 |
| ພະລັງງານ/ວັດtage | 60 ວັດ |
| ປະເພດການຕິດຕັ້ງ | ພູ Downrod |
| ປະເພດການຄວບຄຸມ | ດຶງລະບົບຕ່ອງໂສ້ການຄວບຄຸມ |
8. ການຮັບປະກັນແລະການສະຫນັບສະຫນູນ
This product is covered by the manufacturer's standard warranty. Please refer to the warranty card included in your original packaging for specific terms and conditions.
For technical assistance, missing parts, or warranty claims, please contact Canarm customer support. Contact information can typically be found on the manufacturer's webສະຖານທີ່ຫຼືຢູ່ໃນການຫຸ້ມຫໍ່ຜະລິດຕະພັນ.
ກະລຸນາເກັບຮັກສາຄູ່ມືນີ້ໄວ້ສໍາລັບການອ້າງອີງໃນອະນາຄົດ.


