1. ບົດແນະນຳ
The WiMiUS H7 Trail Game Camera is designed for outdoor wildlife observation, security monitoring, and hunting applications. It features 16MP still image capture, 1080P video recording, night vision capabilities, and motion activation. This manual provides detailed instructions for setting up, operating, and maintaining your camera to ensure optimal performance.
2. ຜະລິດຕະພັນເກີນview
Familiarize yourself with the main components of your WiMiUS H7 Trail Game Camera.
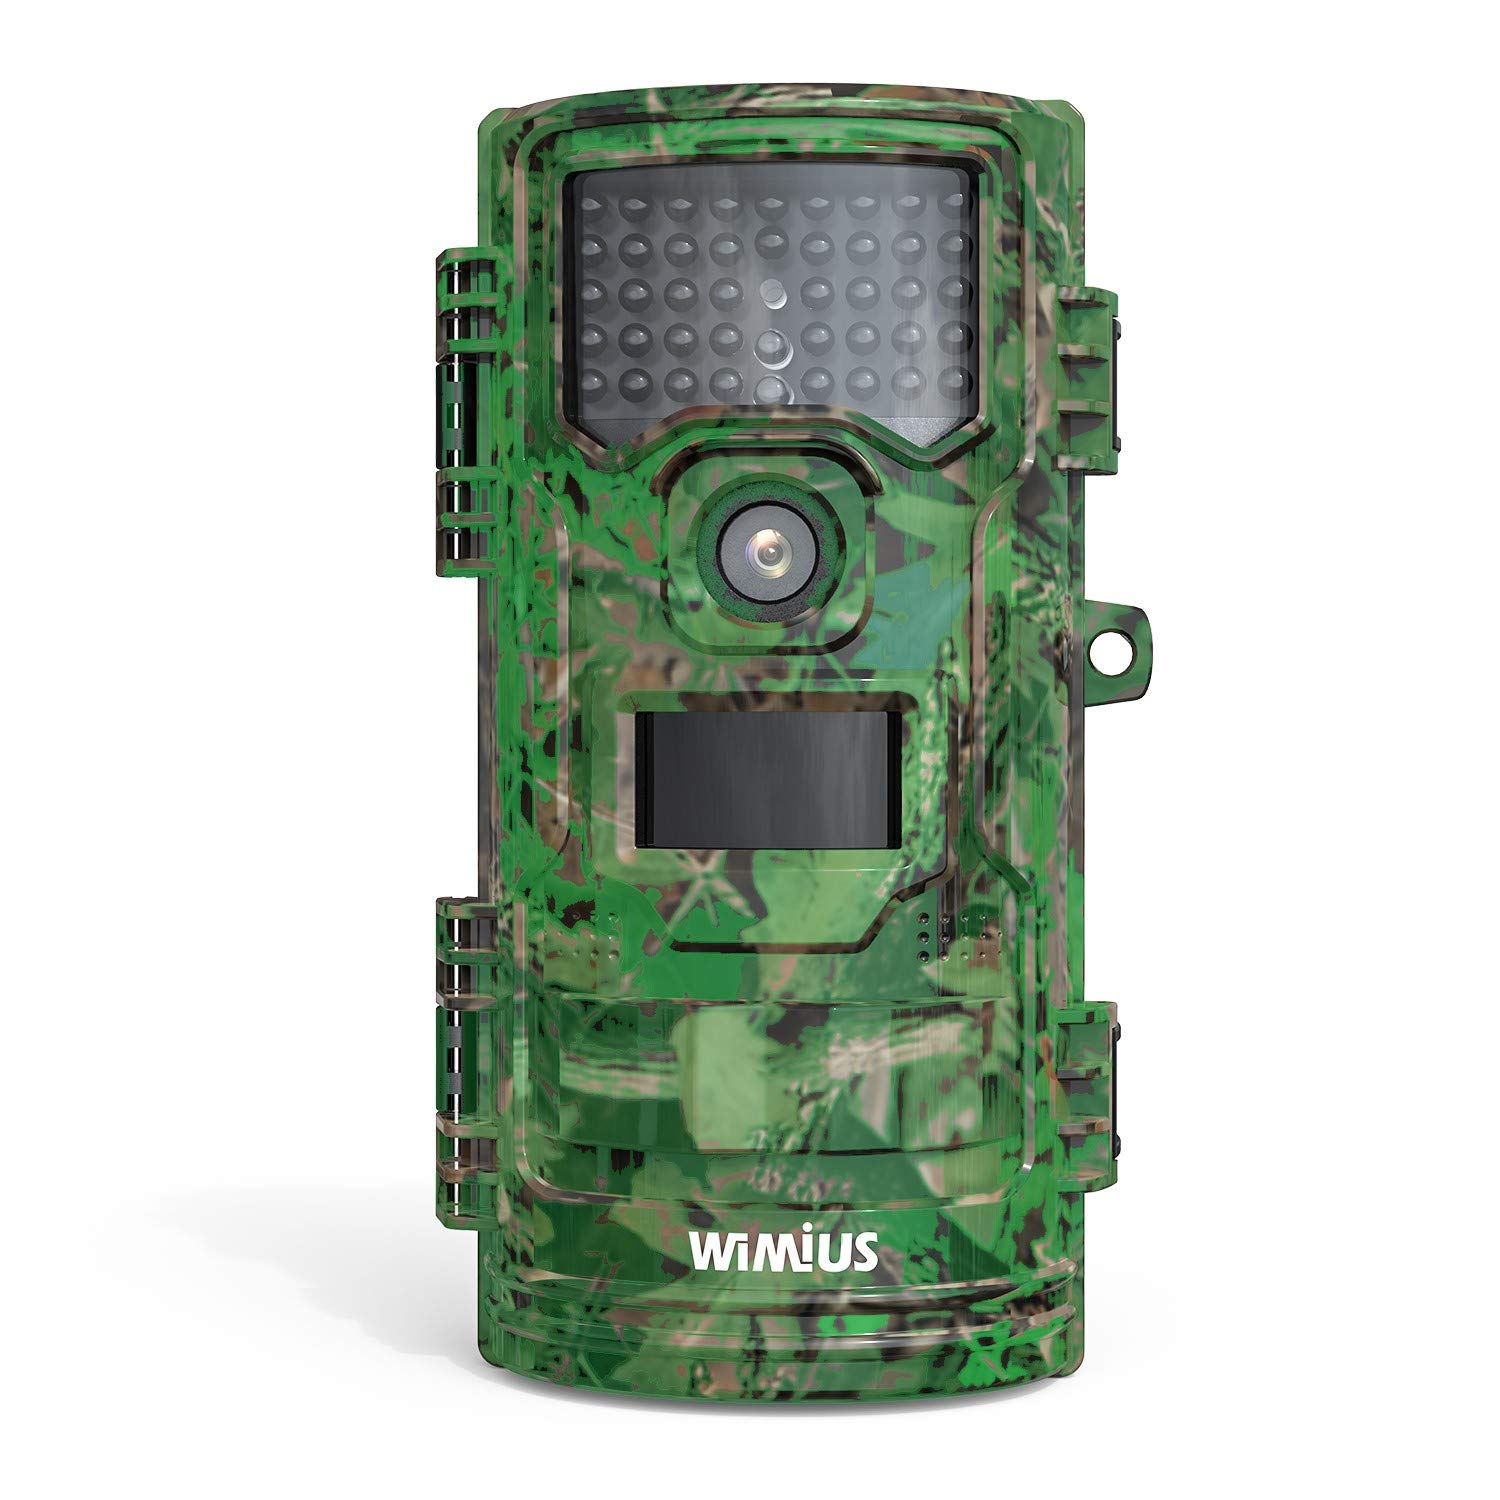
ຮູບທີ 1: ດ້ານໜ້າ view of the WiMiUS H7 Trail Game Camera. This image displays the front of the WiMiUS H7 Trail Game Camera, featuring a camouflage design. Visible components include the main camera lens, the Passive Infrared (PIR) motion sensor, and the array of infrared LEDs for night vision. The camera's robust casing is designed for outdoor use.
ອົງປະກອບທີ່ສໍາຄັນ:
- ເລນຫຼັກ: Captures photos and videos.
- PIR Motion ເຊັນເຊີ: ກວດພົບການເຄື່ອນໄຫວເພື່ອກະຕຸ້ນການບັນທຶກ.
- ໄຟ LED IR: Provide illumination for night vision without visible light.
- ໜ້າຈໍ LCD ຂະໜາດ 2.4 ນິ້ວ: For menu navigation, settings adjustment, and playback.
- ປຸ່ມຄວບຄຸມ: Menu, Up, Down, OK for navigation.
- ຊ່ອງໃສ່ຫມໍ້ໄຟ: ຖືຫມໍ້ໄຟ AA 8 ໜ່ວຍ.
- ຊ່ອງໃສ່ Micro SD Card: ສຳລັບເກັບຮັກສາສື່ທີ່ບັນທຶກໄວ້.
- ຈຸດເຊື່ອມຕໍ່: For strap, tripod, or wall mount.
3. ຕັ້ງຄ່າ
3.1 ການຕິດຕັ້ງຫມໍ້ໄຟ
- Open the camera's front cover latches.
- ຊອກຫາຊ່ອງໃສ່ຫມໍ້ໄຟຢູ່ດ້ານຫຼັງຂອງກ້ອງຖ່າຍຮູບ.
- Insert 8 new AA batteries (not included), ensuring correct polarity (+/-).
- ປິດຝາປິດຝາຫມໍ້ໄຟ.
3.2 ການຕິດຕັ້ງ Micro SD Card
- With the camera open, locate the Micro SD card slot.
- ໃສ່ບັດ Micro SD (ສູງສຸດ 32GB, ບໍ່ລວມ) ເຂົ້າໄປໃນຊ່ອງໃສ່ຈົນກ່ວາມັນກົດເຂົ້າໄປໃນບ່ອນ.
- It is recommended to format the Micro SD card before first use (see Section 3.4).
3.3 ຕິດຕັ້ງກ້ອງ
The camera offers several mounting options:
- ສາຍ: Use the included strap to attach the camera to a tree or post.
- ສະ ໜາມ: The camera has a standard tripod screw mount on the bottom.
- ຕົວຍຶດຕິດWallາ: Utilize the provided mount for fixed installations.
3.4 Initial Settings (Test Mode)
Slide the power switch from "Off" to "Test" to access the camera's menu and settings on the LCD screen.
- ພາສາ: ເລືອກພາສາທີ່ທ່ານຕ້ອງການ (ຕົວຢ່າງ: ພາສາອັງກິດ).
- ວັນທີ ແລະເວລາ: ກໍານົດວັນທີແລະເວລາປະຈຸບັນ.
- ໂໝດ: Choose between Photo, Video, or Photo+Video.
- ໄລຍະຫ່າງ PIR: Adjust the delay between motion detections (e.g., 5 sec, 10 sec, 30 sec, 1 min).
- PIR Level: Set motion sensor sensitivity (Low, Middle, High).
- Capture Num: Number of photos taken per trigger (1, 2, 3).
- ຄວາມຍາວວິດີໂອ: Duration of video recording per trigger (e.g., 10 sec, 30 sec, 1 min).
- ຂະຫນາດວິດີໂອ: Select video resolution (e.g., 1080P 30fps, 720P 30fps).
- ຂະໜາດຮູບ: Select photo resolution (e.g., 16M, 12M, 8M).
- ໂໝດ ສະແຕນບາຍ: Normal or Super.
- IR LED: Adjust infrared LED power (High, Middle, Low).
- ການບັນທຶກສຽງ: Enable or disable audio capture with videos.
- Time Lapse: Set intervals for time-lapse photography.
- ຕັ້ງຄ່າໂມງຈັບເວລາ: Define specific operational hours for the camera.
- ລະຫັດຄວາມປອດໄພ: Set a password to protect camera access.
- ຮູບແບບ: Select "Yes" to format the Micro SD card. This will erase all data on the card.
- ຄ່າເລີ່ມຕົ້ນ: Restore camera settings to factory defaults.
4. ປະຕິບັດການກ້ອງຖ່າຍຮູບ
4.1 Activating Recording
- After configuring settings in "Test" mode, slide the power switch to the "On" position.
- A red LED will flash, indicating a 15-second countdown. This allows you to close the camera and position it without triggering immediate recording.
- Once the countdown finishes, the camera enters active monitoring mode. It will automatically capture photos or videos based on your settings when motion is detected.
4.2 Viewໃນການບັນທຶກ
ເຈົ້າສາມາດ view captured media directly on the camera or on a computer.
- ໃນກ້ອງຖ່າຍຮູບ: Switch the camera to "Test" mode. Use the navigation buttons to browse and play back photos and videos on the LCD screen.
- On Computer: Remove the Micro SD card from the camera and insert it into a computer's card reader. The media files ຫຼັງຈາກນັ້ນສາມາດໄດ້ຮັບການເຂົ້າເຖິງແລະ viewed.
5. ບໍາລຸງຮັກສາ
- ທໍາຄວາມສະອາດ: Gently clean the camera lens, PIR sensor, and IR LEDs with a soft, dry cloth. Avoid abrasive materials or harsh chemicals.
- ກວດສອບຫມໍ້ໄຟ: ກວດສອບລະດັບແບັດເຕີຣີເປັນປະຈຳ, ໂດຍສະເພາະກ່ອນການນຳໃຊ້ທີ່ຂະຫຍາຍອອກໄປ. ປ່ຽນແບັດເຕີຣີທັງໝົດພ້ອມໆກັນເພື່ອຮັບປະກັນພະລັງງານທີ່ສະໝໍ່າສະເໝີ.
- ການຄຸ້ມຄອງບັດ SD: Periodically format the Micro SD card to maintain optimal performance and prevent data corruption. Back up important files ກ່ອນການຈັດຮູບແບບ.
- ປະທັບຕາກັນນ້ໍາ: Ensure the rubber seals around the battery compartment and camera housing are clean and properly seated to maintain waterproof integrity.
- ການເກັບຮັກສາ: ເມື່ອບໍ່ໄດ້ໃຊ້ງານ, ໃຫ້ເກັບຮັກສາກ້ອງຖ່າຍຮູບໄວ້ໃນບ່ອນທີ່ເຢັນ, ແຫ້ງ, ຫ່າງຈາກແສງແດດໂດຍກົງ ແລະ ອຸນຫະພູມທີ່ຮຸນແຮງ. ຖອດແບັດເຕີຣີອອກເພື່ອເກັບຮັກສາໄດ້ດົນ.
6. ການແກ້ໄຂບັນຫາ
ບັນຫາທົ່ວໄປ ແລະການແກ້ໄຂ:
- ກ້ອງຖ່າຍຮູບບໍ່ເປີດ:
ການແກ້ໄຂ: Check if batteries are inserted correctly with proper polarity. Ensure batteries have sufficient charge. Try new batteries. - ບໍ່ໄດ້ບັນທຶກຮູບພາບ/ວິດີໂອ:
ການແກ້ໄຂ: Verify the Micro SD card is inserted correctly and has available space. Format the SD card. Check PIR sensor sensitivity and interval settings. Ensure the camera is in "On" mode, not "Test" or "Off". - ຄຸນນະພາບຮູບພາບ/ວິດີໂອບໍ່ດີ:
ການແກ້ໄຂ: Clean the camera lens. Adjust photo/video resolution settings. Ensure the camera is stable and not subject to excessive movement. For night images, ensure IR LEDs are not obstructed. - ການລະບາຍແບັດເຕີຣີຫຼາຍເກີນໄປ:
ການແກ້ໄຂ: Use high-quality alkaline or rechargeable AA batteries. Reduce PIR sensitivity or increase PIR interval. Ensure the camera is not constantly triggered by environmental factors (e.g., swaying branches). - Incorrect Date/Time Stamp:
ການແກ້ໄຂ: Re-enter the correct date and time in the settings menu.
7. ຂໍ້ມູນຈໍາເພາະ
| ການແກ້ໄຂປະສິດທິພາບ | 16 MP (Maximum 20 MP) |
| ຄວາມລະອຽດການຖ່າຍວິດີໂອ | 1080p |
| ຂະໜາດໜ້າຈໍ | 2.4 ນິ້ວ |
| ລະດັບຄວາມຕ້ານທານນ້ໍາ | ກັນນ້ ຳ (IP54) |
| ແຫຼ່ງພະລັງງານ | 8 AA Batteries (4 AA minimum required) |
| ປະເພດຫນ່ວຍຄວາມຈໍາ Flash | Micro SD (ສູງສຸດ 32GB) |
| ຄຸນນະສົມບັດພິເສດ | ເຊັນເຊີກວດຈັບການເຄື່ອນໄຫວ, ວິໄສທັດກາງຄືນ |
| ອຸນຫະພູມປະຕິບັດການ | ສູງເຖິງ 60 ອົງສາເຊ |
| ເຕັກໂນໂລຊີການເຊື່ອມຕໍ່ | ໄຮ້ສາຍ (Wi-Fi) |
| ໝາຍເລກຕົວແບບ | CEX107 |
8. ການຮັບປະກັນແລະການສະຫນັບສະຫນູນ
8.1 ຂໍ້ມູນການຮັບປະກັນ
Your WiMiUS H7 Trail Game Camera is covered by a limited warranty against defects in materials and workmanship. Please refer to the warranty card included with your purchase or visit the official WiMiUS webສະຖານທີ່ສໍາລັບຂໍ້ກໍານົດແລະເງື່ອນໄຂສະເພາະ.
8.2 ສະຫນັບສະຫນູນລູກຄ້າ
For technical assistance, troubleshooting, or warranty claims, please contact WiMiUS customer support through their official website or the contact information provided with your product packaging. When contacting support, please have your model number (H7 or CEX107) and purchase details ready.


