1. ບົດແນະນຳ
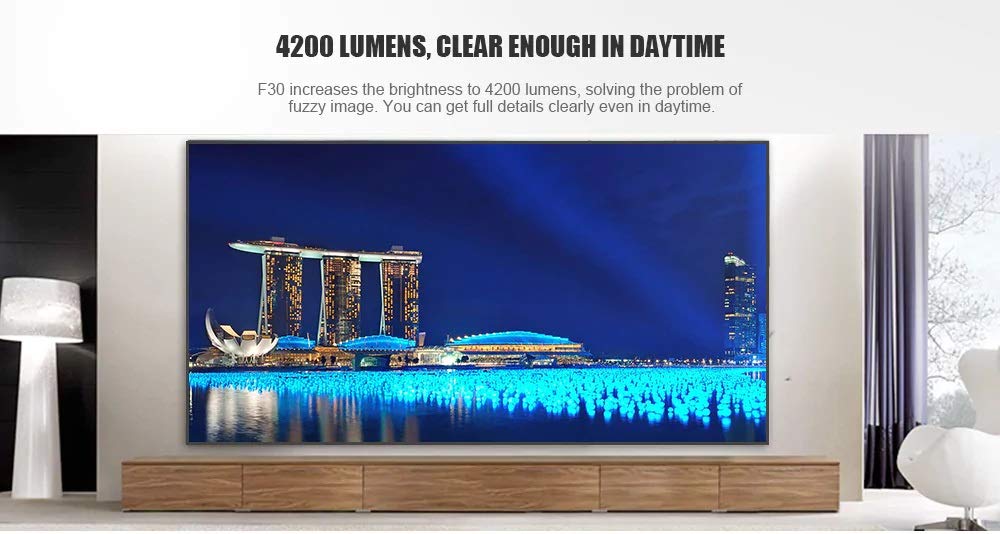
This manual provides essential instructions for the safe and efficient use of your Vivibright F30 Projector. Please read this manual thoroughly before operating the device and retain it for future reference. The Vivibright F30 is a Full HD 1080p LED projector designed for home theater, education, and business presentations, offering 4200 lumens brightness and multiple connectivity options.
2. ຂໍ້ມູນຄວາມປອດໄພ
- ການສະຫນອງພະລັງງານ: ໃຊ້ພຽງແຕ່ອະແດັບເຕີພະລັງງານທີ່ລະບຸໄວ້. ຮັບປະກັນ voltage ກົງກັບຄວາມຕ້ອງການຂອງໂປເຈັກເຕີ.
- ການລະບາຍອາກາດ: ຫ້າມປິດຊ່ອງລະບາຍອາກາດ. ຮັບປະກັນພື້ນທີ່ພຽງພໍຮອບໆໂປເຈັກເຕີສໍາລັບການໄຫຼວຽນຂອງອາກາດທີ່ເຫມາະສົມເພື່ອປ້ອງກັນຄວາມຮ້ອນເກີນ.
- ຄວາມຮ້ອນ: ໂປເຈັກເຕີ lamp generates heat. Avoid touching the lens or vents immediately after use.
- ການປົກປ້ອງຕາ: ຢ່າເບິ່ງໂດຍກົງໃນເລນໂປເຈັກເຕີເມື່ອ lamp is on. The bright light can cause eye strain or damage.
- ການຈັດວາງ: ວາງໂປເຈັກເຕີຢູ່ເທິງພື້ນຜິວທີ່ມີລະດັບຄວາມຫມັ້ນຄົງ. ຫຼີກເວັ້ນການວາງມັນຢູ່ໃນແສງແດດໂດຍກົງ, ຢູ່ໃກ້ກັບແຫຼ່ງຄວາມຮ້ອນ, ຫຼືໃນສະພາບແວດລ້ອມທີ່ມີຄວາມຊຸ່ມຊື່ນສູງຫຼືຂີ້ຝຸ່ນ.
- ທໍາຄວາມສະອາດ: ຕັດການເຊື່ອມຕໍ່ໄຟກ່ອນທີ່ຈະທໍາຄວາມສະອາດ. ໃຊ້ຜ້າອ່ອນ, ແຫ້ງ. ຫ້າມໃຊ້ນໍ້າສະອາດ ຫຼື ແອໂຣໂຊລ.
- ການບໍລິການ: Do not attempt to service the projector yourself. Refer all servicing to qualified personnel.
3. ເນື້ອໃນຊຸດ
ກວດສອບວ່າລາຍການທັງຫມົດແມ່ນມີຢູ່ໃນຊຸດ:
- Vivibright F30 Projector
- ສາຍໄຟ
- ການຄວບຄຸມໄລຍະໄກ
- ຄູ່ມືຜູ້ໃຊ້ (ເອກະສານນີ້)
- ສາຍ HDMI (ອາດຈະແຕກຕ່າງກັນໄປຕາມພາກພື້ນ/ຊຸດ)
4. ຜະລິດຕະພັນເກີນview
ຮູ້ຈັກກັບອົງປະກອບ ແລະ ອິນເຕີເຟດຂອງໂປເຈັກເຕີ.
ຮູບທີ 4.1: ດ້ານໜ້າ view of the Vivibright F30 Projector, showing the lens and ventilation.

ຮູບທີ 4.2: ຂ້າງ view of the Vivibright F30 Projector, highlighting the various input ports.
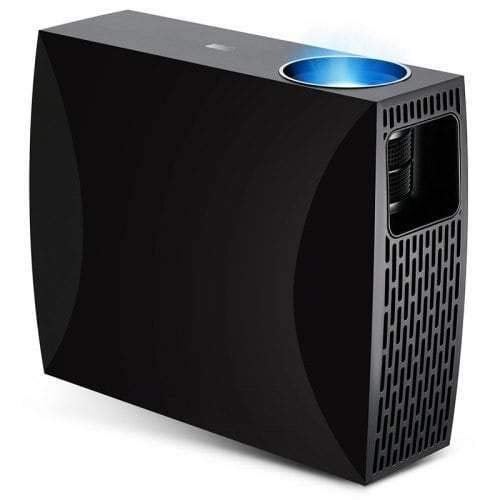
ຮູບທີ 4.3: Top or rear view of the Vivibright F30 Projector, showing control buttons or additional vents.
4.1. ການໂຕ້ຕອບ
- ຜອດ HDMI: For connecting devices like laptops, gaming consoles, Blu-ray players, and media players.
- ຜອດ VGA: For connecting older computers or other VGA-compatible devices.
- ພອດ USB: ສໍາລັບການເຊື່ອມຕໍ່ອຸປະກອນເກັບຮັກສາ USB ເພື່ອຫຼິ້ນສື່ໂດຍກົງ.
- ອອກສຽງ: ສໍາລັບການເຊື່ອມຕໍ່ລໍາໂພງພາຍນອກຫຼືຫູຟັງ.
- ການປ້ອນຂໍ້ມູນພະລັງງານ: ສໍາລັບການເຊື່ອມຕໍ່ສາຍໄຟ.
5. ຕັ້ງຄ່າ
5.1. ບັນຈຸເຂົ້າຮຽນ
Position the projector on a stable surface or mount it appropriately. Ensure the projector is perpendicular to the projection screen for optimal image geometry. The projection distance can range from 1.2 to 6.8 meters, depending on the desired screen size.
5.2. ການເຊື່ອມຕໍ່ພະລັງງານ
- ເຊື່ອມຕໍ່ສາຍໄຟເຂົ້າກັບພອດປ້ອນຂໍ້ມູນພະລັງງານຂອງໂປເຈັກເຕີ.
- ສຽບປາຍສາຍໄຟອີກດ້ານໜຶ່ງເຂົ້າໄປໃນປລັກໄຟຟ້າທີ່ມີສາຍດິນ.
5.3. ການເຊື່ອມຕໍ່ອຸປະກອນປ້ອນຂໍ້ມູນ
Connect your desired source device (e.g., laptop, media player) to the projector using an appropriate cable (HDMI, VGA, USB). Ensure the cable is securely connected to both the projector and the source device.
5.4. ຈຸດສຸມແລະການປັບຕົວຂອງ Keystone
- ຈຸດສຸມ: ໝຸນວົງແຫວນໂຟກັສເທິງເລນໂປເຈັກເຕີຈົນກວ່າຮູບພາບຈະຄົມຊັດ ແລະ ຊັດເຈນຢູ່ໜ້າຈໍ.
- Keystone: If the projected image is trapezoidal (wider at the top or bottom), use the keystone correction feature (manual or digital, depending on model) to adjust the image to a rectangular shape.
6. ຄໍາແນະນໍາການດໍາເນີນງານ
6.1. ເປີດ / ປິດພະລັງງານ
- ເປີດ: Press the power button on the projector or the remote control. The indicator light will change, and the lamp ຈະສະຫວ່າງ.
- ປິດພະລັງງານ: Press the power button again. Confirm shutdown if prompted. Allow the projector to cool down before unplugging it.
6.2. ການເລືອກແຫຼ່ງປ້ອນຂໍ້ມູນ
Press the "Source" button on the remote control or the projector's control panel to cycle through available input sources (HDMI1, HDMI2, VGA, USB). Select the input corresponding to your connected device.
6.3. ເມນູນໍາທາງ
Use the arrow buttons on the remote control or projector to navigate through the on-screen display (OSD) menu. Press "OK" or "Enter" to select an option and "Exit" or "Menu" to go back or close the menu.
6.4. ການຕັ້ງຄ່າຮູບພາບ ແລະສຽງ
Adjust picture settings such as brightness, contrast, color, and aspect ratio via the OSD menu to optimize image quality. Adjust volume levels for the built-in speaker or connected external audio devices.
7. ບໍາລຸງຮັກສາ
7.1. ການເຮັດຄວາມສະອາດເລນ
ເຊັດເລນໂປເຈັກເຕີຢ່າງອ່ອນໂຍນດ້ວຍຜ້າອ່ອນໆ, ບໍ່ມີເສັ້ນດ່າງທີ່ຖືກອອກແບບໂດຍສະເພາະສໍາລັບພື້ນຜິວ optical. ຢ່າໃຊ້ວັດສະດຸຂັດຫຼືສານເຄມີທີ່ຮຸນແຮງ.
7.2. ການທຳຄວາມສະອາດຕົວເຄື່ອງໂປເຈັກເຕີ
ໃຊ້ຜ້າປຽກແຫ້ງເພື່ອເຮັດຄວາມສະອາດດ້ານນອກຂອງໂປເຈັກເຕີ. ສໍາລັບຮອຍແຂງ, ເລັກນ້ອຍ damp ຜ້າສາມາດນໍາໃຊ້ໄດ້, ປະຕິບັດຕາມດ້ວຍຜ້າແຫ້ງ. ໃຫ້ແນ່ໃຈວ່າບໍ່ມີຂອງແຫຼວເຂົ້າໄປໃນຊ່ອງລະບາຍອາກາດ.
7.3. ລamp ຊີວິດ
The Vivibright F30 Projector utilizes an LED lamp with an estimated lifespan of up to 50,000 hours, requiring no regular replacement under normal usage conditions.
8. ການແກ້ໄຂບັນຫາ
| ບັນຫາ | ສາເຫດທີ່ເປັນໄປໄດ້ | ການແກ້ໄຂ |
|---|---|---|
| ບໍ່ມີຮູບພາບສະແດງ |
|
|
| ຮູບພາບມົວ |
|
|
| ຮູບພາບເປັນຮູບສີ່ຫຼ່ຽມມຸມສາກ (ຜົນກະທົບຄີສະໂຕນ) |
|
|
| ບໍ່ມີສຽງ |
|
|
| ໂປເຈັກເຕີເກີນຄວາມຮ້ອນ ຫຼືປິດລົງ |
|
|
9. ຂໍ້ມູນຈໍາເພາະ
| ຄຸນສົມບັດ | ລາຍລະອຽດ |
|---|---|
| ຍີ່ຫໍ້ | Vivibright |
| ຕົວແບບ | F30 |
| ຄວາມລະອຽດເດີມ | 1920 x 1080 (Full HD) |
| ຄວາມລະອຽດທີ່ຮອງຮັບ | ເຖິງ 4K |
| ຄວາມສະຫວ່າງ | 4200 Lumens (LED Luminous) |
| ອັດຕາສ່ວນກົງກັນຂ້າມ | 2200:1 |
| ເຕັກໂນໂລຊີການສະແດງ | ຈໍ LCD |
| Lamp ປະເພດ | LED |
| Lamp ຊີວິດ | ສູງສຸດ 50,000 ຊົ່ວໂມງ |
| ໄລຍະການຄາດຄະເນ | 1.2 ຫາ 6.8 ແມັດ |
| ລະດັບສຽງ | 29 Decibels |
| ການເຊື່ອມຕໍ່ | HDMI, VGA, USB |
| ຄຸນນະສົມບັດພິເສດ | Portable, Built-in Speaker |
| ນ້ໍາຫນັກລາຍການ | 3 ກິໂລ |
| ປະເພດການຕິດຕັ້ງ | ພູຕັ້ງໂຕະ |
10. ການຮັບປະກັນແລະການສະຫນັບສະຫນູນ
10.1. ຂໍ້ມູນການຮັບປະກັນ
The Vivibright F30 Projector comes with a ຮັບປະກັນ 1 ປີ ຈາກວັນທີ່ຊື້. ການຮັບປະກັນນີ້ກວມເອົາຄວາມບົກຜ່ອງດ້ານການຜະລິດແລະການເຮັດວຽກຜິດປົກກະຕິພາຍໃຕ້ການນໍາໃຊ້ປົກກະຕິ. ກະລຸນາຮັກສາຫຼັກຖານການຊື້ຂອງທ່ານສໍາລັບການຮຽກຮ້ອງການຮັບປະກັນ.
ການຮັບປະກັນບໍ່ຄອບຄຸມຄວາມເສຍຫາຍທີ່ເກີດຈາກການໃຊ້ຜິດວິທີ, ອຸບັດຕິເຫດ, ການສ້ອມແປງທີ່ບໍ່ໄດ້ຮັບອະນຸຍາດ, ຫຼື ການສວມໃສ່ຕາມປົກກະຕິ.
10.2. ການຊ່ວຍເຫຼືອລູກຄ້າ
For technical assistance, warranty claims, or further inquiries, please contact Vivibright customer support through their official website or the contact information provided with your purchase documentation. When contacting support, please have your product model (F30) and purchase details ready.


