1. ບົດແນະນຳ
The Samson AirLine 99m AH9 Headset Wireless System is a compact and versatile wireless microphone solution designed for active performers, presenters, and educators. This system provides high-definition audio transmission without the need for cables or belt packs, offering freedom of movement and ease of use. It operates on a frequency-agile UHF band, ensuring reliable performance across 100 selectable channels.
The system comprises three main components:
- AH9 Micro Transmitter: A lightweight, rechargeable transmitter integrated into the headset.
- AR99m Micro Receiver: A compact receiver with multiple output options for versatile connectivity.
- DE10x Headset Microphone: ອາຊີບຕ່ຳfile, comfortable headset microphone designed for clear vocal reproduction.
2. ອົງປະກອບຂອງລະບົບຫຼາຍກວ່າview

ຮູບທີ 2.1: The complete Samson AirLine 99m AH9 Headset Wireless System, showing the AR99m receiver, AH9 micro transmitter, and DE10x headset microphone.

ຮູບທີ 2.2: ໃກ້ຊິດ view of the AH9 micro transmitter integrated with the DE10x headset microphone. The green light indicates power status.

ຮູບທີ 2.3: ເທິງ view of the AR99m micro receiver, showing the volume knob, SET button, channel display, and status indicators (READY, IR, PEAK).
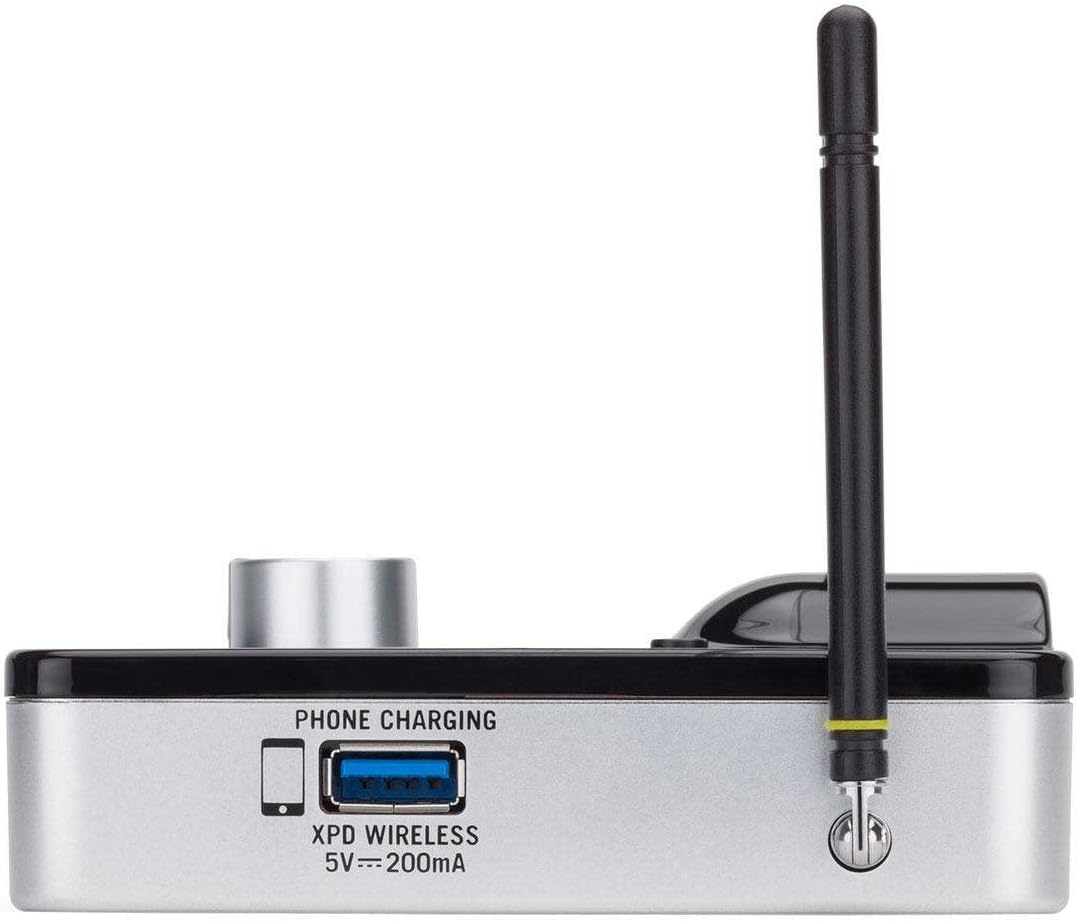
ຮູບທີ 2.4: ຂ້າງ view of the AR99m micro receiver, highlighting the 'PHONE CHARGING' USB port (5V --- 200mA) and antenna connection.

ຮູບທີ 2.5: ມຸມ view of the AR99m micro receiver, showing the DC IN port, 1/8" unbalanced output, and XLR balanced output.

ຮູບທີ 2.6: ຫລັງ view of the AH9 micro transmitter, showing the charging contacts and the integrated headset cable connection.

ຮູບທີ 2.7: ຫລັງ view of the AR99m micro receiver, detailing the DC IN (15V === 600mA), 1/4" unbalanced output, and XLR balanced output ports.

ຮູບທີ 2.8: The DE10x headset microphone, showing its lightweight design and adjustable ear hooks.
3. ຄໍາແນະນໍາການຕິດຕັ້ງ
3.1. Charging the AH9 Micro Transmitter
- Connect the supplied USB charging cable to the AH9 micro transmitter.
- Plug the other end of the USB cable into a standard USB power adapter (not included) or a powered USB port.
- The LED indicator on the AH9 will show charging status. A full charge provides up to 8 hours of operation.
3.2. Connecting the AR99m Micro Receiver
- Connect the included power adapter to the DC IN port (15V === 600mA) on the AR99m receiver.
- ສຽບອະແດບເຕີໄຟເຂົ້າໄປໃນປລັກສຽບໄຟ AC.
- Connect the AR99m receiver to your audio mixer, PA system, or recording device using one of the following outputs:
- ຜົນຜະລິດ XLR ທີ່ສົມດູນ: For professional audio equipment.
- Unbalanced 1/4" Output: For standard instrument inputs or line-level inputs.
- Unbalanced 1/8" Output: For consumer-grade audio devices or computer inputs.
- Extend the antennas on the AR99m receiver for optimal signal reception.
3.3. Wearing the DE10x Headset Microphone
- Carefully place the headset over your ears, ensuring a comfortable and secure fit.
- Position the microphone element approximately 1-2 inches from the corner of your mouth for best sound quality.
- Use the included windscreens to reduce plosives and wind noise, if necessary.
4. ຄໍາແນະນໍາການດໍາເນີນງານ
4.1. ເປີດ / ປິດພະລັງງານ
- AH9 Micro Transmitter: Press and hold the power button on the transmitter until the LED illuminates. Press and hold again to power off.
- AR99m Micro Receiver: Turn the VOLUME knob clockwise to power on. Turn counter-clockwise until it clicks to power off.
4.2. ການເລືອກຊ່ອງທາງ ແລະ ການຈັບຄູ່
The AirLine 99m system features 100 operating channels across a 24MHz bandwidth.
- Turn on the AR99m receiver. The channel display will show the current channel.
- ກົດ SET button on the AR99m receiver to cycle through available channels. Select a clear channel with no interference.
- Once a channel is selected on the receiver, turn on the AH9 transmitter.
- The AH9 transmitter will automatically scan and pair with the receiver on the selected channel. The 'READY' indicator on the receiver will illuminate when a successful connection is established.
4.3. ປັບລະດັບສຽງ
ໃຊ້ ປະລິມານ knob on the AR99m receiver to adjust the output level of the wireless system. Start with a low volume and gradually increase it to avoid sudden loud audio.
4.4. Monitoring Signal Status
- ຕົວຊີ້ບອກຄວາມພ້ອມ: Illuminates when the transmitter and receiver are successfully paired and receiving a signal.
- PEAK Indicator: Illuminates when the audio input from the transmitter is too high, indicating potential clipping. Reduce the input gain on your mixer or adjust the microphone position if this occurs.
- ຕົວຊີ້ວັດ IR: Used during initial setup for infrared pairing (if applicable, though this model typically auto-pairs).
5. ບໍາລຸງຮັກສາ
- ທໍາຄວາມສະອາດ: Use a soft, dry cloth to clean the surfaces of the transmitter and receiver. Avoid using abrasive cleaners or solvents.
- ການດູແລຫມໍ້ໄຟ: Recharge the AH9 transmitter regularly. For long-term storage, ensure the battery is partially charged (around 50%) to prolong its lifespan.
- ການເກັບຮັກສາ: ເກັບຮັກສາລະບົບໄວ້ໃນບ່ອນທີ່ເຢັນ, ແຫ້ງ, ຫ່າງຈາກແສງແດດໂດຍກົງແລະອຸນຫະພູມທີ່ສຸດ.
- ແວ່ນກັນລົມ: Replace windscreens on the DE10x headset microphone as needed to maintain hygiene and acoustic performance.
6. ການແກ້ໄຂບັນຫາ
| ບັນຫາ | ສາເຫດທີ່ເປັນໄປໄດ້ | ການແກ້ໄຂ |
|---|---|---|
| ບໍ່ມີສຽງຈາກຜູ້ຮັບ |
|
|
| ການລົບກວນ ຫຼື ການຢຸດເຮັດວຽກ |
|
|
| ສຽງບິດເບືອນ |
|
|
| ອາຍຸແບັດເຕີຣີສັ້ນ |
|
|
7. ຂໍ້ມູນຈໍາເພາະ
| ຄຸນສົມບັດ | ລາຍລະອຽດ |
|---|---|
| ໝາຍເລກຕົວແບບ | SW9A9SDE10-K |
| ຊ່ອງທາງການດໍາເນີນການ | 100 (across 24MHz bandwidth) |
| ຊ່ວງການດໍາເນີນງານ | ສູງເຖິງ 300 ຟຸດ (ເສັ້ນສາຍຕາ) |
| AH9 Transmitter Battery Life | Up to 8 hours (Lithium-Ion, rechargeable) |
| AR99m Receiver Outputs | Balanced XLR, Unbalanced 1/4", Unbalanced 1/8" |
| ປະເພດໄມໂຄຣໂຟນ | DE10x Headset Microphone |
| ລວມອຸປະກອນເສີມ | 4 Windscreens, USB charging cable, Power adapter |
| ນ້ໍາຫນັກລາຍການ | 1 ປອນ |
| ຂະໜາດສິນຄ້າ | 3 x 3 x 3 ນິ້ວ |
| ປະເພດວັດສະດຸ | ພາດສະຕິກ |
| ແຫຼ່ງພະລັງງານ | ພະລັງງານຫມໍ້ໄຟ |
| ອຸປະກອນທີ່ເຂົ້າກັນໄດ້ | Mixers, Audio Interfaces, PA Systems, Computers, Recording Devices |
8. ການຮັບປະກັນແລະການສະຫນັບສະຫນູນ
For warranty information and technical support, please refer to the official Samson Technologies webເວັບໄຊ ຫຼືຕິດຕໍ່ບໍລິການລູກຄ້າຂອງເຂົາເຈົ້າໂດຍກົງ. ຮັກສາໃບຮັບເງິນການຊື້ຂອງທ່ານໄວ້ເປັນຫຼັກຖານການຊື້ສໍາລັບການຮຽກຮ້ອງການຮັບປະກັນໃດໆ.
ຊັບພະຍາກອນອອນໄລນ໌: ຢ້ຽມຢາມ Samson Brand Store on Amazon ສໍາລັບຂໍ້ມູນເພີ່ມເຕີມແລະການສະຫນັບສະຫນູນຜະລິດຕະພັນ.


