1. ບົດແນະນຳ
This manual provides detailed instructions for the installation, operation, and maintenance of your Vibe Powerbox Micro Mono Amplifier, model POWERBOX400.1M-V7. Please read this manual thoroughly before attempting installation or operation to ensure proper use and to prevent damage to the unit or your vehicle's audio system.
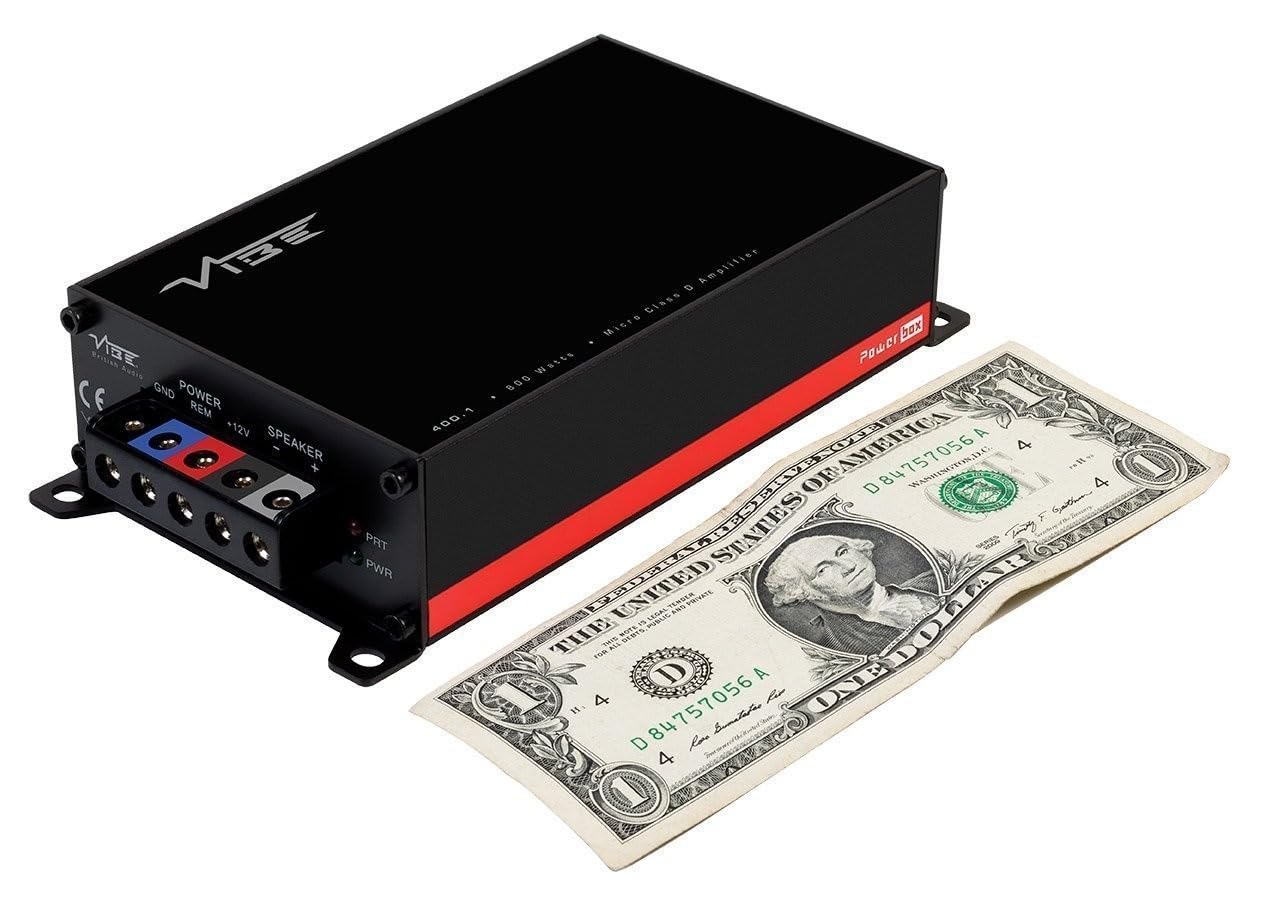
The Vibe Powerbox Micro Mono Amplifier is a compact, high-performance Class D amplifier designed for car audio systems. It delivers up to 400W RMS, making it suitable for powering subwoofers. Its small footprint allows for flexible installation options.
2. ຂໍ້ມູນຄວາມປອດໄພ
- ຖອດແບັດເຕີລີ່ຂອງລົດທຸກຄັ້ງກ່ອນທີ່ຈະເລີ່ມເຮັດວຽກໄຟຟ້າ.
- Ensure all wiring is correctly routed and secured to prevent damage from moving parts or sharp edges.
- Use appropriate gauge wiring for power and speaker connections as specified in this manual to prevent overheating and potential fire hazards.
- ຢ່າຕິດ amplifier ໃນສະຖານທີ່ສໍາຜັດກັບແສງແດດໂດຍກົງ, ຄວາມຮ້ອນຫຼາຍເກີນໄປ, ຄວາມຊຸ່ມຊື່ນ, ຫຼືຂີ້ຝຸ່ນ.
- ປຶກສາຜູ້ຕິດຕັ້ງເຄື່ອງສຽງໃນລົດມືອາຊີບ ຖ້າທ່ານບໍ່ແນ່ໃຈກ່ຽວກັບພາກສ່ວນໃດນຶ່ງຂອງຂະບວນການຕິດຕັ້ງ.
- ປະຕິບັດການ amplifier at excessively high volumes for prolonged periods can cause hearing damage.
3. ເນື້ອໃນຊຸດ
ກວດສອບວ່າລາຍການທັງຫມົດແມ່ນມີຢູ່ໃນຊຸດກ່ອນທີ່ຈະສືບຕໍ່ການຕິດຕັ້ງ:
- Vibe Powerbox Micro Mono Amplifier (POWERBOX400.1M-V7)
- Remote Gain Control Unit
- ສາຍສຽງ RCA
- Mounting Hardware (screws, connectors)
- ຄູ່ມືຜູ້ໃຊ້

4. ຄຸນລັກສະນະຂອງຜະລິດຕະພັນ
- Class D Micro Amplifier design for high efficiency and compact size.
- Ultra-compact footprint for easy and discreet installation.
- Output: 1 x 400W RMS at 1 ohm, with a maximum output of 800W.
- Dimensions: 37 x 157 x 82mm (approximately 1.46 x 6.18 x 3.23 inches).
- Compatible with Critical Link Rapid kits for simplified integration.
- Features Deltabox™ Connectivity auto turn-on.
- VIBE Sound Studio™ Active crossovers.
- 1 Ohm Stable operation.
5. ການກໍານົດອົງປະກອບ
5.1 Power and Speaker Terminals

The power input section includes terminals for Ground (GND), Remote Turn-On (REM), and +12V power. The speaker output section provides terminals for connecting your subwoofer.
5.2 Input and Control Panel
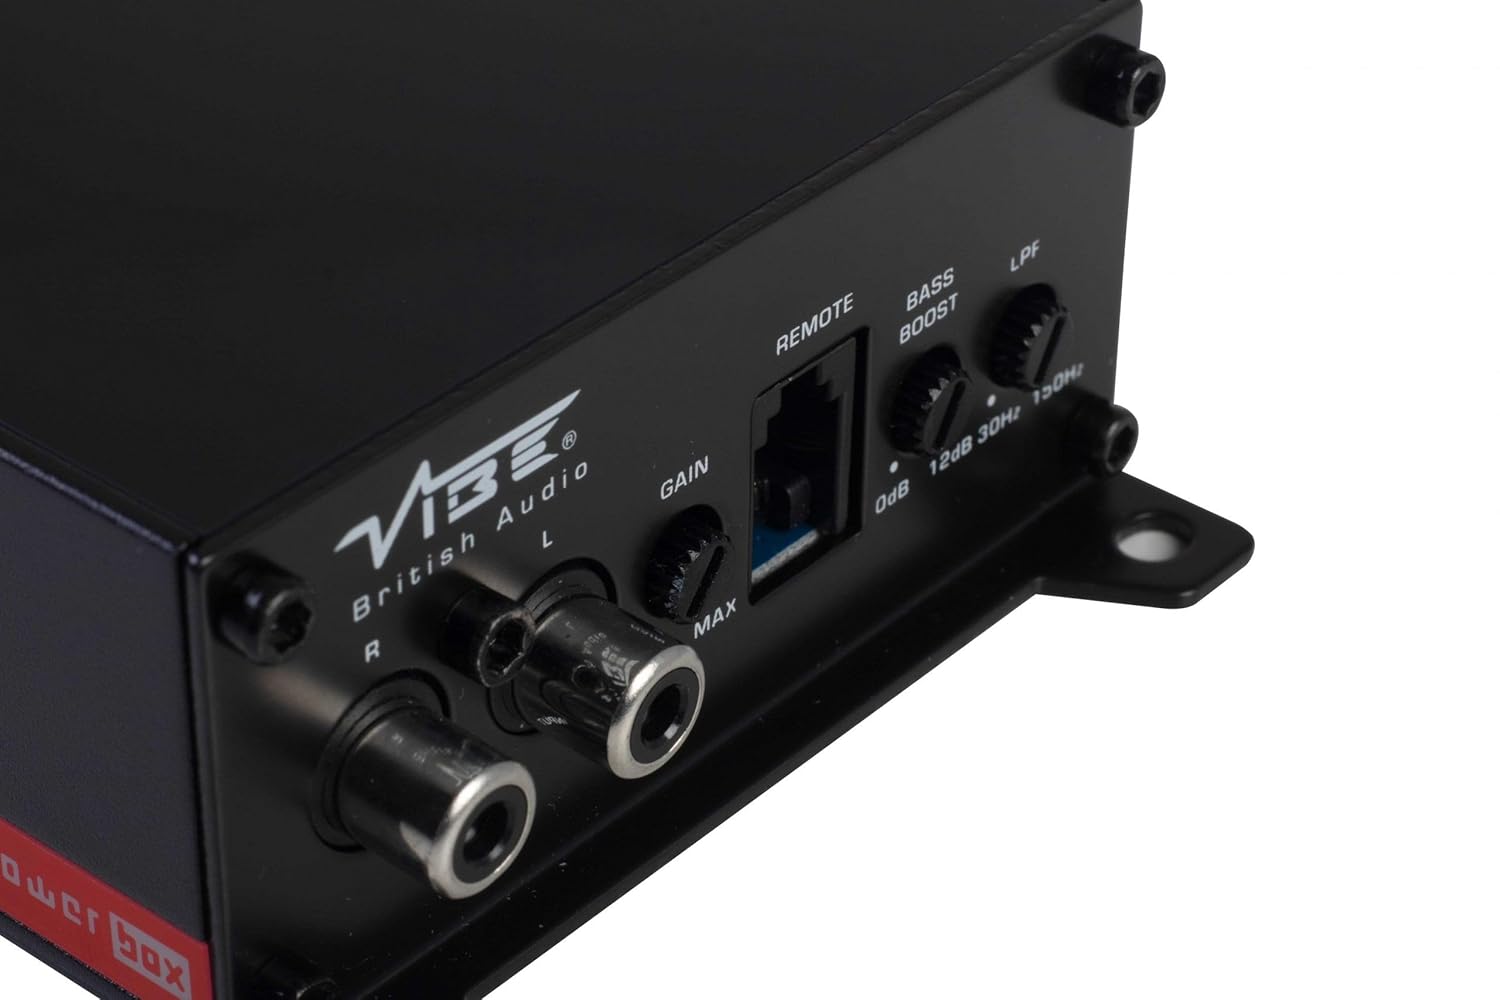
This panel features the RCA input jacks for audio signal, a Gain control knob to match the amplifier's input sensitivity to your head unit's output, a dedicated port for the remote gain control, a Bass Boost switch for enhancing low frequencies, and an LPF (Low Pass Filter) control to adjust the upper frequency limit for the subwoofer.
5.3 Remote Gain Control

The remote gain control unit connects to the amplifier via the 'REMOTE' port and allows for convenient adjustment of the subwoofer's output level from the vehicle's cabin.
6. ການຕິດຕັ້ງແລະການຕິດຕັ້ງ
Proper installation is crucial for optimal performance and safety. If you are not confident in your ability to install the amplifier, seek professional assistance.
6.1 ສະຖານທີ່ຕັ້ງ
Choose a mounting location that is dry, well-ventilated, and away from direct heat sources. The compact size of the Powerbox Micro allows for installation under seats, behind trim panels, or in other discreet locations. Ensure there is sufficient airflow around the amplifier ສໍາລັບການເຮັດຄວາມເຢັນ.
6.2 ການເຊື່ອມຕໍ່ສາຍໄຟ
ສາຍໄຟ:
- ເຊື່ອມຕໍ່ +12V terminal to the vehicle's positive battery terminal using a suitable gauge power cable (e.g., 8 AWG or 10 AWG). Install an in-line fuse holder within 18 inches (45 cm) of the battery.
- ເຊື່ອມຕໍ່ GND terminal to a clean, unpainted metal surface on the vehicle's chassis. Ensure a good electrical connection. The ground cable should be of the same gauge as the power cable and as short as possible.
- ເຊື່ອມຕໍ່ REM (Remote Turn-On) terminal to the remote output of your head unit. This wire signals the amplifier to turn on and off with your stereo. If your head unit lacks a remote output, you can use an accessory wire that turns on with the ignition, or utilize the amplifier's auto-sense feature if applicable.
ສາຍລຳໂພງ:
- ເຊື່ອມຕໍ່ subwoofer ຂອງທ່ານກັບ ລຳໂພງ Output terminals (+ and -). Ensure correct polarity. This amplifier is 1 Ohm stable, allowing flexibility in subwoofer impedance configurations. Refer to your subwoofer's specifications for optimal impedance matching.
Signal Input (RCA):
- Connect the RCA output from your head unit or signal processor to the INPUT (L/R) RCA jacks on the ampມີຊີວິດຊີວາ.
ການຄວບຄຸມການໄດ້ຮັບໄລຍະໄກ:
- Plug the remote gain control unit into the dedicated ໄລຍະໄກ ທີ່ Port ສຸດ amplifier. Route the cable to a convenient location for adjustment.
ISO T Harness / ISOAWK Kit:
- For simplified installation with existing stereo looms, an optional ISOAWK kit (available separately) can be used to make the amplifier compatible with an ISO T harness. This allows for plug-and-play integration for audio signal, power, and ground, potentially eliminating the need for separate battery connections.
7. ການດໍາເນີນງານ
7.1 ການເປີດພະລັງງານເບື້ອງຕົ້ນ
ຫຼັງຈາກເຊື່ອມຕໍ່ ແລະ ກວດສອບແລ້ວທັງໝົດ, ໃຫ້ເຊື່ອມຕໍ່ແບັດເຕີຣີຂອງລົດຄືນໃໝ່. ເປີດເຄື່ອງຫຼິ້ນຫົວຂອງທ່ານ. amplifier's power indicator (PWR) should illuminate green. If the protection indicator (PRT) illuminates red, refer to the troubleshooting section.
7.2 ໄດ້ຮັບການປັບຕົວ
The Gain control matches the ampຄວາມອ່ອນໄຫວຂອງ input ຂອງ lifier ກັບຜົນຜະລິດ voltage of your head unit. To set the gain:
- ຫັນ amplifier's Gain control to its minimum (MIN) setting.
- ຕັ້ງລະດັບສຽງຂອງຫົວໜ່ວຍຂອງທ່ານໃຫ້ປະມານ 75-80% ຂອງລະດັບສຽງສູງສຸດ.
- ຫຼິ້ນເພງແບບເຄື່ອນໄຫວ.
- ຄ່ອຍໆເພີ່ມຂຶ້ນ amplifier's Gain control until you hear distortion, then back it off slightly until the sound is clear.
The remote gain control unit allows for real-time adjustment of the subwoofer level without affecting the main system volume.
7.3 ຕົວກອງ Low Pass (LPF)
The LPF control sets the upper frequency limit for the amplifier's output. This is essential for subwoofers, ensuring they only reproduce low frequencies. Adjust the LPF knob (typically 30Hz to 150Hz) to blend the subwoofer's output seamlessly with your main speakers. A common starting point is around 80-100Hz.
7.4 Bass Boost
The Bass Boost switch provides an adjustable low-frequency enhancement. Use this feature sparingly, as excessive bass boost can lead to distortion and potential damage to your subwoofer. Adjust the boost level (0dB to 12dB) to your preference.
8. ບໍາລຸງຮັກສາ
- ທໍາຄວາມສະອາດ: ເຊັດເປັນໄລຍະ ampດ້ານນອກຂອງ lifier ດ້ວຍຜ້າອ່ອນໆ, ແຫ້ງ. ຢ່າໃຊ້ສານເຄມີທີ່ຮຸນແຮງຫຼືເຄື່ອງເຮັດຄວາມສະອາດຂັດ.
- ການເຊື່ອມຕໍ່: Regularly check all power, ground, and speaker connections to ensure they are secure and free from corrosion. Loose connections can cause performance issues or damage.
- ການລະບາຍອາກາດ: ຮັບປະກັນວ່າ ampຄີເຢັນຂອງເຄື່ອງປັບອາກາດບໍ່ໄດ້ຖືກອຸດຕັນເພື່ອຮັກສາການລະບາຍຄວາມຮ້ອນໃຫ້ເໝາະສົມ.
9. ການແກ້ໄຂບັນຫາ
| ບັນຫາ | ສາເຫດທີ່ເປັນໄປໄດ້ | ການແກ້ໄຂ |
|---|---|---|
| ບໍ່ມີພະລັງງານ (ໄຟ LED PWR ປິດ) | ຟິວຂາດ, ສາຍໄຟ/ສາຍດິນວ່າງ, ບໍ່ມີສັນຍານຣີໂໝດ. | Check in-line fuse, verify +12V, GND, and REM connections. |
| Protection Mode (PRT LED on) | ຮ້ອນເກີນໄປ, ລັດວົງຈອນໃນສາຍໄຟລຳໂພງ, ຄວາມຕ້ານທານຕໍ່າເກີນໄປ. | Ensure proper ventilation, check speaker wiring for shorts, verify speaker impedance. |
| ບໍ່ມີສຽງອອກ | ບໍ່ມີສັນຍານເຂົ້າ, ເກນຕໍ່າເກີນໄປ, ສາຍລຳໂພງຖືກຕັດການເຊື່ອມຕໍ່. | Check RCA input connections, adjust gain, verify speaker wiring. |
| ສຽງບິດເບືອນ | Gain set too high, LPF incorrectly set, poor ground connection. | Reduce gain, adjust LPF, check ground connection. |
10. ຂໍ້ມູນຈໍາເພາະ
- ໝາຍເລກຕົວແບບ: POWERBOX 400.1M-V7
- Ampປະເພດຊີວິດ: ຄລາສ D ໂມໂນ Ampມີຊີວິດຊີວາ
- RMS Power Output: 1 x 400W RMS @ 1 Ohm
- ຜົນຜະລິດພະລັງງານສູງສຸດ: 800W
- ຂະໜາດສິນຄ້າ (L x W x H): ຂະໜາດປະມານ 157 x 82 x 37 ມມ (6.18 x 3.23 x 1.46 ນິ້ວ)
- ນ້ຳໜັກ: ປະມານ 1.54 ປອນ
- ສະບັບtage: 12 ໂວນ (ແຮງດັນໄຟຟ້າທີ່ກຳນົດໄວ້)
- ການສະ ໜອງ ສູງສຸດ Voltage: 12 ໂວນ
- ປະເພດການຕິດຕັ້ງ: Surface Mount
- ຜູ້ຜະລິດ: Vibe Audio
- ວັນທີທໍາອິດທີ່ມີ: ວັນທີ 21 ກໍລະກົດ 2018
11. ການຮັບປະກັນແລະການສະຫນັບສະຫນູນ
Vibe Audio products are designed and manufactured to the highest standards. For warranty information and technical support, please refer to the warranty card included with your product or visit the official Vibe Audio webເວັບໄຊ. ຮັກສາຫຼັກຖານການຊື້ຂອງທ່ານສໍາລັບການຮ້ອງຂໍການຮັບປະກັນ.


