1. ບົດແນະນຳ
This manual provides detailed instructions for the installation, operation, and maintenance of your Zebronics H61 Motherboard. Please read this manual thoroughly before proceeding with installation to ensure proper setup and functionality.
The Zebronics H61 Motherboard is designed to support Intel LGA 1155 socket processors (i7/i5/i3/Pentium/Celeron series) and DDR3 dual-channel memory. It features an Intel H61 chipset, providing a stable and efficient platform for your computing needs.
2. ຂໍ້ມູນຄວາມປອດໄພ
- ສະເຫມີຕັດການເຊື່ອມຕໍ່ການສະຫນອງພະລັງງານກ່ອນທີ່ຈະຕິດຕັ້ງຫຼືເອົາອົງປະກອບໃດໆ.
- Handle the motherboard by its edges to avoid electrostatic discharge (ESD) damage. Use an anti-static wrist strap if available.
- ຮັບປະກັນການລະບາຍອາກາດທີ່ເຫມາະສົມພາຍໃນກໍລະນີຄອມພິວເຕີຂອງທ່ານເພື່ອປ້ອງກັນຄວາມຮ້ອນເກີນ.
- ຢ່າປ່ອຍໃຫ້ເມນບອດມີຄວາມຊຸ່ມຊື່ນ ຫຼືອຸນຫະພູມສູງສຸດ.
- ໃຫ້ອ້າງອີງໃສ່ຄູ່ມືຂອງຜູ້ຜະລິດອຸປະກອນສຳລັບຄຳແນະນຳການຕິດຕັ້ງສະເພາະສຳລັບ CPU, RAM ແລະ ອຸປະກອນເສີມອື່ນໆຂອງທ່ານ.
3. ເນື້ອໃນຊຸດ
ກວດສອບວ່າລາຍການທັງຫມົດແມ່ນມີຢູ່ໃນຊຸດ:
- Zebronics H61 Motherboard
- I / O ໄສ້
- SATA Data Cable(s)
- Driver CD (for operating systems that do not automatically install drivers)
- ຄູ່ມືຜູ້ໃຊ້ (ເອກະສານນີ້)
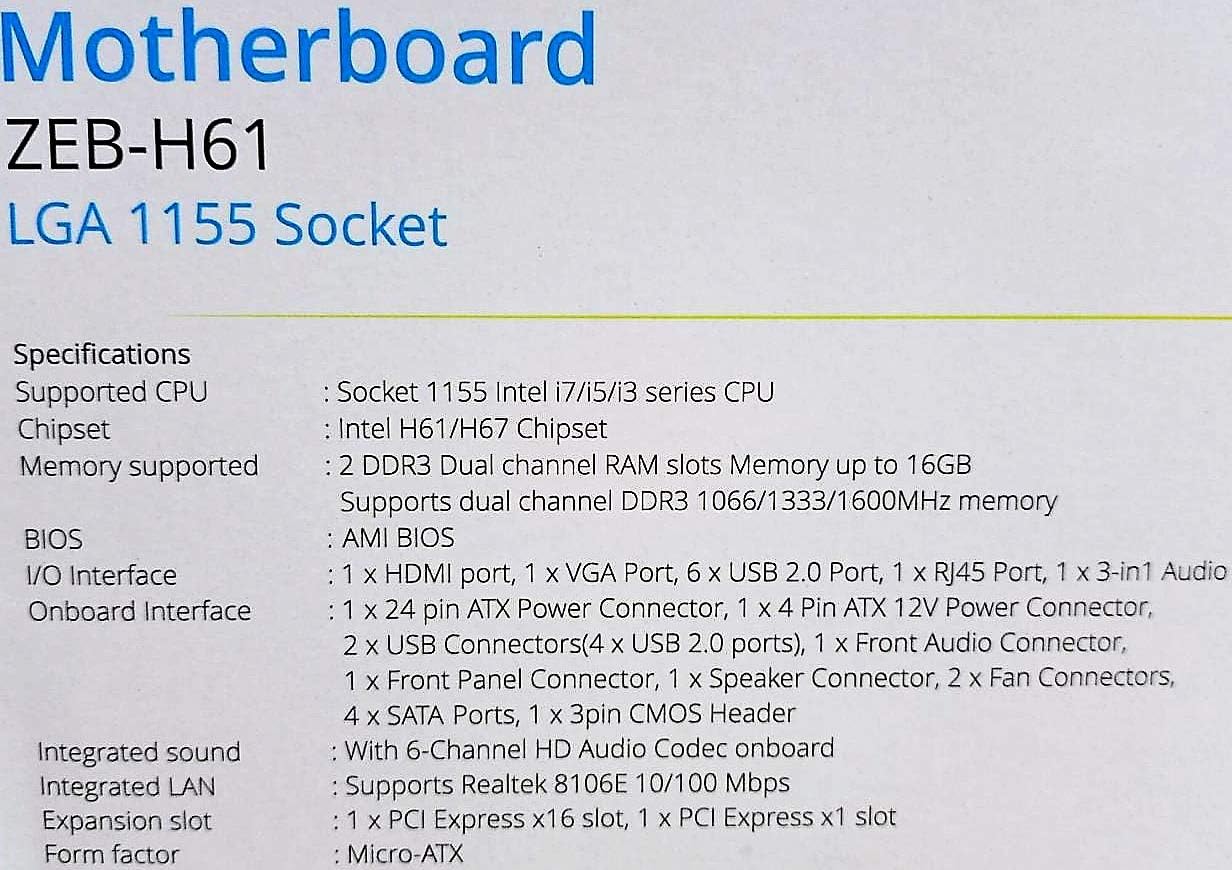
4. ຂໍ້ມູນຈໍາເພາະ
| ຄຸນສົມບັດ | ລາຍລະອຽດ |
|---|---|
| ຕົວແບບ | H61 |
| ຊິບເຊັດ | Intel H61 Express |
| ເຕົ້າສຽບ CPU | LGA 1155 |
| ໂປເຊດເຊີທີ່ເຂົ້າກັນໄດ້ | Intel i7/i5/i3/Pentium/Celeron processors (2nd and 3rd Generation) |
| Memory Slots | 2 x DDR3 Dual-channel slots |
| ສະຫນັບສະຫນູນຫນ່ວຍຄວາມຈໍາ | DDR3 1066/1333/1600MHz, up to 16GB |
| ການໂຕ້ຕອບກາຟິກ | 1 x PCI-Express x16 slot |
| ສະລັອດຕິງຂະຫຍາຍ | 1 x PCI Express x1 slot |
| ການເກັບຮັກສາ | 4 x SATA II ports |
| LAN | Realtek 8106E 10/100 Mbps Ethernet |
| ສຽງ | 6-Channel HD Audio Codec onboard (5.1 surround sound support) |
| ພອດ I/O ດ້ານຫຼັງ | 1 x HDMI, 1 x VGA, 6 x USB 2.0, 1 x RJ45, 1 x 3-in-1 Audio Jacks (Line-in, Line-out, Mic-in), PS/2 (Keyboard/Mouse) |
| ປັດໄຈແບບຟອມ | ATX |
| ຂະໜາດ | 25 x 20 x 3 cm |
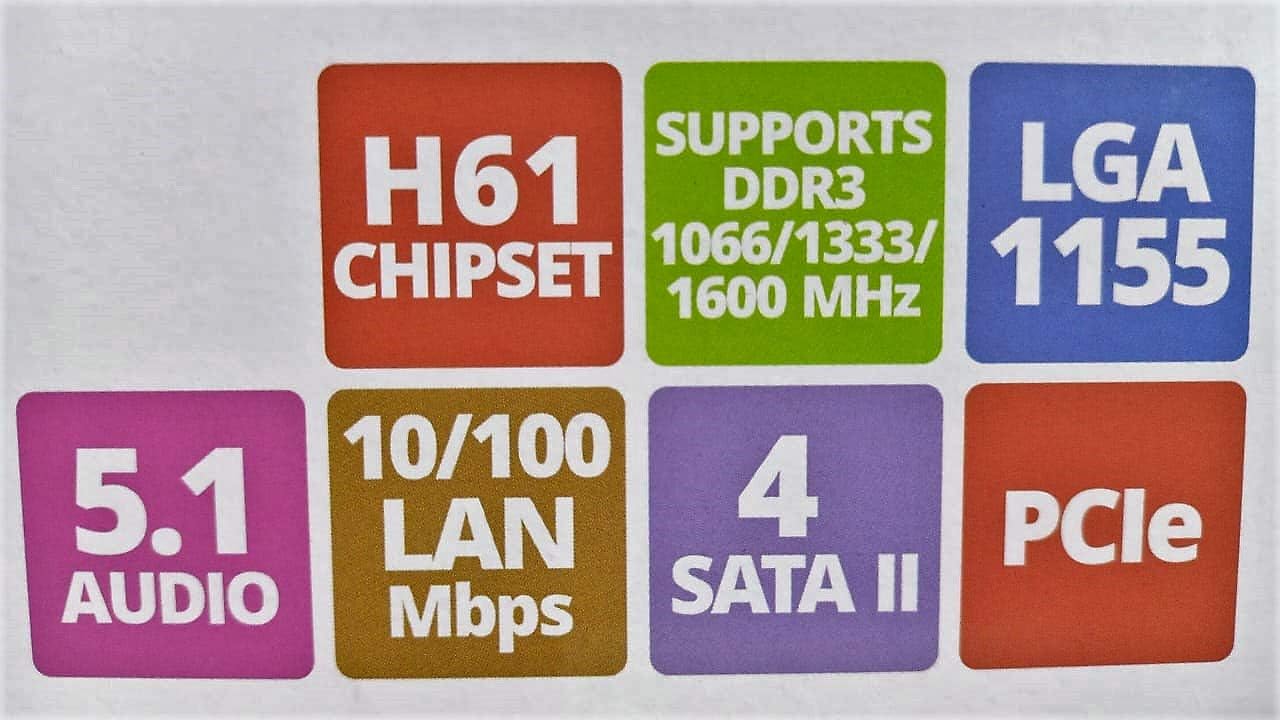
Image: Detailed specifications of the Zebronics H61 Motherboard, including chipset, CPU socket, memory support, and I/O interfaces.

Image: Visual representation of key features such as H61 Chipset, DDR3 support, LGA 1155 socket, 5.1 Audio, 10/100 LAN, 4 SATA II ports, and PCIe.
5. ການຕິດຕັ້ງແລະການຕິດຕັ້ງ
5.1 ໂຄງຮ່າງຂອງເມນບອດ

ຮູບພາບ: ເທິງລົງລຸ່ມ view of the Zebronics H61 Motherboard, showing the CPU socket, RAM slots, PCIe slot, and various headers.

Image: Another top-down perspective of the Zebronics H61 Motherboard, highlighting component placement.
5.2 ແຜງ I/O ດ້ານຫຼັງ

Image: Rear I/O panel of the Zebronics H61 Motherboard, displaying ports for PS/2 keyboard/mouse, VGA, HDMI, USB 2.0, LAN, and audio jacks.
ຮູບພາບ: A ໃກ້ຊິດ view of the rear I/O ports, detailing the VGA, HDMI, USB, LAN, and audio connections.
5.3 ຂັ້ນຕອນການຕິດຕັ້ງອົງປະກອບ
- ຕິດຕັ້ງ CPU:
- ເປີດແລັບຊັອກເກັດ CPU.
- Carefully align the CPU with the socket, ensuring the golden triangle on the CPU matches the mark on the socket.
- ຄ່ອຍໆວາງ CPU ເຂົ້າໄປໃນເຕົ້າຮັບໂດຍບໍ່ມີການບັງຄັບມັນ.
- ປິດ lever ເພື່ອຮັບປະກັນ CPU.
- ທານ້ຳຢາກັນຄວາມຮ້ອນ ແລະ ຕິດຕັ້ງຕົວເຮັດຄວາມເຢັນ CPU ຕາມຄຳແນະນຳຂອງຜູ້ຜະລິດ.
- ຕິດຕັ້ງ RAM:
- ເປີດຄລິບຢູ່ທັງສອງສົ້ນຂອງຊ່ອງຄວາມຈຳ DDR3.
- ວາງໂມດູນໜ່ວຍຄວາມຈຳກັບຊ່ອງສຽບ, ຮັບປະກັນວ່າຮອຍບັ້ງຢູ່ໃນໂມດູນກົງກັບກະແຈໃນຊ່ອງສຽບ.
- ກົດລົງໃຫ້ແໜ້ນທັງສອງສົ້ນຂອງໂມດູນໜ່ວຍຄວາມຈຳຈົນກວ່າຄລິບຈະເຂົ້າໃສ່.
- ຕິດຕັ້ງບັດກາຟິກ (ທາງເລືອກ):
- Locate the PCI-Express x16 slot.
- ເອົາຝາປິດຊ່ອງສຽບການຂະຫຍາຍທີ່ສອດຄ້ອງກັນອອກຈາກກໍລະນີ PC ຂອງທ່ານ.
- Align the graphics card with the slot and press down firmly until it is seated correctly.
- ຮັບປະກັນບັດດ້ວຍສະກູກັບກໍລະນີ PC.
- ເຊື່ອມຕໍ່ອຸປະກອນການເກັບຮັກສາ:
- Connect SATA data cables from the motherboard's SATA ports to your hard drives or SSDs.
- Ensure power cables from the power supply are connected to these devices.
- ເຊື່ອມຕໍ່ການສະຫນອງພະລັງງານ:
- ເຊື່ອມຕໍ່ຕົວເຊື່ອມຕໍ່ໄຟ ATX 24-pin ຈາກແຫຼ່ງສະໜອງໄຟຂອງທ່ານໃສ່ກັບເມນບອດ.
- Connect the 4-pin ATX 12V power connector (CPU power) to the motherboard.
- ເຊື່ອມຕໍ່ຫົວແຜງໜ້າ:
- Connect the power switch, reset switch, HDD LED, and power LED cables from your PC case to the corresponding pins on the motherboard's front panel header. Refer to the motherboard diagram for pin assignments.
- Connect front USB and audio headers.
6. ຄໍາແນະນໍາການດໍາເນີນງານ
6.1 First Boot ແລະການຕັ້ງຄ່າ BIOS
- ຫຼັງຈາກການປະກອບສ່ວນປະກອບທັງຫມົດ, ເຊື່ອມຕໍ່ກັບຈໍພາບ, keyboard, ແລະຫນູຂອງທ່ານ.
- ເປີດຄອມພິວເຕີຂອງທ່ານ.
- Press the designated key (usually DEL or F2) repeatedly during startup to enter the BIOS/UEFI setup utility.
- In the BIOS, verify that all installed components (CPU, RAM, storage) are detected correctly.
- ຕັ້ງຄ່າຄໍາສັ່ງ boot ເພື່ອຕິດຕັ້ງລະບົບປະຕິບັດການຂອງທ່ານຈາກ USB drive ຫຼື optical drive.
- ບັນທຶກການປ່ຽນແປງ ແລະ ອອກຈາກ BIOS. ລະບົບຈະເລີ່ມຕົ້ນໃໝ່.
6.2 ການຕິດຕັ້ງໄດເວີ
After installing your operating system, install the necessary drivers for optimal performance. Drivers can be found on the included driver CD or downloaded from the official Zebronics webເວັບໄຊ.
- ໄດເວີຊິບເຊັດ
- Graphics Drivers (if using integrated graphics or a dedicated GPU)
- ໄດເວີ LAN
- ໄດເວີສຽງ
- USB Drivers (if applicable)
7. ບໍາລຸງຮັກສາ
- ຮັກສາຄວາມສະອາດ: Regularly clean dust from inside your PC case, especially from fans and heatsinks, to ensure proper airflow and prevent overheating. Use compressed air.
- ອັບເດດ BIOS: Check the Zebronics website periodically for BIOS updates. BIOS updates can improve system stability, compatibility, and performance. Follow update instructions carefully.
- ອັບເດດໄດເວີ: ອັບເດດໄດເວີຂອງທ່ານເພື່ອຮັບປະກັນຄວາມເຂົ້າກັນໄດ້ ແລະປະສິດທິພາບທີ່ດີທີ່ສຸດກັບລະບົບປະຕິບັດການ ແລະແອັບພລິເຄຊັນຂອງທ່ານ.
- ແບັດເຕີຣີ CMOS: The motherboard uses a CR2032 battery to retain BIOS settings. If your system frequently loses time or BIOS settings, the battery may need replacement.
8. ການແກ້ໄຂບັນຫາ
- ບໍ່ມີພະລັງງານ / ລະບົບບໍ່ເປີດ:
- Ensure all power cables (24-pin ATX, 4-pin ATX 12V) are securely connected to the motherboard.
- Check if the power supply unit (PSU) is switched on and functioning.
- ຢືນຢັນການເຊື່ອມຕໍ່ສະວິດໄຟແຜງດ້ານໜ້າ.
- ລອງຕິດຕັ້ງໂມດູນ RAM ແລະກາດກຣາບຟິກຄືນໃໝ່.
- ບໍ່ມີຈໍສະແດງຜົນໃນຈໍສະແດງຜົນ:
- Ensure the monitor is connected to the correct video output (either integrated graphics on the motherboard or dedicated graphics card).
- Check monitor power and input selection.
- Reseat the graphics card (if installed) and RAM modules.
- ຄວາມບໍ່ສະຖຽນລະພາບຂອງລະບົບ / ການຂັດຂ້ອງ:
- ກວດເບິ່ງອຸນຫະພູມ CPU ແລະ GPU. ຄວາມຮ້ອນເກີນສາມາດເຮັດໃຫ້ເກີດຄວາມບໍ່ສະຖຽນລະພາບ.
- Ensure RAM modules are properly seated and compatible. Test with one RAM stick if multiple are installed.
- ອັບເດດໄດເວີ ແລະ BIOS ເປັນເວີຊັນຫຼ້າສຸດ.
- ເປີດໃຊ້ເຄື່ອງມືວິນິດໄສຄວາມຈຳເພື່ອກວດສອບ RAM ທີ່ຜິດພາດ.
- CMOS Battery Issue (Loss of Time/Settings):
- If the system loses time or BIOS settings after being powered off, the CMOS battery (CR2032) may need replacement.
- To reset CMOS: Disconnect power, remove the CMOS battery, short the battery socket's positive and negative terminals for 30 seconds, then reinsert the battery.
9. ການຮັບປະກັນແລະການສະຫນັບສະຫນູນ
For warranty information and technical support, please refer to the official Zebronics webເວັບໄຊ ຫຼືຕິດຕໍ່ພະແນກບໍລິການລູກຄ້າຂອງເຂົາເຈົ້າ. ຮັກສາໃບຮັບເງິນການຊື້ຂອງທ່ານໄວ້ເປັນຫຼັກຖານການຊື້ສໍາລັບການຮ້ອງຂໍການຮັບປະກັນ.
Zebronics Official Webເວັບໄຊ: www.zebronics.com


