1. ບົດແນະນຳ
This manual provides instructions for the proper use and maintenance of the ARB ARB601 Digital Tire Pressure Gauge. This device is designed to accurately measure, inflate, and deflate vehicle tire pressures, particularly beneficial for 4WD applications and off-roading where precise tire pressure adjustments are critical.
The ARB601 features a large digital display with a blue backlight, a thumb-operated inflator button, and an accessible deflator bleed button for efficient tire pressure management.

Image 1.1: The ARB ARB601 Digital Tire Pressure Gauge, showing the main unit, braided hose, and chuck.
2. ຂໍ້ມູນຄວາມປອດໄພ
Please read and understand all safety warnings and instructions before using this product. Failure to follow these instructions may result in property damage or personal injury.
- Always wear appropriate eye protection when working with compressed air and tires.
- Ensure the tire valve stem is clean and free of debris before attaching the chuck.
- Do not exceed the maximum pressure rating of the tire or the gauge. The ARB601 is rated for 0-200 PSI.
- Keep hands and fingers clear of moving parts during inflation/deflation.
- Store the gauge in a clean, dry place away from extreme temperatures.
- ຮັກສາໃຫ້ໄກຈາກເດັກນ້ອຍ.
3. ຜະລິດຕະພັນເກີນview
The ARB601 Digital Tire Pressure Gauge is constructed with a durable metal body and features a rubber bump guard for protection against impacts. It includes a 600mm (approximately 23.6 inches) PVC coated braided hose and a 1/4" NPT fitting.
ອົງປະກອບ:
- ຈໍດິຈິຕອນ: Large, blue backlit screen for clear readings.
- ປຸ່ມເປີດ: ເປີດ ແລະປິດອຸປະກອນ.
- ປຸ່ມ FUNC: Cycles through measurement units (PSI, Bar, Kpa, KgF).
- Inflator Button: Thumb-operated button to initiate inflation when connected to an air source.
- Deflator Bleed Button: Releases air from the tire to reduce pressure.
- Braided Hose: 600mm dual swivel PVC coated hose for flexibility and durability.
- Air Chuck: Connects to the tire valve stem.
- ສາຍການບິນ: Connects to an air compressor hose (1/4" NPT fitting).
- Rubber Bump Guard: ໃຫ້ການປົກປ້ອງຈາກການຕົກ ແລະ ຜົນກະທົບ.

ຮູບພາບ 3.1: ຂ້າງ view of the ARB601, highlighting the main unit and hose connection.

ຮູບພາບ 3.2: ມຸມ view of the ARB601, showing the robust construction.
4. ຕັ້ງຄ່າ
4.1. ການຕິດຕັ້ງຫມໍ້ໄຟ
The ARB601 requires 2 AAA batteries for operation. To install or replace batteries:
- Locate the battery compartment cover on the back of the digital gauge unit.
- ເອົາຝາປິດອອກ.
- ໃສ່ໝໍ້ໄຟ AAA 2 ອັນ, ຮັບປະກັນການຂົ້ວທີ່ຖືກຕ້ອງ (+/-).
- ປ່ຽນຝາປິດຊ່ອງໃສ່ຫມໍ້ໄຟໃຫ້ປອດໄພ.
The device is designed for up to 200 hours of runtime on a set of batteries.

Image 4.1: Close-up of the digital display and 'ON' and 'FUNC' buttons.
5. ຄໍາແນະນໍາການດໍາເນີນງານ
5.1. ເປີດ/ປິດ
- ເພື່ອເປີດເຄື່ອງວັດແທກ, ກົດປຸ່ມ ON ປຸ່ມ. ຈໍສະແດງຜົນຈະສະຫວ່າງ.
- ເພື່ອປິດໄຟ, ກົດປຸ່ມແລະກົດປຸ່ມ ON button for a few seconds until the display turns off. The device also features an auto-off function to conserve battery life.
5.2. ການເລືອກຫົວໜ່ວຍວັດແທກ
- ດ້ວຍການເປີດເຄື່ອງວັດແທກ, ກົດປຸ່ມ FUNC button to cycle through the available measurement units: PSI, Bar, Kpa, and KgF.
- Select the desired unit before taking a measurement or adjusting pressure.
5.3. Measuring Tire Pressure
- Ensure the gauge is powered on and the correct measurement unit is selected.
- Firmly attach the air chuck to the tire valve stem. Ensure a secure connection to prevent air leakage.
- ຄວາມດັນລົມຢາງໃນປະຈຸບັນຈະຖືກສະແດງຢູ່ໜ້າຈໍດິຈິຕອນ.
- Remove the chuck from the valve stem to stop measuring.

Image 5.1: User holding the ARB601, showing the digital display with a pressure reading.
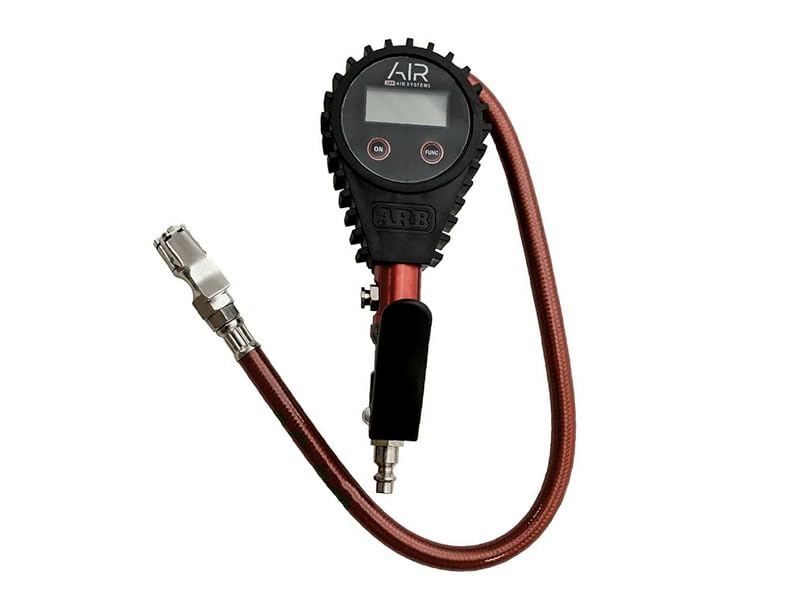
Image 5.2: The ARB601 gauge positioned on the ground near a vehicle tire.
5.4. ການສູບລົມຢາງລົດ
- Connect the 1/4" NPT fitting of the gauge to a suitable air compressor hose.
- Attach the air chuck securely to the tire valve stem.
- ກົດຄ້າງໄວ້ Inflator Button to begin inflating the tire. The digital display will show the increasinຄວາມກົດດັນ g ໃນເວລາຈິງ.
- Release the button when the desired pressure is reached.
- Disconnect the chuck from the tire valve.

Image 5.3: A user actively inflating a vehicle tire with the ARB601 gauge.
5.5. ການລະບາຍລົມຢາງລົດ
- Attach the air chuck securely to the tire valve stem. The current pressure will be displayed.
- ກົດ Deflator Bleed Button to release air from the tire. The digital display will show the decreasinຄວາມກົດດັນ g ໃນເວລາຈິງ.
- Release the button when the desired pressure is reached.
- Disconnect the chuck from the tire valve.

Image 5.4: A user deflating a vehicle tire using the ARB601 gauge.
6. ບໍາລຸງຮັກສາ
6.1. ທໍາຄວາມສະອາດ
- Wipe the gauge with a soft, damp ຜ້າ. ຢ່າໃຊ້ສານເຄມີທີ່ຮຸນແຮງຫຼືເຄື່ອງເຮັດຄວາມສະອາດຂັດ.
- Ensure the display and buttons are free from dirt and debris.
6.2. ການເກັບຮັກສາ
- Store the gauge in its protective pouch (if included) or a clean, dry environment.
- ຫຼີກເວັ້ນການເກັບຮັກສາໄວ້ໃນບ່ອນທີ່ມີແສງແດດໂດຍກົງຫຼືບ່ອນທີ່ມີອຸນຫະພູມສູງ.
- The rubber bump guard provides protection during storage and transport.
6.3. ການດູແລຫມໍ້ໄຟ
- ຖອດແບດເຕີຣີອອກຖ້າອຸປະກອນຈະບໍ່ຖືກໃຊ້ເປັນໄລຍະເວລາເພີ່ມເຕີມເພື່ອປ້ອງກັນການຮົ່ວໄຫຼ.
- ປ່ຽນແບັດເຕີລີ ເມື່ອຕົວຊີ້ບອກແບດເຕີລີ່ຕ່ຳປະກົດຂຶ້ນເທິງຈໍສະແດງຜົນ.
7. ການແກ້ໄຂບັນຫາ
| ບັນຫາ | ສາເຫດທີ່ເປັນໄປໄດ້ | ການແກ້ໄຂ |
|---|---|---|
| Gauge does not power on | ແບັດເຕີຣີຕາຍ ຫຼື ຕິດຕັ້ງບໍ່ຖືກຕ້ອງ | ກວດເບິ່ງຂົ້ວຂອງຫມໍ້ໄຟ; ປ່ຽນແບັດເຕີລີ. |
| ການອ່ານບໍ່ຖືກຕ້ອງ | Loose connection to valve stem; gauge malfunction | Ensure chuck is securely attached. If problem persists, contact support. |
| Air leaks during inflation/deflation | Improper chuck attachment; damaged chuck/hose | Re-attach chuck firmly. Inspect hose and chuck for damage. |
| Display flickering or not functioning | Low batteries; internal fault | Replace batteries. If issue continues, contact support. |
8. ຂໍ້ມູນຈໍາເພາະ
- ຍີ່ຫໍ້: ARB
- ຕົວແບບ: ARO601
- ວັດສະດຸ: Metal (with rubber bump guard)
- ໄລຍະການວັດແທກ: 0-14 Bar, 0-200 PSI, 0-1400 Kpa, 0-14 KgF
- ຄວາມຖືກຕ້ອງ: +/-1 PSI @ 25-75 PSI
- ຄວາມຍາວທໍ່: 600mm (PVC coated braided hose)
- Air Inlet Fitting: 1/4" NPT
- ແຫຼ່ງພະລັງງານ: 2 ຫມໍ້ໄຟ AAA (ຕ້ອງການ)
- ເວລາແລ່ນຫມໍ້ໄຟ: ສູງສຸດ 200 ຊົ່ວໂມງ
- ນ້ໍາຫນັກລາຍການ: ປະມານ 1 ປອນ
- ຂະໜາດຜະລິດຕະພັນ: 10.4 x 5.2 x 3.8 ນິ້ວ
9. ການຮັບປະກັນແລະການສະຫນັບສະຫນູນ
For warranty information and technical support, please refer to the documentation provided with your purchase or visit the official ARB webເວັບໄຊ. ຮັກສາຫຼັກຖານການຊື້ຂອງທ່ານສໍາລັບການຮຽກຮ້ອງການຮັບປະກັນໃດໆ.
If you encounter issues not covered in this manual, please contact ARB customer service for assistance.
10. ວິດີໂອຜະລິດຕະພັນຢ່າງເປັນທາງການ
No official product videos with 'Seller' creator type and relevant filenames were provided in the product data to embed in this manual.


