1. ບົດແນະນຳ
This manual provides essential instructions for the installation, operation, and maintenance of your ANNKE i61dr 1080P WiFi IP Security Camera. Please read this manual thoroughly before using the product to ensure proper setup and functionality. Keep this manual for future reference.
2. ເນື້ອໃນຊຸດ
ກວດສອບວ່າລາຍການທັງຫມົດທີ່ລະບຸໄວ້ຂ້າງລຸ່ມນີ້ແມ່ນມີຢູ່ໃນຊຸດຂອງທ່ານ. ຖ້າລາຍການໃດຂາດຫາຍໄປຫຼືເສຍຫາຍ, ກະລຸນາຕິດຕໍ່ຝ່າຍຊ່ວຍເຫຼືອລູກຄ້າ.

Image: Contents of the ANNKE i61dr camera package, including the camera, power adapter, Ethernet cable, mounting hardware, drill template, and user manual.
- ANNKE i61dr 1080P WiFi IP Security Camera
- ອະແດບເຕີໄຟ (DC12V)
- ສາຍອີເທີເນັດ
- screws mounting ແລະ plugs ຝາ
- ແມ່ແບບເຈາະ
- ຄູ່ມືຜູ້ໃຊ້
- Software CD
3. ຜະລິດຕະພັນເກີນview
Familiarize yourself with the components and indicators of your ANNKE i61dr camera.
ດ້ານໜ້າ View
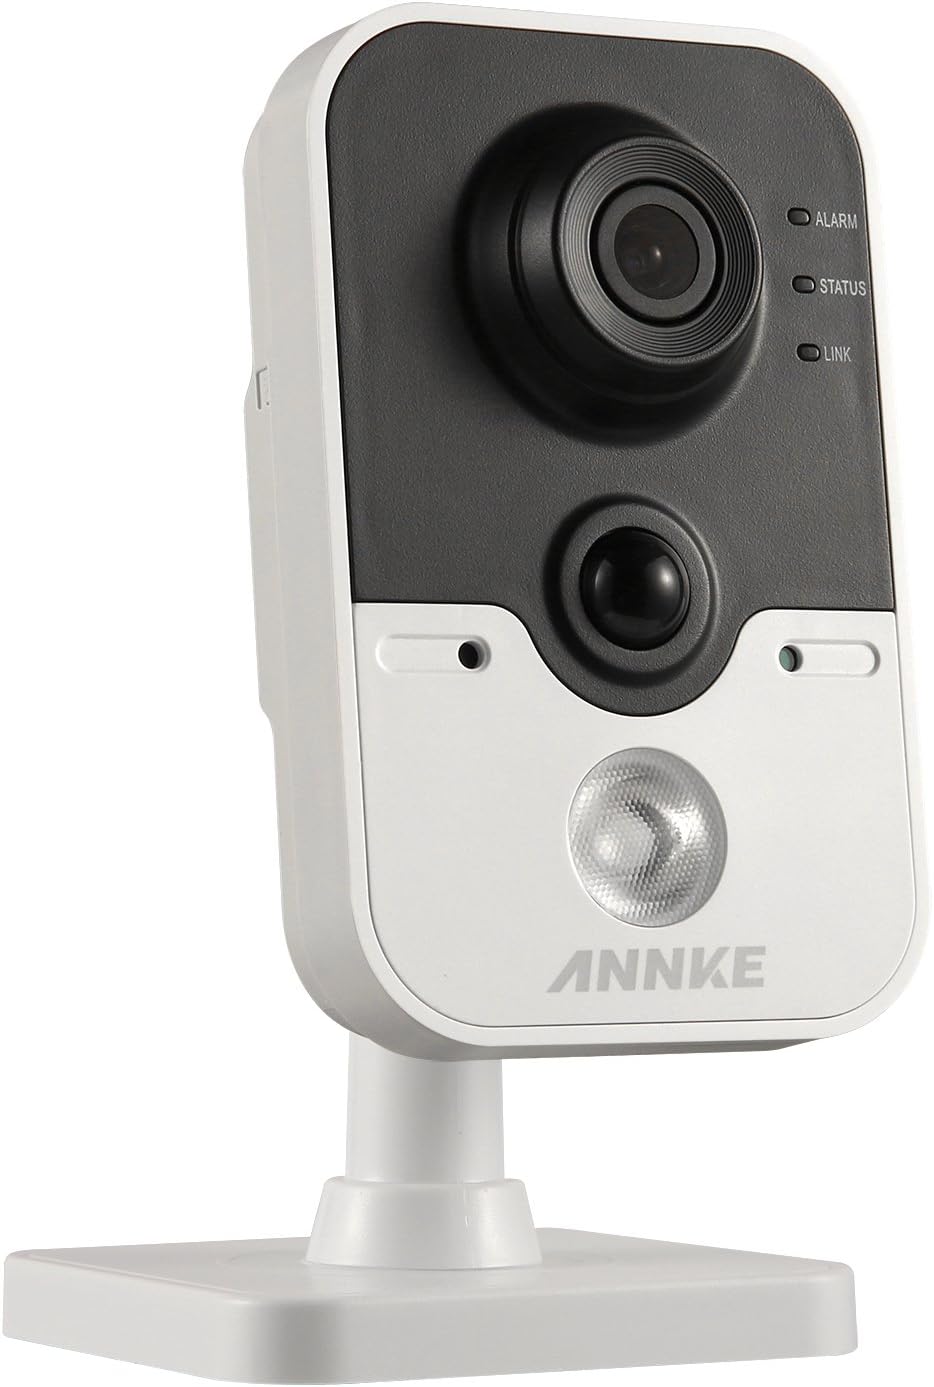
Image: The front of the ANNKE i61dr camera, featuring the main camera lens, a passive infrared (PIR) sensor, and three LED indicators labeled ALARM, STATUS, and LINK.
- ເລນກ້ອງຖ່າຍຮູບ: ຖ່າຍວິດີໂອ HD 1080p.
- ເຊັນເຊີ PIR: Detects heat signatures for accurate motion detection.
- ໄຟ LED ປຸກ: ຊີ້ບອກສະຖານະການປຸກ.
- LED ສະຖານະ: Indicates camera operational status.
- ເຊື່ອມຕໍ່ LED: Indicates network connectivity status.
ຫລັງ View

Image: The rear of the ANNKE i61dr camera, displaying the LAN port, WPS/RST button, Alarm I/O terminals, and DC12V power input.
- LAN Port: For wired Ethernet connection and Power over Ethernet (PoE).
- ປຸ່ມ WPS/RST: Used for WPS Wi-Fi setup or to reset the camera to factory defaults.
- ALARM I/O: ຂົ້ວຕໍ່ສຳລັບອຸປະກອນເຕືອນໄພພາຍນອກ.
- ພະລັງງານເຂົ້າ DC12V: ເຊື່ອມຕໍ່ກັບອະແດບເຕີພະລັງງານທີ່ລວມຢູ່.
ຂ້າງ View

Image: The side of the ANNKE i61dr camera, showing the accessible SD card slot for local storage.
- ຊ່ອງໃສ່ບັດ SD: Insert a microSD card (not included) for local video storage.
4. ຕັ້ງຄ່າ
Follow these steps to set up your ANNKE i61dr camera.
4.1 ການເປີດກ້ອງຖ່າຍຮູບ
- Connect the included power adapter to the DC12V input port on the back of the camera.
- ສຽບອະແດບເຕີໄຟໃສ່ກັບປລັກສຽບໃສ່ຝາ.
- Alternatively, if using Power over Ethernet (PoE), connect an Ethernet cable from a PoE-enabled switch or injector to the LAN port.
4.2 ການເຊື່ອມຕໍ່ເຄືອຂ່າຍ
ກ້ອງຖ່າຍຮູບຮອງຮັບທັງ Wi-Fi ແລະການເຊື່ອມຕໍ່ອີເທີເນັດແບບມີສາຍ.
Wi-Fi Setup (One-Touch or WPS)
- Ensure your router supports WPS or follow the camera's app instructions for one-touch Wi-Fi setup.
- For WPS, press the WPS button on your router, then press the WPS/RST button on the camera within 2 minutes. The LINK LED will indicate successful connection.
- For app-guided setup, download the ANNKE app (compatible with Android) and follow the on-screen instructions to connect the camera to your Wi-Fi network.
ຕັ້ງຄ່າອີເທີເນັດແບບມີສາຍ
- Connect an Ethernet cable from your router or network switch to the LAN port on the back of the camera.
- The camera will automatically obtain an IP address.
4.3 ຕິດຕັ້ງກ້ອງ
The camera is designed for ceiling mounting but can also be placed on a flat surface.
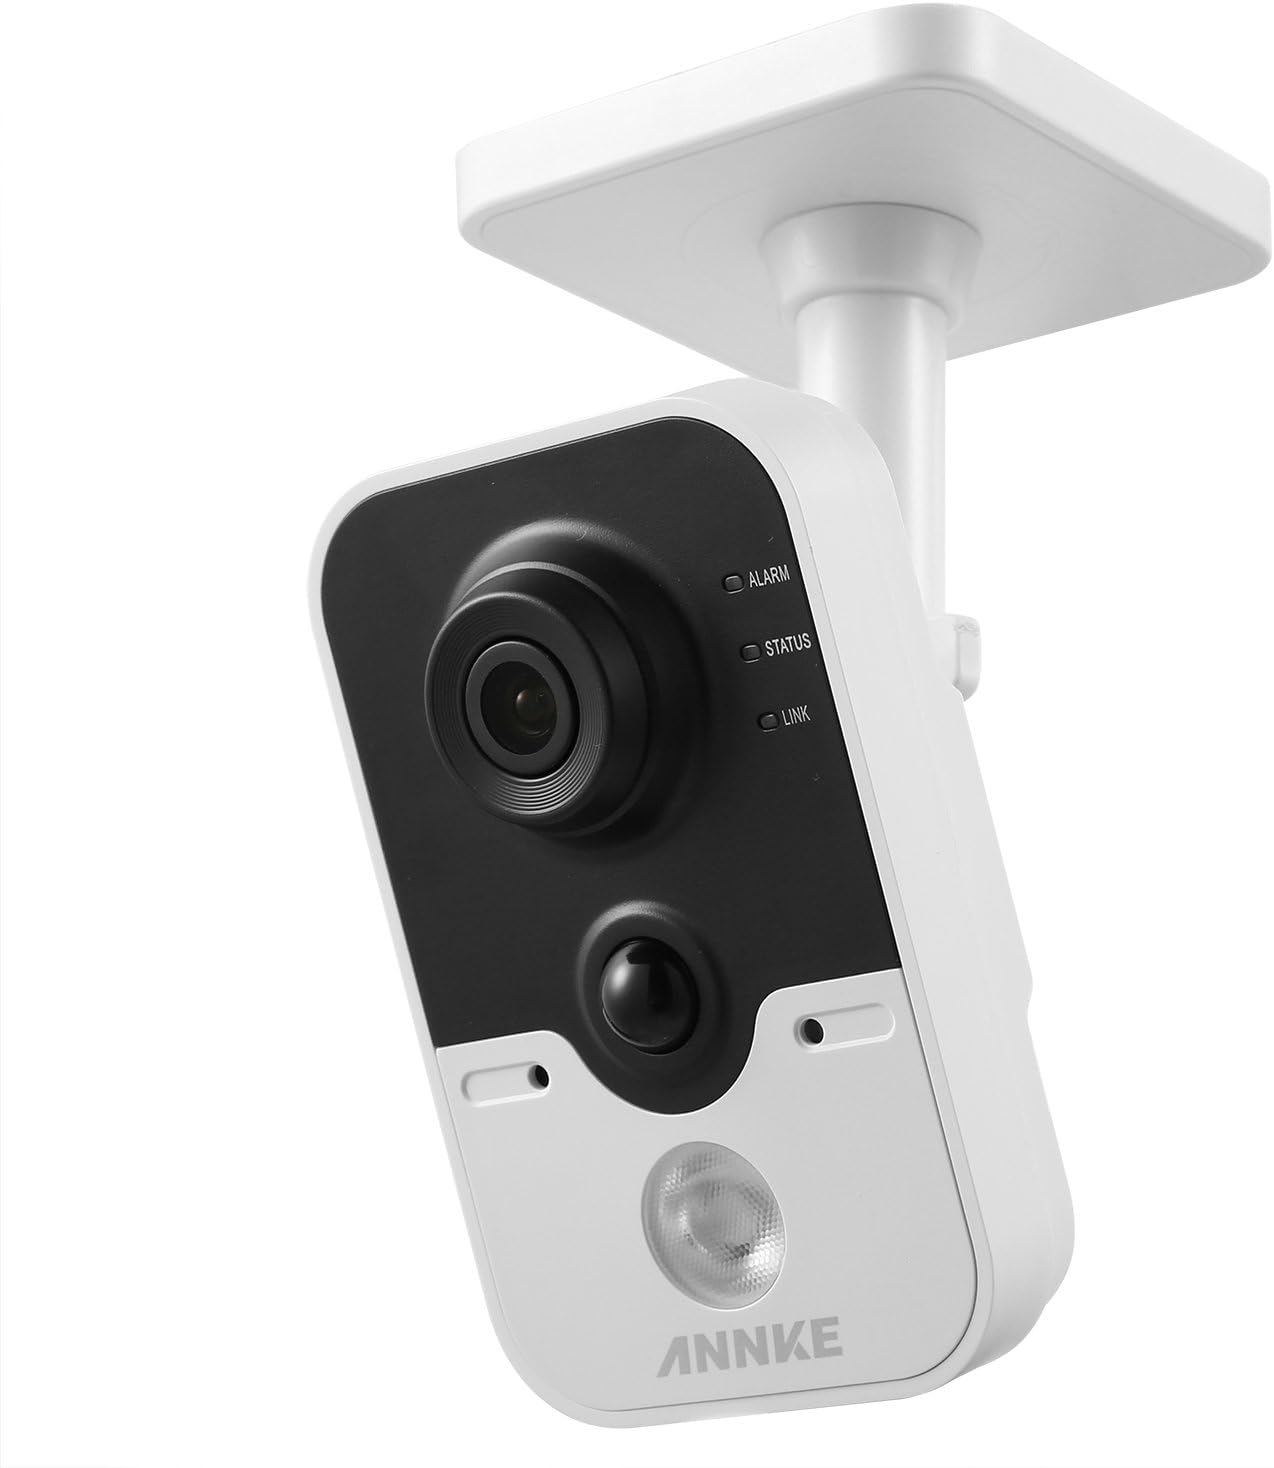
Image: The ANNKE i61dr camera shown mounted on a ceiling, demonstrating its intended installation method.
- ເລືອກສະຖານທີ່ທີ່ເໝາະສົມສຳລັບສະຖານທີ່ທີ່ດີທີ່ສຸດ viewing and network signal.
- Use the provided drill template to mark the screw holes on the mounting surface.
- Drill pilot holes and insert wall plugs if mounting on drywall or masonry.
- Secure the camera's base to the surface using the provided screws.
- ປັບມຸມກ້ອງຕາມຄວາມຕ້ອງການ.
5. ຄໍາແນະນໍາການດໍາເນີນງານ
Once set up, your ANNKE i61dr camera offers various monitoring and recording features.
5.1 ດໍາລົງຊີວິດ View ແລະ Playback
- Access the live 1080p HD video feed through the ANNKE mobile application or compatible VCA NVR system.
- Review ບັນທຶກ footage stored on the microSD card or cloud storage (if subscribed).
5.2 Motion and PIR Detection
- The camera utilizes both pixel-based motion detection and advanced PIR (Passive Infrared) detection to minimize false alarms.
- Configure detection zones and sensitivity settings within the ANNKE app.
- Receive email alerts or push notifications to your smartphone upon detection of activity.
5.3 ສຽງສອງທາງ
- Use the built-in microphone and speaker to communicate with individuals near the camera via the mobile app.
5.4 ການບີບອັດວິດີໂອ
- The camera uses H.264 video compression for efficient storage and bandwidth usage while maintaining high video quality.
5.5 ການກວດຫາການບຸກລຸກ
- Advanced intrusion detection features are available, compatible with VCA NVR systems for enhanced security monitoring.
6. ບໍາລຸງຮັກສາ
ການບໍາລຸງຮັກສາເປັນປົກກະຕິຮັບປະກັນການປະຕິບັດທີ່ດີທີ່ສຸດແລະຄວາມທົນທານຂອງກ້ອງຖ່າຍຮູບຂອງທ່ານ.
- ທໍາຄວາມສະອາດ: ເຊັດເລນກ້ອງຖ່າຍຮູບ ແລະ ຕົວກ້ອງດ້ວຍຜ້າອ່ອນໆ ແລະ ແຫ້ງຄ່ອຍໆ. ຫຼີກລ່ຽງນໍ້າຢາທຳຄວາມສະອາດທີ່ມີສີຂັດ ຫຼື ຕົວລະລາຍ.
- ການອັບເດດເຟີມແວ: Periodically check for and install firmware updates through the ANNKE app to ensure the latest features and security enhancements.
- ຄວາມໝັ້ນຄົງເຄືອຂ່າຍ: Ensure your Wi-Fi network is stable and has sufficient bandwidth for continuous video streaming.
- ການຈັດການການເກັບຮັກສາ: If using a microSD card, regularly check its status and ensure there is sufficient space for recordings. Back up important footage ຕາມຄວາມຕ້ອງການ.
7. ການແກ້ໄຂບັນຫາ
ເບິ່ງພາກນີ້ເພື່ອແກ້ໄຂບັນຫາທົ່ວໄປ.
7.1 ບໍ່ມີພະລັງງານ
- ກວດເບິ່ງການເຊື່ອມຕໍ່ພະລັງງານ: Ensure the power adapter is securely plugged into the camera and a working electrical outlet.
- ກວດສອບ PoE: If using PoE, confirm the Ethernet cable is connected to a PoE-enabled port and the PoE device is functioning.
7.2 ບໍ່ມີການເຊື່ອມຕໍ່ເຄືອຂ່າຍ
- ສັນຍານ Wi-Fi: Ensure the camera is within range of your Wi-Fi router. Relocate the camera or router if necessary.
- ຕັ້ງຄ່າ Router: Verify your router's Wi-Fi settings (SSID, password) are correct.
- ຣີເຊັດກ້ອງຖ່າຍຮູບ: Press and hold the WPS/RST button for approximately 10 seconds to reset the camera to factory defaults, then attempt setup again.
- ສາຍ Ethernet: If using a wired connection, ensure the Ethernet cable is properly connected and undamaged.
7.3 ຄຸນນະພາບວິດີໂອບໍ່ດີ
- ເລນສະອາດ: Gently clean the camera lens with a soft cloth.
- ແບນວິດເຄືອຂ່າຍ: Ensure your internet connection has sufficient upload speed for 1080p video streaming.
- ແສງ: Adjust camera placement to optimize lighting conditions.
7.4 ການກວດຈັບການເຄື່ອນໄຫວບໍ່ເຮັດວຽກ
- ການຕັ້ງຄ່າຄວາມອ່ອນໄຫວ: Adjust motion detection sensitivity in the ANNKE app.
- ເຂດກວດຫາ: Ensure detection zones are correctly configured to cover the desired areas.
- ອຸປະສັກ: ກວດເບິ່ງສິ່ງກີດຂວາງທາງກາຍະພາບທີ່ຂັດຂວາງກ້ອງຖ່າຍຮູບ view or the PIR sensor.
8. ຂໍ້ມູນຈໍາເພາະ
| ຄຸນສົມບັດ | ຂໍ້ມູນຈໍາເພາະ |
|---|---|
| ໝາຍເລກຕົວແບບ | I61DR |
| ຄວາມລະອຽດວິດີໂອ | 1080p HD |
| ການເຊື່ອມຕໍ່ | ໄຮ້ສາຍ (Wi-Fi), ມີສາຍ (Ethernet/PoE) |
| ແຫຼ່ງພະລັງງານ | DC12V Power Adapter, Power over Ethernet (PoE) |
| ກວດຈັບການເຄື່ອນໄຫວ | PIR Detection, Pixel-based Motion Detection |
| ສຽງ | ສຽງສອງທາງ |
| ການບີບອັດວິດີໂອ | H.264 |
| ການເກັບຮັກສາ | MicroSD Card Slot (card not included) |
| ປະເພດການຕິດຕັ້ງ | Ceiling Mount (also suitable for flat surfaces) |
| ຂະໜາດ (L x W x H) | 13 x 7 x 9 cm |
| ວັດສະດຸ | ພາດສະຕິກ |
9. ການຮັບປະກັນແລະການສະຫນັບສະຫນູນ
ANNKE products are designed for reliability and performance. For warranty information, technical support, or service inquiries, please refer to the official ANNKE webເວັບໄຊ ຫຼືຕິດຕໍ່ບໍລິການລູກຄ້າຂອງເຂົາເຈົ້າໂດຍກົງ. ຮັກສາໃບຮັບເງິນການຊື້ຂອງທ່ານໄວ້ເປັນຫຼັກຖານການຊື້ສໍາລັບການຮ້ອງຂໍການຮັບປະກັນ.


