1. ບົດແນະນຳ
The Muse M-192 CR is a versatile clock radio designed to provide reliable timekeeping, alarm functions, and FM radio reception. It features a large, easy-to-read digital display, dual alarms, and convenient functions such as snooze, sleep, and NAP. This manual provides detailed instructions for the proper setup, operation, and maintenance of your device.
2. ຄໍາແນະນໍາຄວາມປອດໄພ
- ອ່ານຄໍາແນະນໍາທັງຫມົດຢ່າງລະອຽດກ່ອນທີ່ຈະດໍາເນີນການອຸປະກອນ.
- Keep the device away from water or moisture.
- ຫ້າມປິດຊ່ອງລະບາຍອາກາດໃດໆ. ຮັບປະກັນພື້ນທີ່ພຽງພໍຮອບຫນ່ວຍສໍາລັບການໄຫຼຂອງອາກາດທີ່ເຫມາະສົມ.
- Use only the AC adapter supplied with the unit.
- ຫຼີກເວັ້ນການເປີດເຜີຍອຸປະກອນກັບອຸນຫະພູມທີ່ຮຸນແຮງ, ແສງແດດໂດຍກົງ, ຫຼືຄວາມຊຸ່ມຊື່ນສູງ.
- ຢ່າພະຍາຍາມຖອດປະກອບຫຼືດັດແປງຫນ່ວຍງານ. ອ້າງອີງການບໍລິການທັງໝົດໃຫ້ກັບບຸກຄະລາກອນທີ່ມີຄຸນວຸດທິ.
3. ເນື້ອໃນຊຸດ
ກະລຸນາກວດເບິ່ງຊຸດສຳລັບລາຍການຕໍ່ໄປນີ້:
- 1 x Muse M-192 CR Clock Radio
- 1 x AC ອະແດບເຕີ
- 1 x ຄູ່ມືແນະນຳ (ເອກະສານນີ້)
4. ຜະລິດຕະພັນເກີນview
Familiarize yourself with the various parts and controls of your Muse M-192 CR Clock Radio.

ຮູບທີ 1: ດ້ານໜ້າເປັນມຸມ view of the Muse M-192 CR Clock Radio, showcasing ຈໍສະແດງຜົນດິຈິຕອນຂະຫນາດໃຫຍ່ແລະປຸ່ມຄວບຄຸມຂອງມັນ.
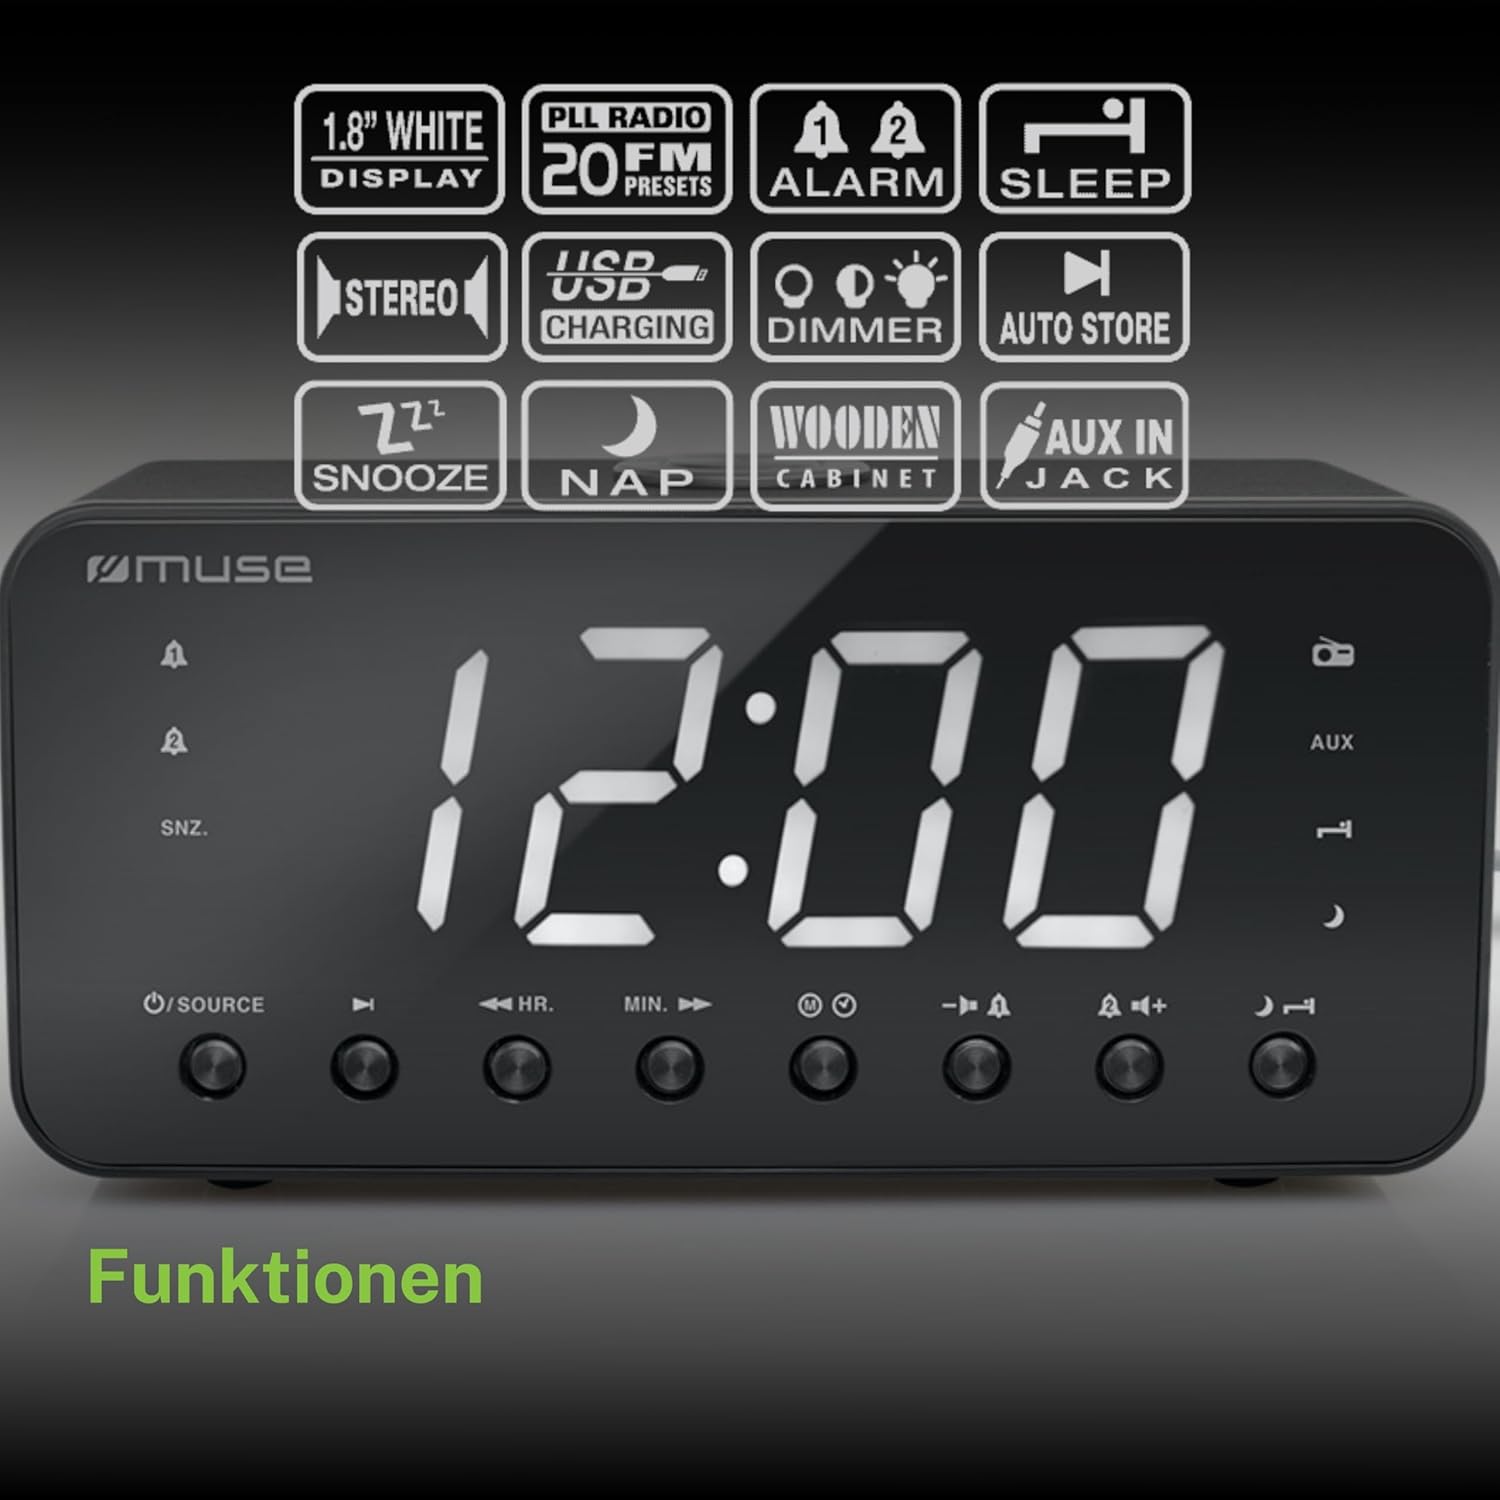
Figure 2: Diagram illustrating the key features and control buttons on the Muse M-192 CR Clock Radio, including the 1.8-inch white display, PLL FM radio with 20 presets, dual alarms, sleep, snooze, NAP functions, USB charging, dimmer, auto store, and AUX input jack.
ແຜງຄວບຄຸມດ້ານໜ້າ:
- ຈໍສະແດງຜົນ: Large 1.8-inch white LED display for time and status.
- ປຸ່ມແຫຼ່ງທີ່ມາ: Selects between FM radio and AUX input.
- ປຸ່ມ HR (ຊົ່ວໂມງ): Adjusts hour for time and alarm settings.
- MIN (ນາທີ) ປຸ່ມ: Adjusts minute for time and alarm settings.
- ALARM 1 Button: Sets and activates/deactivates Alarm 1.
- ALARM 2 Button: Sets and activates/deactivates Alarm 2.
- ປຸ່ມ SNOOZE/DIMMER: Activates snooze during an alarm; adjusts display brightness (High/Low/Off) when not alarming.
- ປຸ່ມນອນ: Sets the sleep timer for radio playback.
- NAP Button: Sets a short nap alarm.
- ປຸ່ມປຸ່ມ Volume Up / Down: ປັບລະດັບສຽງ.
ການເຊື່ອມຕໍ່ແຜງດ້ານຫຼັງ:
- AUX ໃນ Jack: ເຊື່ອມຕໍ່ອຸປະກອນສຽງພາຍນອກ.
- ພອດສາກໄຟ USB: Provides power to charge compatible devices.
- DC ໃນ Jack: Connects the AC adapter for power.
- ຊ່ອງໃສ່ຫມໍ້ໄຟ: Holds backup batteries.
5. ຕັ້ງຄ່າ
5.1 ການເຊື່ອມຕໍ່ພະລັງງານ
- Insert the small plug of the supplied AC adapter into the DC IN jack on the rear of the clock radio.
- ສຽບອະແດບເຕີ AC ເຂົ້າກັບປລັກສຽບຝາມາດຕະຖານ. ໜ້າຈໍຈະສະຫວ່າງຂຶ້ນ.
5.2 ການຕິດຕັ້ງແບັດສຳຮອງ
The clock radio requires 2 x 1.5V AAA batteries (not included) for backup power. These batteries maintain the time and alarm settings during a power outage.
- ເປີດຝາປິດຊ່ອງໃສ່ໝໍ້ໄຟຢູ່ດ້ານລຸ່ມຂອງໜ່ວຍ.
- ໃສ່ໝໍ້ໄຟ AAA ສອງໜ່ວຍ, ສັງເກດການຂົ້ວທີ່ຖືກຕ້ອງ (+ ແລະ -) ຕາມທີ່ລະບຸໄວ້ພາຍໃນຊ່ອງ.
- ປິດຝາປິດຊ່ອງໃສ່ຫມໍ້ໄຟຢ່າງປອດໄພ.
Note: Battery backup only preserves settings; the display will not illuminate and alarms will not sound during a power outage if only running on battery backup.
6. ຄໍາແນະນໍາການດໍາເນີນງານ
6.1 ການ ກຳ ນົດເວລາ
- In standby mode (when the radio is off), press and hold the ເວລາ ກຳ ນົດ button (if available, otherwise use HR/MIN directly or a dedicated time set button not explicitly listed but implied by HR/MIN). If no dedicated button, proceed to step 2.
- ກົດ HR ປຸ່ມເພື່ອປັບຊົ່ວໂມງ.
- ກົດ ນາທີ ປຸ່ມເພື່ອປັບນາທີ.
- Release the buttons to confirm the time. The time will automatically set after a few seconds of inactivity.
6.2 ການຕັ້ງຄ່າໂມງປຸກ (ປຸກ 1 ແລະປຸກ 2)
The Muse M-192 CR features two independent alarms.
- ກົດຄ້າງໄວ້ ໂມງປຸກ 1 ຈົນກວ່າເວລາປຸກຈະກະພິບຢູ່ເທິງໜ້າຈໍ.
- ໃຊ້ HR ແລະ ນາທີ ປຸ່ມເພື່ອຕັ້ງເວລາປຸກທີ່ຕ້ອງການ.
- ກົດ ໂມງປຸກ 1 ກົດປຸ່ມອີກຄັ້ງເພື່ອເລືອກແຫຼ່ງສັນຍານເຕືອນ: Buzzer or ວິທະຍຸ.
- ກົດ ໂມງປຸກ 1 button a third time to confirm and activate Alarm 1. An alarm icon will appear on the display.
- Repeat the process for ໂມງປຸກ 2 ການນໍາໃຊ້ ໂມງປຸກ 2 ປຸ່ມ.
ເພື່ອປິດການປຸກ, ໃຫ້ກົດທີ່ສອດຄ້ອງກັນ ປຸກ button until its icon disappears from the display.
6.3 Snooze ຟັງຊັນ
ເມື່ອມີສຽງປຸກ, ກົດປຸ່ມ SNOOZE / DIMMER ປຸ່ມເພື່ອປິດສຽງໂມງປຸກຊົ່ວຄາວ. ສັນຍານເຕືອນຈະດັງອີກຄັ້ງຫຼັງຈາກປະມານ 9 ນາທີ.
6.4 ຟັງຊັນນອນ
The sleep function allows you to fall asleep to the radio, which will automatically turn off after a set period.
- ໃນຂະນະທີ່ວິທະຍຸກຳລັງຫຼິ້ນຢູ່, ກົດປຸ່ມ ນອນ ກົດປຸ່ມຊ້ຳໆເພື່ອໝຸນວຽນເວລານອນທີ່ມີຢູ່ (ເຊັ່ນ: 90, 60, 30, 15 ນາທີ, ຫຼື ປິດ).
- ວິທະຍຸຈະຫຼິ້ນເປັນໄລຍະເວລາທີ່ເລືອກ ແລະຈາກນັ້ນປິດອັດຕະໂນມັດ.
6.5 NAP Function
The NAP function sets a short alarm for a specified duration.
- ກົດ NAP button repeatedly to select a nap duration (e.g., 10, 20, 30, 60, 90, 120 minutes, or OFF).
- The alarm will sound after the selected duration.
6.6 ການດຳເນີນງານວິທະຍຸ (FM)
- ກົດ ແຫຼ່ງຂໍ້ມູນ ປຸ່ມເພື່ອເລືອກໂໝດວິທະຍຸ FM.
- ກົດຄ້າງໄວ້ HR or ນາທີ button to automatically scan for the next available station. Briefly press to manually tune.
- ປັບລະດັບສຽງໂດຍໃຊ້ ປະລິມານຂຶ້ນ/ລົງ ປຸ່ມ.
ການຕັ້ງຄ່າ Presets ວິທະຍຸ:
The unit supports up to 20 FM radio presets.
- Tune to your desired FM station.
- ກົດຄ້າງໄວ້ ຕັ້ງໄວ້ລ່ວງໜ້າ button (often combined with a number or memory button, if not explicitly labeled, refer to the full manual for specific button). If no dedicated PRESET button, the HR/MIN buttons might serve this function in radio mode.
- ໃຊ້ HR or ນາທີ ປຸ່ມເພື່ອເລືອກຕົວເລກທີ່ກໍານົດໄວ້ກ່ອນ (P01-P20).
- ກົດ ຕັ້ງໄວ້ລ່ວງໜ້າ ກົດປຸ່ມອີກຄັ້ງເພື່ອບັນທຶກສະຖານີ.
- To recall a preset, briefly press the ຕັ້ງໄວ້ລ່ວງໜ້າ ປຸ່ມແລະຫຼັງຈາກນັ້ນນໍາໃຊ້ HR or ນາທີ ເພື່ອຄັດເລືອກເອົາຕົວເລກ preset ທີ່ຕ້ອງການ.
6.7 AUX Input
Connect an external audio device (e.g., MP3 player, smartphone) to the AUX IN jack on the rear of the unit using a 3.5mm audio cable (not included).
- Connect one end of the audio cable to your external device's headphone jack.
- Connect the other end to the AUX IN jack on the clock radio.
- ກົດ ແຫຼ່ງຂໍ້ມູນ button to select AUX mode. The display will show "AUX".
- Play audio from your external device. Adjust volume using the clock radio's ປະລິມານຂຶ້ນ/ລົງ buttons and your external device's volume control.
6.8 ການສາກ USB
The USB port on the rear of the unit can be used to charge compatible devices.

Figure 3: The Muse M-192 CR Clock Radio highlighting its jumbo white display and the USB charging port located on the rear of the unit.
- Connect your device's USB charging cable to the USB charging port on the clock radio.
- ໃຫ້ແນ່ໃຈວ່າວິທະຍຸໂມງເປີດຢູ່.
- ອຸປະກອນຂອງທ່ານຄວນຈະເລີ່ມສາກໄຟ.
Note: The USB port is for charging only and does not support data transfer or audio playback.
6.9 ຈໍສະແດງຜົນ Dimmer
Adjust the brightness of the display to suit your preference.
- ໃນໂຫມດສະແຕນບາຍ, ກົດປຸ່ມ SNOOZE / DIMMER ປຸ່ມຊ້ຳໆ.
- Cycle through the brightness levels: High, Low, and Off.
7. ບໍາລຸງຮັກສາ
- ທໍາຄວາມສະອາດ: ເຊັດເຄື່ອງດ້ວຍຜ້າອ່ອນ, ແຫ້ງ. ຢ່າໃຊ້ເຄື່ອງເຮັດຄວາມສະອາດຂັດ, ຂີ້ເຜີ້ງ, ຫຼືສານລະລາຍ.
- ການລະບາຍອາກາດ: ຮັກສາຊ່ອງລະບາຍອາກາດໃຫ້ສະອາດຂອງຂີ້ຝຸ່ນແລະສິ່ງເສດເຫຼືອ.
- ການເກັບຮັກສາ: ຖ້າເກັບຮັກສາເຄື່ອງໄວ້ເປັນເວລາດົນ, ໃຫ້ຖອດມັນອອກຈາກປລັກສຽບໄຟ ແລະຖອດແບັດສຳຮອງອອກ.
8. ການແກ້ໄຂບັນຫາ
| ບັນຫາ | ສາເຫດທີ່ເປັນໄປໄດ້ | ການແກ້ໄຂ |
|---|---|---|
| ບໍ່ມີໄຟ / ຈໍສະແດງຜົນປິດ | ອະແດບເຕີ AC ບໍ່ເຊື່ອມຕໍ່ ຫຼື ຂັດຂ້ອງ. | ໃຫ້ແນ່ໃຈວ່າອະແດບເຕີ AC ໄດ້ສຽບເຂົ້າກັບເຄື່ອງຢ່າງແໜ້ນໜາ ແລະ ປລັກສຽບຝາທີ່ໃຊ້ງານໄດ້. |
| ໂມງປຸກບໍ່ມີສຽງ | ປຸກບໍ່ໄດ້ເປີດໃຊ້ງານ ຫຼືຕັ້ງບໍ່ຖືກຕ້ອງ. | Verify alarm time and source are set correctly and the alarm icon is visible on the display. |
| ການຮັບວິທະຍຸ FM ບໍ່ດີ | ເສົາອາກາດບໍ່ໄດ້ຂະຫຍາຍ ຫຼື ລົບກວນ. | Extend the FM wire antenna fully. Reposition the unit to improve reception. |
| Display too bright/dim | Dimmer setting needs adjustment. | ກົດ SNOOZE / DIMMER ເພື່ອໝຸນວຽນລະດັບຄວາມສະຫວ່າງ. |
9. ຂໍ້ມູນຈໍາເພາະ

Figure 4: Technical drawing illustrating the dimensions of the Muse M-192 CR Clock Radio (226mm length, 86mm width, 108mm height).
- ຕົວແບບ: M-192 CR
- ຈໍສະແດງຜົນ: 1.8-inch White Digital LED
- ວິທະຍຸ: FM PLL Radio with 20 Presets
- ຟັງຊັນປຸກ: Dual Alarm, Snooze, Sleep, NAP
- ທີ່ມາ: Radio or Buzzer
- ການເຊື່ອມຕໍ່: AUX-in, USB Charging Port
- ພະລັງງານ: AC Power (Adapter Included), Battery Backup (2 x 1.5V AAA batteries, not included)
- ພະລັງງານອອກ: 2 ວັດ
- ຂະໜາດ (L x W x H): 22.6 x 8.6 x 10.8 cm
- ນ້ຳໜັກ: 800 g
10. ການຮັບປະກັນແລະການສະຫນັບສະຫນູນ
For detailed warranty information and technical support, please refer to the documentation provided with your purchase or contact your retailer. Keep your proof of purchase for any warranty claims.


