1. ບົດແນະນຳ
This manual provides detailed instructions for the safe and effective operation of the Mastech MS8260A Digital Multimeter. The MS8260A is a versatile instrument designed for various electrical measurements, including AC/DC voltage, AC/DC current, resistance, diode check, continuity test, and transistor check. It also features a non-contact voltage ການທໍາງານຂອງການກວດສອບ.
Key features of the MS8260A include:
- ບໍ່ມີການຕິດຕໍ່ voltage ການຊອກຄົ້ນຫາ
- Automatic power-off function to conserve battery life
- ຕົວຊີ້ບອກແບັດເຕີຣີຕໍ່າ
2. ຂໍ້ມູນຄວາມປອດໄພ
ເພື່ອຮັບປະກັນການໃຊ້ງານ ແລະ ການບໍລິການທີ່ປອດໄພຂອງມິເຕີ, ກະລຸນາອ່ານຄໍາແນະນໍາທັງໝົດຢ່າງລະອຽດກ່ອນການນໍາໃຊ້. ການບໍ່ປະຕິບັດຕາມຄໍາເຕືອນດ້ານຄວາມປອດໄພອາດເຮັດໃຫ້ເກີດໄຟຟ້າຊັອດ, ໄຟໄໝ້ ຫຼື ຄວາມເສຍຫາຍຕໍ່ມິເຕີ.
- ຖອດສາຍທົດສອບອອກຈາກວົງຈອນສະເໝີກ່ອນທີ່ຈະປ່ຽນໜ້າທີ່.
- ຫ້າມໃຊ້ຫຼາຍກ່ວາ voltage, ຕາມທີ່ໝາຍໄວ້ເທິງເຄື່ອງວັດແທກ, ລະຫວ່າງ terminals ຫຼືລະຫວ່າງ terminal ແລະແຜ່ນດິນໂລກ.
- ໃຊ້ຄວາມລະມັດລະວັງໃນເວລາທີ່ເຮັດວຽກກັບ voltages ຂ້າງເທິງ 30V AC RMS, ສູງສຸດ 42V, ຫຼື 60V DC. vol ເຫຼົ່ານີ້tages ເຮັດໃຫ້ເກີດອັນຕະລາຍຊ໊ອກ.
- Before measuring current, ensure the meter's fuses are intact and the test leads are connected correctly.
- ໃຫ້ປ່ຽນແບັດເຕີຣີທັນທີເມື່ອໄຟສະແດງແບັດເຕີຣີຕໍ່າປະກົດຂຶ້ນເພື່ອຮັບປະກັນການອ່ານທີ່ຖືກຕ້ອງ.
- ຢ່າໃຊ້ມິເຕີຖ້າມັນເບິ່ງຄືວ່າເສຍຫາຍ ຫຼື ຖ້າກ່ອງເປີດຢູ່.
- ປະຕິບັດຕາມລະຫັດຄວາມປອດໄພທ້ອງຖິ່ນ ແລະແຫ່ງຊາດ.
3. ອົງປະກອບຂອງຜະລິດຕະພັນ
The Mastech MS8260A Digital Multimeter consists of the main unit and essential accessories.
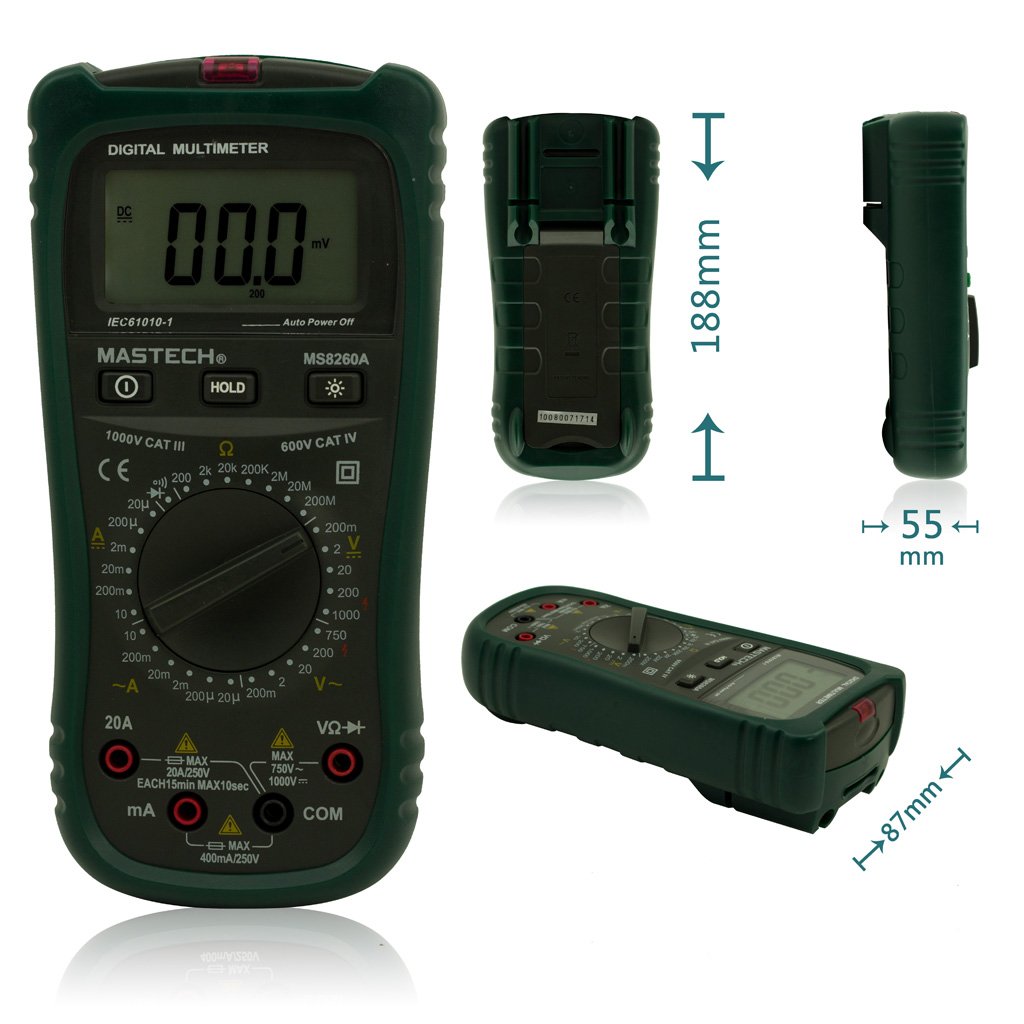
ຮູບ 1: ດ້ານຫນ້າ View of Mastech MS8260A Digital Multimeter with Dimensions
This image displays the Mastech MS8260A Digital Multimeter from the front, highlighting its LCD screen, rotary function switch, and input terminals. Key dimensions are indicated: 188mm height, 87mm depth, and 55mm width. The display shows '00.0 mV' and 'Auto Power Off' text. The rotary switch is set to 'mV' range. The input jacks are labeled 'VΩHz', 'mA', and 'COM'.
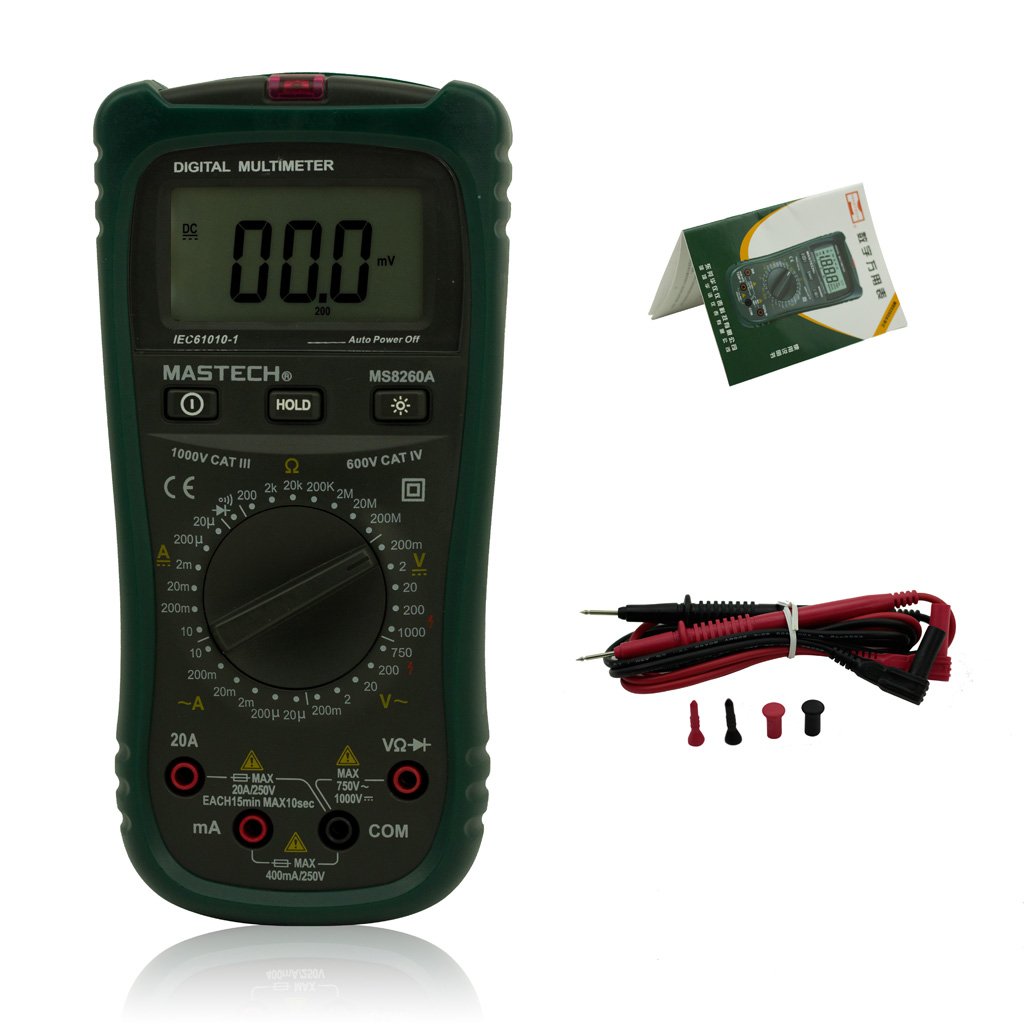
Figure 2: Mastech MS8260A Digital Multimeter and Accessories
This image shows the Mastech MS8260A Digital Multimeter accompanied by its standard accessories. These include a pair of red and black test leads with protective caps, and a printed user manual. The multimeter itself is shown from the front, similar to the main product view.
3.1 ຄຸນສົມບັດຫຼັກຂອງຫົວໜ່ວຍ
- ຈໍ LCD: ສະແດງໃຫ້ເຫັນການອ່ານການວັດແທກ, ຫນ່ວຍງານ, ແລະຕົວຊີ້ວັດການເຮັດວຽກ.
- ສະວິດ Rotary: ເລືອກຟັງຊັນການວັດແທກທີ່ຕ້ອງການ ແລະໄລຍະ.
- Input Jacks: Terminals for connecting test leads (VΩHz, mA, COM).
- ປຸ່ມຖື: ຢຸດການອ່ານໜ້າຈໍປັດຈຸບັນ.
- ປຸ່ມ Backlight: Activates the display backlight for improved visibility in low light.
- Vol-Non-Contacttage (NCV) Sensor: ກວດພົບ AC voltage ໂດຍບໍ່ມີການຕິດຕໍ່ໂດຍກົງ.
3.2 ອຸປະກອນເສີມ
- ການທົດສອບນໍາພາ (ສີແດງແລະສີດໍາ)
- ຄູ່ມືຜູ້ໃຊ້
4. ການຕິດຕັ້ງເບື້ອງຕົ້ນ
4.1 ການຕິດຕັ້ງຫມໍ້ໄຟ
The Mastech MS8260A Digital Multimeter requires one 9V 6F22 battery for operation. Batteries are not included with the product.
- Ensure the multimeter is turned off and disconnect any test leads.
- ຊອກຫາຝາປິດຊ່ອງໃສ່ຫມໍ້ໄຟຢູ່ດ້ານຫຼັງຂອງໜ່ວຍ.
- ໃຊ້ໄຂຄວງເພື່ອຖອດສະກູທີ່ຍຶດຝາປິດແບັດເຕີຣີອອກ.
- ເອົາຝາປິດອອກຢ່າງລະມັດລະວັງ.
- Connect a new 9V 6F22 battery to the battery clips, observing correct polarity.
- ວາງຫມໍ້ໄຟເຂົ້າໄປໃນຊ່ອງ.
- ປ່ຽນຝາປິດຊ່ອງໃສ່ໝໍ້ໄຟ ແລະຍຶດມັນດ້ວຍສະກູ.
5. ຄໍາແນະນໍາການດໍາເນີນງານ
Before taking any measurements, ensure the test leads are properly connected to the meter and the circuit under test.
5.1 ການເຊື່ອມຕໍ່ຜູ້ນໍາການທົດສອບ
- ສະເຫມີເຊື່ອມຕໍ່ ສີດໍາ test lead to the COM (ທົ່ວໄປ) ຊ່ອງສຽບອິນພຸດ.
- ສໍາລັບ voltage, resistance, diode, continuity, and transistor measurements, connect the ສີແດງ test lead to the VΩHz jack ປ້ອນຂໍ້ມູນ.
- For current measurements (mA or 20A), connect the ສີແດງ test lead to the appropriate current input jack (mA or 20A).
5.2 ການເລືອກຟັງຊັນ
Turn the rotary switch to the desired measurement function and range. The meter will display the reading on the LCD.
5.2.1 DC Voltagການວັດແທກ e (V–)
- ຕັ້ງສະວິດ rotary ເປັນ DC Vol ທີ່ຕ້ອງການtagຊ່ວງ e (ຕົວຢ່າງ, 200mV, 2V, 20V, 200V, 1000V).
- ເຊື່ອມຕໍ່ສາຍທົດສອບຂະໜານກັບວົງຈອນ ຫຼື ອົງປະກອບທີ່ຈະວັດແທກ.
- ອ່ານ voltage ມູນຄ່າໃນການສະແດງຜົນ.
5.2.2 AC Voltagການວັດແທກ e (V∼)
- ຕັ້ງຄ່າສະຫຼັບ rotary ກັບ AC Vol ທີ່ຕ້ອງການtage range (e.g., 2V, 20V, 200V, 750V).
- ເຊື່ອມຕໍ່ສາຍທົດສອບຂະໜານກັບແຮງດັນ ACtage ແຫຼ່ງ.
- ອ່ານ voltage ມູນຄ່າໃນການສະແດງຜົນ.
5.2.3 ການວັດແທກກະແສໄຟຟ້າ DC (A–)
- Set the rotary switch to the desired DC Current range (e.g., 20µA, 200µA, 2mA, 20mA, 200mA, 20A).
- ສຳຄັນ: Disconnect power to the circuit. Break the circuit and connect the meter in series with the load.
- ໃຊ້ພະລັງງານກັບວົງຈອນ.
- ອ່ານຄ່າປັດຈຸບັນຢູ່ໜ້າຈໍ.
5.2.4 AC Current Measurement (A∼)
- Set the rotary switch to the desired AC Current range (e.g., 20µA, 200µA, 2mA, 20mA, 200mA, 20A).
- ສຳຄັນ: Disconnect power to the circuit. Break the circuit and connect the meter in series with the load.
- ໃຊ້ພະລັງງານກັບວົງຈອນ.
- ອ່ານຄ່າປັດຈຸບັນຢູ່ໜ້າຈໍ.
5.2.5 ການວັດແທກຄວາມຕ້ານທານ (Ω)
- ຕັ້ງຄ່າສະຫຼັບ rotary ກັບລະດັບຄວາມຕ້ານທານທີ່ຕ້ອງການ (ເຊັ່ນ: 200Ω, 2kΩ, 20kΩ, 200kΩ, 2MΩ, 20MΩ).
- ໃຫ້ແນ່ໃຈວ່າວົງຈອນຖືກຕັດພະລັງງານກ່ອນທີ່ຈະວັດແທກຄວາມຕ້ານທານ.
- ເຊື່ອມຕໍ່ຕົວນໍາການທົດສອບໃນທົ່ວອົງປະກອບທີ່ຈະວັດແທກ.
- ອ່ານຄ່າການຕໍ່ຕ້ານໃນຈໍສະແດງຜົນ.
5.2.6 Diode Test (→|)
- Set the rotary switch to the Diode Test position.
- ເຊື່ອມຕໍ່ນໍາການທົດສອບສີແດງກັບ anode ແລະການທົດສອບສີດໍານໍາໄປສູ່ cathode ຂອງ diode ໄດ້.
- ຈໍສະແດງຜົນຈະສະແດງລະດັບສຽງໄປໜ້າtagປ່ອຍ e. ປີ້ນສາຍໄຟກັບຄືນ; ຈໍສະແດງຜົນຄວນສະແດງ 'OL' (Open Loop) ສຳລັບໄດໂອດທີ່ດີ.
5.2.7 ການທົດສອບຄວາມຕໍ່ເນື່ອງ (♫)
- Set the rotary switch to the Continuity Test position.
- ເຊື່ອມຕໍ່ຕົວນໍາການທົດສອບໃນທົ່ວວົງຈອນຫຼືອົງປະກອບ.
- ຖ້າຄວາມຕ້ານທານຕໍ່າກວ່າປະມານ 50Ω, ສຽງກະດິ່ງຈະດັງຂຶ້ນ, ຊີ້ບອກເຖິງຄວາມຕໍ່ເນື່ອງ.
5.2.8 Transistor Test (hFE)
- ຕັ້ງສະວິດ rotary ກັບຕໍາແຫນ່ງ hFE.
- Insert the transistor's emitter, base, and collector leads into the appropriate sockets on the meter's hFE test socket.
- The display will show the hFE value (DC current gain).
5.2.9 ບໍ່ຕິດຕໍ່ Voltage (NCV) ການກວດຫາ
- ຕັ້ງສະວິດ rotary ກັບຕໍາແຫນ່ງ NCV.
- Move the top front part of the meter (where the NCV sensor is located) close to the conductor suspected of having AC voltage.
- ຖ້າ AC voltage greater than 110V is detected, the meter will emit an audible beep and the NCV indicator light will illuminate.
6. ບໍາລຸງຮັກສາ
6.1 ການທໍາຄວາມສະອາດ
ເຊັດກໍລະນີທີ່ມີໂຄສະນາamp ຜ້າແລະຢາຊັກຜ້າອ່ອນໆ. ຢ່າໃຊ້ສານຂັດຫຼືສານລະລາຍ. ໃຫ້ແນ່ໃຈວ່າເຄື່ອງວັດແທກແຫ້ງຫມົດກ່ອນການນໍາໃຊ້.
6.2 ການທົດແທນຫມໍ້ໄຟ
When the low battery indicator appears on the display, replace the 9V 6F22 battery as described in Section 4.1. Prompt battery replacement ensures accurate measurements and proper meter function.
6.3 ການທົດແທນຟິວ
If the meter fails to measure current, the fuse may be blown. Refer to the specifications for the correct fuse type and rating. Fuse replacement should only be performed by qualified personnel.
7. ການແກ້ໄຂບັນຫາ
- ບໍ່ມີການສະແດງໃຫ້ເຫັນຫຼືແຈ້ງການ: ກວດເບິ່ງການຕິດຕັ້ງຫມໍ້ໄຟແລະປ່ຽນແທນຖ້າຈໍາເປັນ.
- ການອ່ານບໍ່ຖືກຕ້ອງ: ໃຫ້ແນ່ໃຈວ່າສາຍທົດສອບໄດ້ເຊື່ອມຕໍ່ຢ່າງຖືກຕ້ອງ, ເລືອກໜ້າທີ່/ຂອບເຂດທີ່ຖືກຕ້ອງ, ແລະ ແບັດເຕີຣີບໍ່ຕໍ່າ.
- ບໍ່ມີການວັດແທກກະແສໄຟຟ້າ: Check the fuse. Ensure the meter is connected in series with the circuit.
- 'OL' (ໂອເວີໂຫຼດ) ສະແດງ: ຄ່າທີ່ວັດແທກໄດ້ເກີນຂອບເຂດທີ່ເລືອກໄວ້. ເລືອກຂອບເຂດທີ່ສູງກວ່າ.
8. ຂໍ້ມູນຈໍາເພາະ
| ຂໍ້ມູນຈໍາເພາະ | ມູນຄ່າ |
|---|---|
| ຍີ່ຫໍ້ | mastech |
| ໝາຍເລກຕົວແບບ | MS8260A |
| ປະເພດການວັດແທກ | Digital Multimeter |
| ແຫຼ່ງພະລັງງານ | ແບັດເຕີຣີ 9V 6F22 |
| ນ້ໍາຫນັກລາຍການ | 454 g |
| ການຢັ້ງຢືນ | CE |
| ແບດເຕີລີ່ລວມ | ບໍ່ |
9. ຂໍ້ມູນການຮັບປະກັນ
Please refer to the warranty card included with your product or contact Mastech customer support for detailed warranty terms and conditions. Warranty coverage typically applies to defects in materials and workmanship under normal use.
10. ການຊ່ວຍເຫຼືອລູກຄ້າ
For technical assistance, troubleshooting, or service inquiries, please contact Mastech customer support. Refer to the official Mastech webສະຖານທີ່ຫຼືການຫຸ້ມຫໍ່ຜະລິດຕະພັນສໍາລັບຂໍ້ມູນຕິດຕໍ່ໃນປະຈຸບັນຫຼາຍທີ່ສຸດ.
ທ່ານສາມາດໄປຢ້ຽມຢາມໄດ້ Mastech Store on Amazon ສໍາລັບຂໍ້ມູນເພີ່ມເຕີມຜະລິດຕະພັນ.