1. ບົດແນະນຳ
This manual provides comprehensive instructions for the safe and effective use of the PeakTech True RMS P 3131 Clamp Meter with Multimeter. This device is designed for measuring AC/DC currents without circuit interruption, as well as AC/DC voltage and resistance, with continuity testing capabilities. It features a 3 3/4 digit LCD display with True RMS measurement for accurate readings.
ກະລຸນາອ່ານຄູ່ມືນີ້ຢ່າງລະອຽດກ່ອນທີ່ຈະປະຕິບັດອຸປະກອນແລະເກັບຮັກສາມັນສໍາລັບການອ້າງອີງໃນອະນາຄົດ.
2. ຂໍ້ມູນຄວາມປອດໄພ
WARNING: Improper use of this meter can cause damage, shock, injury, or death. Always follow all safety precautions.
- ປະຕິບັດຕາມລະຫັດຄວາມປອດໄພໃນທ້ອງຖິ່ນ ແລະລະດັບຊາດສະເໝີ.
- Do not use the meter if it appears damaged or if the insulation on test leads is compromised.
- ໃຫ້ແນ່ໃຈວ່າມິເຕີຖືກຕັ້ງໃຫ້ມີໜ້າທີ່ ແລະ ລະດັບທີ່ຖືກຕ້ອງກ່ອນທີ່ຈະວັດແທກ.
- ຫຼີກລ່ຽງການສຳຜັດກັບວົງຈອນໄຟຟ້າ. ໃຊ້ອຸປະກອນປ້ອງກັນສ່ວນຕົວ (PPE) ທີ່ເໝາະສົມ.
- The device is rated for CAT II 600V. Do not exceed these limits.
- ປ່ຽນແບັດເຕີລີທັນທີເມື່ອຕົວຊີ້ບອກແບັດເຕີຣີຕໍ່າປະກົດຂຶ້ນ.
- Do not operate the meter in explosive atmospheres.
3. ຜະລິດຕະພັນເກີນview ແລະອົງປະກອບ
The PeakTech P 3131 is a robust and reliable clamp meter. Familiarize yourself with its main components:

ຮູບ 1: ດ້ານຫນ້າ view of the PeakTech P 3131 Clamp Meter, showing the clamp jaw, function selector, LCD display, and input terminals.
- Clamp ຄາງກະໄຕ: For non-contact AC/DC current measurement.
- Function Selector Dial: To select measurement modes (A~, A=, V~, V=, Ω/Continuity, OFF).
- ຈໍ LCD: ສະແດງການອ່ານຄ່າການວັດແທກ, ຫົວໜ່ວຍ ແລະ ຕົວຊີ້ວັດຕ່າງໆ.
- ປຸ່ມ: AC/DC, ZERO, H/MAX (Data Hold/Max Hold).
- ຂົ້ວຂາເຂົ້າ: COM (common) and VΩ (voltage/resistance) for test leads.
- Hand Guard: Provides protection against accidental contact.
4. ຕັ້ງຄ່າ
4.1 ການຕິດຕັ້ງຫມໍ້ໄຟ
The PeakTech P 3131 requires two 1.5V AAA batteries (included). To install or replace batteries:
- ໃຫ້ແນ່ໃຈວ່າອຸປະກອນຖືກປິດ.
- ຊອກຫາຝາປິດຊ່ອງໃສ່ຫມໍ້ໄຟຢູ່ດ້ານຫຼັງຂອງເຄື່ອງວັດແທກ.
- ໃຊ້ screwdriver ເພື່ອເປີດຊ່ອງໄດ້.
- Insert the two AAA batteries, observing correct polarity (+ and -).
- ປ່ຽນຝາປິດຊ່ອງໃສ່ໝໍ້ໄຟ ແລະຍຶດມັນດ້ວຍສະກູ.
When the low battery indicator appears on the display, replace the batteries immediately to ensure accurate measurements.
4.2 ການເຊື່ອມຕໍ່ຜູ້ນໍາການທົດສອບ
ສໍາລັບ voltage, resistance, and continuity measurements, connect the supplied test leads:
- ໃສ່ຫົວການທົດສອບສີດໍາເຂົ້າໄປໃນ COM (common) input terminal.
- ໃສ່ຫົວການທົດສອບສີແດງເຂົ້າໄປໃນ VΩ ສະຖານີປ້ອນຂໍ້ມູນ.

Figure 2: PeakTech P 3131 Clamp Meter shown with its carrying case, test leads, batteries, and user manual.
5. ຄໍາແນະນໍາການດໍາເນີນງານ
5.1 ເປີດ/ປິດ
Rotate the function selector dial from the "OFF" position to any desired measurement function to power on the meter. To power off, rotate the dial back to "OFF". The meter features an automatic power-off function (can be deactivated) to conserve battery life.
5.2 ການວັດແທກກະແສໄຟຟ້າ AC/DC (Clamp)
To measure current without breaking the circuit:
- ຫັນໜ້າປັດຕົວເລືອກຟັງຊັນໄປທີ່ປຸ່ມ A~ (ກະແສໄຟຟ້າ AC) ຫຼື A= ຕຳແໜ່ງ (ກະແສໄຟຟ້າ DC).
- ກົດ AC/DC button if you need to switch between AC and DC current modes (if the dial position combines them).
- ກົດ ZERO button to zero the display before measuring DC current, especially for small currents, to compensate for residual magnetism.
- ເປີດ clamp ຄາງກະໄຕໂດຍການກົດປຸ່ມໄກ.
- Enclose only ຫນຶ່ງ conductor with the clamp ຄາງກະໄຕ. ໃຫ້ແນ່ໃຈວ່າຄາງກະໄຕປິດสนิทແລ້ວ.
- ອ່ານຄ່າປັດຈຸບັນຢູ່ໃນຈໍສະແດງຜົນ LCD.
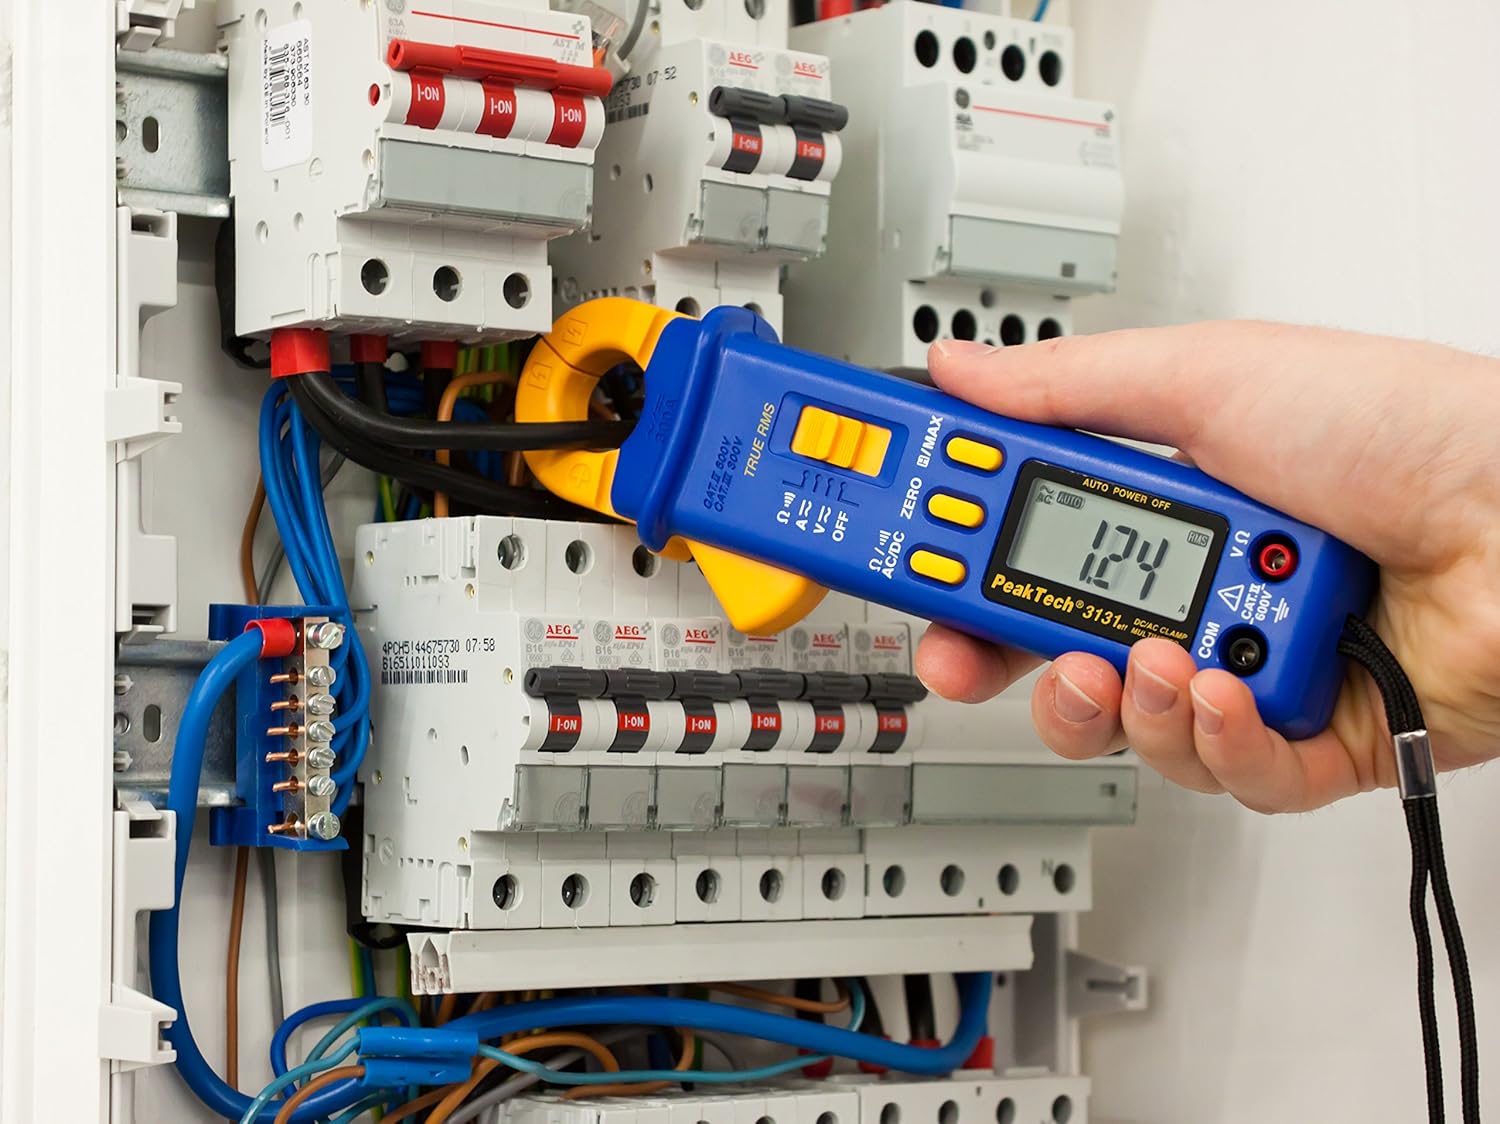
Figure 3: The PeakTech P 3131 Clamp Meter in use, measuring current on a single conductor within an electrical panel.
5.3 AC/DC Voltage ການວັດແທກ
ການວັດແທກ voltage:
- ເຊື່ອມຕໍ່ສາຍທົດສອບຕາມທີ່ໄດ້ອະທິບາຍໄວ້ໃນພາກ 4.2.
- ຫັນໜ້າປັດຕົວເລືອກຟັງຊັນໄປທີ່ປຸ່ມ V~ (AC Voltage) ຫຼື V= (DC Voltage) ຕໍາແໜ່ງ.
- ເຊື່ອມຕໍ່ໂພຣບທົດສອບຂະໜານກັບວົງຈອນ ຫຼື ອົງປະກອບທີ່ທ່ານຕ້ອງການວັດແທກ.
- ອ່ານ voltage ມູນຄ່າຢູ່ໃນຈໍສະແດງຜົນ LCD.
5.4 ການວັດແທກຄວາມຕ້ານທານ ແລະ ຄວາມຕໍ່ເນື່ອງ
To measure resistance or check for continuity:
- ເຊື່ອມຕໍ່ສາຍທົດສອບຕາມທີ່ໄດ້ອະທິບາຍໄວ້ໃນພາກ 4.2.
- ຫັນໜ້າປັດຕົວເລືອກຟັງຊັນໄປທີ່ປຸ່ມ Ω/))) (Resistance/Continuity) position.
- For resistance: Connect the test probes across the component. Ensure the circuit is de-energized.
- For continuity: Touch the test probes to the two points you want to check. A continuous beep indicates a low-resistance path (continuity).
- ອ່ານຄ່າຄວາມຕ້ານທານໃນຈໍສະແດງຜົນ LCD.
5.5 ໜ້າທີ່ພິເສດ
- RMS ທີ່ແທ້ຈິງ: The meter measures True Root Mean Square values for AC voltage and current, providing accurate readings for non-sinusoidal waveforms.
- ການເກັບຮັກສາຂໍ້ມູນ (H): ກົດ H/MAX ກົດປຸ່ມຊົ່ວຄາວເພື່ອຢຸດການອ່ານປັດຈຸບັນຢູ່ເທິງໜ້າຈໍ. ກົດອີກຄັ້ງເພື່ອປ່ອຍ.
- Maximum Value Hold (MAX): ກົດຄ້າງໄວ້ H/MAX button to capture and display the maximum measured value. Press again to exit.
- ZERO Function: Used to zero the display for DC current measurements to eliminate offset errors.
- ການວັດແທກລະດັບອັດຕະໂນມັດ: The meter automatically selects the appropriate measurement range.
- ປິດເຄື່ອງອັດຕະໂນມັດ: The meter automatically turns off after a period of inactivity to save battery. This feature can typically be disabled by holding a specific button during power-on (refer to the device's on-screen indicators or a more detailed manual if available).
6. ບໍາລຸງຮັກສາ
6.1 ການທໍາຄວາມສະອາດ
ເຊັດກ່ອງຂອງມິເຕີດ້ວຍໂຄສະນາamp ຜ້າ ແລະ ຜົງຊັກຟອກອ່ອນໆ. ຢ່າໃຊ້ນໍ້າຢາຂັດ ຫຼື ຕົວລະລາຍ. ໃຫ້ແນ່ໃຈວ່າມິເຕີແຫ້ງໝົດກ່ອນການນຳໃຊ້.
6.2 ການທົດແທນຫມໍ້ໄຟ
Refer to Section 4.1 for instructions on battery replacement. Always use two fresh 1.5V AAA batteries. Remove batteries if the meter is not used for an extended period to prevent leakage.
6.3 ການເກັບຮັກສາ
Store the meter in a cool, dry place, away from direct sunlight and extreme temperatures. Use the provided carrying case for protection.
7. ການແກ້ໄຂບັນຫາ
| ບັນຫາ | ສາເຫດທີ່ເປັນໄປໄດ້ | ການແກ້ໄຂ |
|---|---|---|
| ເຄື່ອງວັດແທກບໍ່ເປີດ. | ແບັດເຕີຣີຕາຍ ຫຼື ຕິດຕັ້ງບໍ່ຖືກຕ້ອງ. | ກວດເບິ່ງຂົ້ວຂອງຫມໍ້ໄຟ; ປ່ຽນແບັດເຕີລີ. |
| ສະແດງ "OL" ຫຼື "OVER". | ການວັດແທກເກີນຂອບເຂດທີ່ເລືອກ ຫຼື ຄວາມຈຸສູງສຸດຂອງມິເຕີ. | Select a higher range (if manual ranging) or ensure measurement is within meter's limits. |
| Inaccurate DC current reading. | Residual magnetism in clamp ຄາງກະໄຕ. | ກົດ ZERO button before measurement. |
| ບໍ່ມີສຽງດັງຕໍ່ເນື່ອງ. | ວົງຈອນເປີດ ຫຼື ຄວາມຕ້ານທານສູງ. | Check connections; ensure circuit is complete. |
If problems persist, contact PeakTech customer support or a qualified service technician.
8. ຂໍ້ກໍານົດດ້ານວິຊາການ
| ພາລາມິເຕີ | ຂໍ້ມູນຈໍາເພາະ |
|---|---|
| ຈໍສະແດງຜົນ | 3 3/4 digit LCD, max. 3999 counts |
| ຊິງຕັນດີຊີ Voltage (DCV) | 0.1 mV to 600 V (Accuracy: 0.5% + 2 digits) |
| AC Voltage (ACV) | 1 mV to 600 V (Accuracy: 1.5% + 5 digits) |
| ກະແສໄຟຟ້າ DC (DCA) | 10 mA to 300 A (Accuracy: 1% + 2 digits) |
| ກະແສໄຟຟ້າ AC (ACA) | 10 mA to 300 A (Accuracy: 1% + 3 digits) |
| ຄວາມຕ້ານທານ (Ω) | 0.1 Ω to 40 MΩ (Accuracy: 0.9% + 2 digits) |
| ການທົດສອບຕໍ່ເນື່ອງ | ຟັງຊັນ Buzzer |
| RMS ທີ່ແທ້ຈິງ | Yes, for AC measurements |
| ການເປີດຄາງກະໄຕ | 22 mm max. conductor diameter |
| ການຈັດອັນດັບຄວາມປອດໄພ | EN 61010-1, CAT II 600 V |
| ການສະຫນອງພະລັງງານ | ແບັດເຕີຣີ 2 x 1.5V AAA |
| ຂະໜາດ (L x W x H) | 192 x 66 x 27 ມມ (ປະມານ 7.56 x 2.6 x 1.06 ນິ້ວ) |
| ນ້ຳໜັກ | 205 g (ປະມານ 0.45 lbs) |
9. ການຮັບປະກັນແລະການສະຫນັບສະຫນູນ
PeakTech products are manufactured under strict quality control. This product is covered by a standard manufacturer's warranty against defects in materials and workmanship. Please refer to the warranty card included with your product or visit the official PeakTech webເວັບໄຊສໍາລັບເງື່ອນໄຂການຮັບປະກັນລາຍລະອຽດ.
For technical support, service, or calibration inquiries, please contact your local PeakTech distributor or the PeakTech customer service department. Contact information can typically be found on the PeakTech webສະຖານທີ່ຫຼືຢູ່ໃນການຫຸ້ມຫໍ່ຜະລິດຕະພັນ.


