1. ບົດແນະນຳ
This manual provides essential information for the proper installation, operation, and maintenance of your Behringer Truth B1031A Active 2-Way Reference Studio Monitor. Please read this manual thoroughly to ensure optimal performance and longevity of your device. The B1031A is designed for professional audio applications, offering ultra-linear frequency response and precise sound reproduction.
2. ຄໍາແນະນໍາຄວາມປອດໄພທີ່ສໍາຄັນ
- ແຫຼ່ງພະລັງງານ: Connect the unit only to a power supply of the voltage specified in the manual or on the unit.
- ການຕໍ່ດິນ: ຮັບປະກັນວ່າໜ່ວຍໄດ້ຖືກຕັ້ງຮາກຖານຢ່າງຖືກຕ້ອງເພື່ອປ້ອງກັນການເກີດໄຟຟ້າຊັອດ.
- ການລະບາຍອາກາດ: ຫ້າມກີດຂວາງການເປີດລະບາຍອາກາດ. ຕິດຕັ້ງຕາມ ຄຳ ແນະ ນຳ ຂອງຜູ້ຜະລິດ.
- ນ້ໍາແລະຄວາມຊຸ່ມ: Do not use this apparatus near water or expose it to rain or moisture.
- ຄວາມຮ້ອນ: ຫ້າມຕິດຕັ້ງໃກ້ກັບແຫຼ່ງຄວາມຮ້ອນເຊັ່ນລັງສີ, ເຄື່ອງບັນທຶກຄວາມຮ້ອນ, ເຕົາຫຼືອຸປະກອນອື່ນໆ (ລວມທັງ. amplifiers) ທີ່ຜະລິດຄວາມຮ້ອນ.
- ທໍາຄວາມສະອາດ: ເຮັດຄວາມສະອາດດ້ວຍຜ້າແຫ້ງເທົ່ານັ້ນ.
- ການບໍລິການ: ອ້າງອີງການບໍລິການທັງໝົດໃຫ້ກັບພະນັກງານບໍລິການທີ່ມີຄຸນວຸດທິ. ການບໍລິການແມ່ນຕ້ອງການເມື່ອອຸປະກອນໄດ້ຮັບຄວາມເສຍຫາຍໃນທາງໃດກໍ່ຕາມເຊັ່ນ: ສາຍໄຟຫຼືປລັກສຽບຖືກເສຍຫາຍ, ແຫຼວຮົ່ວໄຫຼຫຼືສິ່ງຂອງຕົກເຂົ້າໄປໃນອຸປະກອນ, ອຸປະກອນຖືກຝົນຫຼືຄວາມຊຸ່ມຊື່ນ, ບໍ່ເຮັດວຽກຕາມປົກກະຕິ. , ຫຼືໄດ້ຖືກຫຼຸດລົງ.
3. ເນື້ອໃນຊຸດ
Upon unpacking your Behringer Truth B1031A, please verify that all components are present and in good condition:
- Behringer Truth B1031A Active Studio Monitor (1 unit)
- ສາຍໄຟ
- ຄູ່ມືຜູ້ໃຊ້ (ເອກະສານນີ້)
ຖ້າລາຍການໃດຂາດຫາຍໄປຫຼືເສຍຫາຍ, ກະລຸນາຕິດຕໍ່ຕົວແທນຈໍາຫນ່າຍຂອງທ່ານທັນທີ.
4. ຜະລິດຕະພັນເກີນview
The Behringer Truth B1031A is an active 2-way reference studio monitor featuring an 8-inch Kevlar woofer and a 1-inch silk dome tweeter. It incorporates precision Class A/B amplifiers with active protection circuits, delivering 100 W for low frequencies and 50 W for high frequencies. Its design aims for ultra-linear frequency response and wide dispersion characteristics.
4.1. ກະດານດ້ານຫນ້າ

The front panel features the primary acoustic components: the 8-inch Kevlar woofer for low-frequency reproduction and the 1-inch silk dome tweeter for high frequencies. Indicator LEDs provide visual feedback on the monitor's power status and signal clipping.
4.2. ກະດານດ້ານຫລັງ
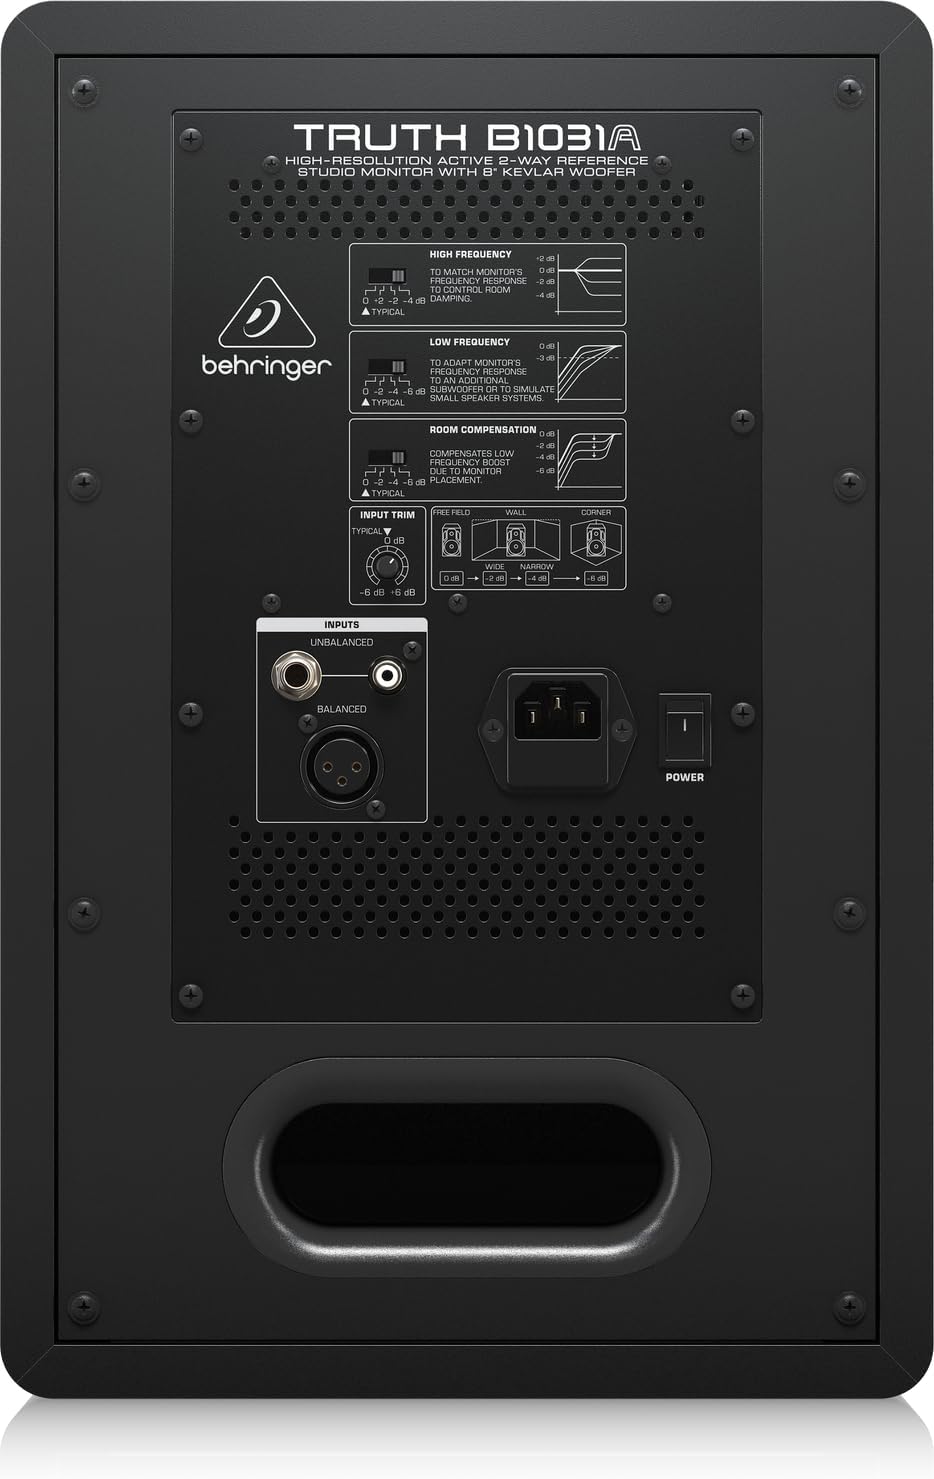
The rear panel houses all input connections and acoustic adjustment controls. These include:
- ການປ້ອນຂໍ້ມູນ XLR ທີ່ສົມດຸນ: For professional audio connections.
- ຂາເຂົ້າ TRS 1/4" ທີ່ສົມດຸນ: For professional audio connections.
- Unbalanced RCA Input: For consumer audio devices.
- ການຕັດຂາເຂົ້າ: ປັບຄວາມອ່ອນໄຫວການປ້ອນຂໍ້ມູນ.
- High Frequency Adjustment: Allows tailoring of the high-frequency response.
- Low Frequency Adjustment: Allows tailoring of the low-frequency response.
- Room Compensation Switches: Adjusts the monitor's response to compensate for room acoustics (e.g., placement near walls or corners).
- Power Switch and IEC Power Inlet: For connecting the power cable and turning the unit on/off.
5. ຕັ້ງຄ່າ
5.1. ບັນຈຸເຂົ້າຮຽນ
Proper placement of your studio monitors is crucial for accurate sound reproduction. Consider the following guidelines:
- ສາມຫຼ່ຽມສະເຕີລິໂອ: Position the monitors and your listening position to form an equilateral triangle. The distance between the two monitors should be equal to the distance from each monitor to your head.
- Ear Level: ສຽງ Tweeter ຄວນຢູ່ໃນລະດັບຫູຂອງທ່ານເມື່ອທ່ານຢູ່ໃນທ່າຟັງຫຼັກຂອງທ່ານ.
- ໄລຍະຫ່າງຈາກຝາ: Avoid placing monitors directly against walls or in corners, as this can exaggerate bass frequencies. If unavoidable, use the ຄ່າຊົດເຊີຍຫ້ອງ switches on the rear panel to adjust.
- Symmetry: Ensure the left and right monitors are placed symmetrically within the room to maintain a balanced stereo image.
5.2. ການເຊື່ອມຕໍ່
Before making any connections, ensure the monitor is powered off and unplugged from the mains.
- ການປ້ອນຂໍ້ມູນສຽງ: Connect your audio source (e.g., audio interface, mixer) to the B1031A using either an XLR, 1/4" TRS, or RCA cable. For optimal signal integrity, balanced XLR or TRS connections are recommended.
- ການເຊື່ອມຕໍ່ພະລັງງານ: Insert the supplied power cable into the IEC power inlet on the rear panel of the monitor, then plug the other end into a suitable AC power outlet.
6. ການເຮັດວຽກ
6.1. ເປີດ / ປິດພະລັງງານ
- Ensure all audio connections are secure and the input trim is set to a low level.
- Flip the power switch on the rear panel to the 'ON' position. The power indicator LED on the front panel will illuminate.
- To power off, flip the power switch to the 'OFF' position. It is recommended to power off your audio source first, then the monitors.
6.2. ປັບການຄວບຄຸມ
- ການຕັດຂາເຂົ້າ: Use this knob to match the output level of your audio source. Start with a low setting and gradually increase until you achieve a comfortable listening level without distortion.
- High Frequency Adjustment: This switch allows you to boost or cut high frequencies to suit your listening environment or preference.
- Low Frequency Adjustment: This switch allows you to boost or cut low frequencies. This is particularly useful for compensating for room acoustics or if you are using a separate subwoofer.
- ຄ່າຊົດເຊີຍຫ້ອງ: These switches are designed to optimize the monitor's performance based on its placement in your room. Refer to the diagram on the rear panel for recommended settings when placing the monitor near walls or in corners.
7. ບໍາລຸງຮັກສາ
To ensure the longevity and optimal performance of your Behringer Truth B1031A monitor, follow these maintenance guidelines:
- ທໍາຄວາມສະອາດ: Use a soft, dry cloth to clean the exterior of the monitor. Avoid using abrasive cleaners, solvents, or waxes, as these can damage the finish.
- ຂີ້ຝຸ່ນ: ຂີ້ຝຸ່ນໂຄນລໍາໂພງແລະຊ່ອງລະບາຍອາກາດເປັນປະຈໍາເພື່ອປ້ອງກັນການສະສົມ, ເຊິ່ງສາມາດສົ່ງຜົນກະທົບຕໍ່ຄຸນນະພາບສຽງແລະຄວາມເຢັນ.
- ສະພາບແວດລ້ອມ: Operate the monitor in a stable environment, away from extreme temperatures, humidity, and direct sunlight.
- ການຂົນສົ່ງ: When moving the monitor, ensure it is powered off and disconnected. Use appropriate packaging to protect it from physical damage.
8. ການແກ້ໄຂບັນຫາ
If you encounter issues with your B1031A monitor, consult the following table for common problems and solutions:
| ບັນຫາ | ສາເຫດທີ່ເປັນໄປໄດ້ | ການແກ້ໄຂ |
|---|---|---|
| ບໍ່ມີສຽງ | No power; incorrect input connection; input trim too low; audio source issue. | Check power cable and switch; verify audio cable connections; increase input trim; check audio source output. |
| ສຽງບິດເບືອນ | Input signal too high; damaged cable; faulty audio source. | Reduce input trim or output level from source; try a different audio cable; test with another audio source. |
| ສຽງດັງ ຫຼື ສຽງດັງ | Ground loop; interference from other electronics; unbalanced cable used for long runs. | Ensure proper grounding; move monitor away from other electronic devices; use balanced cables (XLR/TRS). |
| Uneven stereo image | Improper monitor placement; differing acoustic settings between monitors. | Adjust monitor placement for symmetry; ensure High/Low Frequency and Room Compensation settings are identical on both monitors. |
ຖ້າບັນຫາຍັງຄົງຢູ່ຫຼັງຈາກພະຍາຍາມແກ້ໄຂບັນຫາເຫຼົ່ານີ້ແລ້ວ, ກະລຸນາຕິດຕໍ່ຝ່າຍສະໜັບສະໜູນລູກຄ້າຂອງ Behringer ຫຼື ຊ່າງເຕັກນິກບໍລິການທີ່ມີຄຸນວຸດທິ.
9. ຂໍ້ມູນຈໍາເພາະ
Technical specifications for the Behringer Truth B1031A Active Studio Monitor:
| ຄຸນສົມບັດ | ຂໍ້ມູນຈໍາເພາະ |
|---|---|
| ຊື່ຕົວແບບ | ຄວາມຈິງ B1031A |
| ປະເພດລຳໂພງ | ຈໍສະແດງຜົນສະຕູດິໂອອ້າງອີງແບບ 2 ທາງທີ່ໃຊ້ງານໄດ້ |
| Woofer ເສັ້ນຜ່າສູນກາງ | 8 Inches (Kevlar cone) |
| ປະເພດ Tweeter | 1 Inch Silk Dome |
| Ampປະເພດທີ່ມີຊີວິດຊີວາ | ຫ້ອງຮຽນ A/B |
| LF Ampຜົນໄດ້ຮັບທີ່ມີຊີວິດຊີວາ | 100 ວັດ |
| HF Ampຜົນໄດ້ຮັບທີ່ມີຊີວິດຊີວາ | 50 ວັດ |
| ຜົນຜະລິດທັງໝົດ ວັດtage | 150 ວັດ |
| ເຕັກໂນໂລຊີການເຊື່ອມຕໍ່ | XLR, 1/4" TRS, RCA |
| ແຫຼ່ງພະລັງງານ | ໄຟຟ້າສາຍ (110 ໂວນ) |
| ຂະໜາດສິນຄ້າ (ກວ້າງ x ຍາວ x ສູງ) | 13.3" x 10.28" x 15.47" |
| ນ້ໍາຫນັກລາຍການ | 24.91 ປອນ |
| ສີ | ດຳ |
| ວັດສະດຸ | ໂລຫະ |
10. ການຮັບປະກັນແລະການສະຫນັບສະຫນູນ
Behringer products are designed and manufactured to high-quality standards. For detailed warranty information, including terms and conditions, please refer to the warranty card included with your product or visit the official Behringer website. For technical support, service, or spare parts, please contact your local Behringer dealer or authorized service center. You can also find support resources and contact information on the ຮ້ານ Behringer.


