
1. ບົດແນະນຳ
This manual provides detailed instructions for the installation, operation, and maintenance of your STUDIOFINIX Bluetooth 5.4 4-Zone 8-Channel Audio Amplifier Receiver. This amplifier is designed to deliver high-fidelity audio across multiple rooms, offering independent zone control, various input options, and a professional karaoke function. Please read this manual thoroughly before use to ensure proper setup and optimal performance.
2. ຄໍາແນະນໍາຄວາມປອດໄພ
- ແຫຼ່ງພະລັງງານ: ໃຊ້ພຽງແຕ່ອະແດບເຕີໄຟຟ້າທີ່ສະໜອງໃຫ້ເທົ່ານັ້ນ. ໃຫ້ແນ່ໃຈວ່າລະດັບສຽງtage ກົງກັບຄວາມຕ້ອງການທີ່ລະບຸໄວ້ໃນອຸປະກອນ.
- ການລະບາຍອາກາດ: Do not block any ventilation openings. Install in a location with adequate airflow to prevent overheating.
- ນ້ໍາແລະຄວາມຊຸ່ມ: Do not expose the unit to rain, moisture, or dripping/splashing liquids. Keep away from water sources.
- ຄວາມຮ້ອນ: ຢ່າວາງຢູ່ໃກ້ກັບແຫຼ່ງຄວາມຮ້ອນເຊັ່ນ: radiators, ເຄື່ອງບັນທຶກຄວາມຮ້ອນ, ເຕົາ, ຫຼືອຸປະກອນອື່ນໆທີ່ຜະລິດຄວາມຮ້ອນ.
- ທໍາຄວາມສະອາດ: Unplug the unit from the power outlet before cleaning. Use a dry, soft cloth only.
- ການບໍລິການ: ຢ່າພະຍາຍາມບໍລິການຜະລິດຕະພັນນີ້ດ້ວຍຕົນເອງ. ອ້າງເຖິງການບໍລິການທັງtoົດໃຫ້ກັບພະນັກງານບໍລິການທີ່ມີຄຸນວຸດທິ.
- ລຳໂພງ Impedance: Ensure connected speakers have an impedance of 4-8 ohms. Connecting speakers with lower impedance may damage the ampມີຊີວິດຊີວາ.
3. ເນື້ອໃນຊຸດ
ກວດສອບວ່າລາຍການທັງຫມົດທີ່ລະບຸໄວ້ຂ້າງລຸ່ມນີ້ແມ່ນລວມຢູ່ໃນຊຸດຂອງທ່ານ:
- STUDIOFINIX Amplifier x 1
- ອະແດັບເຕີພະລັງງານ x 1
- Black Terminal Connectors x 4
- ຄູ່ມືການສອນ x 1

Figure 3.1: Package Contents. The image displays the amplifier unit, its power adapter, four black terminal connectors, and the user manual.
4. ຜະລິດຕະພັນເກີນview
4.1 ການແນະນຳກະດານໜ້າ
ແຜງດ້ານໜ້າໃຫ້ການເຂົ້າເຖິງການຄວບຄຸມຫຼັກ ແລະ ພອດປ້ອນຂໍ້ມູນເພື່ອການເຮັດວຽກທີ່ສະດວກສະບາຍ.

Figure 4.1: Front Panel Layout. Key controls include the Volume/Power ON/OFF knob, MIC VOL knob, MIC input, AUX input, USB port, TF Card slot, and Bass/Treble adjustment knobs.
- VOLUME/PWR ON/OFF: Controls the master volume and powers the unit on/off.
- MIC VOL: ປັບລະດັບສຽງຂອງໄມໂຄຣໂຟນທີ່ເຊື່ອມຕໍ່.
- ການປ້ອນຂໍ້ມູນ MIC: ຊ່ອງສຽບ 3.5 ມມ ສຳລັບເຊື່ອມຕໍ່ໄມໂຄຣໂຟນ.
- AUX Input: 3.5mm jack for auxiliary audio devices.
- ພອດ USB: ສໍາລັບການຫຼິ້ນສຽງ files ຈາກ USB drive.
- ສະລັອດຕິງບັດ TF: ສໍາລັບການຫຼິ້ນສຽງ files from a TF (MicroSD) card.
- ເບສ/ສຽງແກມ: ປັບການຕອບສະໜອງຄວາມຖີ່ຕ່ຳ ແລະ ສູງຂອງສຽງອອກ.
4.2 ການແນະນຳກະດານເທິງ
The top panel features controls for mode selection, playback, and echo effects for karaoke.

Figure 4.2: Top Panel Layout. This view highlights the MODE button, playback controls (Fast Retreat/Previous Song, Play/Pause, Fast Forward/Next Song), and the ECHO button for microphone effects.
- ແບບ: Switches between input sources (Bluetooth, Optical, AUX, LINE IN, USB, TF Card).
- ການຄວບຄຸມການຫຼິ້ນ: Buttons for previous track, play/pause, and next track when using USB/TF card or Bluetooth.
- ສຽງສະທ້ອນ: Activates and adjusts the echo effect for the microphone input.
- Zone Control Buttons (1, 2, 3, 4): Independently turn on or off each of the four audio zones.
4.3 Back Panel Introduction
The back panel contains the main speaker outputs and additional wired input options.

Figure 4.3: Back Panel Layout. This image shows the DC IN port, speaker output terminals for Zones 1-4 (supporting 8 speakers), Optical input, and stereo RCA Line In (R/L) inputs.
- DC ໃນ: Power input port for the provided power adapter.
- Speaker Outputs (ZONE 1-4): Connect up to 8 speakers (2 per zone) with 4-8 ohm impedance. Red terminals are positive (+), black terminals are negative (-).
- Optical Input: Digital audio input for connecting devices like TVs or game consoles.
- LINE IN (R/L): Stereo RCA inputs for connecting analog audio sources.
5. ຕັ້ງຄ່າ
5.1 ການເຊື່ອມຕໍ່ ລຳ ໂພງ
ໄດ້ amplifier supports up to 8 speakers, divided into 4 independent zones. Ensure your speakers have an impedance of 4-8 ohms.
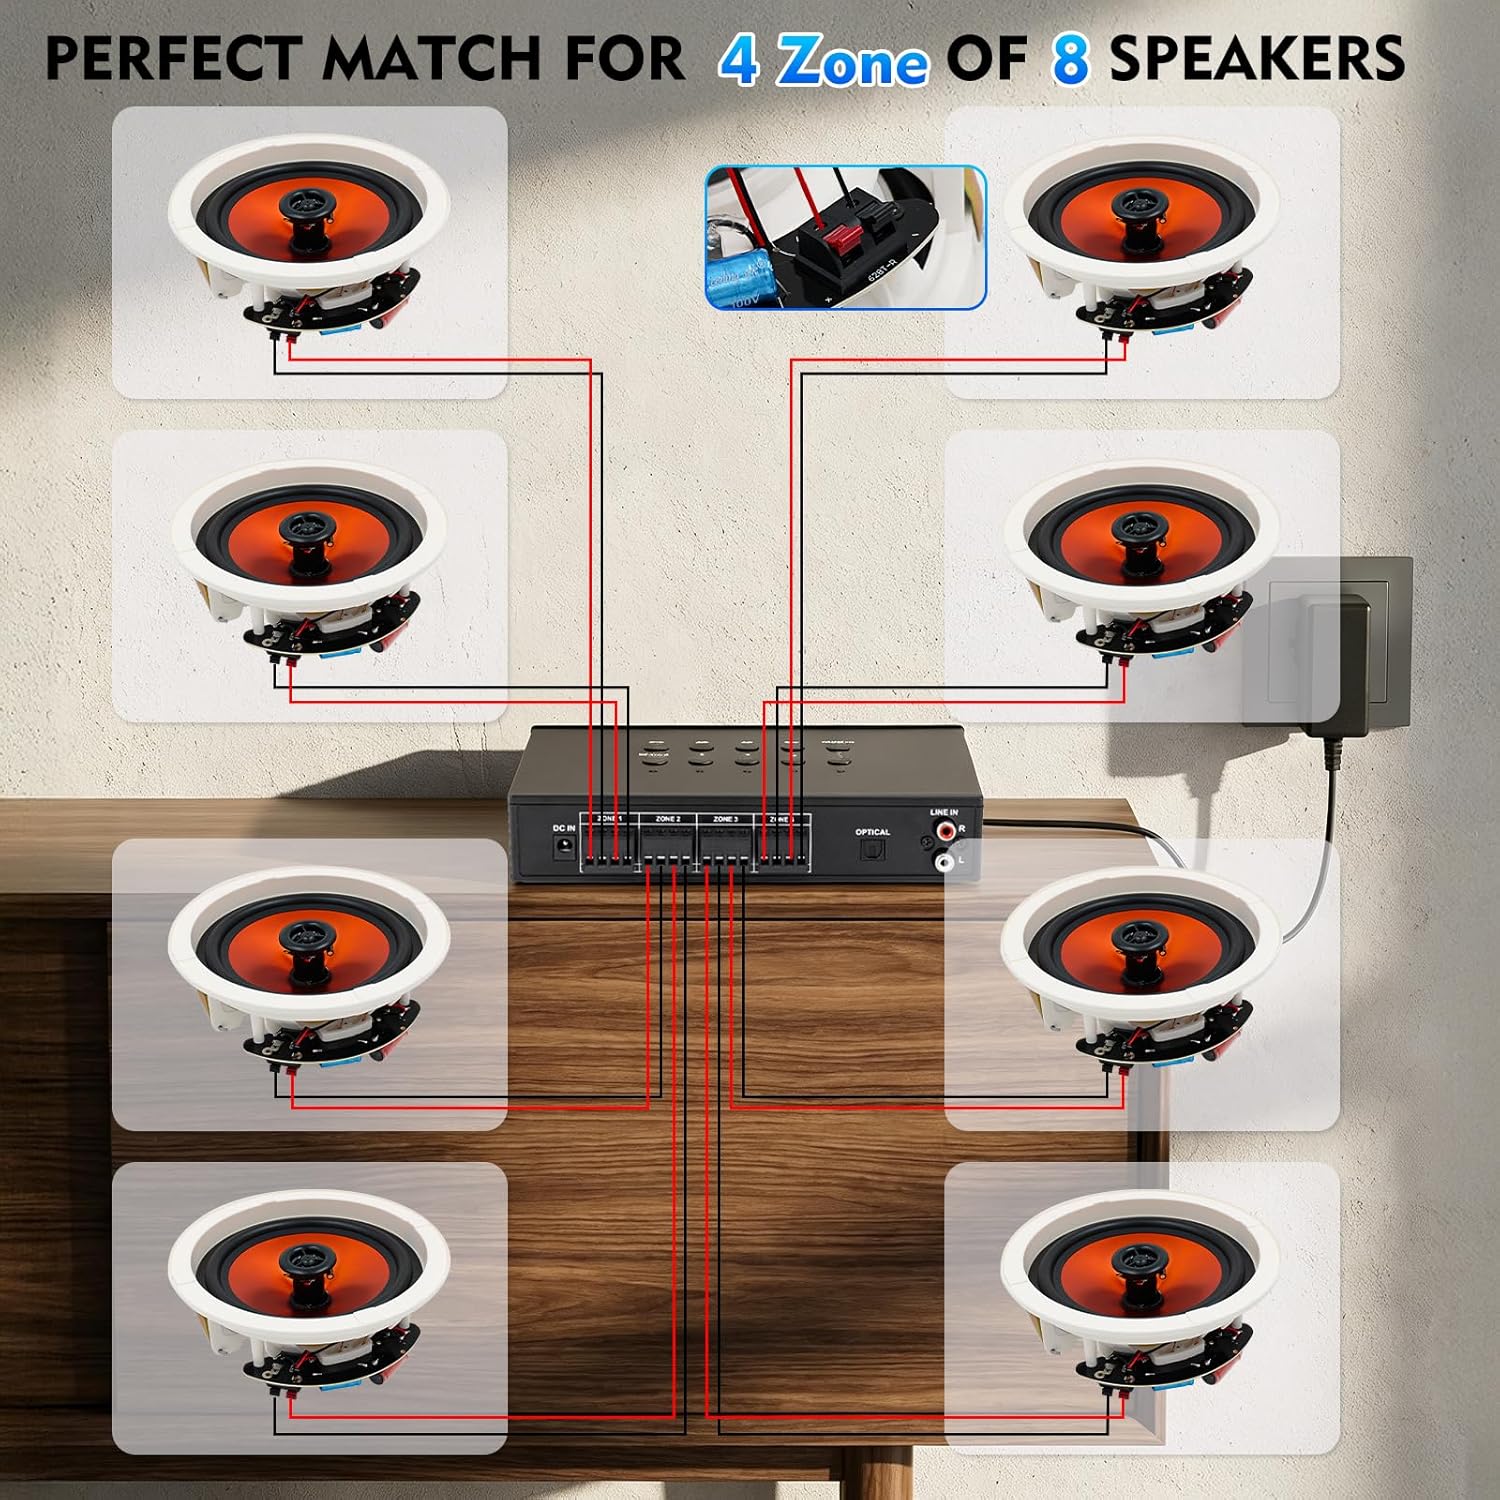
Figure 5.1: Speaker Wiring Diagram. This illustration demonstrates connecting two speakers per zone, with red wires to positive (+) terminals and black wires to negative (-) terminals on the amplifier's back panel.
- ກໍານົດຈຸດບວກ (+) ແລະລົບ (-) ໃນລໍາໂພງຂອງທ່ານ.
- Connect the positive (+) wire from each speaker to the corresponding red (+) terminal on the amplifier for the desired zone.
- Connect the negative (-) wire from each speaker to the corresponding black (-) terminal on the amplifier for the desired zone.
- Repeat for all speakers across the 4 zones. Ensure all connections are secure.
5.2 ການເຊື່ອມຕໍ່ພະລັງງານ
After connecting all speakers and audio sources, connect the power adapter.
- Insert the DC plug of the power adapter into the 'DC IN' port on the back of the ampມີຊີວິດຊີວາ.
- ສຽບອະແດບເຕີໄຟເຂົ້າໄປໃນບ່ອນສຽບຝາທີ່ເຫມາະສົມ.
6. ຄໍາແນະນໍາການດໍາເນີນງານ
6.1 ເປີດ/ປິດ ແລະຄວບຄຸມລະດັບສຽງ
- ເພື່ອພະລັງງານໃນ amplifier, rotate the VOLUME/PWR ON/OFF knob clockwise until the display illuminates.
- To power off, rotate the knob counter-clockwise until it clicks off.
- Adjust the master volume by rotating the VOLUME/PWR ON/OFF ລູກບິດ.
6.2 ການເລືອກແຫຼ່ງປ້ອນຂໍ້ມູນ
ກົດ ໂໝດ button on the top panel to cycle through available input sources: Bluetooth, Optical, AUX, LINE IN, USB, and TF Card.
6.3 ການຈັບຄູ່ Bluetooth
ເພື່ອເຊື່ອມຕໍ່ອຸປະກອນ Bluetooth:

Figure 6.1: Bluetooth Connectivity. The image shows a smartphone successfully paired with the amplifier, indicating stable Bluetooth 5.4 connection for wireless audio streaming.
- ເລືອກຮູບແບບ Bluetooth ການນໍາໃຊ້ ໂໝດ button. The display will show "BT" or a similar indicator.
- ໃນສະມາດໂຟນ, ແທັບເລັດ, ຫຼືອຸປະກອນທີ່ເປີດໃຊ້ Bluetooth ຂອງທ່ານ, ເປີດໃຊ້ Bluetooth ແລະຊອກຫາອຸປະກອນທີ່ມີຢູ່.
- Select "STUDIOFINIX" or a similar name from the list to pair.
- ເມື່ອຈັບຄູ່ແລ້ວ, ທ່ານສາມາດຖ່າຍທອດສຽງໄດ້ແບບໄຮ້ສາຍໄປຫາ ampມີຊີວິດຊີວາ.
6.4 Wired Input Operation
ໄດ້ amplifier supports various wired audio sources:

Figure 6.2: Multiple External Audio Sources. This graphic illustrates the diverse input options available, including Microphone, Bluetooth, USB, AUX, and TF Card, allowing connection of various external devices.
- Optical Input: Connect a digital audio cable from your source (e.g., TV, game console) to the OPTICAL port on the back panel. Select Optical mode using the ໂໝດ ປຸ່ມ.
- AUX Input: Connect a 3.5mm audio cable from your device to the AUX port on the front panel. Select AUX mode.
- ເຂົ້າໃນ: Connect RCA cables from your analog audio source (e.g., CD player) to the LINE IN (R/L) ports on the back panel. Select LINE IN mode.
- ບັດ USB/TF: Insert a USB drive or TF card into the respective slot on the front panel. The amplifier will automatically switch to USB or TF mode and begin playback. Use the playback controls on the top panel to manage tracks.
6.5 ຟັງຊັນຄາຣາໂອເກະ
Enjoy karaoke with the built-in microphone input and echo effect.

Figure 6.3: Karaoke Ready. This image depicts individuals enjoying a karaoke session, highlighting the amplifier's capability to connect a microphone for vocal performances.
- ສຽບໄມໂຄຣໂຟນຂອງທ່ານໃສ່ ການປ້ອນຂໍ້ມູນ MIC ໃນກະດານທາງຫນ້າ.
- ປັບລະດັບສຽງໄມໂຄຣໂຟນໂດຍໃຊ້ປຸ່ມ ມິກ VOL ລູກບິດ.
- ກົດ ແອັກໂກ້ button on the top panel to activate and adjust the echo effect for your vocals.
6.6 Independent Zone Control
ໄດ້ amplifier allows you to independently control the power for each of the four speaker zones.

Figure 6.4: 4-Zone Independent Control. This visual demonstrates how the amplifier can manage audio in four separate areas, allowing users to turn zones on or off as needed for multi-room audio customization.
- ໃຊ້ອຸທິດຕົນ ZONE 1, ZONE 2, ZONE 3, ZONE 4 buttons on the top panel to toggle each zone on or off.
- Note that while zones can be independently turned on/off, the overall volume, bass, and treble settings apply to all active zones simultaneously.
6.7 ການປັບສຽງເບສ ແລະ ສຽງສູງ
Adjust the audio's tonal characteristics using the ເບສ ແລະ ຄວບຄຸມ knobs on the front panel to suit your preference.
7. ບໍາລຸງຮັກສາ
- ທໍາຄວາມສະອາດ: Disconnect the power before cleaning. Use a soft, dry cloth to wipe the exterior of the unit. Do not use liquid cleaners or aerosol sprays.
- ການເກັບຮັກສາ: ຖ້າເກັບຮັກສາເຄື່ອງໄວ້ເປັນເວລາດົນ, ໃຫ້ຖອດສາຍໄຟອອກ ແລະ ເກັບຮັກສາໄວ້ໃນບ່ອນທີ່ເຢັນ, ແຫ້ງແລ້ງຫ່າງຈາກແສງແດດໂດຍກົງ.
- ການລະບາຍອາກາດ: ກວດສອບເປັນປະຈຳວ່າຊ່ອງລະບາຍອາກາດບໍ່ມີຝຸ່ນ ແລະ ສິ່ງເສດເຫຼືອ.
8. ການແກ້ໄຂບັນຫາ
| ບັນຫາ | ສາເຫດທີ່ເປັນໄປໄດ້ | ການແກ້ໄຂ |
|---|---|---|
| ບໍ່ມີພະລັງງານ | Power adapter not connected; Power outlet not working; Unit is off. | Ensure power adapter is securely connected and plugged into a live outlet. Turn the VOLUME/PWR ON/OFF knob clockwise. |
| ບໍ່ມີສຽງຈາກ ລຳ ໂພງ | Incorrect input source selected; Speaker wires loose or incorrectly connected; Volume too low; Specific zone turned off. | Press MODE to select the correct input. Check speaker wire connections (positive/negative). Increase master volume. Ensure the relevant zone button is ON. |
| Bluetooth ບໍ່ເຊື່ອມຕໍ່ | Not in Bluetooth mode; Device too far; Device already connected to another ampມີຊີວິດຊີວາ. | Select Bluetooth mode. Move device closer to the amplifier. Disconnect from other Bluetooth devices and try pairing again. |
| ໄມໂຄຣໂຟນບໍ່ເຮັດວຽກ | Microphone not plugged in; MIC VOL too low. | Ensure microphone is securely plugged into the MIC input. Increase the MIC VOL knob. |
| ບໍ່ສາມາດຫຼິ້ນບັດ USB/TF ໄດ້ | ຮູບແບບບໍ່ຖືກຕ້ອງ; ບໍ່ເຂົ້າກັນໄດ້ file ຮູບແບບ; ສື່ທີ່ເສຍຫາຍ. | Select USB or TF mode. Ensure audio files ຢູ່ໃນຮູບແບບທີ່ຮອງຮັບ (ຕົວຢ່າງ, MP3). ລອງໃຊ້ໄດຣຟ USB ຫຼື TF card ອື່ນ. |
9. ຂໍ້ມູນຈໍາເພາະ
| ຄຸນສົມບັດ | ຂໍ້ມູນຈໍາເພາະ |
|---|---|
| ຍີ່ຫໍ້ | STUDIOFINIX |
| ໝາຍເລກຕົວແບບ | ST-AMP-8PBT-BK-US |
| ຈໍານວນຊ່ອງ | 8 |
| ຜົນຜະລິດວັດtage | 480 ວັດ (ລວມ) |
| ລຸ້ນ Bluetooth | 5.4 |
| ລຳໂພງ Impedance | 4-8 ohms |
| ຕົວເລືອກການປ້ອນຂໍ້ມູນ | Optical, AUX, LINE IN, USB, TF Card, MIC, Bluetooth |
| ການຕອບສະໜອງຄວາມຖີ່ | ±2dB@20-20kHz |
| ອັດຕາສ່ວນສັນຍານເຖິງສຽງດັງ | 85dB |
| ຂະໜາດ (L x W x H) | 195mm x 40mm x 140mm (Approx.) |
10. ຂໍ້ມູນການຮັບປະກັນ
This STUDIOFINIX amplifier ມາພ້ອມກັບ a ການຮັບປະກັນ 1 ປີຈໍາກັດ from the date of purchase. This warranty covers manufacturing defects in materials and workmanship under normal use. It does not cover damage caused by misuse, accident, unauthorized modification, or improper installation. Please retain your proof of purchase for warranty claims.
11. ການຊ່ວຍເຫຼືອລູກຄ້າ
For technical assistance, warranty claims, or general inquiries, please contact STUDIOFINIX customer support through the retailer's platform or visit the official STUDIOFINIX webເວັບໄຊສໍາລັບຂໍ້ມູນຕິດຕໍ່.
ສະຫນັບສະຫນູນອອນໄລນ໌: www.studiofinix.com


