ແນະນຳ
This manual provides comprehensive instructions for the installation, operation, maintenance, and troubleshooting of the ASUS Prime H810M-E-CSM Intel H810 mATX Commercial CSM Motherboard. This motherboard is engineered for Intel Core Ultra (Series 2) processors, offering robust performance and essential features for commercial and AI PC applications.
ຂໍ້ມູນຄວາມປອດໄພ
ປະຕິບັດຕາມຄວາມລະມັດລະວັງດ້ານຄວາມປອດໄພຕໍ່ໄປນີ້ສະເໝີໃນລະຫວ່າງການຕິດຕັ້ງ ແລະ ການດໍາເນີນງານ:
- ຖອດສາຍໄຟອອກຈາກປລັກສຽບໄຟກ່ອນທີ່ຈະສໍາຜັດກັບອົງປະກອບໃດໆ.
- ໃສ່ສາຍແຂນຕ້ານສະຖິດເພື່ອປ້ອງກັນການໄຫຼຂອງໄຟຟ້າສະຖິດ (ESD) ຄວາມເສຍຫາຍຕໍ່ອົງປະກອບ.
- ຈັບອົງປະກອບໂດຍຂອບຂອງເຂົາເຈົ້າເພື່ອຫຼີກເວັ້ນການສໍາຜັດກັບພາກສ່ວນທີ່ລະອຽດອ່ອນ.
- ຮັບປະກັນການລະບາຍອາກາດທີ່ເຫມາະສົມພາຍໃນກໍລະນີ PC ຂອງທ່ານເພື່ອປ້ອງກັນຄວາມຮ້ອນເກີນໄປ.
- Refer to the specific component manuals for additional safety guidelines.
ເນື້ອໃນຊຸດ
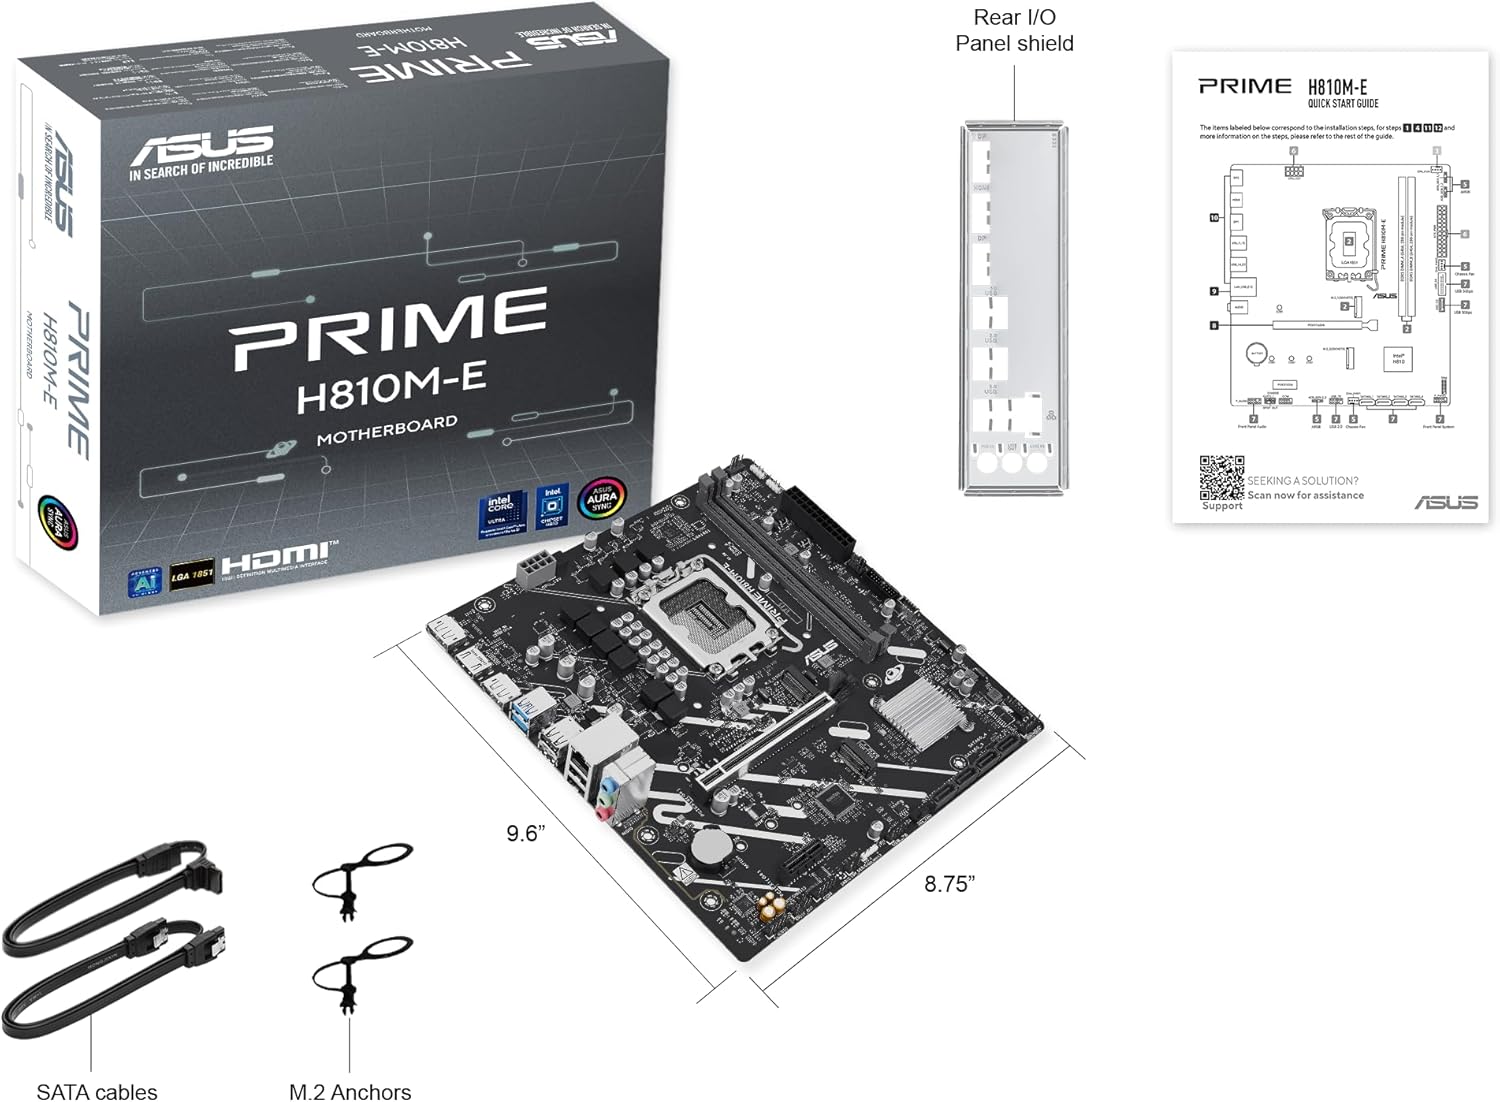
ກວດສອບວ່າລາຍການທັງຫມົດແມ່ນມີຢູ່ໃນຊຸດ motherboard ຂອງທ່ານ:
- ASUS Prime H810M-E-CSM Motherboard
- SATA 6Gb/s Data Cables (2x)
- M.2 SSD Anchors (2x)
- Rear I/O Shield
- ຄູ່ມືຜູ້ໃຊ້ / ຄູ່ມືເລີ່ມຕົ້ນດ່ວນ
ການວາງແຜນແມ່ແບບ
ເຮັດຄວາມຄຸ້ນເຄີຍກັບອົງປະກອບທີ່ສໍາຄັນແລະຕົວເຊື່ອມຕໍ່ໃນເມນບອດ.


ຕັ້ງຄ່າ
1. ການຕິດຕັ້ງ CPU
This motherboard supports Intel Core Ultra (Series 2) processors with an LGA 1851 socket.
- ເປີດຄັນຍົກຂອງຊັອກເກັດ CPU ແລະ ເອົາຝາປິດປ້ອງກັນອອກ.
- Carefully align the CPU with the socket, ensuring the notches on the CPU match the keys on the socket.
- ຄ່ອຍໆວາງ CPU ເຂົ້າໄປໃນເຕົ້າຮັບໂດຍບໍ່ມີການບັງຄັບໃຊ້.
- ປິດຊ່ອງສຽບເຕົ້າຮັບເພື່ອຮັບປະກັນ CPU.
- ຕິດຕັ້ງ CPU cooler ຕາມຄໍາແນະນໍາຂອງຜູ້ຜະລິດ.
2. ການຕິດຕັ້ງຫນ່ວຍຄວາມຈໍາ (RAM).
The motherboard features two DDR5 DIMM slots, supporting up to 128GB of RAM.
- ເປີດຄລິບຢູ່ທັງສອງສົ້ນຂອງຊ່ອງສຽບ DIMM.
- ວາງໂມດູນໜ່ວຍຄວາມຈຳກັບຊ່ອງສຽບ, ຮັບປະກັນວ່າຮອຍບັ້ງຢູ່ໃນໂມດູນກົງກັບກະແຈໃນຊ່ອງສຽບ.
- ກົດລົງໃຫ້ແໜ້ນທັງສອງສົ້ນຂອງໂມດູນໜ່ວຍຄວາມຈຳຈົນກວ່າຄລິບຈະເຂົ້າໃສ່.
3. ການຕິດຕັ້ງການເກັບຮັກສາ
The motherboard supports M.2 SSDs and SATA drives.
ການຕິດຕັ້ງ M.2 SSD:
- ຊອກຫາຊ່ອງສຽບ M.2 ໃນເມນບອດ.
- ສຽບ M.2 SSD ເຂົ້າໄປໃນຊ່ອງສຽບໃນມຸມ 30 ອົງສາ.
- Gently push down the SSD and secure it with the provided M.2 anchor or screw.

ການຕິດຕັ້ງ SATA Drive:
- ເຊື່ອມຕໍ່ປາຍດ້ານໜຶ່ງຂອງສາຍຂໍ້ມູນ SATA ເຂົ້າກັບພອດ SATA ເທິງເມນບອດ.
- Connect the other end of the SATA data cable to your storage drive (HDD/SSD).
- Connect a SATA power cable from your power supply unit (PSU) to the storage drive.
4. ການຕິດຕັ້ງບັດ PCIe
Install graphics cards or other expansion cards into the PCIe 4.0 slots.
- Open the retention clip at the end of the PCIe slot.
- Align the expansion card with the slot and press down firmly until it is seated and the clip snaps shut.
- Secure the card to the PC case with a screw.

5. ການເຊື່ອມຕໍ່ພະລັງງານ
ເຊື່ອມຕໍ່ສາຍເຄເບີນຂອງຫນ່ວຍສະຫນອງພະລັງງານ (PSU) ກັບເມນບອດ.
- ຕົວເຊື່ອມຕໍ່ໄຟ ATX 24-pin: Connect the main 24-pin power cable from your PSU to the corresponding connector on the motherboard.
- 8-pin CPU Power Connector (EATX12V): Connect the 8-pin CPU power cable from your PSU to the connector located near the CPU socket.
6. ການເຊື່ອມຕໍ່ກະດານດ້ານຫນ້າ
Connect your PC case's front panel cables (power button, reset button, USB ports, audio jacks, LED indicators) to the corresponding headers on the motherboard. Refer to the motherboard diagram for exact locations.
ປະຕິບັດການ
ການ Boot ທໍາອິດແລະການຕັ້ງຄ່າ BIOS / UEFI
ຫຼັງຈາກປະກອບລະບົບຂອງທ່ານ, ເຊື່ອມຕໍ່ຈໍພາບ, ແປ້ນພິມ, ແລະຫນູ. ພະລັງງານຢູ່ໃນລະບົບ.
- ກົດ ລຶບ ກົດປຸ່ມໃນລະຫວ່າງການເລີ່ມຕົ້ນເພື່ອເຂົ້າໄປໃນອຸປະກອນການຕັ້ງຄ່າ BIOS/UEFI.
- ກຳນົດຄ່າລຳດັບການບູດ, ເວລາຂອງລະບົບ ແລະ ການຕັ້ງຄ່າທີ່ຈຳເປັນອື່ນໆ.
- ບັນທຶກການປ່ຽນແປງແລະອອກຈາກ BIOS.

Driver and Operating System Installation
Install your preferred operating system (e.g., Windows 10/11) from a bootable USB drive or DVD. After OS installation, install the latest drivers for the motherboard chipset, LAN, audio, and any other integrated components from the ASUS support website ເພື່ອຮັບປະກັນການປະຕິບັດທີ່ດີທີ່ສຸດແລະຄວາມຫມັ້ນຄົງ.
ບໍາລຸງຮັກສາ
ທໍາຄວາມສະອາດ
Regularly clean your PC to prevent dust buildup, which can lead to overheating and component failure. Use compressed air to remove dust from heatsinks, fans, and other components. Ensure the system is powered off and unplugged before cleaning.
BIOS ອັບເດດ
ກວດສອບການຮອງຮັບ ASUS ເປັນໄລຍະ website for BIOS updates. BIOS updates can improve system stability, compatibility, and performance. Follow the instructions provided by ASUS carefully when performing a BIOS update to avoid system damage.
ການແກ້ໄຂບັນຫາ
ພາກສ່ວນນີ້ແກ້ໄຂບັນຫາທົ່ວໄປທີ່ທ່ານອາດຈະພົບ.
- No Display / No Post:
- ໃຫ້ແນ່ໃຈວ່າສາຍໄຟທັງໝົດ (24-pin ATX, CPU 8-pin) ຖືກເຊື່ອມຕໍ່ຢ່າງປອດໄພ.
- ໃສ່ໂມດູນ RAM ຄືນໃໝ່. ລອງບູດດ້ວຍ RAM stick ພຽງອັນດຽວ.
- Verify the CPU is correctly seated and the CPU cooler is properly installed.
- Check that the graphics card is fully seated in its PCIe slot and has adequate power.
- If using integrated graphics, ensure your monitor is connected to the motherboard's video output (HDMI).
- ຄວາມບໍ່ສະຖຽນລະພາບຂອງລະບົບ / ການຂັດຂ້ອງ:
- ຮັບປະກັນວ່າໄດເວີທັງໝົດແມ່ນອັບເດດແລ້ວ.
- ກວດເບິ່ງອຸນຫະພູມ CPU ແລະ GPU ໂດຍໃຊ້ຊອບແວຕິດຕາມກວດກາ.
- ເປີດໃຊ້ເຄື່ອງມືວິນິດໄສຄວາມຈຳເພື່ອກວດສອບ RAM ທີ່ຜິດພາດ.
- ກວດສອບ PSU wattage ແມ່ນພຽງພໍສໍາລັບອົງປະກອບທັງຫມົດ.
- ບໍ່ກວດພົບອຸປະກອນຕໍ່ພ່ວງ:
- ລອງເຊື່ອມຕໍ່ອຸປະກອນຕໍ່ພອດກັບຜອດອື່ນ.
- Install or update drivers for the peripheral.
- Check BIOS settings to ensure the port is enabled.
ຂໍ້ມູນຈໍາເພາະ
| ຄຸນສົມບັດ | ຂໍ້ມູນຈໍາເພາະ |
|---|---|
| ຍີ່ຫໍ້ | ASUS |
| ຊື່ຕົວແບບ | PRIME H810M-E-CSM |
| ເຕົ້າສຽບ CPU | LGA 1851 |
| ໂປເຊດເຊີທີ່ເຂົ້າກັນໄດ້ | ໂປເຊດເຊີ Intel Core Ultra (ຊຸດ 2) |
| ປະເພດຊິບເຊັດ | Intel H810 |
| ເທກໂນໂລຍີຫນ່ວຍຄວາມຈໍາ RAM | DDR5 |
| ສະລັອດຕິງຫນ່ວຍຄວາມຈໍາສາມາດໃຊ້ໄດ້ | 2 |
| Ram Memory Maximum Size | 128 GB |
| ການໂຕ້ຕອບບັດກາຟິກ | PCI Express 4.0 |
| Total PCIe Ports | 2 |
| ພອດ SATA ທັງໝົດ | 4 |
| Total M.2 Slots | 1 |
| ພອດ USB ທັງໝົດ | 11 (ປະເພດຕ່າງໆ) |
| Total Number of HDMI Ports | 1 |
| ຈໍານວນພອດອີເທີເນັດ | 1 (1Gb LAN) |
| ປະເພດຕົວເຊື່ອມຕໍ່ພະລັງງານຫຼັກ | 24-Pin |
| ເວທີ | Windows 10, Windows 11 |
| ຂະໜາດລາຍການ L x W x H | 9.6"L x 8.7"W x 1.5"H |
| ນ້ໍາຫນັກລາຍການ | 1.1 ປອນ |
ຂໍ້ມູນການຮັບປະກັນ
The ASUS Prime H810M-E-CSM Motherboard comes with a ການຮັບປະກັນຂອງຜູ້ຜະລິດ 3 ປີ. For detailed terms and conditions, please refer to the warranty card included in your package or visit the official ASUS support webເວັບໄຊ.
ສະຫນັບສະຫນູນ
For further assistance, technical support, driver downloads, or BIOS updates, please visit the official ASUS support webເວັບໄຊ:
You can also find additional resources and FAQs on the ASUS product page for the Prime H810M-E-CSM.