1. ບົດແນະນຳ
This manual provides detailed instructions for the installation, operation, and maintenance of your darkFlash DS900 Air ATX Mid-Tower PC Gaming Case. Please read this manual thoroughly before beginning assembly to ensure proper setup and safe usage. The DS900 Air is designed to offer a clear view of your components with its 270° full-view tempered glass and provides excellent cooling capabilities for high-performance systems.

Figure 1.1: darkFlash DS900 Air ATX Mid-Tower PC Gaming Case with internal components and RGB lighting.
2. ຂໍ້ມູນຄວາມປອດໄພ
ປະຕິບັດຕາມຄວາມລະມັດລະວັງດ້ານຄວາມປອດໄພຕໍ່ໄປນີ້ສະເໝີໃນລະຫວ່າງການຕິດຕັ້ງ ແລະ ການດໍາເນີນງານ:
- ຖອດສາຍໄຟອອກຈາກປລັກສຽບຝາກ່ອນຕິດຕັ້ງ ຫຼື ຖອດອຸປະກອນໃດໆອອກ.
- ໃສ່ສາຍຮັດຂໍ້ມືປ້ອງກັນໄຟຟ້າສະຖິດເພື່ອປ້ອງກັນຄວາມເສຍຫາຍຈາກການປ່ອຍໄຟຟ້າສະຖິດ (ESD) ຕໍ່ອົງປະກອບທີ່ລະອຽດອ່ອນ.
- Handle tempered glass panels with care. Avoid impacts or dropping them, as they can shatter.
- ເກັບຮັກສາຊິ້ນສ່ວນຂະໜາດນ້ອຍ ແລະ ສະກູໃຫ້ໄກຈາກເດັກນ້ອຍ.
- ຮັບປະກັນການລະບາຍອາກາດທີ່ເໝາະສົມອ້ອມຮອບກ່ອງເພື່ອປ້ອງກັນຄວາມຮ້ອນເກີນໄປ.
- Do not attempt to modify the case structure, as this may void the warranty and pose safety risks.
3. ຂໍ້ມູນຈໍາເພາະ
| ຄຸນສົມບັດ | ຂໍ້ມູນຈໍາເພາະ |
|---|---|
| ຊື່ຕົວແບບ | DS900 Air |
| ປະເພດກໍລະນີ | ATX Mid-Tower |
| ຮອງຮັບເມນບອດ | ATX, Micro ATX, Mini ITX |
| ການເກັບກູ້ຄວາມຍາວ GPU | ເຖິງ 425 ມມ |
| CPU Cooler ຄວາມສູງ Clearance | ເຖິງ 170 ມມ |
| ປະເພດ PSU | ATX (Bottom-mounted) |
| ຂັບລົດ Bays | 2x 3.5" HDD or 2x 2.5" SSD, 2x 2.5" SSD |
| ສະລັອດຕິງຂະຫຍາຍ | 7 PCIe ໂມ້ |
| ຜອດ I/O | 1x USB-C, 1x USB 3.0, Audio (HD Audio) |
| ສະຫນັບສະຫນູນພັດລົມ | Bottom: 3x 120mm; Top: 3x 120mm or 2x 140mm; Rear: 1x 120mm; Right Side: 2x 120mm |
| ສະຫນັບສະຫນູນ radiator | Top: Up to 360mm; Side: Up to 240mm |
| ວັດສະດຸ | ເຫຼັກ, ແກ້ວອຸນຫະພູມສູງ |
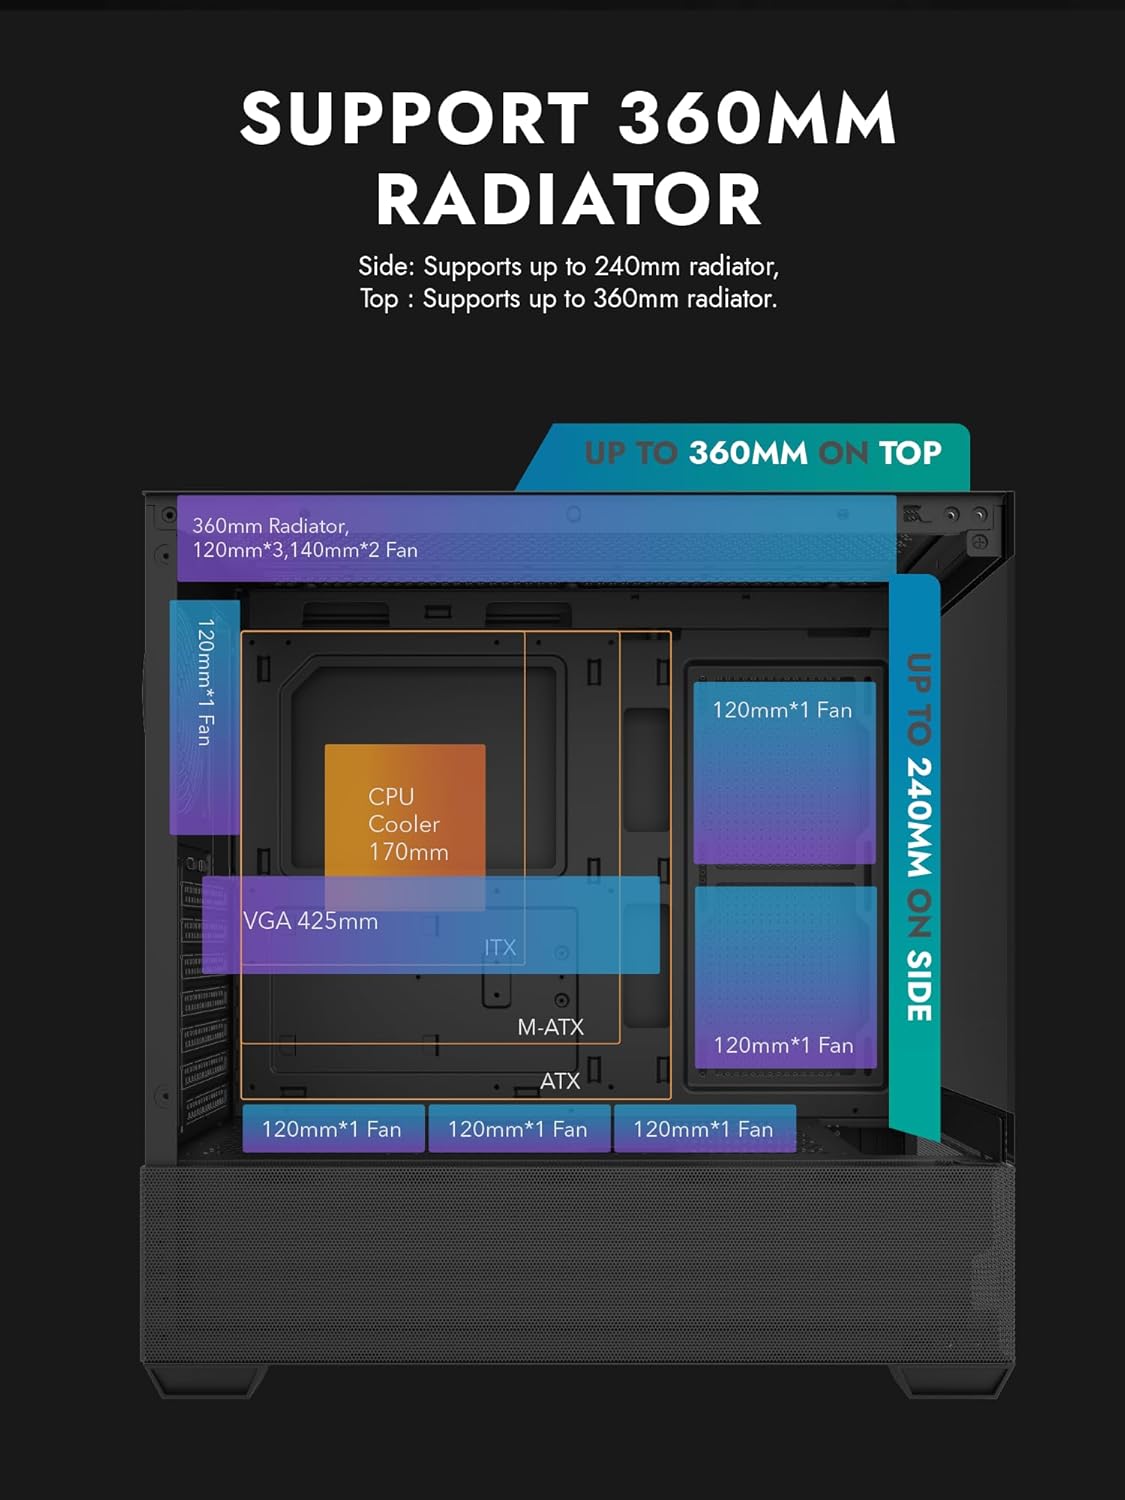
Figure 3.1: Radiator and fan support diagram for the DS900 Air case, illustrating maximum component dimensions.
4. ການຕິດຕັ້ງແລະການຕິດຕັ້ງ
Follow these steps to assemble your PC components within the darkFlash DS900 Air case.
4.1. ການກະກຽມກໍລະນີ
- ເອົາແຜງດ້ານຂ້າງອອກ: The DS900 Air features a tool-free clamshell side panel. Gently pull the top edge of the tempered glass side panel to unlatch it, then lift it off. Repeat for the other side panel if necessary.
- ກ່ອງອຸປະກອນເສີມ: Locate the accessory box inside the case, which contains screws, cable ties, and other mounting hardware.
4.2. ການຕິດຕັ້ງເມນບອດ
- ຕິດຕັ້ງ I/O ໄສ້ເຂົ້າໄປໃນຊ່ອງເປີດດ້ານຫລັງຂອງກໍລະນີ.
- Align your ATX, Micro-ATX, or Mini-ITX motherboard with the standoffs inside the case. Ensure the I/O ports align with the I/O shield.
- Secure the motherboard using the provided screws.
4.3. ການຕິດຕັ້ງຫນ່ວຍບໍລິການສະຫນອງພະລັງງານ (PSU).
- The DS900 Air has a dedicated bottom PSU chamber. Slide your ATX power supply into the chamber from the rear of the case.
- ຮັບປະກັນ PSU ດ້ວຍ screws ຈາກດ້ານຫລັງຂອງກໍລະນີ.
- Route necessary power cables through the cutouts into the main compartment.
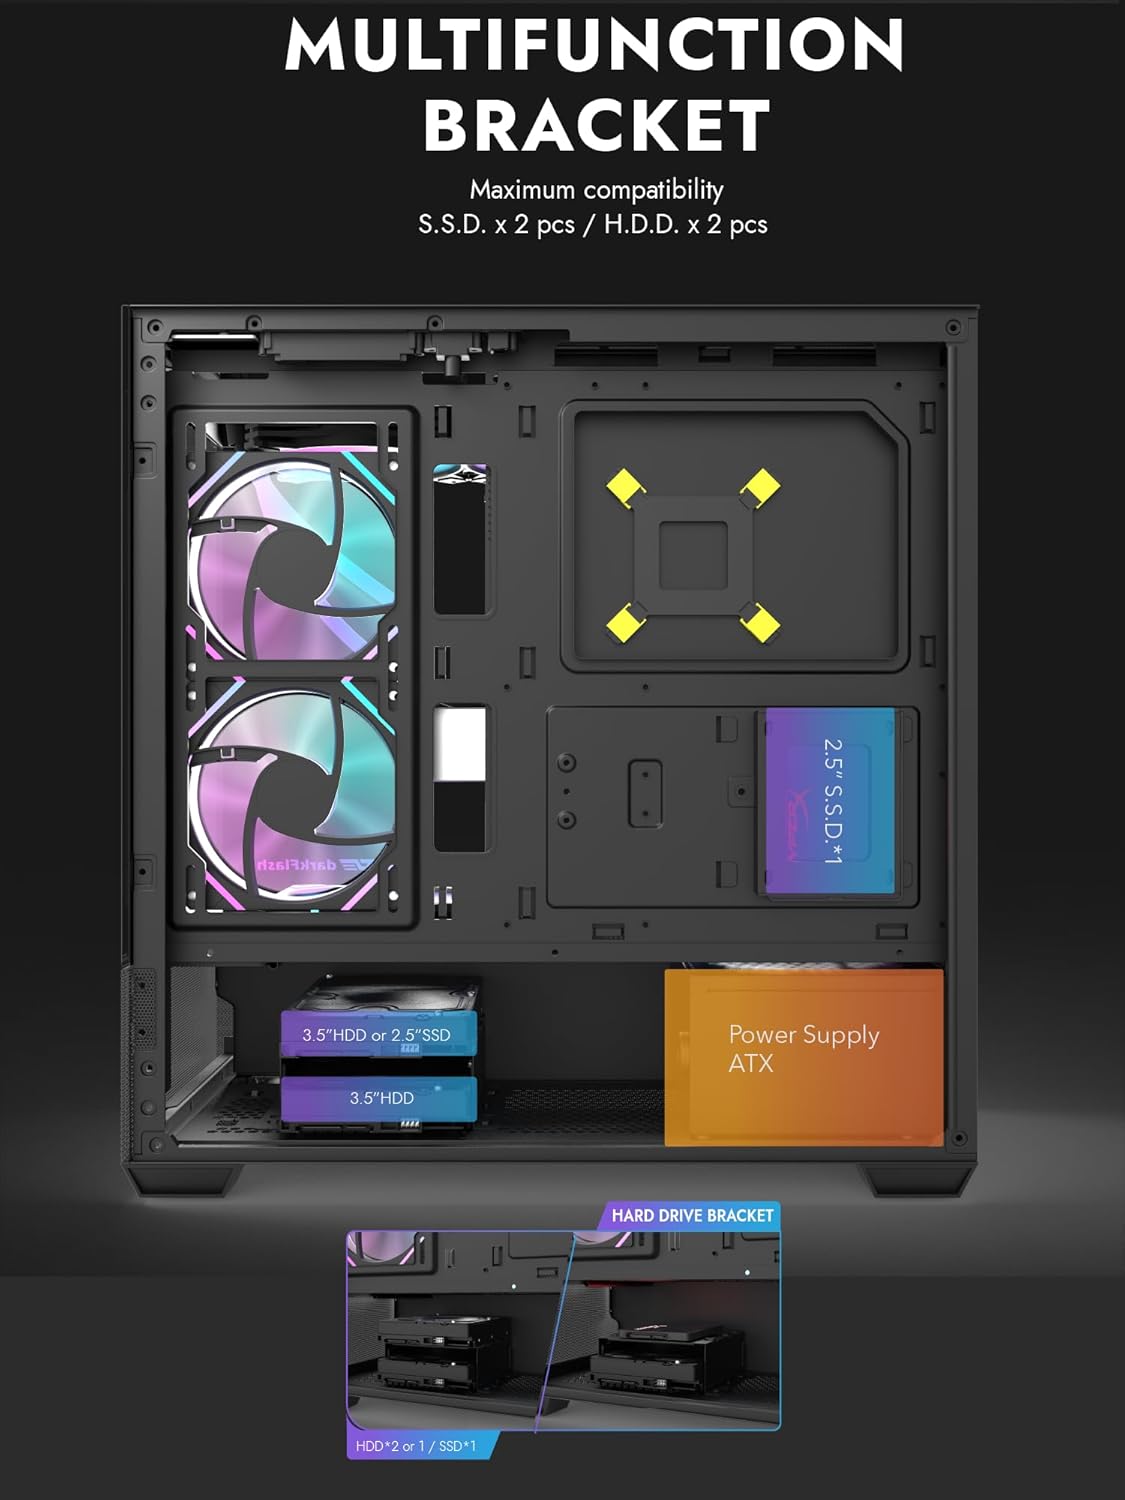
Figure 4.1: Internal layout showing the multifunction drive bracket and the bottom-mounted PSU chamber.
4.4. ການຕິດຕັ້ງອຸປະກອນການເກັບຮັກສາ
The case supports up to two 3.5" HDDs or 2.5" SSDs in the hard drive bracket, and two additional 2.5" SSDs on the multifunction bracket.
- 3.5" HDD / 2.5" SSD: Install drives into the removable hard drive bracket located in the PSU chamber. Secure with screws.
- SSD 2.5": Mount 2.5" SSDs onto the multifunction bracket located on the motherboard tray. Secure with screws.
4.5. ການຕິດຕັ້ງບັດກາຟິກ (GPU).
- ເອົາຊ່ອງສຽບ PCIe ທີ່ຈໍາເປັນອອກຈາກດ້ານຫລັງຂອງກໍລະນີ.
- Insert your graphics card into the appropriate PCIe slot on the motherboard.
- Secure the graphics card with screws. The case supports GPUs up to 425mm in length.
4.6. Cooling System Installation (Fans/Radiators)
The DS900 Air offers extensive cooling options:
- ເທິງ: Supports up to 3x 120mm fans or 2x 140mm fans, or a 360mm radiator.
- ລຸ່ມ: Supports up to 3x 120mm fans.
- ດ້ານຫຼັງ: Supports 1x 120mm fan.
- ເບື້ອງຂວາ: Supports 2x 120mm fans or a 240mm radiator.
Install fans and radiators using the appropriate screws and mounting points. Ensure correct airflow direction for optimal cooling.

Figure 4.2: Fan support locations and quantities within the DS900 Air chassis.

Figure 4.3: Airflow diagram demonstrating optimal cooling paths through the case.
4.7. ເຊື່ອມຕໍ່ສາຍ I/O ທາງໜ້າ
Connect the front panel cables (USB-C, USB 3.0, HD Audio, Power, Reset, LED) to their corresponding headers on your motherboard. Refer to your motherboard manual for exact header locations.

Figure 4.4: Top-right I/O panel featuring USB-C and USB 3.0 ports.
4.8. ການຄຸ້ມຄອງສາຍໄຟ
ນຳໃຊ້ແຜ່ນຕັດເສັ້ນທາງສາຍເຄເບິນ ແລະຈຸດຜູກລົງທາງຫຼັງຖາດເມນບອດເພື່ອຈັດການສາຍ. ນີ້ປັບປຸງການໄຫຼຂອງອາກາດແລະຄວາມງາມ.
5. ການປະຕິບັດ PC ຂອງທ່ານ
Once all components are installed and cables are connected, replace the side panels. Connect your monitor, keyboard, mouse, and power cable. Press the power button on the case to start your system. Ensure all fans are spinning and components are receiving power.
6. ບໍາລຸງຮັກສາ
ການບໍາລຸງຮັກສາເປັນປົກກະຕິຈະຊ່ວຍຮັບປະກັນການປະຕິບັດທີ່ດີທີ່ສຸດແລະອາຍຸຍືນຂອງອົງປະກອບ PC ຂອງທ່ານ.
- ທໍາຄວາມສະອາດຂີ້ຝຸ່ນ: Periodically clean dust filters and internal components using compressed air. The DS900 Air features mesh panels that help filter dust.
- ກະແສລົມ: Ensure no obstructions block the intake or exhaust vents of the case.
- ການຄຸ້ມຄອງສາຍໄຟ: Re-evaluate cable routing periodically to ensure no cables are interfering with fan blades or airflow.
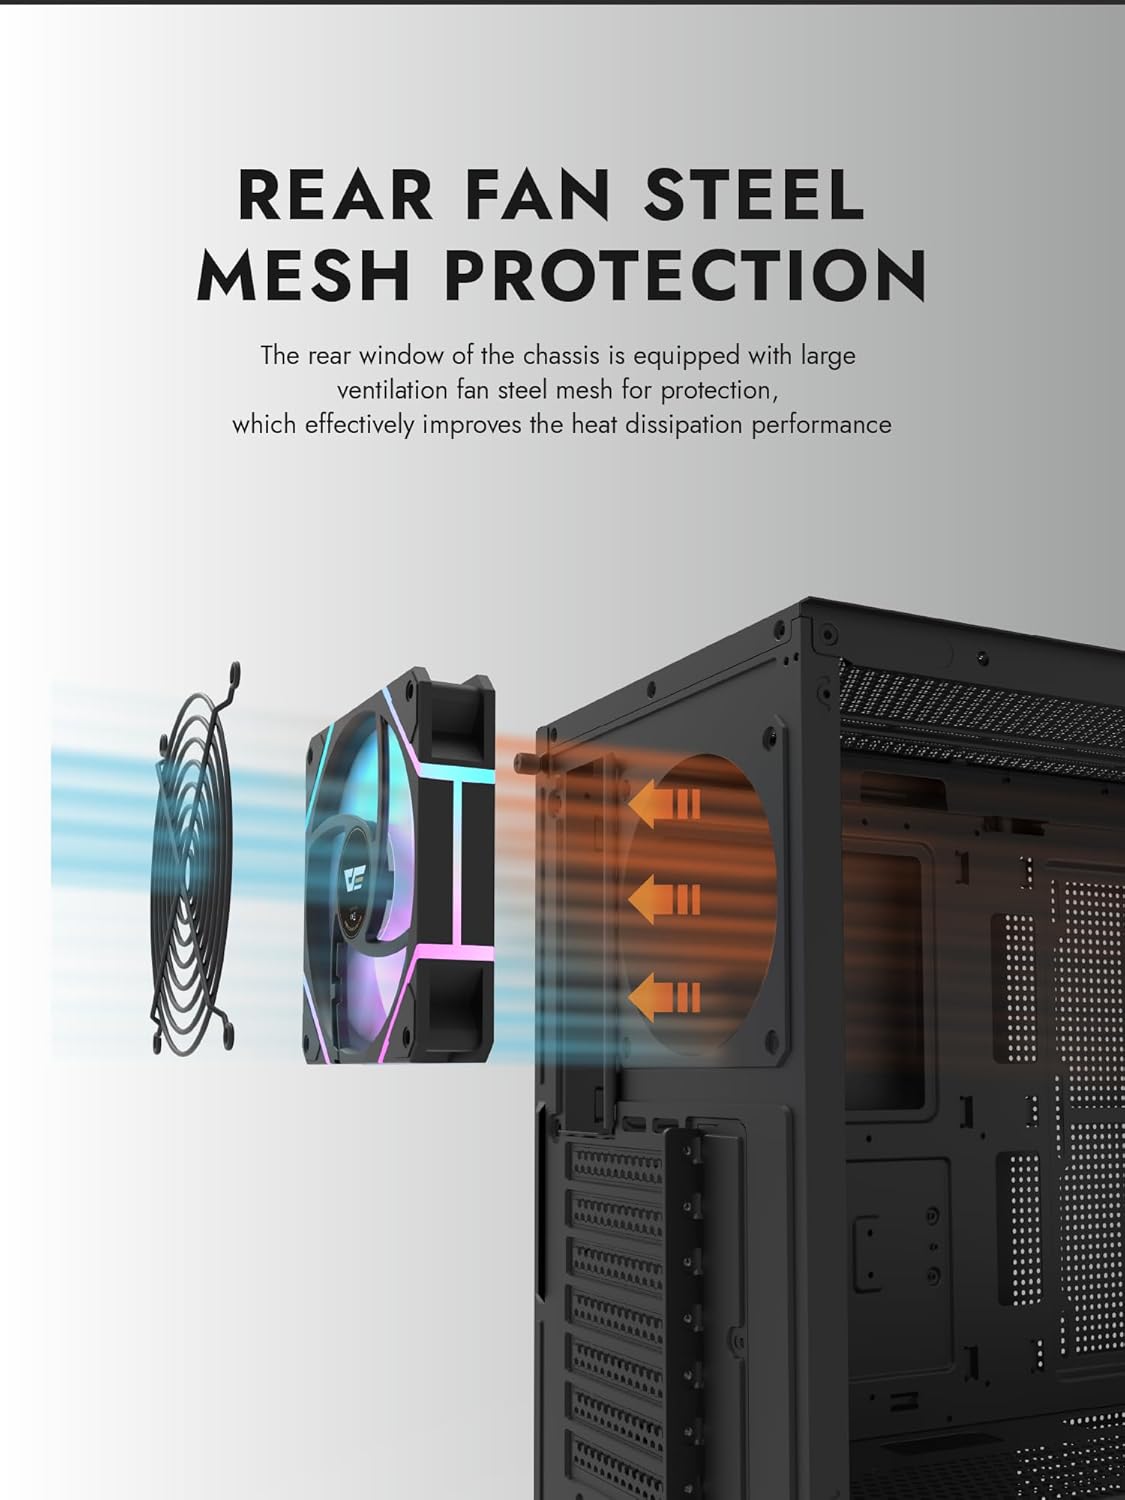
Figure 6.1: Rear fan steel mesh protection, designed to improve heat dissipation.
7. ການແກ້ໄຂບັນຫາ
ຖ້າທ່ານພົບບັນຫາກັບການສ້າງຄອມພິວເຕີຂອງທ່ານ, ໃຫ້ພິຈາລະນາຂັ້ນຕອນການແກ້ໄຂບັນຫາທົ່ວໄປຕໍ່ໄປນີ້:
- ບໍ່ມີພະລັງງານ: ກວດສອບການເຊື່ອມຕໍ່ພະລັງງານທັງໝົດ, ລວມທັງສາຍ PSU ກັບຝາ, PSU ກັບເມນບອດ, ແລະສາຍສະວິດໄຟທີ່ແຜງດ້ານໜ້າໄປຫາເມນບອດ.
- ບໍ່ມີການສະແດງຜົນ: Ensure your monitor is connected to the graphics card (not the motherboard I/O unless using integrated graphics). Reseat the graphics card and RAM.
- ຄວາມຮ້ອນເກີນ: Verify all fans are spinning correctly and are oriented for proper airflow. Check CPU cooler installation.
- ກວດບໍ່ພົບອົງປະກອບ: Reseat the component (e.g., RAM, GPU, storage drive) and check its power and data connections.
8. ການຮັບປະກັນແລະການສະຫນັບສະຫນູນ
darkFlash products are manufactured to high-quality standards. For warranty information or technical support, please refer to the official darkFlash webເວັບໄຊ ຫຼືຕິດຕໍ່ຮ້ານຂາຍຍ່ອຍຂອງທ່ານ. ຮັກສາຫຼັກຖານການຊື້ຂອງທ່ານສໍາລັບການຮ້ອງຂໍການຮັບປະກັນ.