
1. ບົດແນະນຳ
This manual provides detailed instructions for the installation, operation, and maintenance of your plplaaoo 100A MPPT Solar Charge Controller. This advanced controller is designed to optimize energy harvest from your solar panels and manage battery charging efficiently for 12V, 24V, 36V, and 48V solar power systems. Please read this manual thoroughly before installation and use to ensure proper function and safety.
2. ຄໍາແນະນໍາຄວາມປອດໄພ
ກະລຸນາສັງເກດການລະມັດລະວັງດ້ານຄວາມປອດໄພດັ່ງຕໍ່ໄປນີ້ໃນລະຫວ່າງການຕິດຕັ້ງແລະການດໍາເນີນງານ:
- Ensure all wiring is correctly connected and securely fastened to prevent loose connections and overheating.
- Always disconnect the solar panel and battery power before installing or adjusting the controller.
- Use appropriate tools and wear protective gear, including eye protection, during installation.
- Install the controller in a well-ventilated area, away from flammable gases and liquids.
- ຢ່າຖອດປະກອບ ຫຼື ພະຍາຍາມສ້ອມແປງຕົວຄວບຄຸມດ້ວຍຕົນເອງ. ຕິດຕໍ່ພະນັກງານທີ່ມີຄຸນວຸດທິເພື່ອຂໍຄວາມຊ່ວຍເຫຼືອ.
- Ensure the battery bank is properly sized and compatible with the controller's voltage ແລະການຈັດອັນດັບໃນປະຈຸບັນ.
- Avoid short-circuiting the solar panel, battery, or load terminals.
3. ຄຸນລັກສະນະຂອງຜະລິດຕະພັນ
- ການຕິດຕາມຈຸດພະລັງງານສູງສຸດ (MPPT): Achieves up to 98% conversion efficiency by intelligently tracking the maximum power point of solar panels under varying conditions.
- ອັດຕະໂນມັດ Voltage Adaptation: Automatically detects and adapts to 12V, 24V, 36V, or 48V battery systems.
- ການຄວບຄຸມຫຼາຍໜ້າທີ່: Supports various operating modes including PWM charging, constant current output, and voltage ລະບຽບການ.
- Integrated USB and DC Outputs: Features dual 5V 1A USB ports and a 2A DC output for charging external devices.
- ການປົກປ້ອງທີ່ສົມບູນແບບ: Includes safeguards against overvoltage, overcurrent, overtemperature, overload, short circuits, and reverse polarity.
- ການໂຕ້ຕອບຜູ້ເປັນມິດ: Equipped with a backlit LCD display for real-time monitoring and intuitive buttons for configuration.
- ການກໍ່ສ້າງທົນທານ: Features an aluminum heatsink for efficient cooling and robust design for harsh environments (0°C to 60°C).
- ຄວາມເຂົ້າກັນໄດ້ຂອງຫມໍ້ໄຟ: Compatible with gel, sealed lead-acid, and lithium batteries.
4. ເນື້ອໃນຊຸດ
- 1 x plplaaoo 100A MPPT Solar Charge Controller
- 1 x ຄູ່ມືຜູ້ໃຊ້
5. ຜະລິດຕະພັນເກີນview ແລະອົງປະກອບ
Familiarize yourself with the main components and interface of the solar charge controller.

ຮູບທີ 5.1: ດ້ານໜ້າ view of the solar charge controller, highlighting the LCD screen and various connection terminals.
The controller features an intuitive LCD display and clearly labeled ports for easy connection. The display provides real-time information about the system's status.
ຮູບທີ 5.2: ລະອຽດ view of the controller's connection ports.

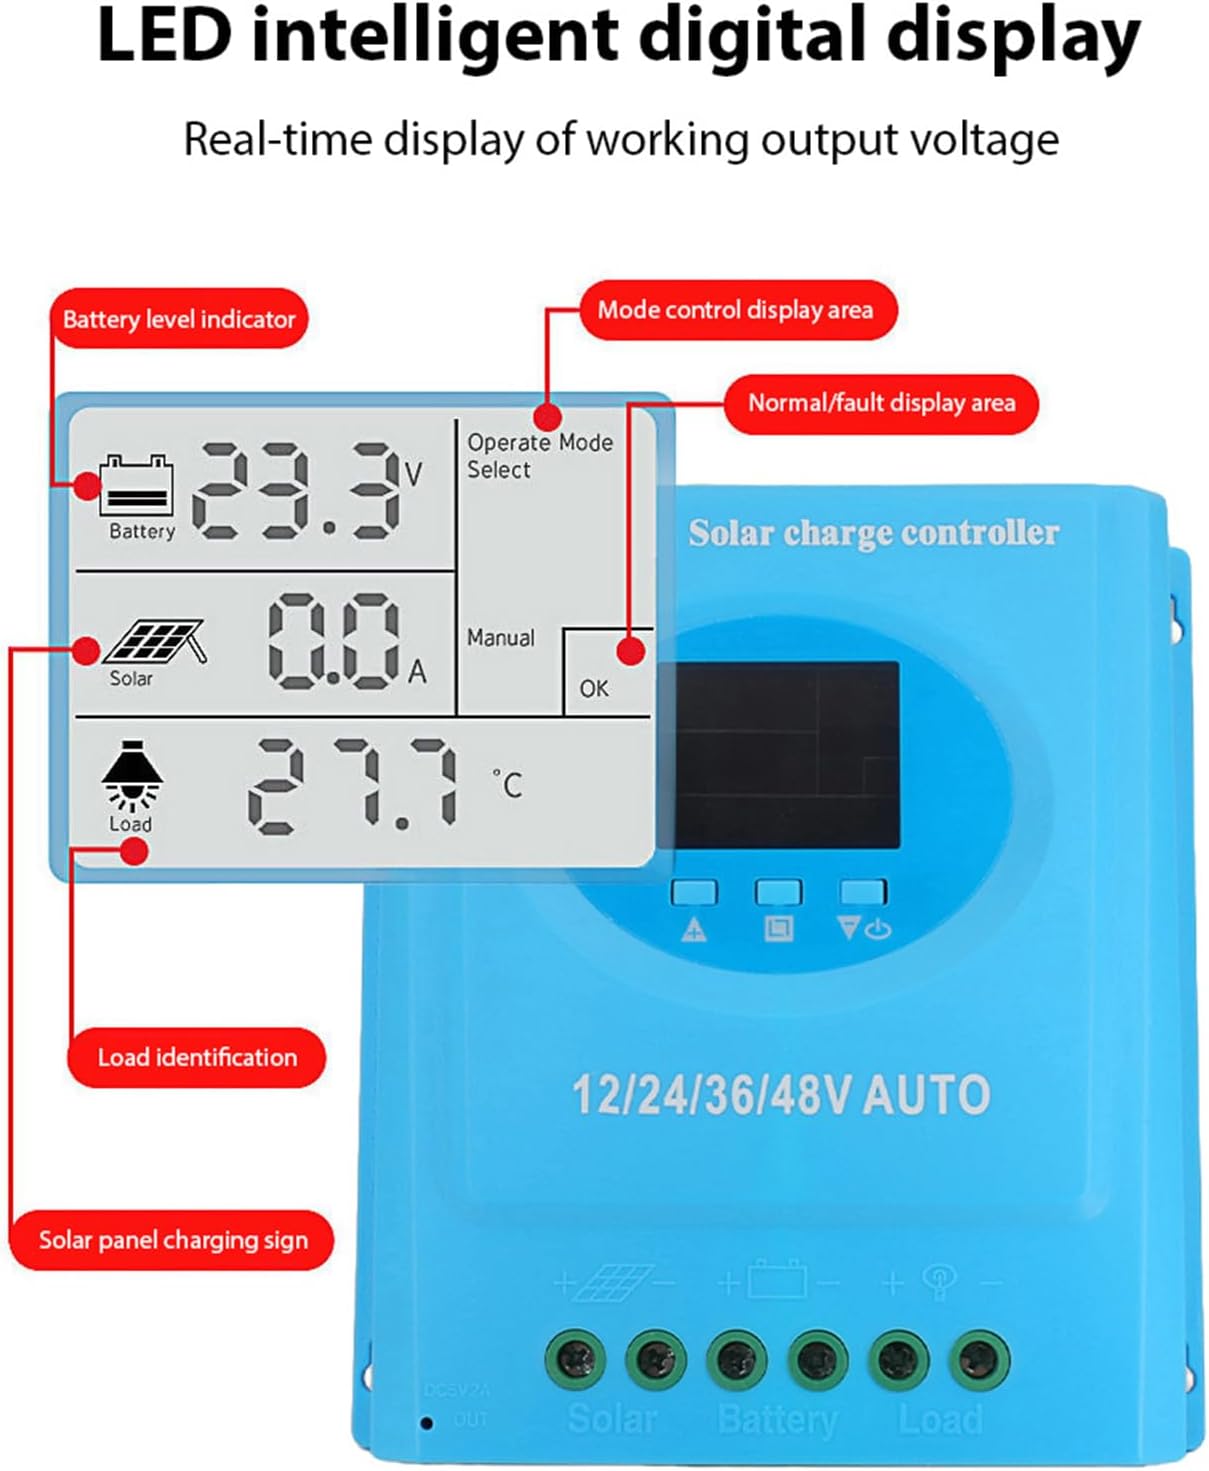
ຮູບທີ 5.3: ລະອຽດ view of the LCD display, indicating battery level, solar panel charging sign, load identification, operating mode, and real-time voltage.
5.1. ພອດເຊື່ອມຕໍ່
- ການໂຕ້ຕອບ USB ຄູ່: Two 5V 1A USB ports for charging mobile devices.
- Solar Panel Port: Connects to your solar panels (positive and negative).
- ພອດຫມໍ້ໄຟ: Connects to your battery bank (positive and negative).
- DC Load Port: Connects to your DC loads (positive and negative).
- DC Output Port: Additional DC output.
6. ການຕິດຕັ້ງແລະການຕິດຕັ້ງ
Follow these steps for proper installation of the solar charge controller. Ensure all power sources are disconnected before beginning.
6.1. ວິທີການສາຍ
Connect the components in the following order to prevent damage:
- ເຊື່ອມຕໍ່ຫມໍ້ໄຟ: Connect the battery to the controller's battery terminals (positive to positive, negative to negative). The controller will automatically detect the battery voltage.
- ເຊື່ອມຕໍ່ແຜງແສງອາທິດ: Connect the solar panel to the controller's solar panel terminals (positive to positive, negative to negative).
- ເຊື່ອມຕໍ່ການໂຫຼດ DC: Connect the DC load to the controller's load terminals (positive to positive, negative to negative).
ສຳຄັນ: ໃຫ້ເຊື່ອມຕໍ່ແບັດເຕີຣີກ່ອນສະເໝີ, ຈາກນັ້ນຕໍ່ແຜງໂຊລາເຊວ, ແລະສຸດທ້າຍຕໍ່ກະແສໄຟຟ້າ. ຕັດການເຊື່ອມຕໍ່ໃນລຳດັບກັບກັນ.

ຮູບທີ 6.1: Solar energy system wiring diagram. Note the correct polarity for all connections.
6.2. ການຕິດຕັ້ງ
Mount the controller vertically on a flat surface in a well-ventilated area, ensuring adequate clearance for air circulation around the heatsink. Avoid direct sunlight, high temperatures, and humid environments.
7. ຄໍາແນະນໍາການດໍາເນີນງານ
Once installed, the controller will automatically begin operating. The LCD display provides real-time system status.
7.1. ຂໍ້ມູນຈໍສະແດງຜົນ LCD
The LCD screen displays various parameters:
- ຕົວຊີ້ບອກລະດັບແບັດເຕີຣີ: Shows the current charge status of the battery.
- Solar Panel Charging Sign: Indicates when the solar panels are actively charging the battery.
- Load Identification: Shows the status of the connected DC load.
- Operating Mode Display Area: Displays the current operating mode (e.g., manual, automatic).
- Normal/Fault Display Area: Indicates normal operation or displays error codes if a fault occurs.
- Real-time Working Output Voltage: ສະແດງສະບັບປັດຈຸບັນtage ຂອງລະບົບ.
7.2. ການທໍາງານຂອງປຸ່ມ
The controller typically features multiple buttons for navigation and setting adjustments:
- ປຸ່ມເມນູ: Used to enter and exit the menu settings.
- ປຸ່ມຂຶ້ນ/ລົງ: Used to navigate through menu options and adjust parameter values.
- ປຸ່ມຕົກລົງ: Used to confirm selections and save settings.
Refer to the on-screen menu for specific parameter adjustments such as battery type, load control mode, and charging thresholds.
8. ບໍາລຸງຮັກສາ
ການບຳລຸງຮັກສາເປັນປະຈຳຮັບປະກັນປະສິດທິພາບທີ່ດີທີ່ສຸດ ແລະ ອາຍຸການໃຊ້ງານທີ່ຍາວນານຂອງຕົວຄວບຄຸມການສາກໄຟພະລັງງານແສງຕາເວັນຂອງທ່ານ.
- ທໍາຄວາມສະອາດ: Periodically clean the controller's exterior with a dry cloth to remove dust and debris. Ensure ventilation openings are clear.
- ກວດສອບການເຊື່ອມຕໍ່: Annually inspect all wiring connections for tightness and corrosion. Re-tighten if necessary.
- ກວດສອບສິ່ງແວດລ້ອມ: Ensure the installation environment remains within the specified operating temperature range and is free from excessive moisture or dust.
- ການກວດກາຫມໍ້ໄຟ: Regularly check the battery terminals for corrosion and ensure the battery is in good condition.
9. ການແກ້ໄຂບັນຫາ
ຖ້າທ່ານພົບບັນຫາກັບຕົວຄວບຄຸມການສາກໄຟພະລັງງານແສງຕາເວັນຂອງທ່ານ, ໃຫ້ອ້າງອີງເຖິງບັນຫາ ແລະ ວິທີແກ້ໄຂທົ່ວໄປຕໍ່ໄປນີ້:
| ບັນຫາ | ສາເຫດທີ່ເປັນໄປໄດ້ | ການແກ້ໄຂ |
|---|---|---|
| Controller not powering on / LCD blank |
|
|
| ແບັດເຕີຣີບໍ່ໄດ້ສາກ |
|
|
| ໂຫຼດບໍ່ເຮັດວຽກ |
|
|
| ສະແດງລະຫັດຂໍ້ຜິດພາດ | ຄວາມຜິດຂອງລະບົບສະເພາະ. | Refer to the controller's display for the specific error code and consult the full product documentation or contact support for detailed interpretation and resolution. |
10. ຂໍ້ມູນຈໍາເພາະ
| ພາລາມິເຕີ | ມູນຄ່າ |
|---|---|
| ຕົວແບບ | plplaaoozi6egog4wm-0A |
| ຍີ່ຫໍ້ | ແປວ່າ |
| ອັນດັບປັດຈຸບັນ | 100A |
| ລະບົບ Voltage | 12V / 24V / 36V / 48V Automatic Adaptation |
| ປະເພດການສາກໄຟ | MPPT (ຕິດຕາມຈຸດພະລັງງານສູງສຸດ) |
| ປະສິດທິພາບການແປງ | ສູງເຖິງ 98% |
| USB Output | Dual 5V 1A ports |
| ຜົນໄດ້ຮັບ DC | 2A |
| ອຸນຫະພູມປະຕິບັດການ | 0°C ຫາ 60°C |
| ຂະໜາດ (ປະມານ) | 19.5ຊມ x 18.3ຊມ x 6.8ຊມ (7.7in x 7.2in x 2.7in) |

ຮູບທີ 10.1: Approximate dimensions of the solar charge controller.
11. ການຮັບປະກັນແລະການສະຫນັບສະຫນູນ
ສໍາລັບຂໍ້ມູນການຮັບປະກັນ, ການສະຫນັບສະຫນູນດ້ານວິຊາການ, ຫຼືການສອບຖາມການບໍລິການ, ກະລຸນາຕິດຕໍ່ຮ້ານຂາຍຍ່ອຍຫຼືຜູ້ຜະລິດຂອງທ່ານໂດຍກົງ. ຮັກສາໃບຮັບເງິນການຊື້ຂອງທ່ານໄວ້ເປັນຫຼັກຖານການຊື້.