1. ບົດແນະນຳ
This manual provides instructions for the assembly, operation, and maintenance of the MONTECH X5M Micro ATX Gaming PC Case. The X5M is designed for high airflow and features pre-installed ARGB fans, a glass side panel, and an integrated GPU holder.
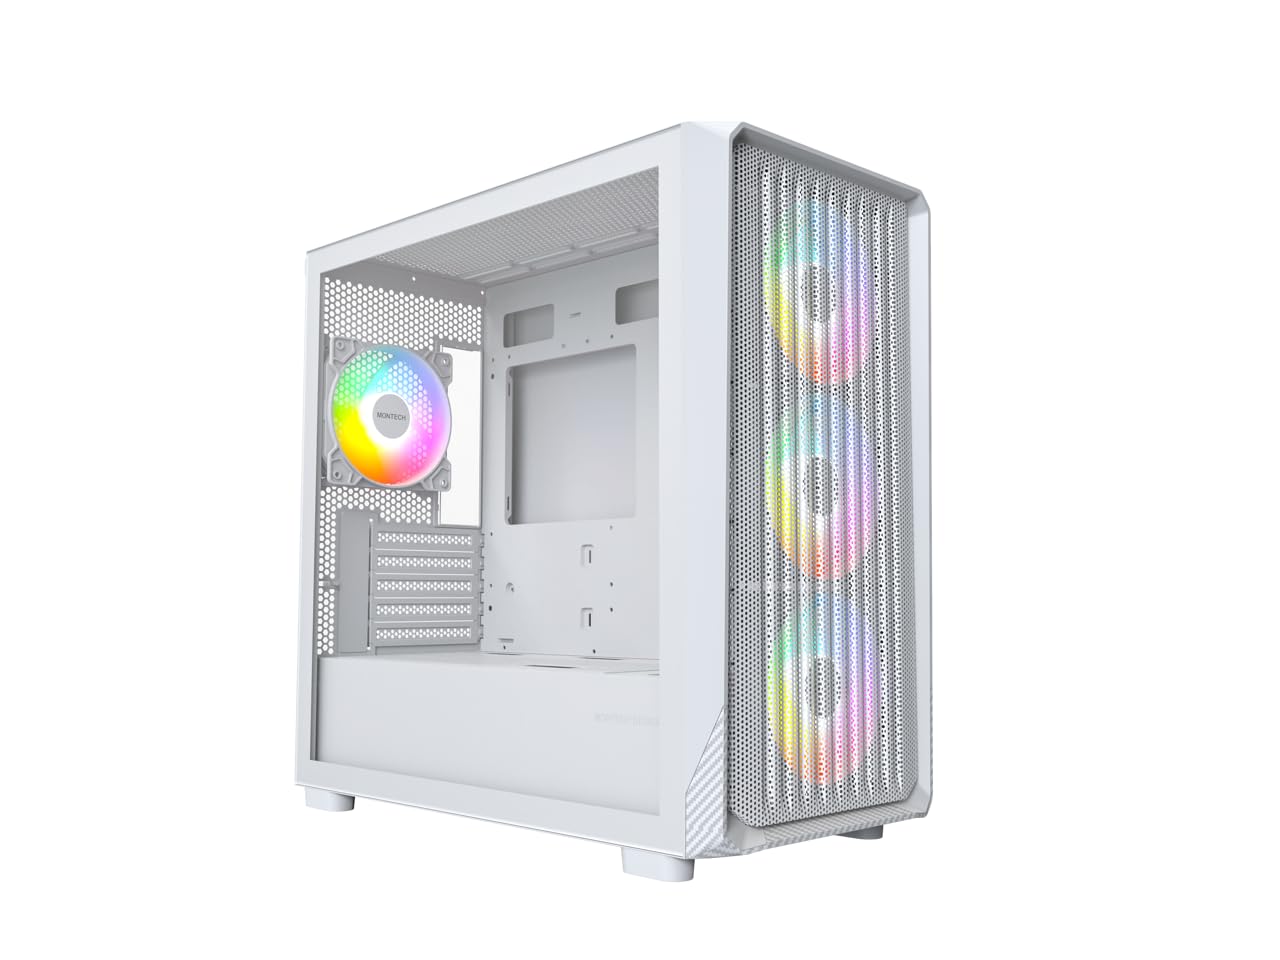
Figure 1: MONTECH X5M Micro ATX Gaming PC Case (White variant).
2. ຄຸນນະສົມບັດທີ່ສໍາຄັນ
- Integrated GPU Holder: An adjustable GPU support stand is included to provide physical support for graphics cards.
- ການອອກແບບກະແສລົມສູງ: Optimized structure for efficient cooling.
- ພັດລົມ ARGB ທີ່ຕິດຕັ້ງໄວ້ລ່ວງໜ້າ: Four 120mm ARGB fans are pre-installed for immediate cooling and customizable lighting.
- ແຜງດ້ານແກ້ວ Tempered: ສະຫນອງຄວາມຊັດເຈນ view ຂອງອົງປະກອບພາຍໃນ.
- Carbon Fiber Print Accents: Aesthetic detailing on the front panel.
- ການເຊື່ອມຕໍ່ອະເນກປະສົງ: Front I/O panel includes USB 2.0, USB 3.0, USB Type-C, and audio ports.

ຮູບ 2: ເກີນview of the MONTECH X5M case highlighting internal layout and ARGB fans.
3. ຂໍ້ມູນຈໍາເພາະ
| ຍີ່ຫໍ້ | ມອນເທັກ |
| ຊື່ຕົວແບບ | X5M |
| ປະເພດກໍລະນີ | Micro ATX Mid Tower |
| ຄວາມເຂົ້າກັນໄດ້ຂອງເມນບອດ | Micro ATX |
| ພັດລົມທີ່ຕິດຕັ້ງໄວ້ລ່ວງໜ້າ | ພັດລົມ ARGB ຂະໜາດ 4 x 120 ມມ |
| ຮອງຮັບຄວາມຍາວ GPU | ເຖິງ 405 ມມ |
| ຮອງຮັບຄວາມສູງຂອງຕົວເຮັດຄວາມເຢັນ CPU | ເຖິງ 165 ມມ |
| ຮອງຮັບຄວາມຍາວຂອງ PSU | ເຖິງ 230 ມມ |
| ການເກັບຮັກສາ Bays | Up to 2 HDDs & 4 SSDs |
| ທ່າເຮືອທາງ ໜ້າ I / O | 1x USB 2.0, 1x USB 3.0, 1x USB Type-C, Mic & Audio, LED Button, Power Button |
| ວິທີການເຮັດຄວາມເຢັນ | ອາກາດ |
| ຮອງຮັບ AIO Radiator | Top: Up to 360mm; Front: Up to 360mm |
| ວັດສະດຸ | Plastic with Carbon Fiber Accents, Tempered Glass |
| ນ້ໍາຫນັກລາຍການ | 14.3 ປອນ (6.49 ກິໂລ) |

Figure 3: Close-up of the carbon fiber print detailing on the front panel of the X5M case.
4. ການຕິດຕັ້ງແລະການຕິດຕັ້ງ
Follow these steps for installing components into your MONTECH X5M PC case. Ensure your system is powered off and unplugged before beginning any installation.
4.1. ການກະກຽມກໍລະນີ
- Carefully remove the tempered glass side panel by unscrewing the thumb screws and sliding it off.
- ເອົາແຜງດ້ານຫຼັງອອກເພື່ອເຂົ້າເຖິງພື້ນທີ່ຈັດການສາຍໄຟ.
4.2. ການຕິດຕັ້ງເມນບອດ
- ຕິດຕັ້ງແຜ່ນປ້ອງກັນ I/O (ຖ້າບໍ່ໄດ້ຕິດກັບເມນບອດຂອງທ່ານລ່ວງໜ້າ) ເຂົ້າກັບຊ່ອງເປີດດ້ານຫຼັງຂອງເຄສ.
- Align your Micro ATX motherboard with the standoffs inside the case.
- Secure the motherboard using the provided screws.
4.3. ການຕິດຕັ້ງຫນ່ວຍບໍລິການສະຫນອງພະລັງງານ (PSU).
- Place the PSU into the dedicated compartment at the bottom rear of the case.
- ຮັບປະກັນ PSU ດ້ວຍ screws ຈາກດ້ານຫລັງຂອງກໍລະນີ.
4.4. ການຕິດຕັ້ງອຸປະກອນເກັບຂໍ້ມູນ (HDD/SSD)
The X5M supports up to 2 HDDs and 4 SSDs.
- 2.5" SSDs: Mount SSDs onto the designated brackets behind the motherboard tray or on the PSU shroud.
- ຮາດດິດ 3.5": Install HDDs into the drive cage located under the PSU shroud.
4.5. ການຕິດຕັ້ງບັດກາຟິກ (GPU).
- ເອົາຊ່ອງສຽບ PCIe ທີ່ຈໍາເປັນອອກຈາກດ້ານຫລັງຂອງກໍລະນີ.
- Insert the GPU into the appropriate PCIe slot on your motherboard.
- ຮັບປະກັນ GPU ດ້ວຍສະກູ.
- Adjust the integrated GPU support stand to provide stability for your graphics card.
4.6. ການຕິດຕັ້ງພັດລົມແລະ radiator
The X5M comes with four 120mm ARGB fans pre-installed. Additional fans or AIO radiators can be installed as follows:
- ເທິງ: Supports 3x 120mm or 2x 140mm fans, or AIO radiators up to 360mm.
- ດ້ານໜ້າ: Supports 3x 120mm or 2x 140mm fans, or AIO radiators up to 360mm.
- ດ້ານຫຼັງ: Supports 1x 120mm fan.
- PSU Shroud: Supports 2x 120mm fans.

Figure 4: Illustration of airflow within the MONTECH X5M case and the pre-installed ARGB fans.

Figure 5: Diagram detailing fan and radiator support locations and sizes within the X5M case.
4.7. ການຄຸ້ມຄອງສາຍໄຟ
ໃຊ້ຈຸດຕັດສາຍໄຟ ແລະ ຈຸດມັດສາຍໄຟຢູ່ທາງຫຼັງຖາດເມນບອດເພື່ອຈັດລະບຽບສາຍໄຟ. ສິ່ງນີ້ຊ່ວຍປັບປຸງການໄຫຼວຽນຂອງອາກາດ ແລະ ຄວາມງາມ.
4.8. Front I/O Panel Connections
Connect the front panel cables (USB 2.0, USB 3.0, USB Type-C, HD Audio, Power Switch, Reset Switch, LED) to the corresponding headers on your motherboard. Refer to your motherboard manual for specific header locations.

Figure 6: Front I/O panel of the MONTECH X5M, showing USB 2.0, USB 3.0, USB Type-C, Mic & Audio jacks, LED button, and Power button.
5. ການດໍາເນີນງານ
5.1. ເປີດເຄື່ອງ
After all components are installed and cables connected, replace the side panels. Connect your monitor, keyboard, mouse, and power cable. Press the Power Button on the front I/O panel to start your system.
5.2. ການຄວບຄຸມພັດລົມ ARGB
ພັດລົມ ARGB ທີ່ຕິດຕັ້ງໄວ້ລ່ວງໜ້າສາມາດຄວບຄຸມໄດ້ສອງວິທີຄື:
- ປຸ່ມ LED ສະເພາະ: Use the LED button on the front I/O panel to cycle through 25 built-in lighting modes.
- ການຊິ້ງຂໍ້ມູນຂອງເມນບອດ: Connect the ARGB cables to a compatible 5V 3-pin ARGB header on your motherboard. Use your motherboard's RGB software (e.g., ASUS Aura Sync, MSI Mystic Light Sync, GIGABYTE RGB Fusion, ASRock Polychrome Sync) to synchronize and customize lighting effects.
6. ບໍາລຸງຮັກສາ
ການບໍາລຸງຮັກສາເປັນປົກກະຕິຈະຊ່ວຍຮັບປະກັນການປະຕິບັດທີ່ດີທີ່ສຸດແລະອາຍຸຍືນຂອງອົງປະກອບ PC ຂອງທ່ານ.
- ການເຮັດຄວາມສະອາດກອງຂີ້ຝຸ່ນ: Periodically remove and clean the dust filters (located on the top, front, and bottom) to maintain optimal airflow. Use compressed air or a soft brush.
- ການອະນາໄມພາຍນອກ: ເຊັດພື້ນຜິວພາຍນອກດ້ວຍຜ້າອ່ອນໆ, ງamp ຜ້າ. ຫຼີກລ້ຽງການເຮັດຄວາມສະອາດຂັດ.
- ທຳ ຄວາມສະອາດພາຍໃນ: With the system powered off and unplugged, use compressed air to remove dust from internal components and fans.
7. ການແກ້ໄຂບັນຫາ
- ລະບົບບໍ່ເປີດ:
- Ensure the power cable is securely connected to the PSU and the wall outlet.
- Check that the PSU switch is in the "ON" position.
- Verify all front panel connectors (especially the Power Switch) are correctly attached to the motherboard.
- Confirm the 24-pin ATX and 8-pin CPU power cables are securely connected to the motherboard.
- ພັດລົມບໍ່ໝຸນ / RGB ບໍ່ສະຫວ່າງ:
- Check that all fan power cables are securely connected to the fan hub or motherboard headers.
- Ensure ARGB cables are properly connected to the fan hub or a compatible 5V 3-pin ARGB header on the motherboard.
- If using motherboard synchronization, verify that the RGB software is installed and configured correctly.
- Try cycling through modes using the dedicated LED button on the front panel.
- ບໍ່ມີການສະແດງຜົນອອກ:
- Ensure your monitor cable is connected to the graphics card (GPU) and not the motherboard's integrated graphics port (unless you are using integrated graphics).
- ຣີເຊັດບັດກາຟິກໃນຊ່ອງ PCIe ຂອງມັນ.
- Check that the GPU power cables are securely connected.
8. ການຮັບປະກັນແລະການສະຫນັບສະຫນູນ
8.1. ຂໍ້ມູນການຮັບປະກັນ
The MONTECH X5M PC Case comes with a 1 ປີຮັບປະກັນຜູ້ຜະລິດ. This warranty covers defects in materials and workmanship under normal use. For specific terms and conditions, please refer to the official Montech webເວັບໄຊທ໌ຫຼືຕິດຕໍ່ສະຫນັບສະຫນູນລູກຄ້າ.
8.2. ການຊ່ວຍເຫຼືອລູກຄ້າ
For further assistance, technical support, or warranty claims, please visit the official Montech website or contact their customer service department. You can find contact information on the Montech webເວັບໄຊ: www.montechpc.com