
1. ບົດແນະນຳ
Thank you for choosing the GKU D1000 3-Camera 4K Dash Cam. This device is designed to provide comprehensive vehicle surveillance with its advanced features, including 4K front recording, 2.5K interior recording, 1080P rear recording, enhanced night vision, 5GHz WiFi connectivity, GPS tracking, G-sensor emergency recording, and 24-hour parking monitoring. This manual will guide you through the setup, operation, and maintenance of your dash cam to ensure optimal performance and safety.
2. ຜະລິດຕະພັນເກີນview
2.1. ເນື້ອໃນຊຸດ
ກະລຸນາກວດເບິ່ງຊຸດສຳລັບລາຍການຕໍ່ໄປນີ້:
- GKU D1000 Dash Cam Main Unit
- Rear Camera (6m cable)
- ສາຍໄຟສຽບໄຟຢາສູບ (3 ແມັດ)
- SD ກາດ 64GB
- 3M Double-Sided Tape (x2)
- Electrostatic Protection Film (x2)
- Japanese User Manual
- ເຄື່ອງມື ກຳ ຈັດສິວ
- ຄລິບສາຍ

ຮູບທີ 2.1: ເນື້ອໃນຊຸດ
2.2. Device Layout and Camera Views
The GKU D1000 features a compact design with integrated front and interior cameras, and a separate rear camera. The interior camera offers 360-degree rotation for flexible monitoring.

Figure 2.2: GKU D1000 Dash Cam Overview

Figure 2.3: 3-Camera Recording Modes

Figure 2.4: Adjustable Camera Angles
3. ຕັ້ງຄ່າ
3.1. ການຕິດຕັ້ງ
- ເຮັດຄວາມສະອາດພື້ນທີ່ກະຈົກທີ່ຝາ dash ຈະຖືກຕິດຕັ້ງ.
- Apply the electrostatic protection film to the windshield, then attach the 3M double-sided tape to the dash cam mount and secure it to the film.
- Connect the power cable to the dash cam and route it along the windshield trim to the cigarette lighter socket.
- Install the rear camera on the rear windshield. Route its cable to the main unit and connect it.
- Adjust the front and interior camera angles to ensure optimal coverage.

Figure 3.1: Dash Cam Installation Diagram
3.2. Initial Power On and SD Card Insertion
Insert the provided 64GB SD card into the dash cam's SD card slot. The device will automatically power on and begin recording when connected to your vehicle's power supply. It is recommended to format the SD card upon first use and periodically thereafter to maintain optimal performance.
4. ຄໍາແນະນໍາການດໍາເນີນງານ
4.1. ການບັນທຶກພື້ນຖານ
Once powered on, the dash cam automatically starts continuous loop recording. Video files are saved in segments (e.g., 1, 3, or 5 minutes) and the oldest files are overwritten when the SD card is full, ensuring continuous recording.
4.2. Emergency Recording (Manual)
Press the emergency button on the dash cam to manually trigger emergency recording. This locks the current video segment, preventing it from being overwritten by loop recording. These files are stored in a dedicated folder.

Figure 4.1: Manual Emergency Recording
4.3. Voice Guidance
The dash cam provides voice prompts for key operations and status updates, such as "Recording started," "Emergency recording activated," or "SD card formatted." This allows you to operate the device without diverting your attention from the road.

Figure 4.2: Voice Guidance Feature
5. ຄຸນສົມບັດຂັ້ນສູງ
5.1. Enhanced Night Vision (WDR & IR)
The GKU D1000 is equipped with an F/1.8 large aperture lens and a 6-layer glass lens for superior light capture. Wide Dynamic Range (WDR) technology balances exposure in high-contrast scenes, preventing overexposure and underexposure. The interior camera features 4 infrared (IR) lights, ensuring clear recording of the cabin even in complete darkness.
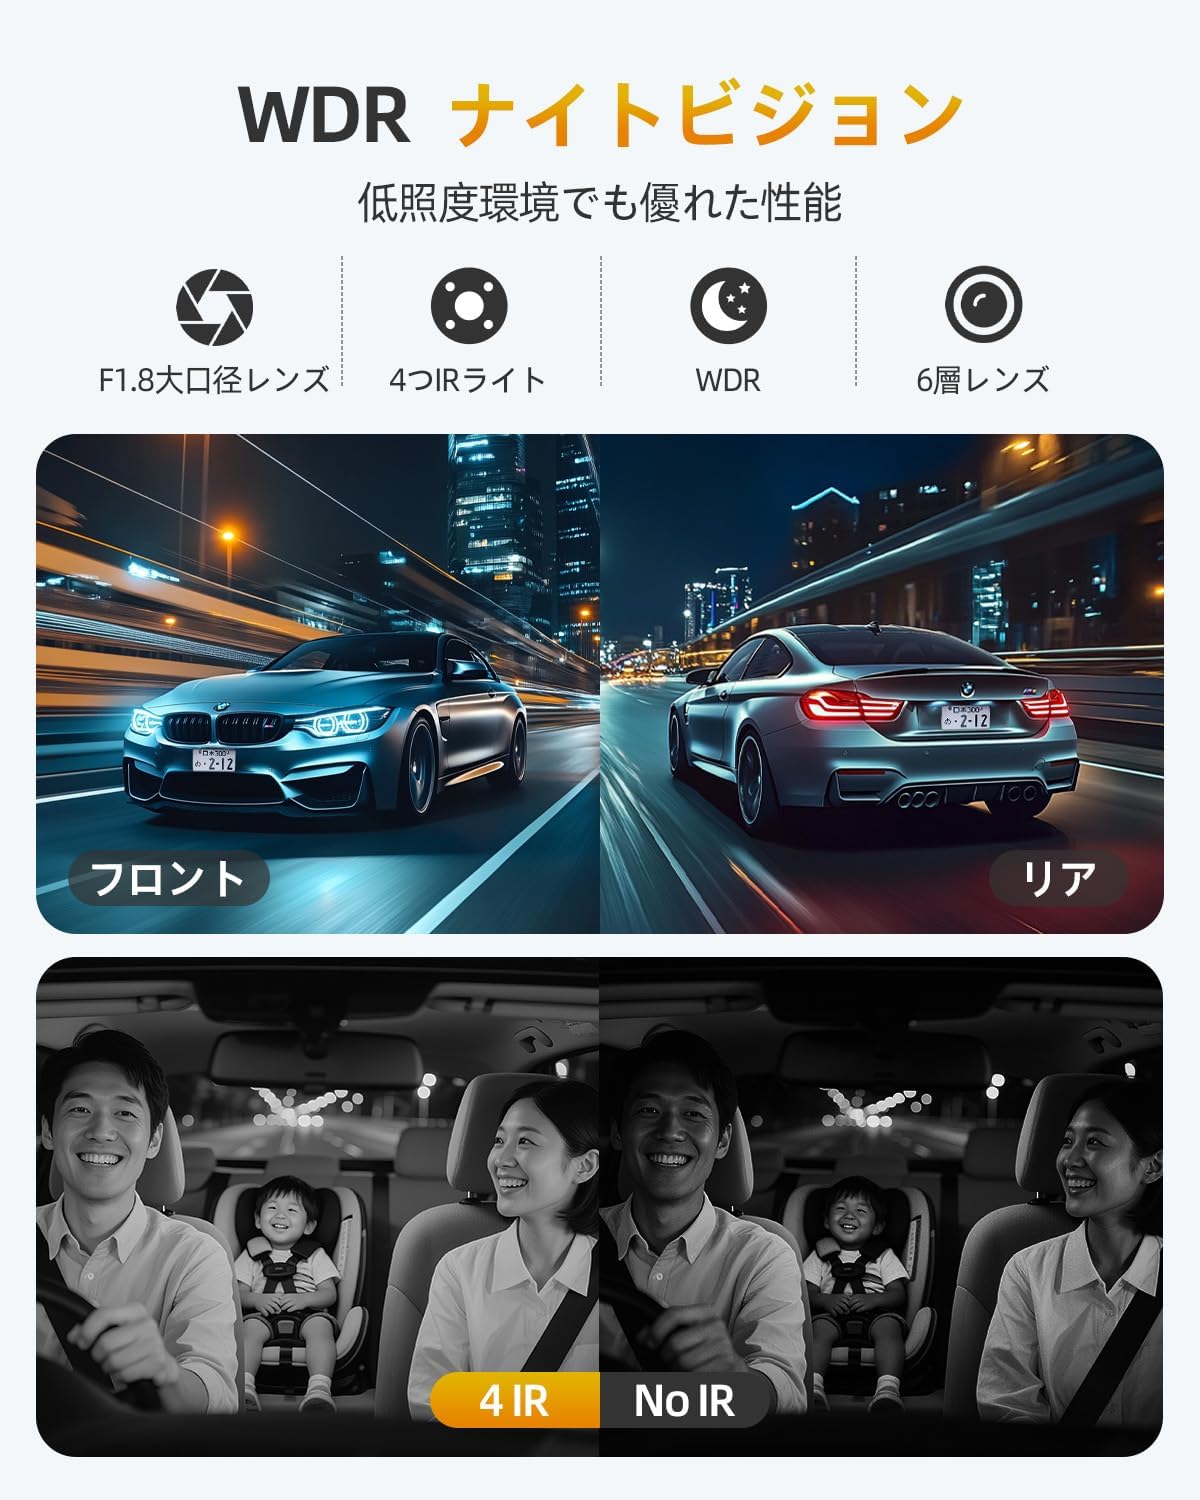
ຮູບທີ 5.1: ປະສິດທິພາບການເບິ່ງເຫັນໃນຕອນກາງຄືນ
5.2. 5GHz WiFi & Smartphone App Control
Connect your dash cam to your smartphone via 5GHz WiFi using the dedicated "GKU GO" app. This allows for high-speed transfer of video and photo files, real-time viewing, playback, and sharing. You can also manage dash cam settings directly from your phone.

Figure 5.2: 5GHz WiFi and App Control
5.3. GPS Route Tracking
The built-in GPS module accurately records your driving route, location, and speed. This data can be viewed ຄຽງຄູ່ກັບ foo ວິດີໂອຂອງທ່ານtage using the "GKU GO" app or a dedicated PC player, providing crucial evidence in case of an incident.

Figure 5.3: GPS Route Tracking
5.4. ການບັນທຶກ Loop
The dash cam continuously records video in a loop. When the memory card is full, the oldest unlocked files ຈະຖືກຂຽນທັບໂດຍອັດຕະໂນມັດໂດຍການບັນທຶກໃໝ່. ສິ່ງນີ້ຮັບປະກັນວ່າທ່ານມີອາຫານລ່າສຸດສະເໝີtage without manually managing storage. The device supports SD cards from 32GB up to 512GB (U3 specification recommended).

ຮູບທີ 5.4: ການທໍາງານຂອງການບັນທຶກ Loop
5.5. G-Sensor Emergency Recording (Automatic)
The built-in G-sensor detects sudden impacts or collisions. When an event is detected, the current video segment is automatically locked and saved to a protected folder, preventing it from being overwritten. The G-sensor sensitivity can be adjusted through the settings (6 levels: Off, Highest, High, Medium, Low, Lowest).

Figure 5.5: G-Sensor Activated Emergency Recording
5.6. ການຕິດຕາມກວດກາບ່ອນຈອດລົດ 24 ຊົ່ວໂມງ
The GKU D1000 offers 24-hour parking monitoring to protect your vehicle while parked. This feature requires a dedicated ACC hardwire kit (sold separately, ASIN: B0F4MWB1Z3 / B0CD222SYB) to connect directly to your car's fuse box.
- ບັນທຶກເວລາສິ້ນສຸດ: Records continuously at a low frame rate, saving storage space and power.
- ການບັນທຶກການກວດຈັບຜົນກະທົບ: If an impact is detected while parked, the G-sensor triggers emergency recording to capture the event.

ຮູບ 5.6: ການຕິດຕາມບ່ອນຈອດລົດ 24 ຊົ່ວໂມງ
5.7. LED Signal Light Interference Countermeasures
The recording frame rate has been adjusted from the traditional 30fps to 27.5fps to prevent the "signal light disappearing phenomenon" caused by synchronization with LED traffic light cycles. This ensures clear recording of traffic signals, providing reliable evidence.
6. ບໍາລຸງຮັກສາ
6.1. ການຈັດການ SD Card
Regularly format your SD card (at least once a month) to prevent data corruption and ensure smooth operation. Use a high-quality U3 speed class SD card for best performance. If the SD card is not recognized or shows errors, try formatting it or replacing it.
6.2. ທໍາຄວາມສະອາດ
Gently wipe the camera lenses with a soft, lint-free cloth to remove dust or smudges. Avoid using abrasive cleaners or solvents that could damage the lens coating. Keep the dash cam unit clean and free from obstructions.
7. ການແກ້ໄຂບັນຫາ
| ບັນຫາ | ສາເຫດທີ່ເປັນໄປໄດ້ | ການແກ້ໄຂ |
|---|---|---|
| Dash cam ບໍ່ເປີດ. | ບໍ່ມີແຫຼ່ງຈ່າຍໄຟ; ສາຍໄຟມີບັນຫາ; ການເຊື່ອມຕໍ່ວ່າງ. | Check power connection; try a different power source; ensure cable is securely plugged in. |
| ການບັນທຶກຢຸດ ຫຼືຢຸດ. | SD card error; low-quality SD card; full SD card. | Format the SD card; use a U3 speed class SD card; replace the SD card. |
| ຄຸນນະພາບວິດີໂອບໍ່ດີ (ມົວ, ມືດ). | ເລນເປື້ອນ; ການຕັ້ງຄ່າບໍ່ຖືກຕ້ອງ; ສະພາບແສງໜ້ອຍ. | Clean the lens; adjust exposure settings; ensure WDR is enabled. |
| ບັນຫາການເຊື່ອມຕໍ່ WiFi. | Incorrect password; out of range; app issues. | Verify WiFi password; move closer to the dash cam; restart the app and dash cam. |
| ກ້ອງຫຼັງບໍ່ສະແດງ. | ການເຊື່ອມຕໍ່ສາຍໄຟວ່າງ; ກ້ອງຫຼັງຜິດພາດ. | Check the rear camera cable connection to the main unit. |
8. ຂໍ້ມູນຈໍາເພາະ
| ຄຸນສົມບັດ | ຂໍ້ມູນຈໍາເພາະ |
|---|---|
| ຍີ່ຫໍ້ | GKU |
| ໝາຍເລກຕົວແບບ | D1000 |
| ຂະໜາດສິນຄ້າ | 7D x 11W x 14H ຊມ |
| ນ້ຳໜັກສິນຄ້າ | 300 ກຣາມ |
| ຮູຮັບແສງສູງສຸດ | f/1.8 |
| ການຈັດວາງ | ດ້ານ ໜ້າ, ດ້ານຫລັງ |
| ລວມແບັດເຕີຣີ | ແມ່ນແລ້ວ |
| Included Memory Card Capacity | 64 GB |
| ຮັບປະກັນ | 1 ປີ |
9. ການຮັບປະກັນແລະການສະຫນັບສະຫນູນ
9.1. ຂໍ້ມູນການຮັບປະກັນ
The GKU D1000 Dash Cam comes with a 1-year manufacturer's warranty from the date of purchase. This warranty covers defects in materials and workmanship under normal use. Please retain your proof of purchase for warranty claims.
9.2. ການຊ່ວຍເຫຼືອລູກຄ້າ
For technical assistance, troubleshooting, or warranty inquiries, please contact GKU customer support through the Amazon platform or visit the official GKU website. Our support team is available to help you with any questions or issues you may encounter.