1. ບົດແນະນຳ
This manual provides comprehensive instructions for the Denash X99D3M M ATX Motherboard. It is designed to assist users with the proper installation, configuration, and maintenance of the motherboard to ensure stable and efficient operation of your computer system. Please read this manual thoroughly before proceeding with installation.

ຮູບພາບ 1.1: ຫຼາຍກວ່າview of the Denash X99D3M M ATX Motherboard. This image displays the general layout of the motherboard, highlighting key components such as the CPU socket, RAM slots, and various expansion ports.
2. ຄຸນລັກສະນະຂອງຜະລິດຕະພັນ
- ຮອງຮັບ CPU: Designed for LGA 2011-3 sockets, supporting E5 V3/V4 and i7 58xx/68xx series CPUs.
- ໜ່ວຍຄວາມຈຳ: Features 4 x DDR4 DIMM slots, supporting up to 128GB of DDR4 2666, 2400, or 2133MHz memory.
- ການເກັບຮັກສາ: Equipped with 4 x SATA 2.0 ports and 1 x NVME M.2 interface (supporting NGFF and NVME protocols).
- ການຂະຫຍາຍຕົວ: Includes 1 x PCIE x16 graphics card slot and 1 x PCIE X1 slot.
- ການເຊື່ອມຕໍ່: Offers 4 x USB 2.0 and 4 x USB 3.0 ports, 1 x RJ45 network port, and PS/2 keyboard/mouse universal port.
- ຄວາມທົນທານ: Constructed with metal and PCB materials, featuring all solid-state capacitors for stable performance and extended lifespan.
3. ເນື້ອໃນຊຸດ
ກວດສອບວ່າລາຍການທັງຫມົດແມ່ນມີຢູ່ໃນຊຸດ:
- 1 x Denash X99D3M M ATX Motherboard
- 1 x Metal I/O Plate
- 1 x ສາຍຂໍ້ມູນ SATA
4. ການຕິດຕັ້ງແລະການຕິດຕັ້ງ
ກ່ອນທີ່ຈະເລີ່ມການຕິດຕັ້ງ, ໃຫ້ແນ່ໃຈວ່າພື້ນທີ່ເຮັດວຽກຂອງທ່ານສະອາດ, ມີແສງສະຫວ່າງດີ, ແລະ ບໍ່ມີໄຟຟ້າສະຖິດ. ແນະນຳໃຫ້ໃສ່ສາຍແຂນປ້ອງກັນໄຟຟ້າສະຖິດເພື່ອປ້ອງກັນຄວາມເສຍຫາຍຕໍ່ອົງປະກອບຕ່າງໆ.
4.1. ການຕິດຕັ້ງ CPU
- ຊອກຫາຊັອກເກັດ CPU LGA 2011-3 ຢູ່ໃນເມນບອດ.
- Gently push down the load lever and pull it away from the socket to open the CPU retention frame.
- ວາງ CPU ກັບຊັອກເກັດຢ່າງລະມັດລະວັງ, ໃຫ້ແນ່ໃຈວ່າສາມຫຼ່ຽມຄໍາໃນ CPU ກົງກັບສາມຫຼ່ຽມຢູ່ໃນເຕົ້າຮັບ. ຢ່າບັງຄັບ CPU ເຂົ້າໄປໃນບ່ອນ.
- Lower the CPU into the socket. Close the retention frame and secure it with the load lever.
- ໃຊ້ການວາງຄວາມຮ້ອນໃສ່ CPU ແລະຕິດຕັ້ງ CPU cooler ຕາມຄໍາແນະນໍາຂອງຜູ້ຜະລິດຂອງມັນ.

Image 4.1: Close-up of the LGA 2011-3 CPU socket. This image shows the socket where the processor is installed, emphasizing the retention mechanism.
4.2. ການຕິດຕັ້ງຫນ່ວຍຄວາມຈໍາ (RAM).
- ເປີດຄລິບຢູ່ທັງສອງສົ້ນຂອງຊ່ອງ DDR4 DIMM.
- ວາງຈຸດຕັດຢູ່ໃນໂມດູນ RAM ດ້ວຍກະແຈໃນຊ່ອງ DIMM.
- ກົດລົງໃຫ້ແໜ້ນທັງສອງສົ້ນຂອງໂມດູນ RAM ຈົນກ່ວາ clips ເຂົ້າໄປໃນສະຖານທີ່.

ຮູບພາບ 4.2: View of the four DDR4 DIMM slots. This image illustrates the memory slots where RAM modules are to be installed.
4.3. Storage Device Installation (SATA & M.2)
- SATA Drives: Connect SATA data cables from your storage drives (HDDs/SSDs) to the SATA 2.0 ports on the motherboard. Connect SATA power cables from your power supply to the drives.
- SSD M.2 NVME: Locate the M.2 slot. Insert the M.2 SSD at a 30-degree angle, then gently push it down and secure it with the provided screw. Ensure the jumper switch for the M.2 interface is set correctly for Serial ATA or PCIE mode as required by your M.2 device.

Image 4.3: Close-up of the SATA 2.0 ports and M.2 NVME interface. This image details the connectivity options for storage devices.
4.4. ການເຊື່ອມຕໍ່ພະລັງງານ
- ເຊື່ອມຕໍ່ຕົວເຊື່ອມຕໍ່ໄຟ ATX 24-pin ຈາກແຫຼ່ງສະໜອງໄຟຂອງທ່ານໄປຫາເຕົ້າສຽບໄຟຫຼັກໃນເມນບອດ.
- Connect the 8-pin CPU power connector (EPS12V) from your power supply to the CPU power socket near the CPU.
4.5. ແຜງດ້ານໜ້າ ແລະ ການເຊື່ອມຕໍ່ I/O
- Connect the front panel headers (power switch, reset switch, HDD LED, power LED) to their respective pins on the motherboard. Refer to the motherboard's silkscreen labels for correct orientation.
- Connect USB 2.0 and USB 3.0 front panel cables to the corresponding USB headers.
- Connect the audio front panel cable to the audio header.
- Install your graphics card into the PCIE x16 slot and secure it.
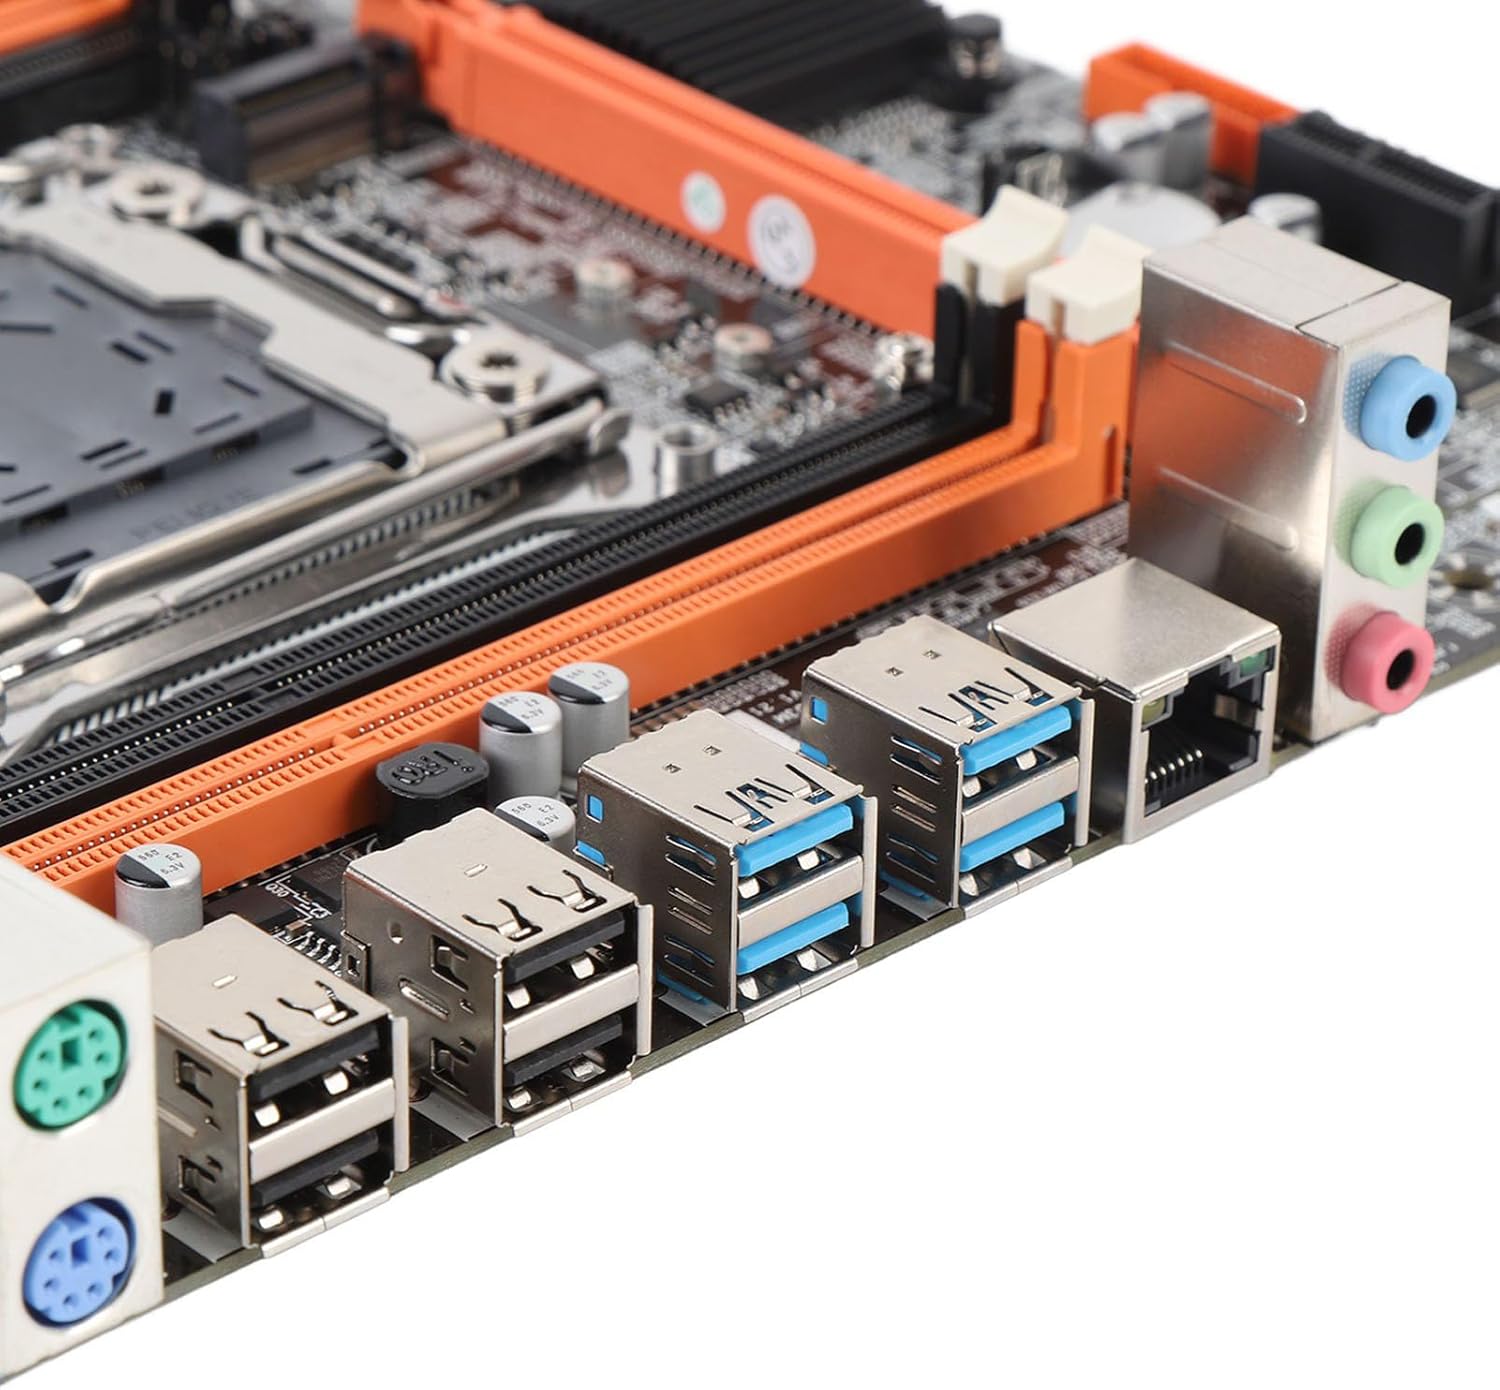
Image 4.4: Rear I/O ports including USB, LAN, and audio jacks. This image shows the external connectivity options available on the motherboard.
5. ຄໍາແນະນໍາການດໍາເນີນງານ
5.1. ການ Boot-up ເບື້ອງຕົ້ນ
- After completing all hardware installations, connect your monitor, keyboard, and mouse.
- ເປີດລະບົບຂອງທ່ານ. ລະບົບຄວນສະແດງໜ້າຈໍເລີ່ມຕົ້ນຂອງ BIOS/UEFI.
- Press the designated key (usually DEL or F2) during boot to enter the BIOS/UEFI setup.
5.2. ການຕັ້ງຄ່າ BIOS/UEFI
In the BIOS/UEFI, you can configure various system settings, including boot order, date/time, and hardware parameters. Ensure your boot device (e.g., SSD with OS) is prioritized in the boot sequence.
5.3. ການຕິດຕັ້ງໄດເວີ
After installing your operating system, install the necessary drivers for the motherboard chipset, network, audio, and any other integrated components. These drivers are typically provided on a CD/DVD or can be downloaded from the manufacturer's webເວັບໄຊ.
6. ຂໍ້ມູນຈໍາເພາະ
| ປະເພດລາຍການ | ເມນບອດ |
| Motherboard Architecture | M ATX |
| ຊິບເຊັດ | X99H |
| Supported CPU Types | for LGA 2011-3 (E5 V3/V4, i7 58xx/68xx) |
| ປະເພດຄວາມຈໍາ | DDR4 2666, 2400, 2133MHz |
| Memory Slots | 4 × DDR4 DIMM (Max 128GB) |
| Onboard Network Card | ແມ່ນແລ້ວ |
| Graphics Card Standard | PCI Express 16X |
| ພອດ USB | 4 x USB 2.0, 4 x USB 3.0 |
| Serial ATA Ports | 4 x Serial ATA 2.0 |
| ແບັດເຕີຣີໃນຕົວ | CR2032 x 1 (240mAh) |
| ສະລັອດຕິງຂະຫຍາຍ | 1 x PCIE x16, 1 x PCIE X1, 1 x NVME M.2 Interface |
| ຜອດ I/O | PS/2, 1 x RJ45, USB 2.0, USB 3.0, Audio |
| ຂະໜາດສິນຄ້າ | 10.24 x 7.87 x 1.97 ນິ້ວ |
| ນ້ໍາຫນັກລາຍການ | 1.46 ປອນ |
| ໝາຍເລກຕົວແບບ | Denashckge97d20i |
7. ການແກ້ໄຂບັນຫາ
- ບໍ່ມີພະລັງງານ: Ensure all power cables (24-pin ATX, 8-pin CPU) are securely connected to the motherboard and power supply. Verify the power supply switch is on.
- ບໍ່ມີການສະແດງຜົນ: Check that the monitor is connected to the graphics card (not the motherboard's I/O if a dedicated GPU is installed). Reseat the graphics card and RAM modules.
- ລະບົບບໍ່ສະຖຽນ/ຂັດຂ້ອງ: This can be caused by incompatible RAM, insufficient power, or overheating. Verify RAM compatibility and seating. Check CPU cooler installation and fan operation.
- ບໍ່ກວດພົບອຸປະກອນຕໍ່ພ່ວງ: Ensure USB devices are properly connected. Try different USB ports. Check for necessary drivers.
- ຣີເຊັດ BIOS: If system settings become unstable, you can clear the CMOS by removing the CR2032 battery for a few minutes or using the CMOS clear jumper (refer to motherboard diagram for location).
8. ບໍາລຸງຮັກສາ
- ທໍາຄວາມສະອາດ: ປົກກະຕິເຮັດຄວາມສະອາດຂີ້ຝຸ່ນຈາກເມນບອດແລະອົງປະກອບໂດຍໃຊ້ອາກາດບີບອັດ. ກວດໃຫ້ແນ່ໃຈວ່າລະບົບປິດ ແລະຖອດປລັກອອກກ່ອນທຳຄວາມສະອາດ.
- ອັບເດດ BIOS/UEFI: ກວດສອບຜູ້ຜະລິດເປັນໄລຍະ webເວັບໄຊທ໌ສຳລັບການອັບເດດ BIOS/UEFI. ການອັບເດດສາມາດປັບປຸງຄວາມໝັ້ນຄົງ, ຄວາມເຂົ້າກັນໄດ້ ແລະ ປະສິດທິພາບ. ປະຕິບັດຕາມຄຳແນະນຳການອັບເດດຢ່າງລະມັດລະວັງເພື່ອຫຼີກເວັ້ນການທຳລາຍເມນບອດ.
- ການຄຸ້ມຄອງສາຍໄຟ: ໃຫ້ແນ່ໃຈວ່າສາຍເຄເບີ້ນຖືກນໍາໄປຢ່າງເປັນລະບຽບເພື່ອປັບປຸງການໄຫຼວຽນຂອງອາກາດແລະປ້ອງກັນການລົບກວນ.

Image 8.1: Close-up of solid-state capacitors. These components contribute to the motherboard's stable performance and longevity.
9. ການຮັບປະກັນແລະການສະຫນັບສະຫນູນ
For warranty information and technical support, please refer to the documentation provided with your purchase or visit the official Denash webເວັບໄຊ. ຮັກສາຫຼັກຖານການຊື້ຂອງທ່ານສໍາລັບການຮ້ອງຂໍການຮັບປະກັນ.