
1. ບົດແນະນຳ
The ASUS DC300 Docking Station is a compact device designed to streamline laptop connectivity and enhance productivity. It allows users to connect multiple peripherals, external displays, and power their laptop through a single USB-C cable. This manual provides detailed instructions for setting up, operating, and maintaining your docking station.
2. ຜະລິດຕະພັນເກີນview
The ASUS DC300 Docking Station offers extensive connectivity options in a sleek, durable design. Its metal construction ensures longevity and a sophisticated appearance that blends seamlessly into any workspace. Key features include support for multiple displays, high-speed data transfer ports, and pass-through charging capabilities.
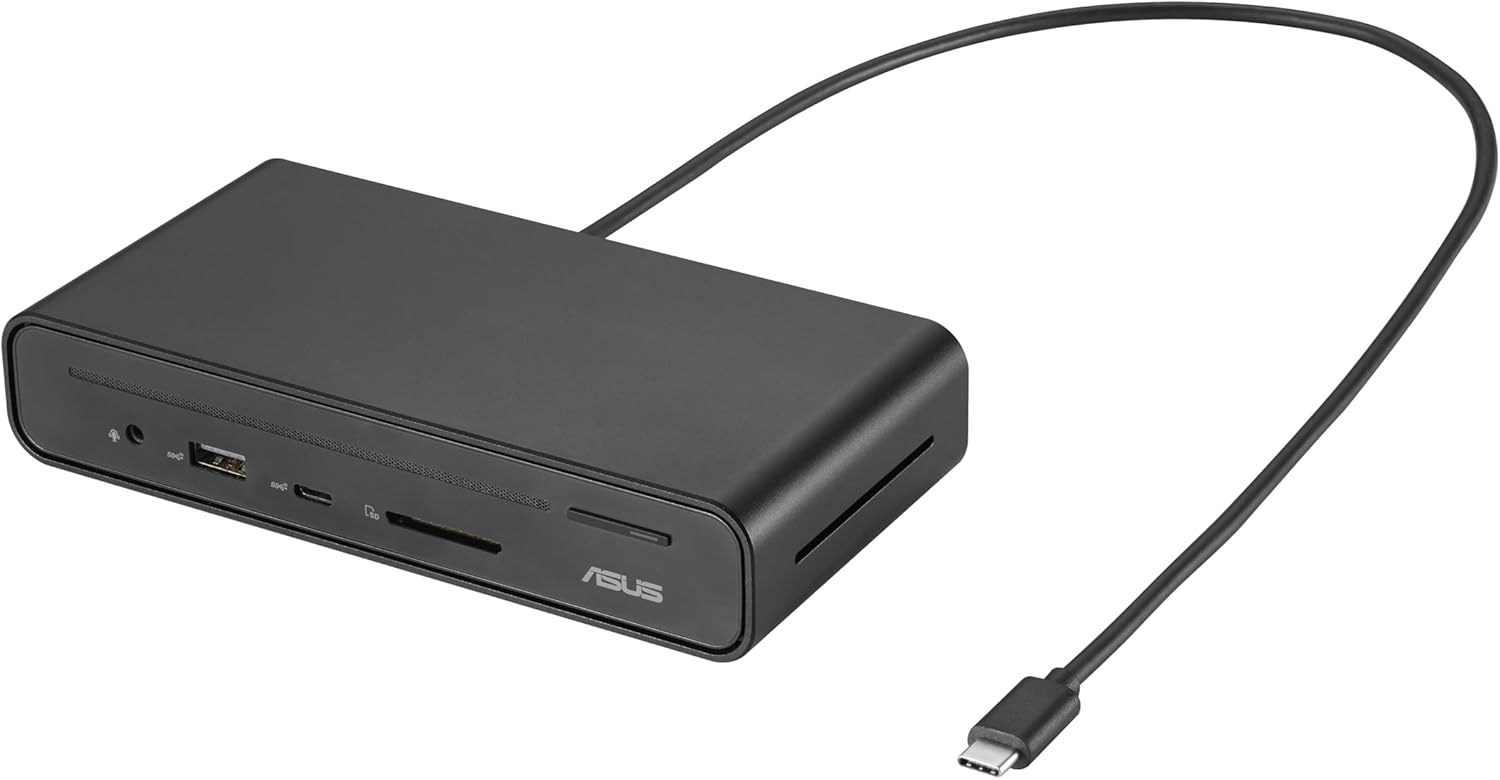
Figure 2.1: ASUS DC300 Docking Station with attached USB-C cable.
3. ເນື້ອໃນຊຸດ
ໃຫ້ແນ່ໃຈວ່າທຸກລາຍການຢູ່ໃນຊຸດ:
- ASUS DC300 Docking Station
- USB Type-C Cable (braided)
- Magnetic Base with Adhesive
- ຄູ່ມືຜູ້ໃຊ້ (ເອກະສານນີ້)
4. Physical Components and Port Layout
The docking station features a variety of ports for comprehensive connectivity. Familiarize yourself with the port layout for optimal use.
4.1 ພອດແຜງດ້ານໜ້າ
- 1x USB Type-C Port (10 Gbps): ສໍາລັບການໂອນຂໍ້ມູນຄວາມໄວສູງ.
- 1x USB Type-A Port (10 Gbps): ສໍາລັບການໂອນຂໍ້ມູນຄວາມໄວສູງ.
- SD Card Reader: ສຳລັບການອ່ານບັດຄວາມຈຳ SD ມາດຕະຖານ.
- ຕົວອ່ານບັດ MicroSD: For reading MicroSD memory cards.
- Jack ສຽງ 3.5mm: ສໍາລັບການເຊື່ອມຕໍ່ຫູຟັງຫຼືອຸປະກອນສຽງພາຍນອກ.
- ປຸ່ມເປີດປິດ: ເພື່ອເປີດ / ປິດສະຖານີຈອດ.

ຮູບ 4.1: ດ້ານຫນ້າ view of the docking station with accessible high-speed data and media card ports.
4.2 ພອດແຜງດ້ານຫຼັງ
- 2x HDMI Ports (4K@60Hz): ສໍາລັບການເຊື່ອມຕໍ່ຈໍສະແດງຜົນພາຍນອກ.
- 2x DisplayPort (4K@60Hz): ສໍາລັບການເຊື່ອມຕໍ່ຈໍສະແດງຜົນພາຍນອກ.
- 1x USB Type-C PD Port (100W): For power delivery to your laptop and pass-through charging.
- 1x USB Type-A Port (10 Gbps): ສໍາລັບການໂອນຂໍ້ມູນຄວາມໄວສູງ.
- 1x USB Type-A Port (480 Mbps): For connecting peripherals like keyboard/mouse dongles.
- 1x Gigabit Ethernet Port: ສໍາລັບການເຊື່ອມຕໍ່ເຄືອຂ່າຍມີສາຍທີ່ຫມັ້ນຄົງ.

ຮູບ 4.2: ດ້ານຫລັງ view of the docking station with various display, power, and network ports.
5. ຄູ່ມືການຕິດຕັ້ງ
Follow these steps to set up your ASUS DC300 Docking Station:
- ຕໍາແຫນ່ງ Dock ໄດ້: Place the docking station on a flat, stable surface. You may use the included magnetic base to secure it to your desk. Ensure the adhesive is applied to a suitable surface if you intend to use it permanently.
- ເຊື່ອມຕໍ່ຫາແລັບທັອບ: Connect the braided USB Type-C cable from the docking station's "To Laptop" port (rear panel) to your laptop's USB Type-C port.
- ເຊື່ອມຕໍ່ພະລັງງານ (ທາງເລືອກແຕ່ແນະນໍາ): For optimal performance, especially with multiple displays and charging, connect your laptop's USB Type-C power adapter to the docking station's "USB Type-C PD" port (rear panel). This enables pass-through charging for your laptop.
- ເຊື່ອມຕໍ່ຈໍສະແດງຜົນ: Use HDMI or DisplayPort cables to connect your external monitors to the corresponding ports on the rear panel of the docking station.
- ເຊື່ອມຕໍ່ອຸປະກອນຕໍ່ພ່ວງ: Plug in your mouse, keyboard, external drives, or other USB devices to the available USB Type-A or USB Type-C ports on the front or rear panels.
- ເຊື່ອມຕໍ່ກັບເຄືອຂ່າຍ (ທາງເລືອກ): For a stable wired internet connection, connect an Ethernet cable to the Gigabit Ethernet port on the rear panel.
- ເປີດ: Press the power button on the front panel to turn on the docking station. The digital LED display will illuminate, showing the status of connected ports.
6. ຄໍາແນະນໍາການດໍາເນີນງານ
6.1 ຮູບແບບການສະແດງ
ສະຖານີເຊື່ອມຕໍ່ຮອງຮັບການຕັ້ງຄ່າຈໍສະແດງຜົນຕ່າງໆ:
- ລະບົບ Windows: Supports single, dual, and triple external displays in extended or mirrored modes. Resolutions up to 4K@60Hz are supported for single/dual displays, and 4K@30Hz for triple displays.
- ລະບົບ Mac OS: Supports single and dual external displays. Triple display is not supported in extended mode; displays will be mirrored.

ຮູບທີ 6.1: ຕົວຢ່າງample of a triple monitor setup with the ASUS DC300 Docking Station.
6.2 ການໂອນຂໍ້ມູນ
Utilize the high-speed USB ports for quick data transfer:
- USB 3.2 Gen 2 Ports (10 Gbps): Ideal for transferring large files to/from external SSDs or other high-speed devices.
- ເຄື່ອງອ່ານກາດ SD/MicroSD: For fast transfer of photos and videos from memory cards.
6.3 One-Click Screen Lock
The power button on the top of the docking station also functions as a screen lock button:
- Windows: Press the button once to instantly lock your displays.
- MacOS: Press the button twice to lock your displays.
7. ການບໍາລຸງຮັກສາແລະການດູແລ
- Keep the docking station in a clean, dry environment.
- ຫຼີກເວັ້ນການເປີດເຜີຍອຸປະກອນກັບອຸນຫະພູມທີ່ຮຸນແຮງຫຼືແສງແດດໂດຍກົງ.
- Clean the surface with a soft, dry cloth. Do not use liquid cleaners.
- Ensure cables are properly connected and not under strain to prevent damage.
8. ການແກ້ໄຂບັນຫາ
ຖ້າເຈົ້າພົບບັນຫາ, ໃຫ້ອ້າງອີງເຖິງວິທີແກ້ໄຂທົ່ວໄປຕໍ່ໄປນີ້:
- Unstable LAN Connection: If the LAN connection is unstable or disconnects, especially after sleep mode, try disabling and re-enabling the network driver in your operating system settings.
- Power Button Not Functioning: Ensure the docking station is properly connected to your laptop and, if applicable, to a power source.
- ການກະພິບໜ້າຈໍ: Check all display cable connections. Ensure your display drivers are up to date. Verify that your monitor and cable support the selected resolution and refresh rate.
- ບໍ່ມີການສະແດງຜົນອອກ: Confirm that your laptop's USB-C port supports video output (DisplayPort Alt Mode). Ensure all display cables are securely connected. Check your display settings in your operating system.
- ບັນຫາການສາກໄຟ: Ensure your laptop's power adapter is connected to the docking station's USB Type-C PD port. Verify that your laptop supports USB-C power delivery.
9. ຂໍ້ມູນຈໍາເພາະ
| ຄຸນສົມບັດ | ລາຍລະອຽດ |
|---|---|
| ໝາຍເລກຕົວແບບ | 90XB08CN-BDS000 |
| ຂະໜາດສິນຄ້າ | 3.66 x 3.27 x 0.98 ນິ້ວ |
| ນ້ໍາຫນັກລາຍການ | 1.1 ປອນ |
| ເຕັກໂນໂລຊີການເຊື່ອມຕໍ່ | ມີສາຍ |
| ຄວາມສາມາດສາກໄຟ | Yes (up to 100W via USB-C PD) |
| ສະຫນັບສະຫນູນການສະແດງ | 3 Displays Supported (4K resolution) |
| ພອດ HDMI | 2 (4K@60Hz) |
| DisplayPort | 2 (4K@60Hz) |
| ພອດ USB ທັງໝົດ | 4 (2x USB 3.2 Gen 2 Type-A, 1x USB 3.2 Gen 2 Type-C, 1x USB 2.0 Type-A) |
| ອີເທີເນັດ | Gigabit Ethernet |
| ເຄື່ອງອ່ານກາດຫນ່ວຍຄວາມຈໍາ | ຊິມກາດ, ໄມໂຄຣກາດ |
| ອຸປະກອນທີ່ເຂົ້າກັນໄດ້ | Expertbook (and other USB-C compatible laptops) |
10. ການຮັບປະກັນແລະການສະຫນັບສະຫນູນ
For warranty information and customer support, please refer to the official ASUS website or contact their customer service directly. The product typically comes with a manufacturer's warranty. Please retain your proof of purchase for warranty claims.
ສະຫນັບສະຫນູນ ASUS: https://www.asus.com/support/