1. ບົດແນະນຳ
This manual provides detailed instructions for the installation, operation, and maintenance of your GESKS ICSEE WiFi Camera Security 6MP Dual Lens Wireless PTZ Camera. This advanced security camera is designed for outdoor use, offering comprehensive surveillance with its dual-lens system, pan-tilt-zoom capabilities, and intelligent features.
Please read this manual thoroughly before using the product to ensure proper setup and optimal performance. Keep this manual for future reference.
2. ຄຸນລັກສະນະຂອງຜະລິດຕະພັນ
- Upgraded Dual Lens & Dual Screen & 360° View: Features one fixed lens and one Pan-Tilt lens, providing a 360-degree field of view with two integrated screens for comprehensive monitoring.
- 6MP HD Image & Full-Color Night Vision: Delivers 6MP (3MP+3MP) full HD clearer images and video. Equipped with white and infrared lamps, offering three night vision modes: Full-color, Infrared, and Smart Vision, with a night vision distance up to 65ft.
- Human Detection & Real-time Alarm: Incorporates human detection with automatic tracking of movement trajectories. Triggers real-time alarms and sends notifications to the iCSee app upon detection of potential threats.
- Two-Way Audio & Multi-User Sharing: Built-in microphone and speaker enable two-way communication. Allows sharing access with multiple users for collaborative monitoring.
- SD Card/Cloud Storage & Alexa Compatibility: Supports 24/7 recording with local storage via micro SD card (up to 128GB) or cloud server. Compatible with Amazon Alexa for voice control.
- ການເຊື່ອມຕໍ່ແບບຍືດຫຍຸ່ນ: Supports both wireless WiFi (2.4GHz) and wired Ethernet connections for enhanced network stability.
3. ສິ່ງທີ່ຢູ່ໃນກ່ອງ
ເມື່ອເປີດກ່ອງ, ກະລຸນາກວດສອບວ່າສ່ວນປະກອບທັງໝົດຕໍ່ໄປນີ້ຖືກລວມເຂົ້າກັນ ແລະ ຢູ່ໃນສະພາບດີ:
- CCTV Camera (Dual Lens White 6MP)
- Power Adapter
- ຄູ່ມືຜູ້ໃຊ້
- screws ການຕິດຕັ້ງ
- ວົງເລັບຕິດຕັ້ງ

ຮູບທີ 3.1: ອຸປະກອນເສີມຜະລິດຕະພັນທີ່ລວມຢູ່
This image displays the contents of the product packaging, including the camera unit, power adapter, mounting screws, and the user manual.
4. ຄູ່ມືການຕິດຕັ້ງ
4.1 ອົງປະກອບກ້ອງຖ່າຍຮູບview
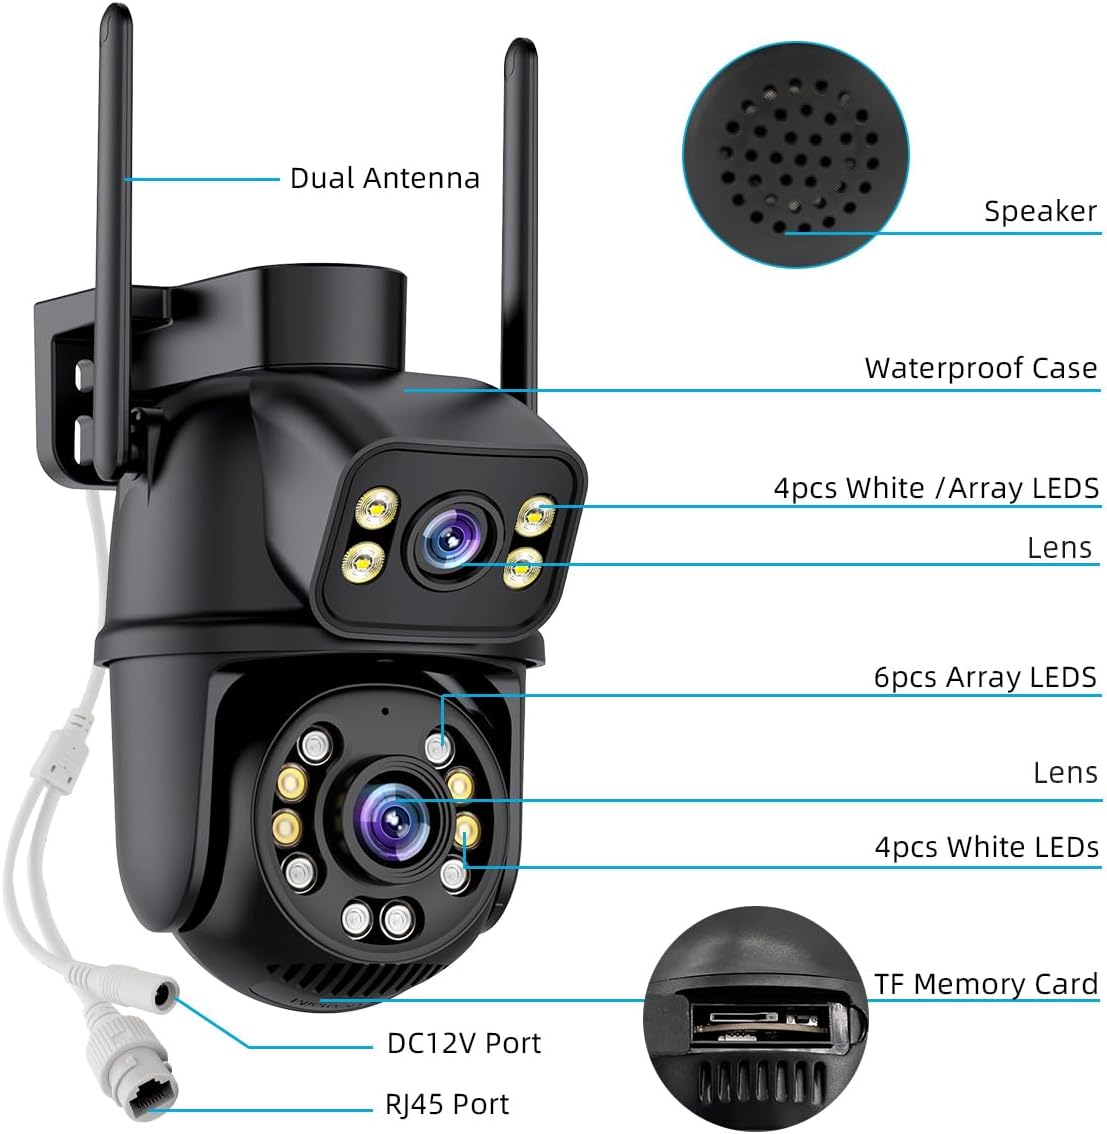
ຮູບ 4.1: ແຜນວາດອົງປະກອບກ້ອງ
This diagram labels key components of the camera, such as the dual antennas for wireless connectivity, the speaker for two-way audio, the waterproof casing, the dual lenses, various LED lights for night vision, the DC12V power port, the RJ45 Ethernet port, and the TF (Micro SD) memory card slot.
4.2 ການເປີດກ້ອງຖ່າຍຮູບ
- Connect the provided power adaptor to the DC12V port on the camera.
- Plug the power adaptor into a standard electrical outlet.
- Wait for the camera to power on and initiate its self-test sequence.
4.3 ການເຊື່ອມຕໍ່ເຄືອຂ່າຍ
ກ້ອງຖ່າຍຮູບຮອງຮັບທັງ Wi-Fi ແລະການເຊື່ອມຕໍ່ອີເທີເນັດແບບມີສາຍ.

ຮູບທີ 4.2: ວິທີການເຊື່ອມຕໍ່
This image illustrates the three primary methods for connecting the camera to your network: initial setup via Bluetooth, wireless connection using 2.4GHz WiFi, and a stable wired connection via an RJ45 Ethernet cable.
Wi-Fi Connection (Recommended)
- ດາວນ໌ໂຫລດ iCSee ເບິ່ງ ແອັບຈາກຮ້ານແອັບໃນໂທລະສັບສະຫຼາດຂອງທ່ານ (iOS App Store ຫຼື Google Play Store).
- ລົງທະບຽນບັນຊີແລະເຂົ້າສູ່ລະບົບ.
- ແຕະທີ່ໄອຄອນ '+' ໃນແອັບເພື່ອເພີ່ມອຸປະກອນໃໝ່.
- Select 'WiFi Camera' and follow the on-screen prompts to connect the camera to your 2.4GHz Wi-Fi network. Ensure your phone is connected to the same 2.4GHz Wi-Fi network during setup.
- The app may use Bluetooth for initial device discovery.
ການເຊື່ອມຕໍ່ອີເທີເນັດແບບມີສາຍ
- Connect an Ethernet cable from your router to the RJ45 port on the camera.
- The camera will automatically attempt to obtain an IP address and connect to the network.
- Open the iCSee app, tap the '+' icon, and select 'Add device in LAN' to discover the camera.
4.4 ຕິດຕັ້ງກ້ອງ
The camera is designed for ceiling mount installation.
- Choose a suitable outdoor location for optimal surveillance coverage.
- Use the mounting bracket as a template to mark the drill holes on the desired surface.
- ເຈາະຮູນັກບິນ ແລະໃສ່ບ່ອນຍຶດຕິດຝາທີ່ໃຫ້ໄວ້ຖ້າຈຳເປັນ.
- ຍຶດຍຶດຍຶດຕິດກັບພື້ນຜິວໂດຍໃຊ້ສະກູທີ່ໃຫ້ມາ.
- Attach the camera securely to the mounting bracket.
5. ຄໍາແນະນໍາການດໍາເນີນງານ
5.1 ດໍາລົງຊີວິດ View ແລະການຄວບຄຸມ PTZ
Once connected, open the iCSee app to access the live view. You can control the camera's pan (horizontal rotation), tilt (vertical movement), and digital zoom directly from the app interface.
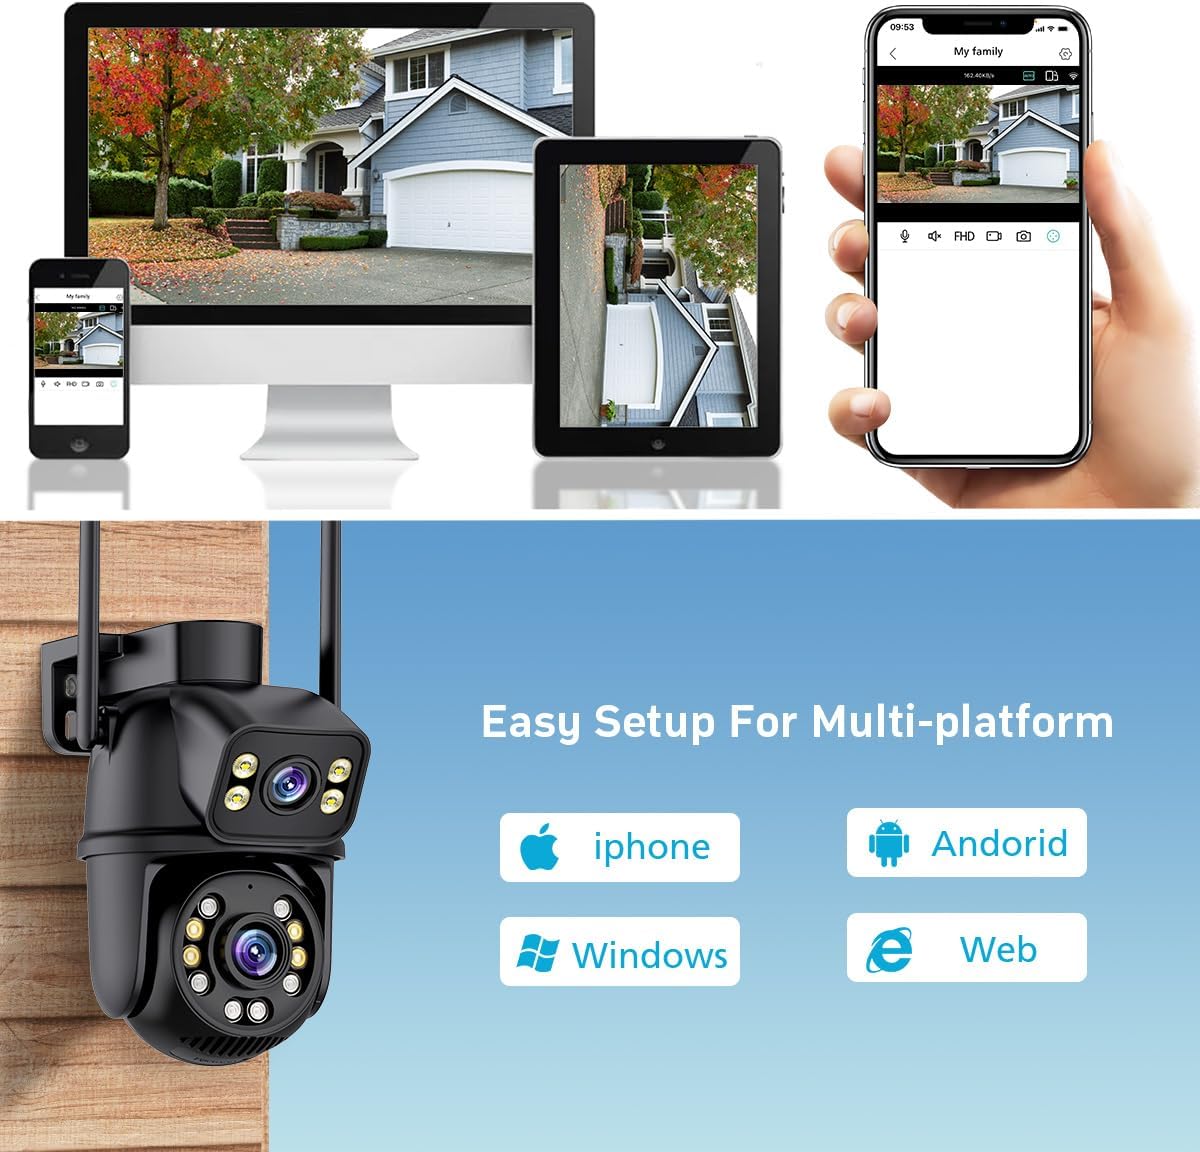
Figure 5.1: Multi-platform Live View
This image demonstrates the camera's compatibility with multiple platforms, including iPhone, Android, Windows, and web browsers, allowing users to view the live feed from various devices.

ຮູບທີ 5.2: ໜ້າທີ່ການຊູມດິຈິຕອລ
This image illustrates the camera's 5.0X digital zoom capability, highlighting how users can zoom in on specific details within the camera's field of view by pinching the screen on their mobile device.
5.2 ໂໝດວິໄສທັດກາງຄືນ
ກ້ອງຖ່າຍຮູບມີສາມໂຫມດວິໄສທັດໃນຕອນກາງຄືນ:
- ວິໄສທັດກາງຄືນເຕັມສີ: Utilizes white lamps to provide full-color images in low-light conditions.
- ວິໄສທັດກາງຄືນອິນຟາເຣດ: ໃຊ້ໄຟ LED ອິນຟາເຣດເພື່ອໃຫ້ຮູບພາບສີດຳ-ຂາວຊັດເຈນໃນຄວາມມືດສະນິດ.
- ວິໄສທັດອັດສະລິຍະ: Automatically switches between infrared and full-color based on detected motion or ambient light.
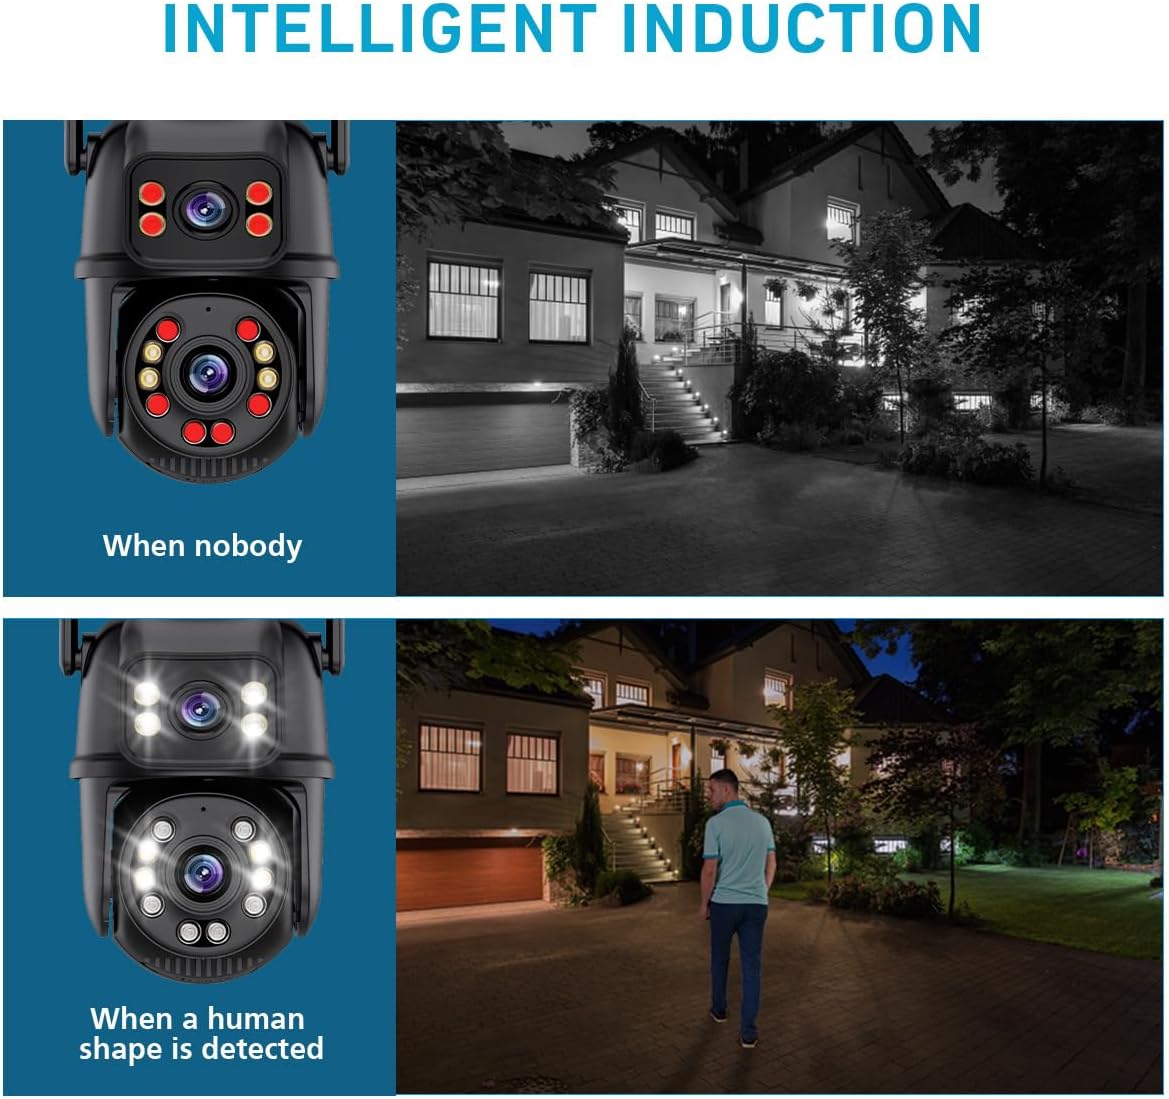
Figure 5.3: Intelligent Induction Night Vision
This image demonstrates the intelligent night vision feature, showing how the camera operates in infrared mode when no one is present and automatically switches to full-color mode with activated white lights upon human detection.

Figure 5.4: Intelligent Full Color Night Vision
This image visually compares traditional infrared night vision (monochrome) with the camera's intelligent full-color night vision, showcasing the enhanced detail and color provided by the latter.
5.3 ສຽງສອງທາງ
Use the two-way audio feature to communicate with visitors or deter intruders. Tap the microphone icon in the app to speak, and the speaker icon to listen.

Figure 5.5: Smoother Two-Way Audio
This image demonstrates the two-way audio functionality, showing how a user can communicate with someone at their doorstep through the camera's built-in microphone and speaker.
5.4 Human Detection and Tracking
Enable human detection in the app settings. When a person is detected, the camera will automatically track their movement within its field of view and send real-time alerts to your smartphone.

Figure 5.6: Automatic Tracking
This image illustrates the camera's automatic tracking feature, showing how it follows the movement of individuals within its surveillance area.

Figure 5.7: Floodlight & Alarm Siren
This image demonstrates the camera's floodlight and alarm siren capabilities, which can be triggered upon detection of moving objects in darkness, providing both visual deterrence and audible alerts.
5.5 ການບັນທຶກແລະການເກັບຮັກສາ
The camera supports two storage methods for continuous 24/7 recording:
- ບັດ Micro SD: Insert a micro SD card (up to 128GB, not included) into the camera's TF memory card slot. Recordings will be stored locally.
- Cloud Storage: Subscribe to the cloud storage service via the iCSee app for secure, remote storage of your recordings.

Figure 5.8: Two Storage Methods
This image visually represents the two available storage options for recorded footage: secure cloud storage and local storage using a micro SD card.
5.6 ການຄວບຄຸມສຽງ Alexa
Integrate your camera with Amazon Alexa for convenient voice control. Follow the instructions in the iCSee app to link your camera to your Alexa account. You can then use voice commands to view the camera feed on compatible Alexa-enabled devices.
6. ບໍາລຸງຮັກສາ
- ທໍາຄວາມສະອາດ: ເຮັດຄວາມສະອາດເລນກ້ອງຖ່າຍຮູບ ແລະ ທີ່ຢູ່ອາໃສຢ່າງເປັນປະຈໍາດ້ວຍເຄື່ອງອ່ອນ, ງamp ຜ້າເພື່ອເອົາຝຸ່ນແລະຝຸ່ນ. ຢ່າໃຊ້ສານເຄມີທີ່ຮຸນແຮງຫຼືວັດສະດຸຂັດ.
- ການອັບເດດເຟີມແວ: Check the iCSee app periodically for firmware updates. Keeping your camera's firmware up-to-date ensures optimal performance, security, and access to new features.
- ການຄຸ້ມຄອງບັດ SD: ຖ້າໃຊ້ SD card, ໃຫ້ປ່ຽນເປັນໄລຍະໆview ແລະ ສຳຮອງອາຫານທີ່ສຳຄັນtage. Consider formatting the SD card every few months to maintain performance.
- ຄວາມສົມບູນກັນນ້ໍາ: Ensure all cable connections and covers are securely fastened to maintain the camera's waterproof rating, especially after installation or maintenance.
7. ການແກ້ໄຂບັນຫາ
| ບັນຫາ | ສາເຫດທີ່ເປັນໄປໄດ້ | ການແກ້ໄຂ |
|---|---|---|
| Camera is offline/cannot connect to Wi-Fi. | Incorrect Wi-Fi password; Camera too far from router; Router is 5GHz only; Network interference. | Verify Wi-Fi password. Move camera closer to router or use a Wi-Fi extender. Ensure router supports 2.4GHz Wi-Fi. Reduce interference from other devices. Try wired Ethernet connection. |
| Poor image quality/blurry video. | Protective film on lens; Dirty lens; Insufficient lighting; Network bandwidth issues. | Remove any protective film. Clean the lens gently. Ensure adequate lighting or enable appropriate night vision mode. Check network speed. |
| ບໍ່ໄດ້ຮັບການແຈ້ງເຕືອນການກວດຈັບການເຄື່ອນໄຫວ. | Detection sensitivity too low; App notifications disabled; Camera not connected to internet. | Adjust detection sensitivity in app settings. Enable notifications for the iCSee app on your smartphone. Verify camera's internet connection. |
| ສຽງສອງທາງບໍ່ເຮັດວຽກ. | ໄມໂຄຣໂຟນ/ລຳໂພງຖືກປິດສຽງໃນແອັບ; ລະດັບສຽງຕ່ຳເກີນໄປ; ເວລາຕອບສະໜອງຂອງເຄືອຂ່າຍ. | Check audio settings in the iCSee app. Increase volume. Ensure stable network connection. |
| SD card ບໍ່ໄດ້ບັນທຶກ. | SD card full or corrupted; Incorrect format; SD card not inserted properly. | Check SD card status in app. Format the SD card via the app. Reinsert the SD card. Ensure it is a compatible type (up to 128GB). |
8. ຂໍ້ມູນຈໍາເພາະ
| ຄຸນສົມບັດ | ຂໍ້ມູນຈໍາເພາະ |
|---|---|
| ໝາຍເລກຕົວແບບ | IK-P11-Q6 |
| ການນຳໃຊ້ພາຍໃນ/ນອກ | ກາງແຈ້ງ |
| ຄວາມລະອຽດການຖ່າຍວິດີໂອ | 6MP (3MP+3MP), 1440p |
| ການແກ້ໄຂປະສິດທິພາບ | 8 ລ້ານພິກເຊວ, 6 ລ້ານພິກເຊວ |
| ເຕັກໂນໂລຊີການເຊື່ອມຕໍ່ | ໄຮ້ສາຍ (Wi-Fi), ມີສາຍ (ອີເທີເນັດ) |
| ອະນຸສັນຍາການເຊື່ອມຕໍ່ | Wi-Fi, Ethernet, ONVIF |
| ແຫຼ່ງພະລັງງານ | ໄຟຟ້າສາຍ (DC 12V) |
| ປະເພດການຄວບຄຸມ | APP (iCSee), Amazon Alexa |
| ປະເພດການຕິດຕັ້ງ | ເພດານ Mount |
| ຂອບເຂດວິໄສທັດກາງຄືນ | 65 ຟຸດ |
| ລະດັບຄວາມຕ້ານທານນ້ໍາ | ກັນນ້ ຳ (IP66) |
| ປະເພດຫນ່ວຍຄວາມຈໍາ Flash | Micro SD |
| Flash Memory ຮອງຮັບຂະໜາດສູງສຸດ | 128 GB |
| ການເຂົ້າລະຫັດວິດີໂອ | H.265 |
| ປະເພດ Alert | Motion Only (Human Detection) |
| ຄຸນນະສົມບັດພິເສດ | Local Recording, 2-Way Audio, Night Vision, Built-In Light, Motion Sensor |
| ຂະໜາດສິນຄ້າ | 4.87 x 4.87 x 7.8 ນິ້ວ |
| ນ້ໍາຫນັກລາຍການ | 1.3 ປອນ |
| ວັດສະດຸ | Acrylonitrile Butadiene Styrene (ABS) |
9. ການຮັບປະກັນແລະການສະຫນັບສະຫນູນ
For warranty information and technical support, please refer to the contact details provided on the product packaging or the official GESKS webເວັບໄຊ. ຮັກສາໃບຮັບເງິນການຊື້ຂອງທ່ານໄວ້ເປັນຫຼັກຖານການຊື້ສໍາລັບການຮ້ອງຂໍການຮັບປະກັນ.
ຖ້າທ່ານພົບບັນຫາໃດໆທີ່ບໍ່ໄດ້ລະບຸໄວ້ໃນຄູ່ມືນີ້, ກະລຸນາຕິດຕໍ່ຝ່າຍສະໜັບສະໜູນລູກຄ້າເພື່ອຂໍຄວາມຊ່ວຍເຫຼືອ.