1. ບົດແນະນຳ
The Phomemo M950 Label Maker is a versatile, portable thermal label printer designed for both home and office use. It offers dual printing modes: direct input via its integrated keyboard and wireless printing via Bluetooth connection to a mobile application. This device utilizes thermal printing technology, eliminating the need for ink cartridges, and supports various label tape types for diverse labeling needs.
2. ຂໍ້ມູນຄວາມປອດໄພ
- Keep the device away from water and high humidity to prevent electric shock or damage.
- ຢ່າຖອດ ຫຼືພະຍາຍາມສ້ອມແປງອຸປະກອນດ້ວຍຕົນເອງ. ຕິດຕໍ່ຝ່າຍຊ່ວຍເຫຼືອລູກຄ້າເພື່ອຂໍຄວາມຊ່ວຍເຫຼືອ.
- Use only Phomemo-approved label tapes to ensure optimal performance and prevent damage to the print head.
- ຮັກສາໃຫ້ໄກຈາກເດັກນ້ອຍ.
- ຫຼີກເວັ້ນການເປີດອຸປະກອນໃຫ້ຖືກແສງແດດໂດຍກົງ ຫຼືອຸນຫະພູມທີ່ຮຸນແຮງ.
- Charge the device using a compatible Type-C USB power adapter.
3. ເນື້ອໃນຊຸດ
Please check the package contents upon unboxing. If any items are missing or damaged, contact your retailer or Phomemo customer support.
- ຜູ້ຜະລິດປ້າຍ Phomemo M950
- 12mm Label Tape Roll (pre-installed or included separately)
- ສາຍສາກໄຟ USB Type-C
- ຄູ່ມືຜູ້ໃຊ້ (ເອກະສານນີ້)
4. ຜະລິດຕະພັນເກີນview
Familiarize yourself with the components of your Phomemo M950 Label Maker.

Image: Phomemo M950 Label Maker showing its main features including no ink, one-touch key, keyboard editing, app editing, 203 DPI resolution, backlight support, Type-C recharge, and built-in cutter.
ຄຸນນະສົມບັດທີ່ສໍາຄັນ:
- ການປ້ອນຂໍ້ມູນແປ້ນພິມ: Integrated QWERTY keyboard for direct label creation.
- ການເຊື່ອມຕໍ່ Bluetooth: Connects to smartphones for advanced label design via the Phomemo app.
- ການພິມຄວາມຮ້ອນ: No ink required, uses thermal label tapes.
- ໜ້າຈໍໄຟພື້ນຫຼັງ: ຮັບປະກັນການເບິ່ງເຫັນໃນສະພາບທີ່ມີແສງໜ້ອຍ.
- ເຄື່ອງຕັດໃນຕົວ: ສຳລັບການຕັດປ້າຍທີ່ສະອາດ ແລະ ແມ່ນຍຳ.
- ແບັດເຕີຣີທີ່ສາມາດສາກໄດ້: Integrated 1200mAh battery, rechargeable via Type-C port.
5. ຕັ້ງຄ່າ
5.1. ການສາກອຸປະກອນ
Before first use, fully charge the label maker.
- Connect the provided USB Type-C cable to the charging port on the side of the label maker.
- ເຊື່ອມຕໍ່ປາຍອີກດ້ານໜຶ່ງຂອງສາຍເຂົ້າກັບອະແດບເຕີໄຟ USB ທີ່ເຂົ້າກັນໄດ້ (ບໍ່ໄດ້ໃຫ້ມາ) ຫຼື ພອດ USB ຂອງຄອມພິວເຕີ.
- The charging indicator light will show the charging status. Once fully charged, the indicator will change or turn off.

Image: Phomemo M950 Label Maker highlighting the Type-C charging port and its compact dimensions.
5.2. ການໂຫຼດເທບປ້າຍ
Ensure the device is powered off before loading or replacing tape.
- Open the tape compartment cover located on the top or back of the device.
- Insert the label tape roll with the label side facing up, ensuring it sits securely in the compartment.
- Feed the end of the label tape through the tape guide until it protrudes slightly from the output slot.
- ປິດຝາປິດຊ່ອງເທບໃຫ້ແໜ້ນ.
5.3. ເປີດ / ປິດພະລັງງານ
ກົດປຸ່ມເປີດ/ປິດຄ້າງໄວ້ (ໂດຍປົກກະຕິແລ້ວຈະມີສັນຍາລັກເປີດ/ປິດ) ເປັນເວລາສອງສາມວິນາທີເພື່ອເປີດ ຫຼື ປິດອຸປະກອນ.
6. ຄໍາແນະນໍາການດໍາເນີນງານ
The Phomemo M950 offers two primary methods for creating labels.

Image: Phomemo M950 Label Maker illustrating the two usage modes: direct printing from the keyboard and printing via a mobile device using the 'Print Master' app.
6.1. Keyboard Printing
This mode allows you to create labels directly on the device without needing a smartphone.
- ເປີດ: Turn on the label maker. The screen will illuminate.
- Type Text: Use the QWERTY keyboard to type your desired label text. The text will appear on the display.
- ປັບແຕ່ງ: Use the function keys (e.g., 'Fn', 'Shift', 'Symbol', 'Caps', 'Accent') to access various customization options such as font styles, sizes, symbols, and borders. The device supports multiple languages, borders, and symbols.
- ກ່ອນview: Use the 'Preview' button to see how your label will look before printing.
- ພິມ: Press the 'Print' button to print the label. The built-in cutter will automatically cut the label after printing.

Image: Phomemo M950 Label Maker showcasing its extensive features including support for 23+ languages, 103+ borders, and 790+ symbols and icons for label customization.
6.2. Bluetooth App Printing
For more advanced design options, connect your label maker to the 'Print Master' mobile app.
- ດາວໂຫລດແອັບ:: Download the 'Print Master' app from your mobile device's app store (App Store for iOS, Google Play for Android).
- ເປີດໃຊ້ Bluetooth: Ensure Bluetooth is enabled on your mobile device and the Phomemo M950.
- ເຊື່ອມຕໍ່: Open the 'Print Master' app and follow the on-screen instructions to connect to your M950 label maker via Bluetooth.
- ປ້າຍກຳກັບການອອກແບບ: Use the app's interface to design your label. The app offers massive templates, additional fonts, borders, and icons.
- ພິມ: Once your design is complete, tap the print icon in the app to send the label to the M950 for printing.

Image: Phomemo M950 Label Maker demonstrating the use of the 'Print Master' app with numerous templates, 270+ borders, 110+ fonts, 1500 icons, and 14+ languages for creative label design.
6.3. Adjusting Print Density
For optimal print quality, especially with ribbon tapes, adjust the print density.
- Press the 'Fn' key, then select 'Pinter Densities' (Printer Densities).
- Choose 'High' for clearer prints, particularly when using ribbon tapes.

Image: Step-by-step guide on how to set the print density to 'High' on the Phomemo M950 Label Maker for clear prints, especially for ribbon tapes.
7. ບໍາລຸງຮັກສາ
7.1. ການເຮັດຄວາມສະອາດຫົວພິມ
Regular cleaning ensures consistent print quality.
- Turn off the label maker and open the tape compartment.
- Gently wipe the print head with a soft, lint-free cloth dampປະກອບດ້ວຍເຫຼົ້າ isopropyl.
- Allow the print head to dry completely before closing the compartment and powering on the device.
7.2. Tape Storage
Store label tapes in a cool, dry place away from direct sunlight to preserve their quality and adhesive properties.
8. ການແກ້ໄຂບັນຫາ
If you encounter issues with your Phomemo M950, refer to the following common problems and solutions.
| ບັນຫາ | ສາເຫດທີ່ເປັນໄປໄດ້ | ການແກ້ໄຂ |
|---|---|---|
| ບໍ່ມີພະລັງງານ | ແບັດເຕີຣີຕໍ່າ; ອຸປະກອນປິດຢູ່ | Charge the device; Press and hold power button to turn on. |
| ຄຸນນະພາບການພິມບໍ່ດີ | Print head dirty; Incorrect print density; Low battery | Clean print head; Adjust print density to 'High'; Charge device. |
| Label not feeding | Tape incorrectly loaded; Tape jammed; Out of tape | Re-load tape correctly; Clear any jams; Replace tape roll. |
| ການເຊື່ອມຕໍ່ Bluetooth ລົ້ມເຫລວ | Bluetooth off; Device not paired; App issue | Ensure Bluetooth is on for both devices; Re-pair in app; Restart app/device. |
| ເຄື່ອງຕັດບໍ່ເຮັດວຽກ | Tape jammed; Cutter mechanism obstructed | Clear any tape jams; Ensure no debris is blocking the cutter. |
9. ຂໍ້ມູນຈໍາເພາະ
| ຄຸນສົມບັດ | ລາຍລະອຽດ |
|---|---|
| ຊື່ຕົວແບບ | M950 |
| ຍີ່ຫໍ້ | Phomemo |
| ເຕັກໂນໂລຊີການພິມ | ຄວາມຮ້ອນ |
| ເຕັກໂນໂລຊີການເຊື່ອມຕໍ່ | Bluetooth, Keyboard |
| ຜົນຜະລິດເຄື່ອງພິມ | ໂມໂນໂຄມ |
| ຄວາມລະອຽດການພິມສູງສຸດ | 203 dpi |
| ຂະໜາດມີເດຍສູງສຸດ | 12mm*4000mm |
| ອຸປະກອນທີ່ເຂົ້າກັນໄດ້ | ໂທລະສັບສະຫຼາດ |
| ພະລັງງານ | 10 ວັດ |
| ປະເພດຫມໍ້ໄຟ | ໃນຕົວ 1200mAh Lithium-ion |
| ພອດສາກໄຟ | USB Type-C |
| ຂະໜາດສິນຄ້າ | 15.2 x 5.4 x 11.2 cm |
| ນ້ໍາຫນັກລາຍການ | 490 ກຣາມ |
| ສີ | ສີຂາວ |
| ຄຸນນະສົມບັດພິເສດ | Portable, Backlight Screen, Built-in Cutter |
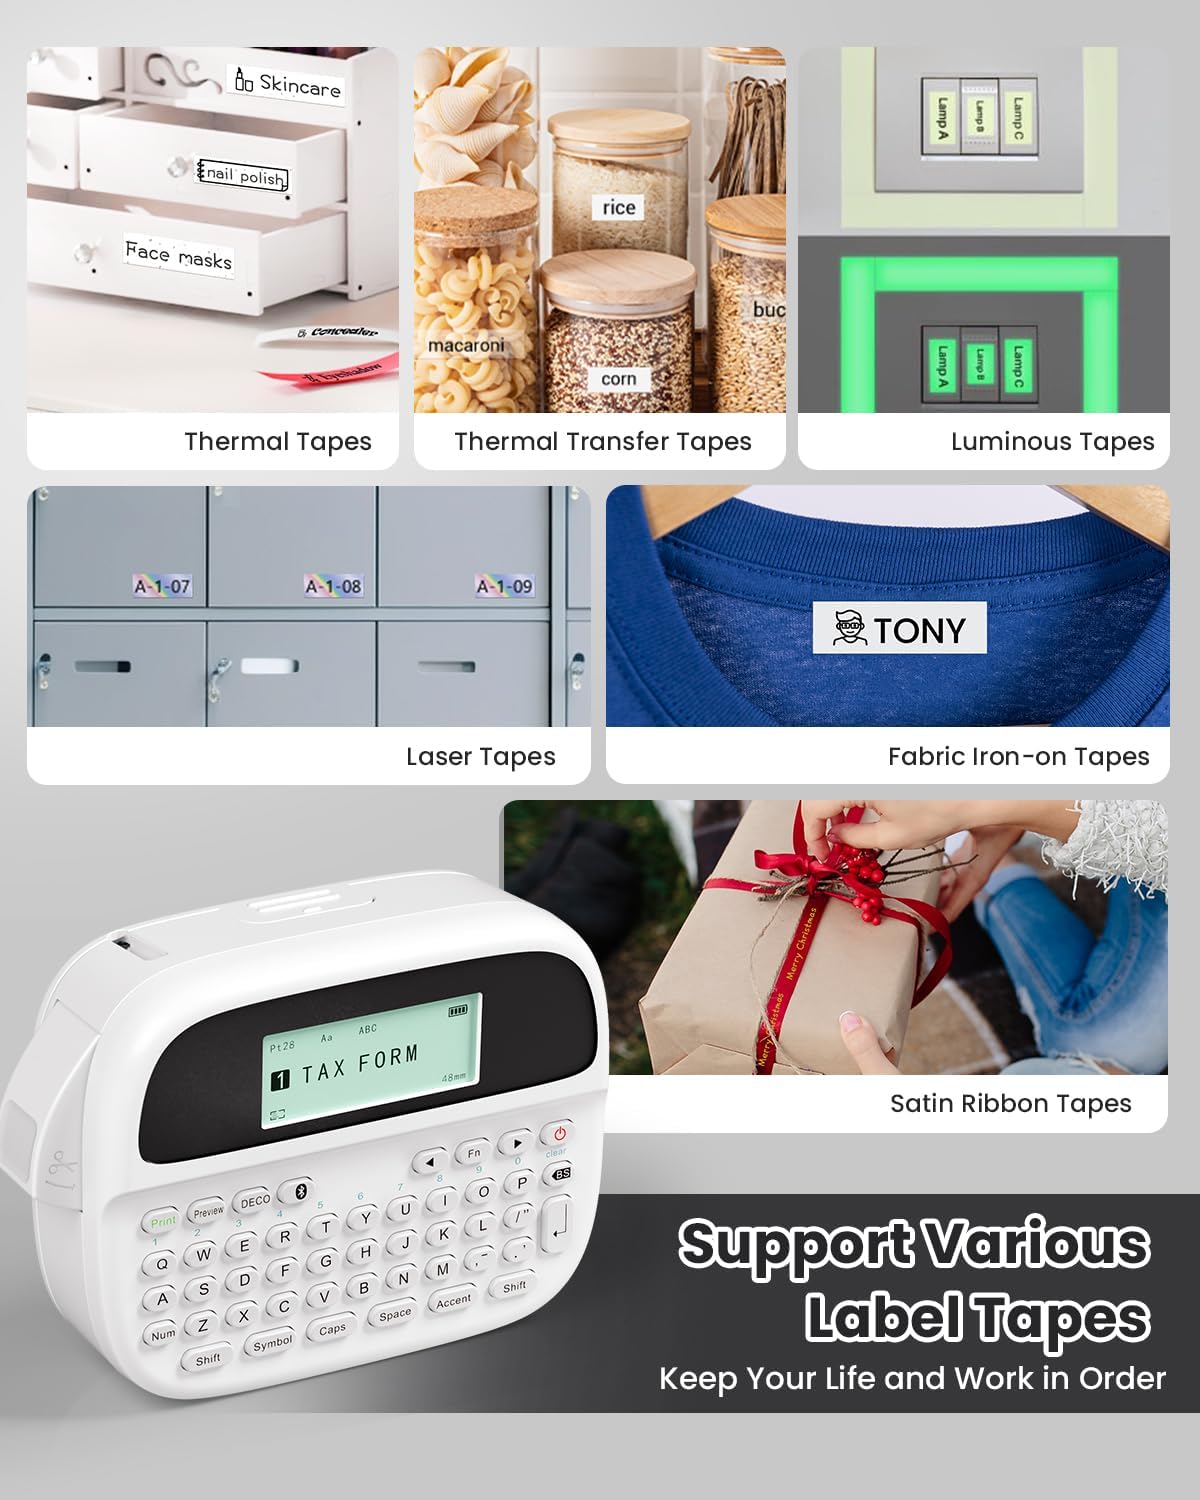
Image: Phomemo M950 Label Maker supporting various label tape types including Thermal, Thermal Transfer, Luminous, Laser, Fabric Iron-on, and Satin Ribbon tapes.

Image: Phomemo M950 Label Maker demonstrating its backlight screen feature, allowing for comfortable use even at night.
10. ການຮັບປະກັນແລະການສະຫນັບສະຫນູນ
For warranty information, technical support, or service inquiries, please refer to the official Phomemo webເວັບໄຊ ຫຼືຕິດຕໍ່ບໍລິການລູກຄ້າຂອງເຂົາເຈົ້າໂດຍກົງ. ຮັກສາໃບຮັບເງິນການຊື້ຂອງທ່ານໄວ້ເປັນຫຼັກຖານການຊື້ສໍາລັບການຮ້ອງຂໍການຮັບປະກັນ.
ເຈົ້າໜ້າທີ່ໂພເມໂມ Webເວັບໄຊ: Visit Phomemo Store