Vetroo AL800
Vetroo AL800 Mid Tower ATX PC Computer Case
ຄູ່ມືການສອນ
ແນະນຳ
This manual provides detailed instructions for the assembly, operation, and maintenance of your Vetroo AL800 Mid Tower ATX PC Computer Case. Please read this manual thoroughly before beginning installation to ensure proper setup and optimal performance.

Figure 1: Vetroo AL800 Mid Tower ATX PC Computer Case (Black)
ຂໍ້ມູນຄວາມປອດໄພ
- ສະເຫມີຕັດການເຊື່ອມຕໍ່ການສະຫນອງພະລັງງານຈາກເຕົ້າສຽບໃສ່ຝາກ່ອນທີ່ຈະຕິດຕັ້ງຫຼືເອົາອົງປະກອບໃດໆ.
- Handle components with care to avoid damage from electrostatic discharge. Consider using an anti-static wrist strap.
- Keep the case and components away from liquids and excessive humidity.
- ຮັບປະກັນການລະບາຍອາກາດທີ່ເຫມາະສົມເພື່ອປ້ອງກັນຄວາມຮ້ອນເກີນ.
- ຢ່າພະຍາຍາມດັດແປງເຄສ ຫຼື ອົງປະກອບຕ່າງໆຂອງມັນ, ເພາະວ່າສິ່ງນີ້ອາດເຮັດໃຫ້ການຮັບປະກັນຂອງທ່ານເປັນໂມຄະ ແລະ ມີຄວາມສ່ຽງດ້ານຄວາມປອດໄພ.
ເນື້ອໃນຊຸດ
ກວດສອບວ່າລາຍການທັງຫມົດແມ່ນມີຢູ່ໃນຊຸດ:
- Vetroo AL800 Mid Tower ATX PC Computer Case
- ກ່ອງອຸປະກອນເສີມ (ສະກູ, ຕົວຍຶດ, ສາຍຮັດ)
- Pre-installed 1x 120mm PWM/ARGB Fan (rear)
- ຄູ່ມືຜູ້ໃຊ້ (ເອກະສານນີ້)
ຄຸນນະສົມບັດທີ່ສໍາຄັນ
- ແຖບ LED ARGB: Integrated LED lighting and ARGB case fans can be synchronized with compatible motherboards via a 5V 3-pin interface.
- ການອອກແບບການເປີດປະຕູ: Features a 4mm thick tempered glass side panel with a convenient door-opening mechanism for easy access to internal components.
- ການໄຫຼວຽນຂອງອາກາດປະສິດທິພາບສູງ: A mesh front panel and strategically placed dust filters ensure optimal airflow and system cooling.
- ຄວາມເຂົ້າກັນໄດ້ຢ່າງກວ້າງຂວາງ: Supports ATX, M-ATX, and ITX motherboards. Accommodates GPUs up to 340mm in length and CPU coolers up to 165mm in height.
- Liquid Cooling Support: Front panel supports up to a 360mm liquid cooling radiator.
- ສະຫນັບສະຫນູນແຟນ: Supports up to 8 x 120mm fans.
- ການຄຸ້ມຄອງສາຍງ່າຍດາຍ: Includes two soft silicone cord grommets for organized cable routing.
- ແຜງ I/O ທີ່ມີປະສິດທິພາບ: Features 1x USB 3.2 Type-C port, 2x USB 3.0 ports, and a combined microphone/headphone jack.
ການຕິດຕັ້ງແລະການຕິດຕັ້ງ
1. General Preparation
- ວາງກະເປົ໋າໄວ້ເທິງພື້ນຜິວທີ່ຮາບພຽງ ແລະ ໝັ້ນຄົງ.
- Open the tempered glass side panel by gently pulling it open. It is hinged for easy access.
- Remove the tempered glass panel if necessary for easier installation by lifting it off its hinges once open.

Figure 2: Tempered Glass Door Opening Design
2. ການຕິດຕັ້ງເມນບອດ
- ຕິດຕັ້ງແຜ່ນປ້ອງກັນ I/O (ຖ້າມີ) ໃສ່ໃນຊ່ອງເປີດດ້ານຫຼັງຂອງເຄສ.
- Align your ATX, M-ATX, or ITX motherboard with the pre-installed standoffs.
- Secure the motherboard using the provided screws from the accessory box.
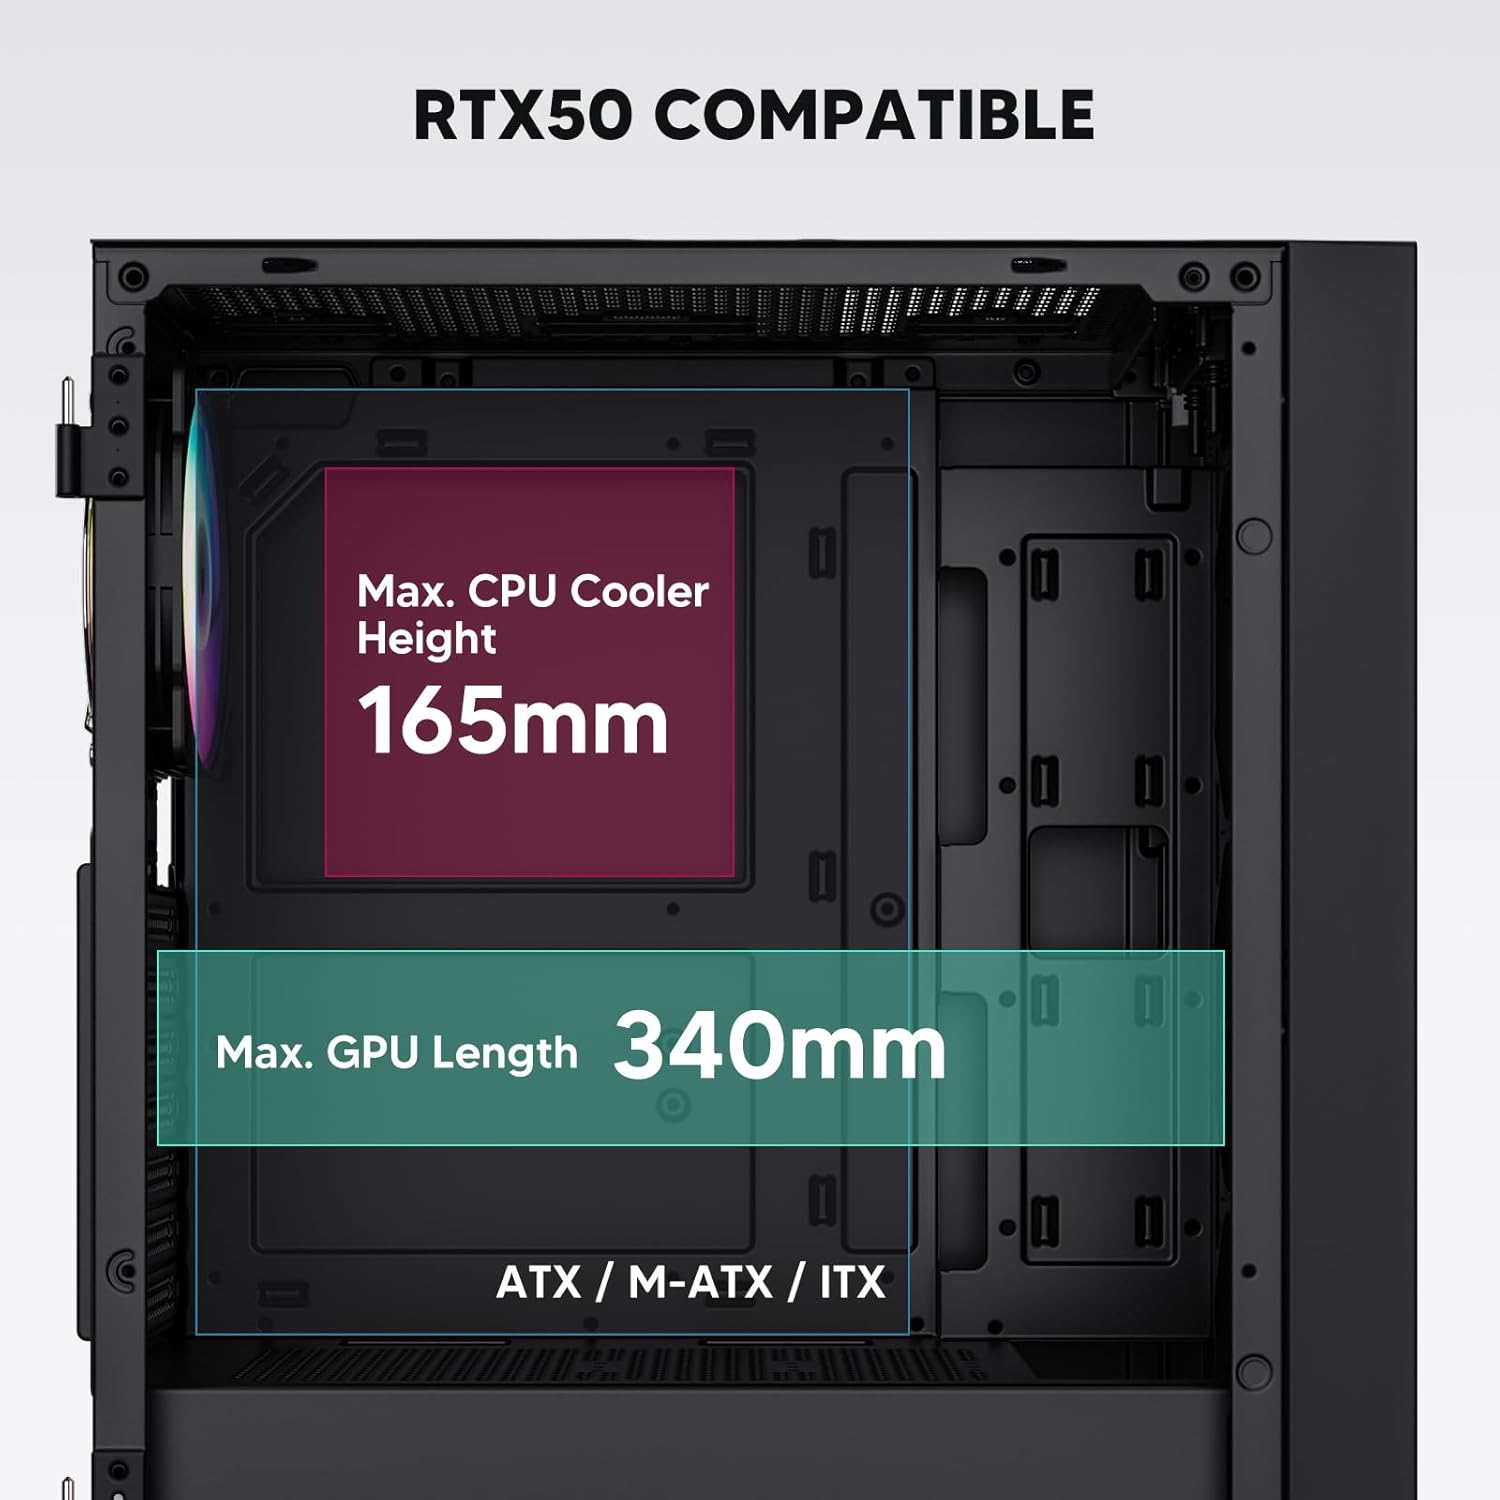
Figure 3: Motherboard and Component Clearance (Max CPU Cooler Height 165mm, Max GPU Length 340mm)
3. Storage Device Installation (HDD/SSD)
- Locate the dedicated mounting points for SSDs and HDDs.
- Install 2.5" SSDs onto the SSD trays or mounting brackets.
- Install 3.5" HDDs into the drive cage located at the bottom of the case.
- Secure all drives with the appropriate screws.

Figure 4: Internal Layout with Drive Bay Locations (SSD, HDD, Power Supply)
4. ການຕິດຕັ້ງການສະຫນອງພະລັງງານ
- Mount your power supply unit (PSU) in the dedicated compartment at the bottom rear of the case.
- Ensure the PSU fan faces downwards (if the case has a bottom vent) or upwards, depending on your cooling preference.
- Secure the PSU with screws from the rear of the case. The case supports PSUs up to 200mm in length.
5. Expansion Card (GPU) Installation
- ເອົາຝາປິດຊ່ອງ PCI-E ທີ່ຈຳເປັນອອກຈາກດ້ານຫຼັງຂອງເຄສ.
- Insert your graphics card or other expansion cards into the motherboard's PCI-E slots.
- ຮັດບັດໃຫ້ແໜ້ນດ້ວຍສະກູ. ເຄສຮອງຮັບ GPU ທີ່ມີຄວາມຍາວສູງສຸດ 340 ມມ.
6. Cooling System Installation (Fans/Radiators)
- The case comes with one pre-installed 120mm PWM/ARGB fan at the rear.
- Additional fans (120mm or 140mm) can be installed at the front, top, and bottom.
- Liquid cooling radiators up to 360mm can be installed at the front, and up to 240mm at the top.
- Refer to the diagram for supported fan and radiator configurations.

Figure 5: Fan and Liquid Radiator Support Diagram
7. ການເຊື່ອມຕໍ່ກະດານດ້ານຫນ້າ
- Connect the front panel cables (Power, Reset, USB 3.0, USB Type-C, HD Audio) to the corresponding headers on your motherboard.
- Consult your motherboard manual for the exact pin layout of these headers.
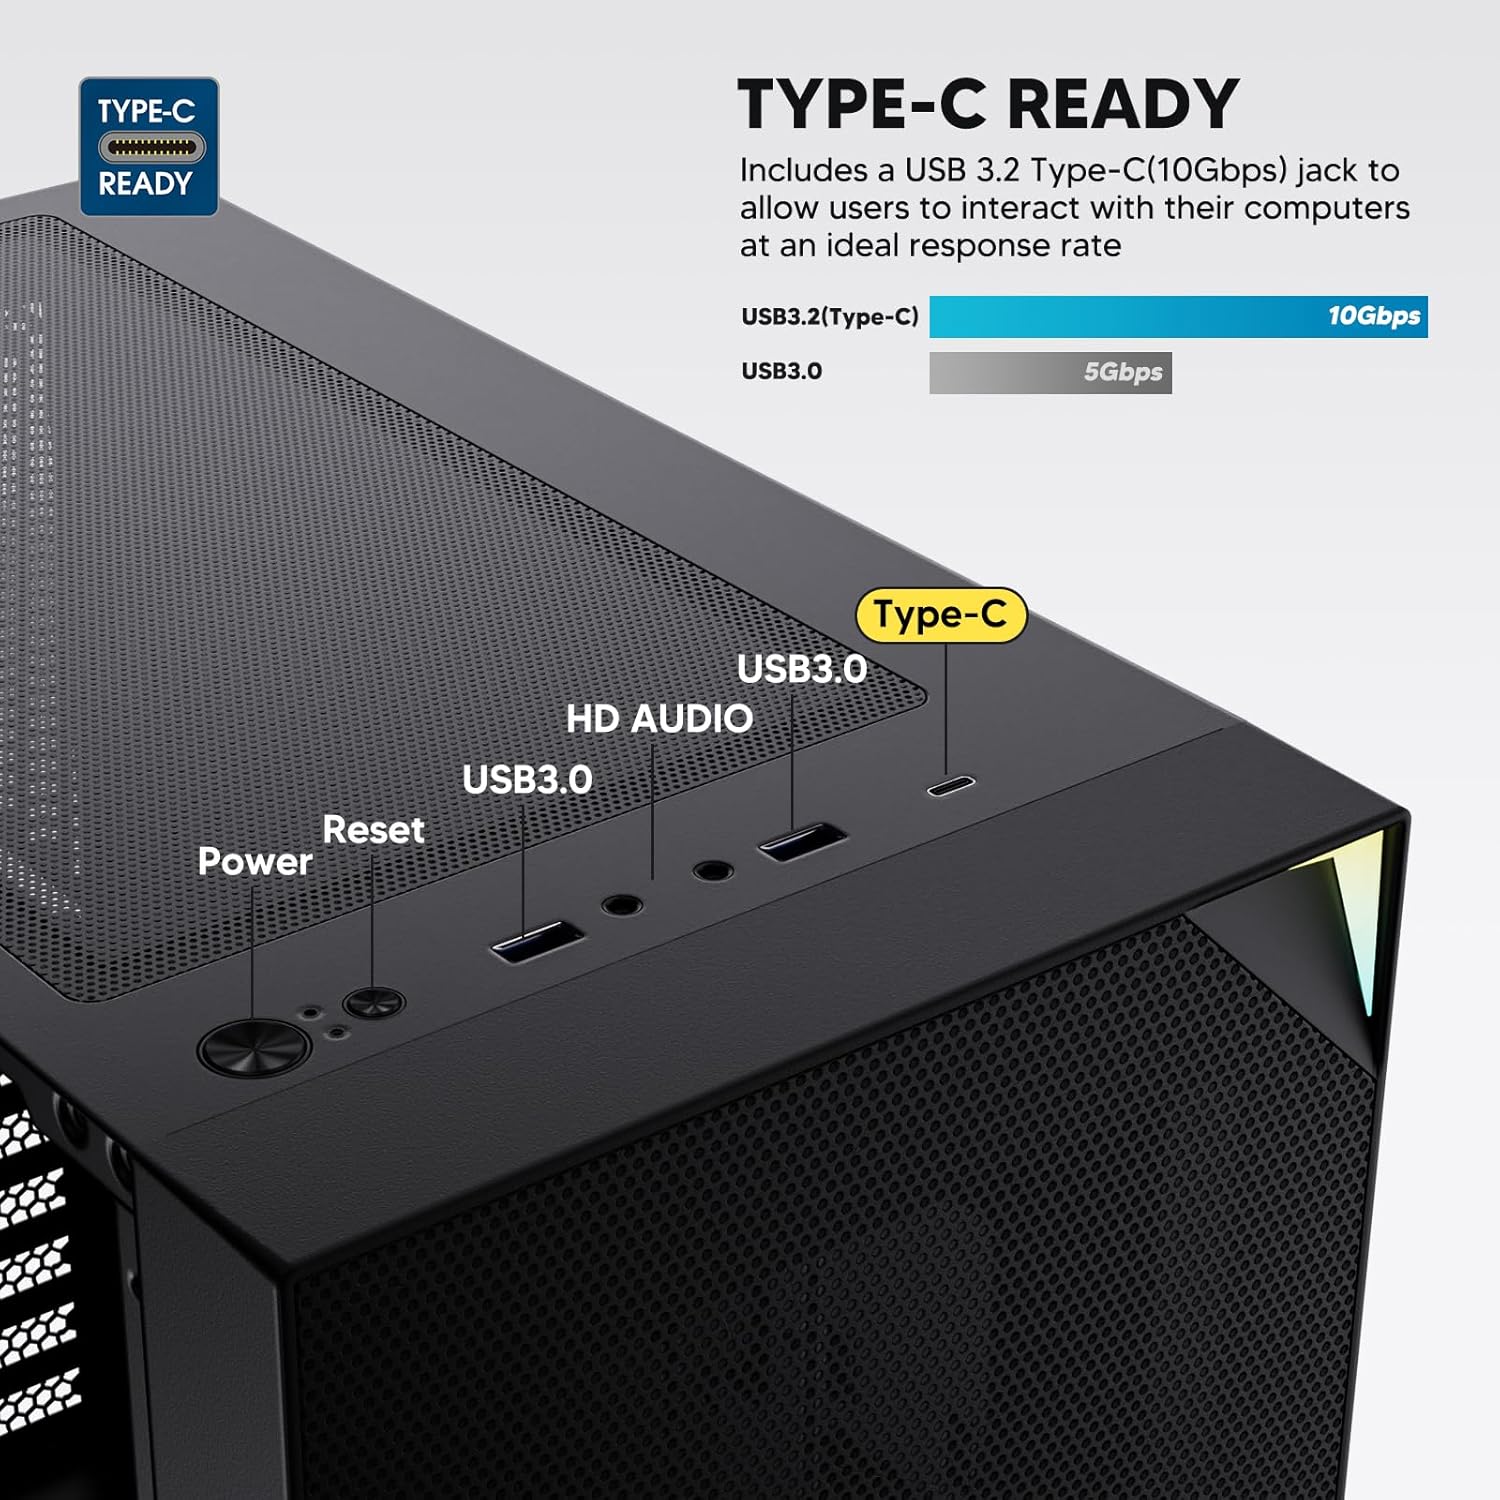
Figure 6: Top I/O Panel Connections
8. ARGB and PWM Connections
- The pre-installed fan and ARGB LED strip require connection to your motherboard.
- Connect the 4-pin PWM connector from the fan to a compatible fan header on your motherboard for speed control.
- Connect the 3-pin ARGB connector from the fan and LED strip to a 5V 3-pin ARGB header on your motherboard for lighting synchronization. ຢ່າເຊື່ອມຕໍ່ກັບຫົວຕໍ່ RGB 12V, ເພາະນີ້ຈະເຮັດໃຫ້ໄຟ LED ເສຍຫາຍ.
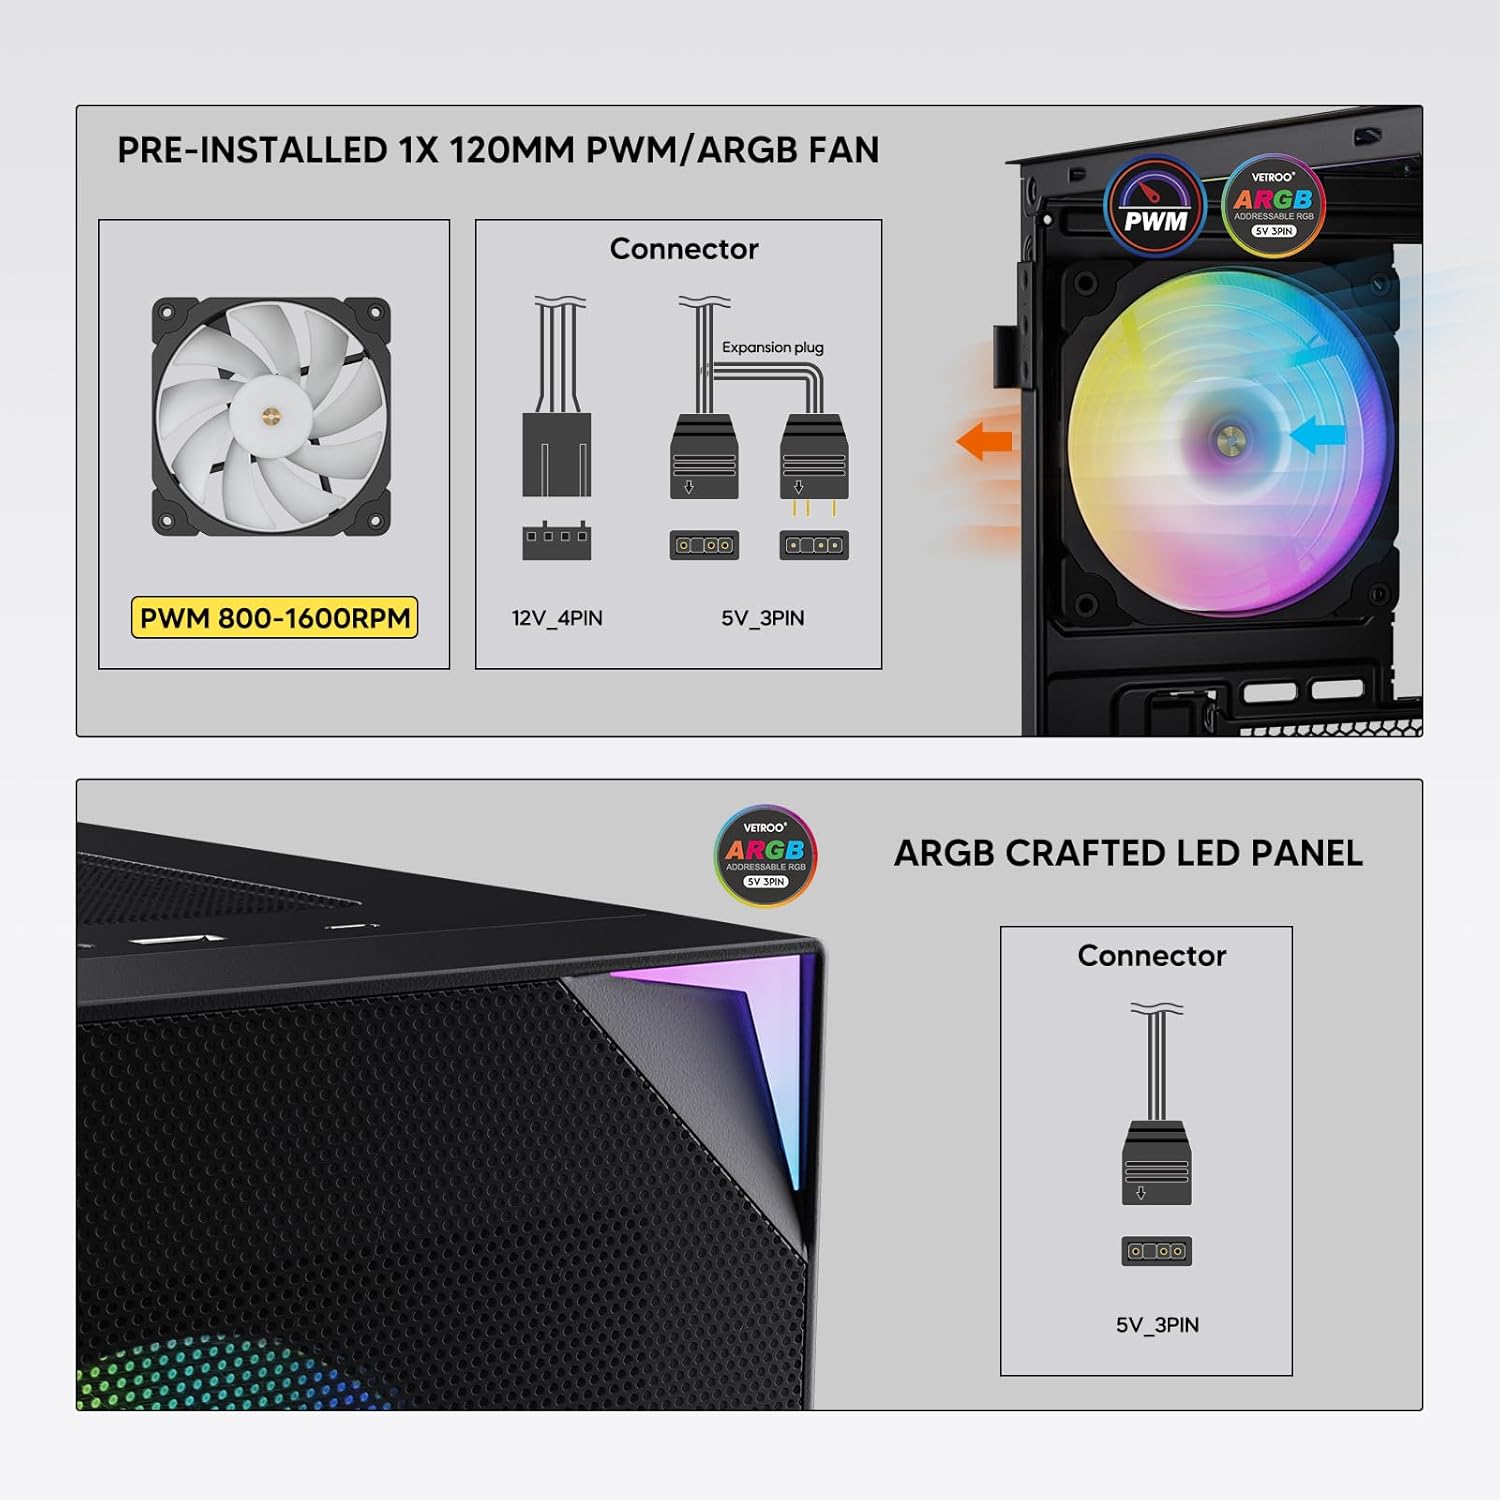
Figure 7: PWM and ARGB Connector Details
9. ການຄຸ້ມຄອງສາຍໄຟ
- Utilize the cable routing cutouts and tie-down points behind the motherboard tray to organize cables.
- The soft silicone grommets help protect cables and provide a clean look.
- Proper cable management improves airflow and aesthetics.
ການດໍາເນີນງານ
1. ການເປີດເຄື່ອງເບື້ອງຕົ້ນ
- After all components are securely installed and cables connected, close the tempered glass side panel.
- Connect your monitor, keyboard, mouse, and power cable to the PC.
- Flip the power switch on your PSU to the 'ON' position.
- Press the power button on the top I/O panel of the case to start your system.
2. ການຄວບຄຸມໄຟ ARGB
- If connected to a compatible motherboard's 5V 3-pin ARGB header, the lighting of the pre-installed fan and LED strip can be controlled via your motherboard's RGB software (e.g., ASUS Aura Sync, MSI Mystic Light Sync, Gigabyte RGB Fusion, ASRock Polychrome Sync).
- Refer to your motherboard's manual for specific instructions on using its ARGB control software.
3. ການຄຸ້ມຄອງກະແສລົມ
- The mesh front panel is designed for optimal air intake.
- Ensure that intake fans (typically front and bottom) and exhaust fans (typically rear and top) are configured to create positive or neutral air pressure for efficient cooling and dust prevention.

Figure 8: Airflow Diagram with Dust Filters
ບໍາລຸງຮັກສາ
1. ການເຮັດຄວາມສະອາດການກັ່ນຕອງຂີ້ຝຸ່ນ
- The case is equipped with dust filters on the top and bottom panels.
- Regularly check and clean these filters to maintain optimal airflow and prevent dust buildup inside the system.
- Gently remove the magnetic dust filters and clean them with compressed air or by rinsing with water (ensure they are completely dry before re-installation).
2. Tempered Glass Panel Care
- Clean the tempered glass panel with a soft, lint-free cloth and a non-abrasive glass cleaner.
- ຫຼີກເວັ້ນສານເຄມີທີ່ຮຸນແຮງ ຫຼືວັດສະດຸຂັດທີ່ອາດເຮັດໃຫ້ແກ້ວເກີດຮອຍຂີດຂ່ວນ ຫຼືເສຍຫາຍໄດ້.
ການແກ້ໄຂບັນຫາ
- ລະບົບບໍ່ເປີດ:
- ໃຫ້ແນ່ໃຈວ່າສາຍໄຟໄດ້ເຊື່ອມຕໍ່ກັບທັງ PSU ແລະປລັກສຽບຝາຢ່າງແໜ້ນໜາແລ້ວ.
- ກວດສອບວ່າສະວິດ PSU ຢູ່ໃນຕຳແໜ່ງ 'ເປີດ'.
- ກວດເບິ່ງວ່າສາຍປຸ່ມເປີດປິດດ້ານໜ້າແມ່ນເຊື່ອມຕໍ່ຢ່າງຖືກຕ້ອງກັບຫົວຂອງເມນບອດ.
- Confirm all power cables (24-pin ATX, CPU, GPU) are properly seated in the motherboard and components.
- ພັດລົມບໍ່ໝຸນ / ARGB ບໍ່ສະຫວ່າງ:
- Check that the fan's PWM connector is securely plugged into a motherboard fan header.
- Verify the ARGB 3-pin connector is correctly attached to a 5V 3-pin ARGB header on the motherboard (not 12V RGB).
- Ensure your motherboard's ARGB software is installed and configured correctly.
- ພອດ USB ບໍ່ເຮັດວຽກ:
- Confirm the USB 3.0 and USB Type-C front panel cables are correctly connected to their respective motherboard headers.
- Check your motherboard manual for correct header locations.
- For other component-specific issues, refer to the instruction manuals for your motherboard, CPU, GPU, and other installed hardware.
ຂໍ້ມູນຈໍາເພາະ
| ຍີ່ຫໍ້ | Vetroo |
| ຊື່ຕົວແບບ | AL800 |
| ໝາຍເລກຕົວແບບ | VT-CASE-AL800-BK (FBA) |
| ປະເພດກໍລະນີ | ຫໍກາງ |
| ຄວາມເຂົ້າກັນໄດ້ຂອງເມນບອດ | ATX, M-ATX, ITX |
| ສີ | ດຳ |
| ວັດສະດຸ | ໂລຫະ, ແກ້ວທີ່ມີຄວາມແຂງແກ່ນ |
| ນ້ໍາຫນັກລາຍການ | 12.37 ປອນ (ປະມານ 5.61 ກິໂລ) |
| ຂະໜາດສິນຄ້າ (LxWxH) | 18.4 x 8.6 x 17.9 ນິ້ວ (ປະມານ 46.7 x 21.8 x 45.5 ຊມ) |
| ຄວາມຍາວສູງສຸດຂອງ GPU | 340 ມມ |
| ຄວາມສູງຂອງ CPU Cooler ສູງສຸດ | 165 ມມ |
| ຄວາມຍາວ PSU ສູງສຸດ | 200 ມມ |
| ທ່າເຮືອທາງ ໜ້າ I / O | 1x USB 3.2 Type-C, 2x USB 3.0, HD Audio (Mic/Headphone), Power, Reset |
| ສະຫນັບສະຫນູນພັດລົມ | Front: 3x 120mm or 2x 140mm; Top: 2x 120mm or 2x 140mm; Rear: 1x 120mm; Bottom: 2x 120mm |
| ສະຫນັບສະຫນູນ radiator | Front: 120/140/240/280/360mm; Top: 120/140/240mm; Rear: 120mm |
| ພັດລົມທີ່ຕິດຕັ້ງໄວ້ລ່ວງໜ້າ | 1x 120mm PWM/ARGB (Rear) |
ການຮັບປະກັນແລະການສະຫນັບສະຫນູນ
For warranty information, technical support, or to inquire about replacement parts, please visit the official Vetroo webເວັບໄຊ ຫຼືຕິດຕໍ່ບໍລິການລູກຄ້າຂອງເຂົາເຈົ້າໂດຍກົງ. ຮັກສາຫຼັກຖານການຊື້ຂອງທ່ານສໍາລັບການຮ້ອງຂໍການຮັບປະກັນ.
Official Vetroo Store: Vetroo Amazon Store
ເອກະສານທີ່ກ່ຽວຂ້ອງ - AL800
 |
Vetroo AL800 PC Case ຄູ່ມືຜູ້ໃຊ້ ຄູ່ມືຜູ້ໃຊ້ສໍາລັບກໍລະນີ PC Vetroo AL800, ລາຍລະອຽດຂັ້ນຕອນການຕິດຕັ້ງສໍາລັບອົງປະກອບເຊັ່ນ: ເມນບອດ, ການສະຫນອງພະລັງງານ, ພັດລົມ, radiators ແຫຼວ, HDDs, SSDs, ແລະບັດກາຟິກ. ລວມມີຄູ່ມືການເຊື່ອມຕໍ່ແຜງ I/O ແລະລາຍການອຸປະກອນເສີມ. |
 |
ຄູ່ມືການໃຊ້ Vetroo AL800 Full Tower Gaming Case ຄູ່ມືການສອນທີ່ສົມບູນແບບສໍາລັບກໍລະນີ PC Vetroo AL800 Full Tower Gaming. ຮຽນຮູ້ວິທີການຕິດຕັ້ງການສະຫນອງພະລັງງານຂອງທ່ານ, ເມນບອດ, ຂັບເກັບຮັກສາ (SSD / HDD), ກາດກາຟິກ, ແລະເຂົ້າໃຈທາງເລືອກການຮອງຮັບພັດລົມແລະ radiator. ລວມມີລາຍການອຸປະກອນເສີມ ແລະຄໍາແນະນໍາຂັ້ນຕອນໂດຍຂັ້ນຕອນລະອຽດ. |
 |
Vetroo MESH-7C AL SERIES PC Case ຄູ່ມືຜູ້ໃຊ້ ຄູ່ມືລາຍລະອຽດຂອງຜູ້ໃຊ້ສໍາລັບກໍລະນີ PC Vetroo MESH-7C AL SERIES, ກວມເອົາສະເພາະ, ຂະຫນາດ, ອຸປະກອນເສີມ, ແລະຂັ້ນຕອນການຕິດຕັ້ງຮາດແວສໍາລັບການກໍ່ສ້າງຄອມພິວເຕີຂອງທ່ານ. |
 |
DeepCool D-SHIELD V2 Mid-Tower PC Case ການຕິດຕັ້ງ ແລະຄູ່ມືຄຸນສົມບັດ ຄູ່ມືລາຍລະອຽດສໍາລັບ DeepCool D-SHIELD V2 Mid-Tower PC Case, ກວມເອົາຄຸນສົມບັດ, ຂໍ້ມູນສະເພາະ, ແລະຂັ້ນຕອນການຕິດຕັ້ງສໍາລັບອົງປະກອບເຊັ່ນ: motherboards, GPUs, HDDs, SSDs, ແລະ PSUs. |
 |
ຄູ່ມືຜູ້ໃຊ້ເຄສ Zalman R2 ATX Mid Tower ຄູ່ມືຜູ້ໃຊ້ທີ່ຄົບຖ້ວນສຳລັບເຄສ Zalman R2 ATX Mid Tower, ເຊິ່ງລະບຸລາຍລະອຽດກ່ຽວກັບຂໍ້ຄວນລະວັງ, ສະເປັກ, ອຸປະກອນເສີມ ແລະ ຄຳແນະນຳໃນການຕິດຕັ້ງແບບເທື່ອລະຂັ້ນຕອນ. |
 |
ເຄສຄອມພິວເຕີ COUGAR MX110 Mid Tower: ຄຸນສົມບັດ, ສະເປັກ ແລະ ຄູ່ມືການຕິດຕັ້ງ ຄູ່ມືທີ່ຄົບຖ້ວນສົມບູນກ່ຽວກັບເຄສຄອມພິວເຕີ COUGAR MX110, ເຊິ່ງລະບຸລາຍລະອຽດກ່ຽວກັບຄຸນສົມບັດ, ສະເປັກດ້ານເຕັກນິກ, ຄຳແນະນຳການຕິດຕັ້ງສຳລັບອົງປະກອບຕ່າງໆເຊັ່ນ GPU ແລະໄດຣຟ໌, ແລະຂໍ້ມູນການຮັບປະກັນ. ສ້າງຂຶ້ນສຳລັບພື້ນຖານ, ພ້ອມສຳລັບເພີ່ມເຕີມ. |
Ask a question about this manual
Ask about setup, troubleshooting, compatibility, parts, safety, or missing instructions. Manuals+ will review the question and use this page’s manual context to help answer it.