
ແນະນຳ
This manual provides detailed instructions for the installation, operation, and maintenance of the Supermicro MBD-X12DPI-N6-B E-ATX Server Motherboard. It is designed to assist users in setting up their server system correctly and efficiently. Please read this manual thoroughly before proceeding with any installation or configuration.
ຂໍ້ມູນຄວາມປອດໄພ
Observe the following safety precautions to prevent damage to the motherboard and ensure personal safety:
- Always disconnect the power cord from the power supply before installing or removing any components.
- Wear an anti-static wrist strap and work on an anti-static mat to prevent electrostatic discharge (ESD) damage to sensitive components.
- ຈັບຂອບຂອງແຜງວົງຈອນຫຼັກເພື່ອຫຼີກລ່ຽງການສຳຜັດກັບອົງປະກອບຕ່າງໆໂດຍກົງ.
- Ensure proper ventilation within the server chassis to prevent overheating.
- Refer to the power supply unit's manual for specific safety guidelines related to power connections.
ເນື້ອໃນຊຸດ
ກວດສອບວ່າລາຍການທັງຫມົດແມ່ນມີຢູ່ໃນຊຸດ:
- Supermicro MBD-X12DPI-N6-B E-ATX Server Motherboard
- I / O ໄສ້
- ສາຍ SATA (ປະລິມານອາດຈະແຕກຕ່າງກັນ)
- ຄູ່ມືອ້າງອີງດ່ວນ
- Driver and Utility DVD/USB (if included)
ການຕິດຕັ້ງແລະການຕິດຕັ້ງ
ພາກນີ້ແນະນໍາທ່ານໂດຍຜ່ານການຕິດຕັ້ງທາງດ້ານຮ່າງກາຍຂອງເມນບອດແລະອົງປະກອບຕົ້ນຕໍຂອງມັນ.
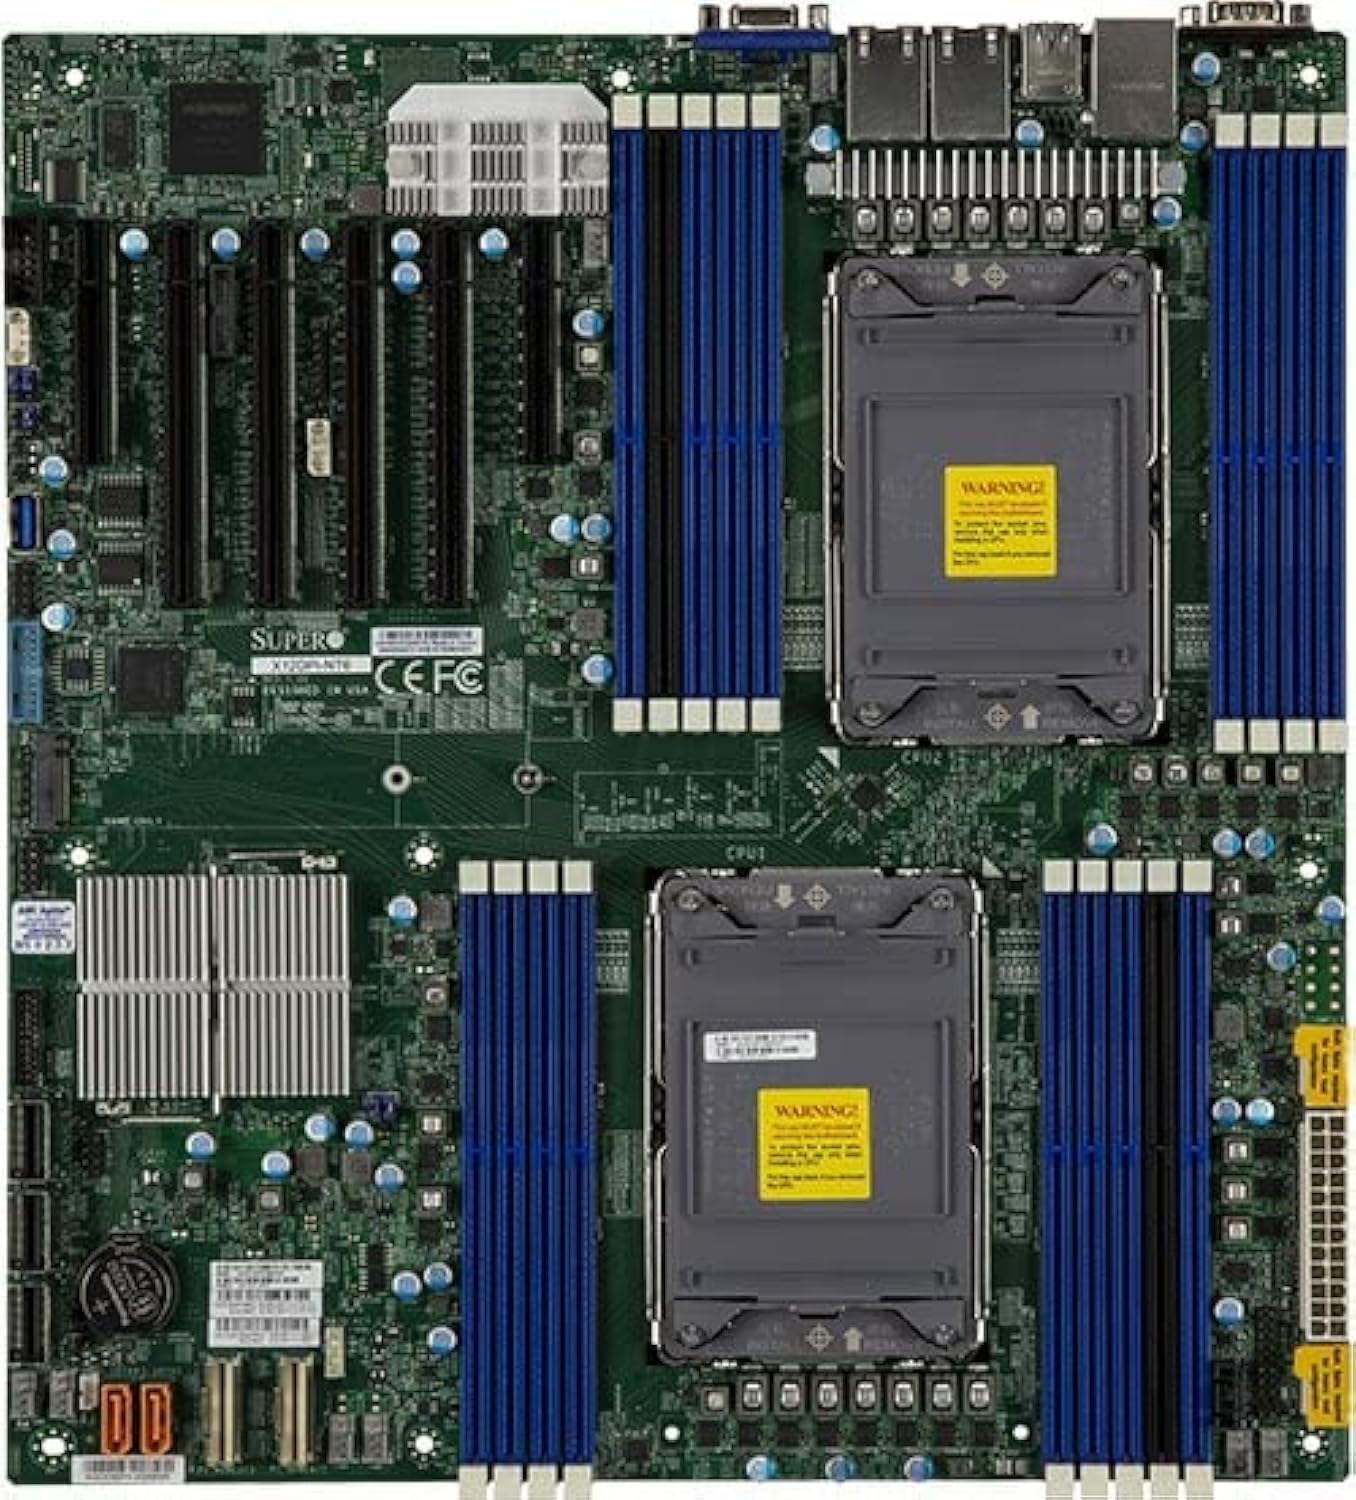
ຮູບທີ 1: ລົງລຸ່ມ view of the Supermicro MBD-X12DPI-N6-B E-ATX Server Motherboard, showcasing its dual LGA 4189 CPU sockets, 18 DDR4 DIMM slots, multiple PCIe 4.0 expansion slots, and various connectors for storage and peripherals. The board features a green PCB with blue and black DIMM slots, and silver heatsinks for chipset and VRMs.
1. ການຕິດຕັ້ງ CPU (LGA 4189)
- Carefully open the CPU socket retention mechanism by releasing ຄັນຍົກ.
- Align the triangular mark on the CPU with the corresponding mark on the socket.
- ຄ່ອຍໆວາງ CPU ເຂົ້າໄປໃນເຕົ້າຮັບໂດຍບໍ່ມີການບັງຄັບມັນ.
- Close the socket retention mechanism, ensuring the CPU is securely seated.
- ໃຊ້ການວາງຄວາມຮ້ອນໃສ່ CPU ແລະຕິດຕັ້ງ CPU cooler ຕາມຄໍາແນະນໍາຂອງຜູ້ຜະລິດຂອງມັນ.
2. Memory (DIMM) Installation
The motherboard supports up to 4TB of 3DS ECC RDIMM/LRDIMM DDR4-3200MHz memory across 18 DIMM slots. Intel Optane Persistent Memory 200 Series is supported in specific slots (P1-DIMMB2 and P2-DIMMB2).
- ເປີດຄລິບເກັບຮັກສາໄວ້ຢູ່ທັງສອງສົ້ນຂອງຊ່ອງສຽບ DIMM.
- ວາງຈຸດໃສ່ໃນໂມດູນໜ່ວຍຄວາມຈຳດ້ວຍກະແຈໃນຊ່ອງສຽບ DIMM.
- Insert the module firmly into the slot until the retention clips snap into place.
- Ensure all modules are seated correctly and evenly.
3. ການຕິດຕັ້ງບັດ PCIe
The motherboard features 2 PCIe 4.0 x8 and 4 PCIe 4.0 x16 slots.
- Select an appropriate PCIe slot for your expansion card.
- Remove the corresponding metal bracket cover from the server chassis.
- ວາງບັດໃຫ້ກົງກັບຊ່ອງໃສ່ ແລະ ກົດລົງໃຫ້ແໜ້ນຈົນກວ່າມັນຈະເຂົ້າທີ່.
- Secure the card with a screw or retention clip to the chassis.
4. ການເຊື່ອມຕໍ່ອຸປະກອນການເກັບຮັກສາ
The Intel C621A controller provides 14 SATA3 (6 Gbps) ports with RAID 0, 1, 5, 10 support. There is also 1 PCIe 4.0 x4 M.2 slot (2280/22110 form factor, M-Key).
- ອຸປະກອນ SATA: Connect SATA data cables from your storage drives to the SATA ports on the motherboard. Connect power cables from the power supply to the drives.
- M.2 Devices: Insert the M.2 SSD into the M.2 slot, securing it with the provided screw.
5. ການເຊື່ອມຕໍ່ການສະ ໜອງ ພະລັງງານ
Connect the main 24-pin ATX power connector and the 8-pin (or 4+4 pin) CPU power connectors from your power supply unit to the corresponding ports on the motherboard. Ensure all power connections are secure.
ຄໍາແນະນໍາການດໍາເນີນງານ
1. ການ Boot-up ເບື້ອງຕົ້ນ
- After all components are installed, connect the power cord to the power supply and turn on the system.
- The system will perform a Power-On Self-Test (POST). Monitor for any error codes or beeps.
2. ການຕັ້ງຄ່າ BIOS/UEFI
During POST, press the designated key (usually DEL or F2) ເພື່ອເຂົ້າສູ່ໂປຣແກຣມຕັ້ງຄ່າ BIOS/UEFI. ທີ່ນີ້ທ່ານສາມາດຕັ້ງຄ່າລຳດັບການບູດ, ເວລາຂອງລະບົບ ແລະ ການຕັ້ງຄ່າຮາດແວຕ່າງໆໄດ້.
3. ການຕິດຕັ້ງລະບົບປະຕິບັດການ
Insert your operating system installation media (USB drive or DVD) and configure the BIOS/UEFI to boot from it. Follow the on-screen instructions to install your preferred operating system.
ບໍາລຸງຮັກສາ
1. ທໍາຄວາມສະອາດ
Regularly clean the interior of your server chassis to prevent dust buildup, which can lead to overheating. Use compressed air to remove dust from heatsinks, fans, and other components. Ensure the system is powered off and unplugged before cleaning.
2. Firmware and Driver Updates
Periodically check the Supermicro official website for the latest BIOS/UEFI firmware and driver updates for your motherboard. Keeping your system updated ensures optimal performance, stability, and security.
ການແກ້ໄຂບັນຫາ
ຖ້າເຈົ້າພົບບັນຫາ, ເບິ່ງຂັ້ນຕອນການແກ້ໄຂບັນຫາທົ່ວໄປຕໍ່ໄປນີ້:
- ບໍ່ມີພະລັງງານ: Ensure all power cables (24-pin ATX, 8-pin CPU) are securely connected. Check the power supply unit and wall outlet.
- ບໍ່ມີການສະແດງຜົນ: Verify that the monitor is connected and powered on. Reseat the graphics card (if applicable) and memory modules. Try booting with minimal components.
- System Beeps: Consult the motherboard's beep code table (usually found in the full manual on the Supermicro website) to diagnose hardware issues indicated by specific beep patterns.
- ລະບົບປະຕິບັດການບໍ່ເປີດ: Check the boot order in BIOS/UEFI. Ensure the storage drive with the OS is detected and functional.
- ຄວາມຮ້ອນເກີນ: Ensure CPU coolers and chassis fans are properly installed and functioning. Clean dust from heatsinks and vents.
ຂໍ້ມູນຈໍາເພາະ
| ຄຸນສົມບັດ | ລາຍລະອຽດ |
|---|---|
| ເຕົ້າສຽບ CPU | Dual LGA 4189 (Socket P+) |
| ໂປເຊດເຊີທີ່ເຂົ້າກັນໄດ້ | 3rd Gen Intel Xeon Scalable processors (up to 270W TDP) |
| ຊິບເຊັດ | Intel C621A |
| ປະເພດຄວາມຈໍາ | DDR4 3DS ECC RDIMM/LRDIMM, Intel Optane Persistent Memory 200 Series |
| ຄວາມໄວຄວາມຈໍາ | 3200MHz |
| Memory Slots | 18 DIMM slots (up to 4TB total) |
| ສະລັອດຕິງຂະຫຍາຍ PCIe | 2 x PCIe 4.0 x8, 4 x PCIe 4.0 x16 |
| ສະຫນັບສະຫນູນ NVMe | 2 x PCIe 4.0 NVMe x8 Internal Port(s) |
| M.2 ການໂຕ້ຕອບ | 1 x PCIe 4.0 x4 (2280/22110, M-Key) |
| ພອດ SATA | 14 x SATA3 (6 Gbps) with RAID 0, 1, 5, 10 |
| LAN | Dual LAN with Intel i350 Gigabit Ethernet Controller |
| ຜົນຜະລິດວິດີໂອ | 2 x VGA (1 rear bezel, 1 front panel) |
| ປັດໄຈແບບຟອມ | E-ATX |
| ຂະໜາດ | 16 x 12 x 5 ນິ້ວ |
ສະຫນັບສະຫນູນແລະການຮັບປະກັນ
For technical support, driver downloads, and the latest BIOS updates, please visit the official Supermicro website. Information regarding product warranty terms and conditions can also be found on the Supermicro support portal or by contacting your point of purchase.
Always refer to the official Supermicro documentation for the most accurate and up-to-date information.