
1. ບົດແນະນຳ
This manual provides detailed instructions for the setup, operation, and maintenance of your AVer F50+ 4K Versatile Document Camera. Please read this manual thoroughly before using the device to ensure proper functionality and to prevent damage.
The AVer F50+ is a compact, high-quality document camera designed for educational and professional environments. It features 4K video output, advanced zoom capabilities, and multiple connectivity options, making it suitable for both in-person and remote learning or presentations.
2. ຄຸນນະສົມບັດທີ່ສໍາຄັນ
- ຜົນຜະລິດວິດີໂອ 4K: Delivers crystal clear images and video with a 13-megapixel camera.
- Advanced Zoom: Features 10X optical zoom and 23X digital zoom (total 230X) for detailed viewing.
- ການອອກແບບທີ່ຍືດຫຍຸ່ນ: A flexible arm and foldable design allow for easy positioning and portability.
- ການເຊື່ອມຕໍ່ຫຼາຍ: Includes HDMI, USB, and VGA outputs for versatile display options.
- Built-in Microphone and LED Light: Enhances presentations and recordings.
- UVC/UAC Compliant: Compatible with popular video conferencing applications for distance learning.
- AVerTouch Software: Free software for Windows and Mac to enhance content creation and management.
3. ຄູ່ມືການຕິດຕັ້ງ
3.1 ການຫຸ້ມຫໍ່ແລະການກວດກາເບື້ອງຕົ້ນ
Carefully remove the document camera from its packaging. Inspect all components for any signs of damage. If any parts are missing or damaged, contact your vendor immediately.

Figure 1: AVer F50+ Document Camera in its operational, upright position with the flexible arm extended.
3.2 Connecting the Document Camera
- ການເຊື່ອມຕໍ່ພະລັງງານ: Connect the power adapter to the DC IN port on the camera and then to a power outlet.
- ການເຊື່ອມຕໍ່ການສະແດງຜົນ: Choose one of the following options to connect to a display device (monitor, projector, interactive flat panel):
- HDMI: Connect an HDMI cable from the camera's HDMI OUT port to the HDMI IN port on your display.
- VGA: Connect a VGA cable from the camera's RGB OUT port to the VGA IN port on your display.
- USB: Connect a USB cable from the camera's USB port to your computer. This enables the camera to function as a webcam and allows use with AVerTouch software.
- ການເຊື່ອມຕໍ່ຄອມພິວເຕີ (ທາງເລືອກ): If using the camera with a computer for software control or as a webcam, connect the USB cable from the camera to a USB port on your computer.

ຮູບທີ 2: ລາຍລະອຽດ view of the connectivity ports on the AVer F50+, showing HDMI IN/OUT, RGB IN/OUT, RS232, and USB ports.
3.3 Software Installation (AVerTouch)
For enhanced functionality, download and install the AVerTouch software from the official AVer website. This software allows for image capture, video recording, annotation, and integration with cloud services.
- Visit the official AVer website and navigate to the support section for the F50+ model.
- Download the AVerTouch software compatible with your operating system (Windows or Mac).
- ປະຕິບັດຕາມຄໍາແນະນໍາໃນຫນ້າຈໍເພື່ອສໍາເລັດການຕິດຕັ້ງ.
- Launch AVerTouch and ensure the F50+ is recognized.
4. ຄໍາແນະນໍາການດໍາເນີນງານ
4.1 ການເປີດ/ປິດ
ກົດ ພະລັງງານ button located on the base of the camera to turn the device on or off. The LED indicator will illuminate when the camera is powered on.
4.2 Adjusting the Camera Head and Arm
The F50+ features a flexible arm and a rotatable camera head. Adjust the arm to position the camera over your desired object or document. The camera head can be rotated to capture different angles or to function as a webກ້ອງ

Figure 3: The AVer F50+ Document Camera shown in its compact, folded position, suitable for transport.
4.3 Using Zoom and Focus
- ຊູມ: ໃຊ້ ຊູມເຂົ້າ ແລະ ຊູມອອກ buttons on the control panel to adjust the magnification. The F50+ offers 10X optical zoom for clear detail and 23X digital zoom for further magnification.
- ຈຸດສຸມ: ກົດ ໂຟກັສອັດຕະໂນມັດ button to automatically adjust the image clarity. Manual focus options may also be available through the AVerTouch software.
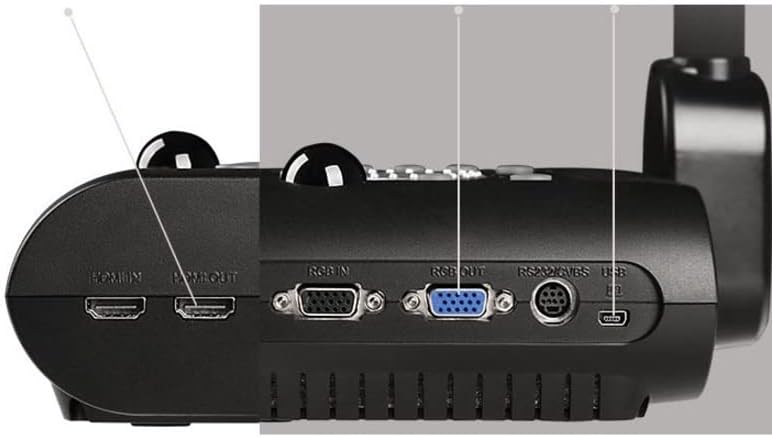
Figure 4: A visual representation of the AVer F50+ displaying a magnified image at 4K resolution with 10x optical zoom.
4.4 Adjusting the LED Light
ກົດ ແສງສະຫວ່າງ button on the control panel to turn the built-in LED light on or off. This provides additional illumination for objects in low-light conditions.
4.5 Using AVerTouch Software
Once connected to a computer with AVerTouch installed, you can:
- ບັນທຶກຮູບພາບ: Take still photos of documents or objects.
- ບັນທຶກວິດີໂອ: Record video with audio using the built-in microphone.
- ໝາຍເຫດ: Draw or write directly on the live image.
- ການເຊື່ອມໂຍງຄລາວ: Save captured content directly to cloud storage for easy sharing.
- Webການທໍາງານຂອງກ້ອງ: Utilize the F50+ as a high-definition webcam for video conferencing applications (Zoom, Google Hangouts, Microsoft Teams).
5. ການບໍາລຸງຮັກສາແລະການດູແລ
- ທໍາຄວາມສະອາດ: ໃຊ້ຜ້າປຽກແຫ້ງເພື່ອເຮັດຄວາມສະອາດຕົວກ້ອງຖ່າຍຮູບ. ສໍາລັບເລນ, ໃຊ້ຜ້າເຮັດຄວາມສະອາດເລນພິເສດແລະການແກ້ໄຂ. ຫຼີກລ້ຽງການເຮັດຄວາມສະອາດຂັດຫຼືສານລະລາຍ.
- ການເກັບຮັກສາ: When not in use, fold the camera into its compact position and store it in a cool, dry place away from direct sunlight and extreme temperatures.
- ການຈັດການ: Handle the flexible arm and camera head gently to avoid damage.
6. ການແກ້ໄຂບັນຫາ
| ບັນຫາ | ສາເຫດທີ່ເປັນໄປໄດ້ | ການແກ້ໄຂ |
|---|---|---|
| ບໍ່ມີຮູບສະແດງຢູ່. | Power not connected; incorrect input selected on display; loose cable connection. | Ensure power is connected and the camera is on. Select the correct input (HDMI, VGA, USB) on your display. Check all cable connections. |
| ຮູບພາບແມ່ນມົວ. | Out of focus; camera too close/far from object. | Press the Auto Focus button. Adjust the camera's distance from the object. |
| AVerTouch software does not detect camera. | USB cable not connected or faulty; software not installed correctly. | Ensure the USB cable is securely connected to both the camera and the computer. Reinstall AVerTouch software if necessary. Try a different USB port. |
| No audio during video recording. | Microphone muted or not selected in software settings. | Check microphone settings within AVerTouch or your computer's sound settings to ensure the F50+ microphone is enabled and selected. |
7. ຂໍ້ມູນຈໍາເພາະ
| ຄຸນສົມບັດ | ລາຍລະອຽດ |
|---|---|
| ຂະໜາດສິນຄ້າ | 5.7 x 17.4 x 11.8 ນິ້ວ |
| ນ້ໍາຫນັກລາຍການ | 8.85 ປອນ |
| ໝາຍເລກຕົວແບບ | F50+ |
| ຜູ້ຜະລິດ | AVer Information Inc |
| ໂໝດຍິງ | Normal, Motion, High Quality, Microscope, Macro, Infinity |
| ປະເພດການຄວບຄຸມການຮັບແສງ | ຄູ່ມື, ອັດຕະໂນມັດ |
| ຄວາມລະອຽດການຖ່າຍວິດີໂອ | 4K |
| ປະເພດສື່ | SDHC Card, USB Drive |
8. ການຮັບປະກັນແລະການສະຫນັບສະຫນູນ
For warranty information and technical support, please refer to the official AVer website or contact AVer customer service directly. Keep your purchase receipt as proof of purchase for warranty claims.
AVer Official Webເວັບໄຊ: www.averusa.com